Modeling - Gamepiaynmo/CustomPlayerModel GitHub Wiki
This section talks about how to make your own models.
Each model is stored as a .zip file, which includes the main JSON file, several Bedrock format model files, several texture files, and a JavaScript file for custom animation. These files should all be stored in the root directory in your .zip file.
The main part of the model data (bones and boxes) are stored in Minecraft Bedrock entity model format. The reason for choosing it is that this format is light-weighted and easy to parse. This format is supported by almost all boxy model editors, like BlockBench. It is recommended to use BlockBench for creating custom models in this mod, since it is free, and easy to get started.
When testing your model, you can create a directory under custom-model/models, and put all of your main JSON file, model files, textures and animation file in it. The mod will regard this directory as a .zip file for convenience. When the model files on your hard disk change, the mod will reload it automatically. This kind of models are highlighted by yellow color in model selection gui, and can only be selected in single-player worlds.
There are two types of models: Model and Accessory. A model will directly replace the original entity model in the game, and only one model could be select at the same time. An accessory is a independent model part that can be attached as complements to models (e.g. a hat, a sword, a backpack, etc), and are intended to be well-suited to any well-organized models. Multiple accessories can be attached at the same time, but require a model to be selected first.
Some example models can be found at Here for reference.
Each model must contain a JSON file named model.json. A typical main JSON file looks like:
{
	"name": " ... ",
	"version": " ... ",
	"author": [ ... ],
	"description": " ... ",
	"url": " ... ",
	"skeleton": {
		...
	},
	"parts": [
		...
	],
	...
}
- Name: Name of your model. It's ok for multiple models to have the same name.
- Version: Version of your model. There's no constraint in versioning format.
- Author: A list of authors of this model.
- Description: A sentence to describe your model.
- URL: A link to your model website (if you have one).
Above are the basic information in each model file. These information will be displayed in model selection ingame gui.
To provide compatibility with Vanilla Minecraft entity models as well as customizability, we introduce the skeleton system. A skeleton is constructed by a series of Vanilla entity bones. For example, the Vanilla player model has one head, one body, two arms and two legs. These 6 bones compose the biped skeleton, and the movement of these 6 bones compose the entity model animation of the player.
The problem is that the parameters of this skeleton are fixed, e.g. body height, leg length, etc. The skeleton system allows you to customize your biped skeleton:
{
	"skeleton": {
		"type": "biped",
		"param": {
			"leg_length": 12,
			"leg_interval": 4,
			"leg_offset": 0,
			"body_pivot_height": 24,
			"body_offset": 0,
			"arm_pivot_height": 24,
			"arm_interval": 10,
			"arm_offset": 0,
			"arm_length": 12,
			"head_pivot_height": 24,
			"head_offset": 0
		}
		...
	}
}
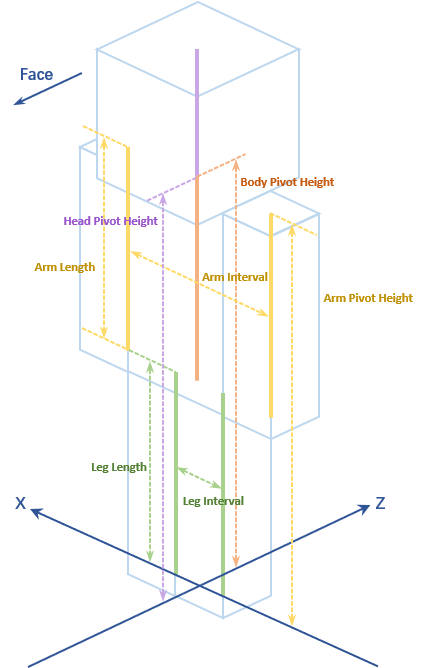
You can use this picture for reference to understand the meaning of these parameters. Other parameters with suffix _offset are the Z positions of the corresponding components.
This biped skeleton has 6 built-in bones:
- head
- body
- left_arm
- right_arm
- left_leg
- right_leg
These bones will follow the entity animation. For example when the player is swinging its hand, the right_arm bone (or left) will rotate along with the swing progress.
After specifying a skeleton of your model, you can attach your own bones to these 6 built-in bones. For example you have a hat model, and want it to move along with the player's head, then you should attach the root bone of your hat to the built-in bone head.
The way to attach your own bones is quite easy, just rename them to <built-in bone name>_c (head_c, body_c, etc.) in BlockBench, then these bones will automatically attach to corresponding built-in bones. Note that the name of your own bones should be unique, or the game will have trouble finding parent bones.
There are also other skeleton types besides biped type. You can find them in the next section.
This tutorial does not focus on how to create models using BlockBench. You can find various BlockBench learning resources on the Internet.
We recommend to use the Bedrock model type in BlockBench (Legacy Bedrock Model is also ok). After your model is finished in BlockBench and is ready to be exported, please follow these steps before exporting:
-
Rearrange your bone hierarchy, so that there are only 6 root bones, corresponding to the 6 built-in bones. This is done by set all other root bones as these 6 bones' children. This means that you should decide which built-in bone should these bones move along with. Typically, if there are bones for hat or hair, these bones should move along with built-in bone head; if there are bones for tail, cloak or wings, these bones should move along with built-in bone body; etc.
-
Rename these 6 root bones to the following: head_c, body_c, left_arm_c, right_arm_c, left_leg_c, right_leg_c. This step ensures that your own bones are correctly attached to the corresponding built-in bones.
-
Adjust the pivots of these 6 root bones, so that they exactly coincide with the built-in bones. This can be done by adjusting the pivot property of your bones in BlockBench. This step ensures that your bones to move correctly along with built-in bones. The pivots of built-in bones are decided by your skeleton parameters, for example the pivot of left_leg will be (-leg_interval / 2, leg_length, leg_offset), and the pivot of body will be (0, body_pivot_height, body_offset), etc.
After these steps, now you can export your model as a Bedrock entity model file. Put it in the same directory with your main JSON file, and add this model to the part section in your main JSON:
"parts": [
	{
		"name": " ... ",
		"texture": " ... "
	}
]
Where name is your entity model file name, and texture is your model texture file name, without file extension. You can have different parts of your model in different files. Note that you can only assign one texture for one model file. If multiple textures are needed, you must put model parts with different textures in different files.
Besides the entity model itself, there are also other stuffs being rendered along with the model, e.g. held items, armors, etc. These components behave just like model parts, so you can create your own attachment bones, to specify the animation of these components.
"skeleton": {
	...
	"attachments": {
		"helmet": ["head_c"]
	}
}
For example, the JSON above will tell the mod to render helmets at the position of bone head_c. You can list multiple bones here to let the attachment to render multiple times at different positions. Below is the list of all attachments:
- helmet
- chestplate_body
- chestplate_left
- chestplate_right
- leggings_body
- leggings_left
- leggings_right
- boots_left
- boots_right
- item_left
- item_right
- cape
- skull
- elytra
- parrot_left
- parrot_right
These attachment bones are generated automatically by default according to the skeleton parameters. If you are not satisfied with these generated ones, you can replace them by declaring your own attachment bones. If you don't want some attachments to render, just specify an empty list in JSON.
When rendering in first person perspective, only one side of your hand is rendered. This feature allows you to specify which bones are the hands of your model. The specified bones as well as all of their children hierarchically will be rendered in first person perspective.
"skeleton": {
	...
	"left_arm": ["left_arm_c"],
	"right_arm": ["right_arm_c"]
}
The biped skeleton select built-in bones left_arm and right_arm as first person rendering bones by default. You can specify your own bones by declaring these properties yourself.
The eye position, which affects the camera position, can be set to bind to a specified bone.
"skeleton": {
	...
	"eye_position": "eye"
}
This only affect the camera position, and does not affect camera orientation.
{
	"size": {
		"standing": [0.6, 1.8],
		"sneaking": [0.6, 1.5],
		"swimming": [0.6, 0.6]
	},
	"eye_height": {
		"standing": [1.62, 0.81],
		"sneaking": [1.27, 0.635],
		"swimming": [0.4, 0.2]
	}
}
Player entities have several poses ingame, and their bounding boxes and eye heights are decided by their poses. This means that you can specify a custom bounding box / eye height for each player pose. There are currently 7 poses ingame:
- standing
- sneaking
- swimming
- sleeping
- elytra_flying
- trident_attacking
- dying
While the bounding box / eye height of dying pose is fixed, and that of swimming, sleeping, elytra_flying and trident_attacking are generally the same. So you only need to specify the values of three poses: standing, sneaking and swimming.
Besides, some entities have different bounding box / eye height when they are children. Generally, the bounding box of children entities is automatically calculated by dividing both the width and height by 2. So that you only need to specify the bounding box of adult entities. For eye height unfortunately there are no universal transform methods, so you need to specify the eye height for adult / children respectively. The first number is for adult, while the second is for children.
Particle system is commonly used in modern 3D games. This mod provides various parameters for particle emitters for you to customize special effects.
{
	"name": " ... ",
	"parent": " ... ",
	"texture": " ... ",
	"position_range": [ ..., ..., ... ],
	"direction_range": ...,
	"angle": [ ..., ... ],
	"speed": [ ..., ... ],
	"rotation_speed": [ ..., ... ],
	"life_span": [ ..., ... ],
	"density": ...,
	"animation": [ ..., ... ],
	"color": [
		[ ..., ... ],
		[ ..., ... ],
		[ ..., ... ],
		[ ..., ... ]
	],
	"gravity": ...,
	"collide": ...
}
- name: name of this particle emitter.
- parent: which bone is this particle emitter attached to.
- texture: which texture does this particle emitter use.
- position_range: maximum initial offset for new particles relative to current bone position.
- direction_range: maximum movement direction angle in degrees when spawning. Particles will pick up one direction randomly in a circular cone.
- angle: minimum and maximum value of initial rotation angle in degrees.
- speed: minimum and maximum value of movement speed in blocks per tick.
- rotation_speed: minimum and maximum value of rotation speed in degrees per tick.
- life_span: minimum and maximum value of how long each particle exists in game ticks.
- density: how many particles are spawned in 1 game tick.
- animation: textures for particles can be split into sub-images to make animation. This parameter specifies how many sub-images are there each column / row.
- color: minimum and maximum value of particle color (RGBA).
- size: minimum and maximum value of particle size.
- gravity: gravity applied on particles.
- collide: whether particles collide with blocks / entities.
You can attach item models to bones.
{
	"name": " ... ",
	"parent": " ... ",
	"item": " ... ",
	"enchanted": ...
}
- name: name of this item model.
- parent: which bone is this item model attached to.
- item: The item that you want to attach. Use item string constants like apple, diamond_sword, etc.
- enchanted: Whether the item is enchanted or not.
Models in directories are client only and only available in a integrated server (i.e. single player). They are said to be in Editing Mode. By selecting these yellow-colored models in the model selection gui, the models are only applied on client side, and are automatically reloaded when file changes are made in this directory.
When debugging JavaScript animations, it is recommended to open the game console (It is available in many minecraft launchers i.e. MultiMC. If your launcher does not support it, you can open the latest.log file to see console outputs). the print() function is available in JavaScript to print values of variables to the game console. Also, when your script encounters an error, it will be printed to game console but not ingame chat gui.
The file format of accessory models are similar:
{
	"name": " ... ",
	"version": " ... ",
	"author": [ ... ],
	"description": " ... ",
	"url": " ... ",
	"accessory": true,    // This line states that it is an accessory model.
	"parts": [
		...
	],
	"addons": {
		"<bone name>": "<attachment name>",
	}
}
To make accessories compatible with all custom models, root bones in an accessory model are only able to be binded to model attachments (i.e. helmet, chestplate, boots etc. See the previous attachment section for a complete list of attachments). For example a hat model with one root bone named "hat", then the following json
"addons": {
	"hat": "helmet",
}
will bind the "hat" bone to the bone for attachment "helmet", i.e. change its parent bone to the attachment "helmet" and follow its position / orientation / scale / visibility.