StyleGuide - Gambini/libRocket GitHub Wiki
libRocket and the controls plugin features several functional elements that need to by sized and decorated with RCSS properties, such as scrollbars, sliders and drop-down boxes. This document will go over all these elements and give recommendations on how you should style them.
Any element with scrolling overflow (a value of 'scroll' or 'auto' on either of the 'overflow-x' or 'overflow-y' properties) may generate scrollbars along its bottom or right side. By default, these are simple block elements with no background colour or decorator.
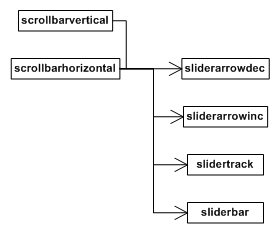
The scrollbar elements are tagged scrollbarhorizontal or scrollbarvertical, depending on their orientation. They are hidden elements parented directly to the scrolling element. Each scrollbar element contains four child elements:
- sliderarrowdec: The button at the top (or left) of the scrollbar which can be clicked to scroll further up (or to the left) the element.
- sliderarrowinc: The button at the bottom (or right) of the scrollbar which can be clicked to scroll further down (or to the right) the element.
- slidertrack: The track that runs between the two arrow buttons.
- sliderbar: The bar that runs on the track. It represents the size and position of the visible segment of the element's content. It can be dragged to scroll the visible window around.
When both horizontal and vertical scrollbars are present on an element, they are both shortened by the amount necessary to avoid an intersection. Another element is created and placed in this intersection point, placed and sized appropriately. This corner element is tagged scrollbarcorner and exists only for decoration purposes.
All of these elements can be styled through RCSS to be sized, positioned and rendered appropriately. The recommended method for configuring a scrollbar is given below (note that this is for a vertical scrollbar; for a horizontal, swap width and height):
- Set the 'width' property of the scrollbarvertical element to the appropriate value for your interface design. This should be enough to encompass the arrows, track and bar.
- Set the 'width' and 'height' properties of the sliderarrowdec and sliderarrowinc elements as appropriate. Set them to '0' if you don't want buttons.
- Set the 'width' property of the slidertrack as appropriate. The 'height' value will be ignored for the track and will always be set internally. Use 'margin-left' to position the track within the scrollbar.
- Set the 'width' property of the sliderbar as appropriate. The height of the bar will be generated internally, but you can override this with the 'height' property, or use the 'min-height' and 'max-height' properties to influence it.
- Apply decorators to the elements as appropriate.
See the Rocket Invaders from Mars demo style sheet and the templating tutorial for more pointers.
As described above, the scrollbar elements (scrollbarvertical and scrollbarhorizontal) will shorten themselves automatically to avoid a corner intersection. This can lead to scenarios where a scrollbar is popping on and off (during a window resize, for example) and causing the other scrollbar to rapidly change size. To avoid this, and force a scrollbar to always shorten itself for a corner, you can use the numerical 'scrollbar-margin' property on a scrollbar element. An element will shorten itself (on the bottom or right side, as appropriate) by the minimum of the appropriate corner dimension and the scrollbar margin.
The following is the section of the style sheet for Rocket Invaders from Mars relevant for scrollbars.
/* Fix the width and push the scrollbar back to the extents of the window. */
scrollbarvertical
{
	margin-top: -6px;
	margin-bottom: -6px;
	margin-right: -11px;
	width: 27px;
}

/* Decorate the slider track. */
scrollbarvertical slidertrack
{
	background-decorator: tiled-vertical;
	background-top-image: invader.png 70px 199px 97px 201px;
	background-center-image: invader.png stretch 70px 201px 97px 202px;
	background-bottom-image: invader.png 70px 203px 97px 204px;
}

/* Push the slider bar in 4 pixels from the left edge. Fix the width of the bar and make sure
   the height doesn't drop below 46 pixels; under that the decorator will start squishing the
   images. */
scrollbarvertical sliderbar
{
	margin-left: 4px;
	width: 23px;
	min-height: 46px;

	background-decorator: tiled-vertical;
	background-top-image: invader.png 56px 152px 79px 175px;
	background-center-image: invader.png stretch 56px 175px 79px 175px;
	background-bottom-image: invader.png 56px 176px 79px 198px;
}

/* Animate the bar's decorator on hover. */
scrollbarvertical sliderbar:hover
{
	background-top-image-s: 80px 103px;
	background-center-image-s: 80px 103px;
	background-bottom-image-s: 80px 103px;
}

/* Animate the bar's decorator on active. */
scrollbarvertical sliderbar:active
{
	background-top-image-s: 104px 127px;
	background-center-image-s: 104px 127px;
	background-bottom-image-s: 104px 127px;
}

/* Fix the size of the 'page up' slider arrow and decorate it appropriately. */
scrollbarvertical sliderarrowdec
{
	width: 27px;
	height: 24px;

	icon-decorator: image;
	icon-image: invader.png 0px 152px 27px 176px;
}

/* Fix the size of the 'page down' slider arrow and decorate it appropriately. */
scrollbarvertical sliderarrowinc
{
	width: 27px;
	height: 24px;

	icon-decorator: image;
	icon-image: invader.png 28px 152px 55px 176px;
}

/* Animate the arrows on hover. */
scrollbarvertical sliderarrowdec:hover,
scrollbarvertical sliderarrowinc:hover
{
	icon-image-t: 177px 201px;
}

/* Animate the arrows on active. */
scrollbarvertical sliderarrowdec:active,
scrollbarvertical sliderarrowinc:active
{
	icon-image-t: 202px 226px;
}The controls plugin adds support for range sliders; these are instanced through the RML tag <input type="range" ... />. Internally these are very similar to scrollbars, and contain identical child elements, i.e.:
- sliderarrowdec
- sliderarrowinc
- slidertrack
- sliderbar
These are styled in the same way you style scrollbars. Note that for input types, the controls plugin automatically sets the 'type' attribute of an input element as a class to ease their specification in a style sheet. So the following rule will apply properties to an input's slider track:
input.range slidertrack
{
	...
}The controls plugin adds support for drop-down boxes; these are instanced through the RML tag , with individual options specified within the selection element with tags.
The select element generates three hidden elements:
- selectvalue: The container element for the selected option.
- selectarrow: The button rendered to the right of the value element. This element has the pseudo-class 'checked' set on it when the selection box is visible.
- selectbox: The box containing the options. The visibility of this element is toggled when the arrow or value elements are clicked on, or when an option is selected.

The following are the select element's RCSS rules and properties from the Rocket Invaders from Mars style sheet:
/* Specify the dimensions of the select element. */
select
{
	width: 175px;
	height: 37px;
}

/* Specify the dimensions of the value element within the select element. Padding is used to position the
   value correctly internally. */
select selectvalue
{
	width: 125px;
	height: 28px;
	padding: 9px 10px 0px 10px;

	background-decorator: image;
	background-image: invader.png 162px 192px 307px 229px;
}

/* Animate the value field when it is hovered. */
select selectvalue:hover
{
	background-image-t: 230px 267px;
}

/* Fix the size of the select arrow decorate the element. */
select selectarrow
{
	width: 30px;
	height: 37px;

	icon-decorator: image;
	icon-image: invader.png 307px 192px 337px 229px;
}

/* Animate the arrow when hovered. */
select selectarrow:hover
{
	icon-image-t: 230px 267px;
}

/* Animate the arrow when the button is pressed or the box is visible. */
select selectarrow:active,
select selectarrow:checked,
{
	icon-image-t: 268px 305px;
}

/* Fix the width of the select box and fiddle with the margins to get it in exactly the right place. */
select selectbox
{
	margin-left: 1px;
	margin-top: -7px;
	width: 162px;
	padding: 1px 4px 4px 4px;

	background-decorator: tiled-box;
	background-top-left-image: invader.png 281px 275px 292px 284px;
	background-top-right-image: invader.png 294px 275px 305px 284px;
	background-top-image: invader.png stretch 292px 275px 293px 284px;
	background-bottom-left-image: invader.png 281px 285px 292px 296px;
	background-bottom-right-image: invader.png 294px 285px 305px 296px;
	background-bottom-image: invader.png stretch 292px 285px 293px 296px;
	background-left-image: invader.png stretch 281px 283px 292px 284px;
	background-center-image: invader.png stretch 292px 283px 293px 284px;
}

/* Sizes the option element to take up the available width in the select box. */
select selectbox option
{
	width: auto;
	padding-left: 3px;
}

/* Specifies every second option in the selection box to have a white background. */
select selectbox option:nth-child(even)
{
	background: #FFFFFFA0;
}

/* Gives the red highlight to the selection box. */
select selectbox option:hover
{
	background: #FF5D5D;
}