ADAM FujiNet Quickstart Guide - FujiNetWIFI/fujinet-firmware GitHub Wiki
FujiNet CONFIG Set-Up Guide for the Coleco ADAM
Easy-to-follow instructions on setting up and using FujiNet CONFIG with your ADAM Family Computer System. Written for first-time FujiNet users — no networking experience required.

Contents
- What Is FujiNet?
- What You Need
- Know Your FujiNet
- Hooking Up Your FujiNet
- Turning On Your Computer
- Connecting to Your Wireless Network
- The Main Screen: Hosts and Disk Slots
- Browsing a Host
- Mounting a Disk Image
- Booting Your Software
- Creating a New Disk Image
- Copying Files Between Hosts
- The Configuration Screen
- Using Your Game Controllers
- Returning to CONFIG
- Troubleshooting
- Key Reference Charts
- Glossary
- Learning More
What Is FujiNet?
FujiNet is a wireless network adapter and multi-peripheral for your Coleco ADAM. It plugs into the ADAMnet bus — the same connection used by your ADAM's keyboard and disk drives — and gives your ADAM:
- Four virtual disk drives. FujiNet appears to the ADAM as ADAMnet disk drives. Disk images (software stored as files) can be loaded — "mounted" — into any of four disk slots and used as if they were real Digital Data Packs or floppy disks.
- Access to file servers on the Internet. Public servers (called TNFS hosts) offer entire libraries of ADAM software you can browse and boot in seconds.
- A microSD card slot. Your own library, on a card in the FujiNet itself.
- A virtual printer. FujiNet can stand in for the ADAM printer and capture print output for retrieval from its built-in web page.
- Network devices for programs. ADAM software written for FujiNet can reach the Internet through it (the N: network device).
CONFIG is the program you use to manage all of this. It is stored inside the FujiNet itself, and the ADAM boots it automatically. CONFIG is what this guide teaches: every screen, every key, every function.
What You Need
Before you begin, make sure you have everything:
- Your ADAM Family Computer System (or Expansion Module #3), hooked up and working
- A FujiNet for the Coleco ADAM
- An ADAMnet cable (RJ12 6P6C — supplied with most FujiNets)
- A 2.4 GHz Wi-Fi network and its password. FujiNet's radio supports 802.11 b/g/n on 2.4 GHz only; a 5 GHz-only network will not be seen.
- (Optional) A microSD card, formatted FAT32
Know Your FujiNet

| Part | What it does |
|---|---|
| ADAMNET IN jack (RJ12) | Connects to the ADAM's ADAMnet port |
| ADAMNET OUT jack (RJ12) | Pass-through, so other ADAMnet devices can daisy-chain behind FujiNet |
| microSD slot | Holds an optional FAT32-formatted card with your disk images |
| Power switch | Turns the FujiNet on and off |
| WiFi LED (white) | Lit when FujiNet is connected to your wireless network |
| BT LED (blue) | Lit when Bluetooth mode is active |
| Bus LED (orange) | Flickers with ADAMnet activity |
| Button A | Short press: rotates the mounted disk images between slots (disk swap) |
| Button B | Hold for a few seconds: restarts the FujiNet |
| Safe Reset button | Short press: safely restarts the FujiNet |
| micro-USB port | Power/programming connector on the ESP32 module; used for firmware flashing |
Hooking Up Your FujiNet
- Turn your ADAM off.
- Plug one end of the ADAMnet cable into the jack marked ADAMNET IN on the FujiNet.
- Plug the other end into the ADAMnet port on your ADAM.
- If you had another ADAMnet device plugged into that port, plug it into the FujiNet's ADAMNET OUT jack — devices behind FujiNet keep working normally.
- If you have a microSD card, insert it into the card slot until it clicks.
- Slide the FujiNet's power switch to ON.

Turning On Your Computer
- Make sure there is no Digital Data Pack in your data drive and no disk in your disk drive, and no game cartridge in the cartridge slot.
- Turn on your TV and select the proper channel.
- Turn on the ADAM (the switch on the back of the SmartWRITER printer) — or, if it is already on, pull the COMPUTER RESET switch toward you.
- The ADAM boots from the FujiNet, and after a moment you will hear a cheerful chime and see WELCOME TO FUJINET at the bottom of the screen.
CONFIG lives inside the FujiNet and acts as the ADAM's boot device whenever the FujiNet has just been switched on. You never need to load it from a digital data pack or disk.
NOTE: If a disk image is already mounted in disk slot 1 from a previous session, the ADAM boots that software instead. See Returning to CONFIG.
Connecting to Your Wireless Network
The first time FujiNet starts (and any time it has no stored network), CONFIG goes straight into network setup. If your FujiNet is already connected, CONFIG skips ahead to the main screen, and you can skip ahead too.
About the SmartKeys
CONFIG is operated mostly with the ADAM's six SmartKeys — the dark keys numbered I through VI across the top of the keyboard. The bottom of every CONFIG screen shows a row of labeled boxes; each box lines up with one SmartKey. If a box is blank, that SmartKey does nothing on the current screen. This guide writes them as [ I ] through [ VI ].
Scanning and selecting
When network setup begins you will see SCANNING FOR NETWORKS... and then a list of the wireless networks FujiNet found (up to 16):

- Your FujiNet's MAC address is printed at the top of the screen — useful if your router filters devices.
- Each network shows a one-to-three bar signal-strength meter. More bars, better signal.
- The status area reads N NETWORKS FOUND — SELECT A NETWORK.
| Key | Action |
|---|---|
| ↑ / ↓ | Move the highlight bar |
| RETURN | Choose the highlighted network |
| [ IV ] HIDDEN SSID | Type the name of a network that doesn't broadcast itself |
| [ V ] RESCAN | Search for networks again |
| [ VI ] SKIP | Skip network setup and go to the main screen without a connection |
Entering your password
After you choose a network, CONFIG asks: ENTER NETWORK PASSWORD AND PRESS [RETURN]. Type the password (up to 64 characters — capitalization matters) and press RETURN. Each character appears as a smudge so onlookers can't read your password. Use BACKSPACE to fix mistakes.
If you chose HIDDEN SSID, you'll first be asked to type the network's name (up to 32 characters), then the password.

Connecting
CONFIG announces CONNECTING TO NETWORK with the network's name, and tries for about 20 attempts, displaying PLEASE WAIT...(ESC TO ABORT). Then:
- CONNECTION SUCCESS! — you're online. CONFIG remembers this network inside the FujiNet and will reconnect automatically every time it powers up. You go straight to the main screen.
- CONNECT FAILED, NO SSID AVAILABLE, CONNECTION LOST, or UNABLE TO CONNECT — the connection didn't take; CONFIG returns to the network list. Most often the password was mistyped — try again. See Troubleshooting.
- Press ESCAPE/WP at any time to abort the attempt.
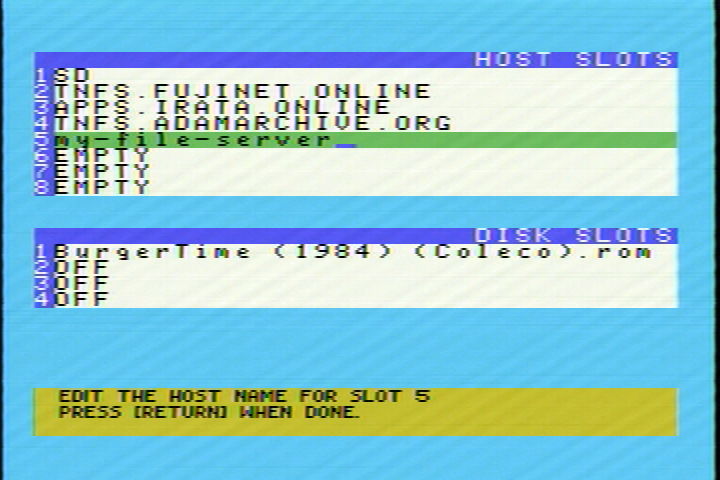
The Main Screen: Hosts and Disk Slots
This is CONFIG's home screen, and the one you'll use most. It has two halves:

- HOST SLOTS — eight remembered places software can come from. A host is
most often a TNFS server on the Internet (such as
fujinet.online) or the FujiNet's own SD card (enter the nameSD) — but several other server types work too; see the protocol table below. Empty slots readEMPTY. - DISK SLOTS — the four virtual drives the ADAM sees. Each shows the disk
image currently mounted in it, or
EMPTY(nothing mounted), orOFF(that virtual drive is disabled).
Press TAB to jump back and forth between the two halves. The bottom of the screen always lists the active keys.
Working with host slots
| Key | Action |
|---|---|
| ↑ / ↓ | Move the highlight bar |
| 1–8 | Jump straight to a host slot |
| RETURN | Open the highlighted host and browse it (next section) |
| TAB | Switch to the disk slots |
| [ IV ] SHOW CONFIG | Show FujiNet's network details (Configuration Screen) |
| [ V ] EDIT SLOT | Type a new host name into the highlighted slot |
| [ VI ] BOOT | Leave CONFIG and boot the ADAM with whatever is mounted |
To add a host: highlight a slot, press [ V ] EDIT SLOT, type the host name, and press RETURN.
Host slots speak several protocols. What you type determines what FujiNet connects to:
| You type | FujiNet connects to |
|---|---|
SD |
The microSD card inside your FujiNet |
A plain name or IP address (e.g. fujinet.online) |
A TNFS server — the default when no protocol is given |
http://server/path or https://server/path |
A web server. FujiNet reads the server's index page and presents it as a browsable folder (works with most auto-generated directory listings) |
smb://server/share |
A Windows file share (SMB). Credentials may be included: smb://user:password@server/share |
nfs://server/export |
An NFS server |
ftp://server |
An FTP server |
Some names to try first: SD, fujinet.online, or the name/IP of a TNFS
server running on your own PC.
To clear a host: edit the slot and backspace the name away, then press RETURN.
IMPORTANT: Changing or clearing a host slot automatically ejects any disk images that were mounted from it, since they can no longer be reached.
Working with disk slots
Press TAB to move to the DISK SLOTS half:

| Key | Action |
|---|---|
| ↑ / ↓ | Move the highlight bar |
| 1–4 | Jump straight to a disk slot |
| TAB | Switch back to the host slots |
| [ IV ] EJECT | Unmount the image in the highlighted slot |
| [ V ] ON/OFF TOGGLE | Enable or disable that virtual drive entirely |
| [ VI ] BOOT | Leave CONFIG and boot with the current arrangement |
| CLEAR | Eject all disk slots at once |
Each slot's number is drawn on a colored tile: blue means the image is mounted read-only, green means read/write.
ON/OFF TOGGLE is for owners of real hardware: if you have a physical disk
drive or digital data drive at the same ADAMnet address, switch the corresponding FujiNet slot
OFF so the two don't collide. A slot showing OFF ignores everything until
toggled back on.
If a mounted image's filename is too long for the slot row, the full name is shown in the area below the disk slots.
Browsing a Host
Highlight a host slot and press RETURN. CONFIG shows OPENING... and then lists the host's files:
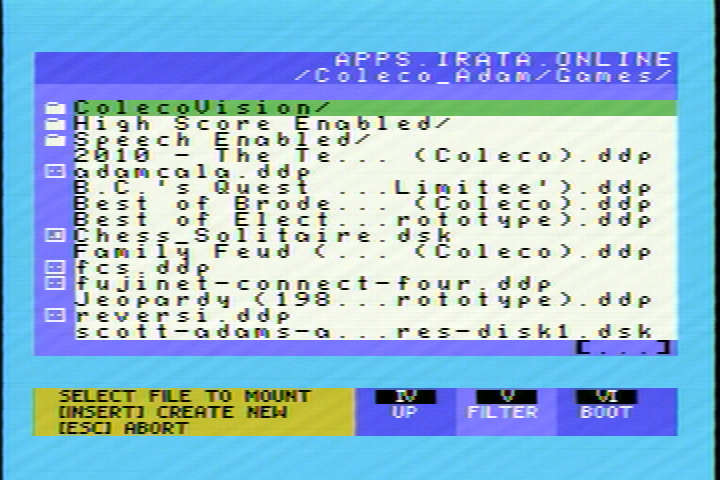
The host's name and your current folder path are shown at the top. Each entry
carries a small icon showing what it is — a folder, a DDP (Digital Data Pack
image), a DSK (disk image), or a ROM. Fifteen entries are listed per page; a
[...] mark at the top or bottom of the list means there is more in that
direction.
| Key | Action |
|---|---|
| ↑ / ↓ | Move the highlight bar (keeps going onto the next/previous page) |
| CONTROL + ↑ / ↓ | Jump a whole page at a time |
| HOME | Go back to the top of the list |
| RETURN | Open the highlighted folder, or pick the highlighted file |
| [ IV ] UP | Go up to the parent folder (hidden when you're at the top) |
| [ V ] FILTER | Show only matching files / search the whole host (below) |
| [ VI ] BOOT / QUICK BOOT | Instantly mount the highlighted file in slot 1 and boot it |
| INSERT | Create a brand-new blank disk image (details) |
| MOVE/COPY | Copy the highlighted file to another host (details) |
| ESCAPE/WP | Abort and return to the main screen |
Names too long for the list are shown in full at the bottom of the screen when you rest the highlight on them for a moment.
Filtering and searching
Press [ V ] FILTER and CONFIG prompts: ENTER A WILDCARD FILTER. E.G. *Coleco*, or !TERM FOR SEARCH.
- A pattern with
*wildcards — like*Coleco*orDonkey*— narrows the current folder to matching names. - A pattern starting with
!— like!zork— searches the entire host, top to bottom, and lists every file whose name contains that term, wherever it is. - Enter a blank filter to see everything again.
While a filter is active it is displayed in the top-right corner of the browser.
Link entries
On some public servers you may see entries marked with a +. These are links to
other TNFS hosts. Choosing one connects you to the linked host and continues
browsing there. (The linked host's name is written into host slot 8, so it also
appears on your main screen afterward.)
Mounting a Disk Image
Highlight a disk image in the browser and press RETURN. CONFIG shows the FILE DETAILS screen: the file's name, date, and size, along with your four disk slots:

| Key | Action |
|---|---|
| ↑ / ↓ or 1–4 | Choose a disk slot |
| RETURN or [ V ] READ ONLY | Mount the image read-only (safe — the image cannot be changed) |
| [ VI ] READ/WRITE | Mount the image writable, so programs can save onto it |
| [ IV ] EJECT | Empty the highlighted slot first, if you need room |
| ESCAPE/WP | Abort, back to the main screen |
After mounting, CONFIG returns you to the browser in the same folder so you can mount additional disks into other slots. Press ESCAPE/WP when you're done to go back to the main screen.
HINT: Mount read-only unless you know the software saves to its own disk. Read-only images can be shared by everyone on a server simultaneously, and a stray write can never damage them.
Booting Your Software
There are two ways to start the software you've mounted:
- BOOT — from the main screen (either half), press [ VI ] BOOT. CONFIG mounts everything listed in your disk slots, disables itself, and restarts the ADAM. The ADAM boots from disk slot 1 exactly as if a real Data Pack were in the drive.
- QUICK BOOT — in the browser, highlight a disk image and press [ VI ]. The image is mounted into disk slot 1 (read-only) and booted immediately — browse, pick, play.
Your mounted disk slots are remembered inside the FujiNet, so the same software boots again next time — until you eject it or mount something else.
Creating a New Disk Image
CONFIG can manufacture blank media on any writable host — your SD card or a TNFS server that allows writing. While browsing the folder where you want the new image, press INSERT:
-
SELECT MEDIA TYPE — press [ V ] DDP for a Digital Data Pack image, or [ VI ] DISK for a floppy disk image. (Any other key cancels.)
-
SIZE? — pick a capacity with the SmartKeys:
- DDP: 128K, 256K, or 320K — or CUSTOM
- DISK: 160K, 320K, 720K, or 1440K — or CUSTOM
- CUSTOM asks for the size as a number of 1K blocks.
NOTE: 256K is the most common DDP size — it is the size of a standard digital data pack. 160K is the most common DSK size — the size of a standard Coleco Disk Drive disk.
-
PLEASE ENTER A FILENAME FOR THIS DISK/DDP: — type a name (give it a
.ddpor.dskending to match its type) and press RETURN. A blank name cancels. -
Choose which disk slot to put it in, and press RETURN. CONFIG shows CREATING FILE... PLEASE WAIT. The new image is mounted read/write.
-
DO YOU WISH TO WRITE AN EOS DIRECTORY TO THIS IMAGE? — press [ V ] YES to format the image for EOS (SmartBASIC, SmartWriter and friends), or [ VI ] NO to leave it completely blank (for CP/M or other uses).
-
If you chose YES: ENTER A VOLUME LABEL (12 CHARACTERS MAX), type a name for the volume, and press RETURN. CONFIG writes the directory — CREATING THE DIRECTORY. PLEASE WAIT.

You then return to the main screen with your fresh, formatted, writable disk ready in its slot.
Copying Files Between Hosts
CONFIG can copy a file from any host to any writable host — TNFS server to SD
card, SD to TNFS, even server to server. Grab a game from fujinet.online and
keep it on your own card:
- Browse to the file you want and highlight it.
- Press the MOVE/COPY key. (The original is never altered.)
- COPY TO HOST SLOT — your eight host slots are listed. Choose the destination host with 1–8 or the arrows, and press RETURN. (ESCAPE/WP aborts.)
- The destination host opens in the browser. Walk to the folder where the copy should go. The status line reads SELECT DESTINATION.
- Press [ VI ] PERFORM COPY. CONFIG shows COPYING FILE...PLEASE WAIT. with the source and destination paths.

When the copy finishes you are returned to the folder you copied from.
The Configuration Screen
From the main screen's host half, press [ IV ] SHOW CONFIG:

| Field | Meaning |
|---|---|
| SSID | The wireless network FujiNet is connected to |
| HOSTNAME | FujiNet's name on your network |
| IP | FujiNet's address on your network |
| NETMASK | Your network's subnet mask |
| DNS | The name server FujiNet uses |
| MAC | FujiNet's hardware address |
| BSSID | The hardware address of your Wi-Fi access point |
| FNVER | The FujiNet firmware version and build date |
| Key | Action |
|---|---|
| [ IV ] PRINTER? YES/NO | Toggle FujiNet's virtual printer |
| [ V ] CHANGE SSID | Forget this network and run network setup again |
| [ VI ] RECONNECT | Drop and re-join the current network |
| RETURN / ESCAPE / SPACE | Back to the main screen |
About the printer toggle: when set to YES, FujiNet answers as the ADAM's ADAMnet printer and quietly captures everything programs print; you can view and save the output from FujiNet's built-in web page. Set it to NO if you want output to go to the real SmartWRITER printer instead.
The web page: type the IP address shown here into a web browser on any
computer or phone on your network (for example http://192.168.1.123/) to reach
FujiNet's full configuration site — printer output, host and slot management,
firmware settings, and more.
Using Your Game Controllers
Just like the ADAM's keypad controllers can drive SmartWriter, they can drive CONFIG — from the comfort of your couch:
| Control | Action |
|---|---|
| Joystick up / down (hold briefly) | Move the highlight bar |
| Either fire button | Same as RETURN |
| Keypad 1–8 | Jump to that slot |
| Keypad ✱ | Same as [ VI ] — BOOT |
Both controller ports work.
Returning to CONFIG
After you press BOOT, CONFIG steps out of the way until the FujiNet is restarted. To get back to CONFIG:
- Press the FujiNet's Safe Reset button (or switch it off and on).
- Pull the ADAM's COMPUTER RESET switch.
The ADAM boots into CONFIG again, with your hosts and mounted images just as you left them.
Swapping disks without CONFIG: when software asks you to "insert disk 2," press FujiNet's Button A. Each short press rotates the mounted images one slot forward — slot 2's image moves into slot 1, and so on, all without leaving your program.
Troubleshooting
| Symptom | Cause | Remedy |
|---|---|---|
| ADAM boots SmartWriter, not CONFIG | FujiNet off, or cable loose | Check power switch and ADAMnet cable; pull COMPUTER RESET |
| Boot media in a drive | Remove Data Packs/disks and reset | |
| ADAM boots old software instead of CONFIG | An image is still mounted in slot 1 | Restart FujiNet, then pull COMPUTER RESET; or eject via the web page |
| No networks found | 2.4 GHz network not in range | FujiNet sees 2.4 GHz networks only; move closer, or check the router broadcasts on 2.4 GHz |
| Network is hidden | Use [ IV ] HIDDEN SSID and type the name | |
| CONNECT FAILED / UNABLE TO CONNECT | Wrong password | Re-enter carefully — capitalization counts |
| Router restrictions | Check MAC filtering against the MAC shown on the scan screen | |
| COULD NOT MOUNT HOST SLOT | Host name mistyped, server down, or no SD card | Check spelling with EDIT SLOT; confirm the server is reachable; insert/format the SD card (FAT32) |
| COULD NOT OPEN DIRECTORY | Path or filter problem | Press HOME, clear the filter, try again |
| ERROR SETTING DISK MODE / can't mount READ/WRITE | Host or image is read-only | Public servers are usually read-only; copy the image to SD first |
| Printer output vanishes | FujiNet printer set to YES | View captured output on the web page, or set PRINTER? to NO |
| Real disk drive or digital data drive conflicts with FujiNet | Both answer the same ADAMnet drive number | Switch the matching disk slot OFF with [ V ] ON/OFF TOGGLE |
Key Reference Charts
Network selection screen
| Key | Function |
|---|---|
| ↑ / ↓ | Move highlight |
| RETURN | Select network |
| [ IV ] | Enter hidden SSID by name |
| [ V ] | Rescan |
| [ VI ] | Skip network setup |
| ESCAPE/WP (while connecting) | Abort connection attempt |
Main screen — host slots
| Key | Function |
|---|---|
| ↑ / ↓, 1–8 | Move / jump |
| RETURN | Browse highlighted host |
| TAB | To disk slots |
| [ IV ] | Show configuration |
| [ V ] | Edit host slot |
| [ VI ] | Boot |
Main screen — disk slots
| Key | Function |
|---|---|
| ↑ / ↓, 1–4 | Move / jump |
| TAB | To host slots |
| CLEAR | Eject all slots |
| [ IV ] | Eject slot |
| [ V ] | Drive on/off toggle |
| [ VI ] | Boot |
File browser
| Key | Function |
|---|---|
| ↑ / ↓ | Move highlight (auto-pages) |
| CONTROL + ↑ / ↓ | Page up / page down |
| HOME | Top of list |
| RETURN | Open folder / choose file |
| INSERT | Create new image |
| MOVE/COPY | Copy file to another host |
| [ IV ] | Up one folder |
| [ V ] | Filter / search |
| [ VI ] | Boot highlighted image now |
| ESCAPE/WP | Back to main screen |
Mounting (FILE DETAILS) screen
| Key | Function |
|---|---|
| ↑ / ↓, 1–4 | Choose slot |
| RETURN or [ V ] | Mount read-only |
| [ VI ] | Mount read/write |
| [ IV ] | Eject slot |
| ESCAPE/WP | Abort |
Configuration screen
| Key | Function |
|---|---|
| [ IV ] | Printer on/off |
| [ V ] | Change network |
| [ VI ] | Reconnect |
| RETURN / ESCAPE / SPACE | Back |
Glossary
- ADAMnet — the ADAM's built-in network of peripherals (keyboard, drives, printer). FujiNet joins it as several devices at once.
- CONFIG — the program in this guide; FujiNet's control panel, booted by the ADAM directly from the FujiNet.
- DDP — a Digital Data Pack image file; an entire ADAM digital data pack in a single file.
- Disk image — a complete digital data pack or disk stored as one file (.ddp, .dsk, .rom).
- Disk slot — one of FujiNet's four virtual drives. What is mounted in disk slot 1 is what the ADAM boots.
- EOS — the Elementary Operating System, the ADAM's native OS. "Writing an EOS directory" is formatting an image so EOS programs can store files on it.
- FTP — the File Transfer Protocol, a longtime Internet standard for
moving files. A host slot beginning
ftp://browses an FTP server. - Host — a place disk images live: a TNFS, web (HTTP/HTTPS), SMB, NFS, or FTP server — or FujiNet's SD card.
- Host slot — one of eight remembered host names on the main screen.
- HTTP — the protocol of the World Wide Web. A host slot beginning
http://orhttps://reads a web server's index page and presents it as a browsable folder. - MAC address — a hardware serial number that identifies FujiNet to your network.
- Mount — to load a disk image into a disk slot, like inserting a digital data pack.
- NFS — the Network File System, a file-sharing protocol commonly used on
UNIX™ systems. A host slot beginning
nfs://browses an NFS server's export. - Read-only / Read-write — whether programs may change the mounted image.
- SMB — Server Message Block, the file-sharing protocol of Microsoft
Windows. A host slot beginning
smb://browses a Windows shared folder. - SSID — the broadcast name of a wireless network.
- TNFS — Trivial Network File System, the simple protocol FujiNet uses to browse Internet software servers.
Learning More
- FujiNet web site: https://fujinet.online/
- Firmware, downloads & wiki: https://github.com/FujiNetWIFI/fujinet-firmware
- FujiNet Discord: https://discord.gg/7MfFTvD — the fastest place to get help
- Flashing/updating firmware: https://fujinet.online/download/
- AtariAge ADAM forum: active FujiNet-for-ADAM discussion and releases
FujiNet is an open-source community project. ADAM, SmartWRITER, SmartBASIC, ColecoVision and UNIX are trademarks of their respective owners; they are used here in loving tribute.