Creating Custom Environments with Blender and BrawlCrate - FortuneStreetModding/fortunestreetmodding.github.io GitHub Wiki
- About This Guide
- Getting Set Up: Required Programs
-
Blender
- Creating a new scene
- Importing the model
- Enabling textures in the 3D viewport
- Overview of viewport controls
- Using the Peach's Castle Ground model to gauge the imported model's size
- Resizing the model
- Rotating the environment
- Moving the environment
- Packing external files into the .blend file
- Separating the model into objects by material
- Removing a mesh we don't want to deal with (lol)
- Saving the .blend file and exporting the model to .fbx
- Autodesk FBX Converter
-
BrawlCrate
- Creating a new BRRES file
- Importing textures to the BRRES file
- Importing models to the BRRES file
- Configuring shader settings
- Configuring material settings for fully- or partially-transparent textures
- Importing the default Intro and Switch camera animations
- Converting from BRRES to CMPRES and saving the file
- Adding the Files to the Fortune Street ISO
- Conclusion
- Next Steps
This guide covers, in basic detail, the process for importing 3D environments and skyboxes to Fortune Street. While it is by no means a comprehensive guide on every possible issue that could come up during the process, it should serve well as a primer to the process. This guide covers the following topics:
- Pulling a model from the internet
- Sizing it appropriately and converting it to the correct format for Fortune Street
- Using BrawlCrate and NTCompress to import it to the ISO
This guide does not cover these topics:
- Ripping models from other games
- Environment animation
- Installing the various required programs.
Blender (for editing 3D models):
https://www.blender.org/download/
Autodesk FBX Converter (for converting from .fbx to .dae):
https://www.autodesk.com/developer-network/platform-technologies/fbx-converter-archives
BrawlCrate (to import, extract, and replace
files from the .brres files):
https://github.com/soopercool101/BrawlCrate/releases
The helper files. These include the Castle Ground model from Peach's Castle that you can use as a size-guide in Blender, default Intro and Switch camera files that work out of the box and can also be edited in BrawlCrate, and a thin/template .scene file that you can use to build up an entirely new scene, which is preconfigured to work with the aforementioned camera files:\ https://cdn.discordapp.com/attachments/696605668647370766/762411810295906354/fs-environment-helperfiles.zip
An environment rip of some sort. (For the purposes of this guide, I will be using Paradise Street from Super Monkey Ball 2):
https://www.models-resource.com/gamecube/supermonkeyball2/model/33080/
Start by decompressing the environment file (GameCube - Super Monkey Ball 2 - Paradise Street.zip) to its own directory somewhere. 84 files will come out: an .obj model, a .mtl file, and 82 .png texture files. Once that is done, open Blender. If you get the splash screen, choose General under the New File column. If the splash screen does not show, go to File > New > General. Once you've done this, take a look at the Collection pane in the top-right. In that pane, right-click the Camera, the Cube, and the Light and click Delete on each of them so that the scene is truly empty.

A very empty scene.
Next, go to File > Import > Wavefront (.obj) and select the file that came out of the environment box .zip above. It should simply be named Model.obj.
Looking a bit grey. This is because Blender's viewport doesn't show textures by default.
The scene should come in completely gray. This is okay and is only because the viewport, by default, shows all objects with solid shading. To enable the textures, simply click the Material Preview button in the upper-right corner of Blender's 3D viewport:

Let there be textures!
Woah!
This is great! But...you might have noticed that some of the textures look a bit off. There is some black border below the net, as well as some of that same weird border around the letters on the Monkey Café sign in the back. This is totally fixable in Blender, but we can actually ignore this here: we'll use the Alpha Function in BrawlCrate so this won't show up in-game. In the long run, I've found that this is the easiest way to handle it.
Moving onward! If you are using a standard three-button mouse and are running Windows, the controls for the viewport are as follows:
Rotate the camera: click and hold the scroll wheel down and drag the mouse around.
Move the camera around: Shift + press and hold the scroll wheel down and drag the mouse around.
Move the camera forward and backward: Ctrl + click and hold the scroll wheel down and drag the mouse around.
Camera zoom: Scroll wheel up and down.
The first thing we need to do once we have the environment loaded is to see how it compares to the size Fortune Street is expecting. In most cases, Fortune Street will want an environment box that is much smaller than the one we are importing. As such, we need to measure this and scale down to match what the game expects. Enter the Peach's Castle Ground model: it is okay to go larger than this but try and be in the same ballpark. Going dramatically higher is not likely to work in my experience. To check, import the Peach's Castle Grounds file by going to File > Import > Collada (.dae).
That's tiny!
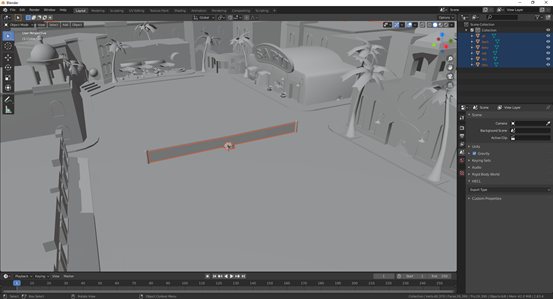
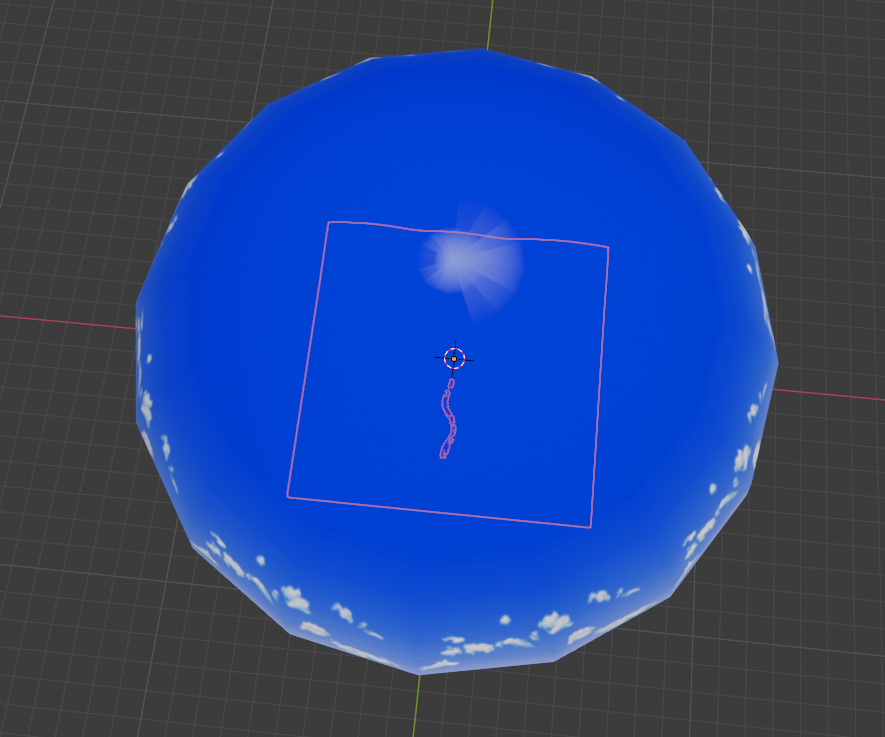
Once it imports, it will be selected automatically. It looks like it is under the ground here so we can only see the selection outline. We want this castle ground model to be smaller than everything else, but not this much smaller. So, we need to shrink everything relative to it. Go ahead and delete the Castle Ground file, we will reimport it later. You can do so by using the Shift key and selecting the Armature as well as the stuff inside it, then right-clicking the selection and choosing Delete:
Yeet thyself from my collection, ground.
Click back into the viewport somewhere to make sure that pane is active, then press the A key to select all the Meshes. On the right side of the Viewport, click the icon that looks like a square with brackets around it to open the Object Properties pane.
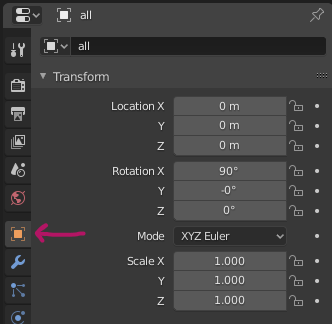
Object Properties!
From here, we can scale things down. However, in order to do so, you need to use the Alt key. Just typing a number and pressing enter will only apply the value to one of the selected objects, but pressing Alt + Enter applies it to all of them. Try changing this to 0.25 in each of the Scale X, Scale Y, and Scale Z boxes, pressing Alt + Enter to confirm each of the values. If you mess up, Ctrl + Z to undo works.
Import the Castle Grounds again as you did above and observe.
Better!
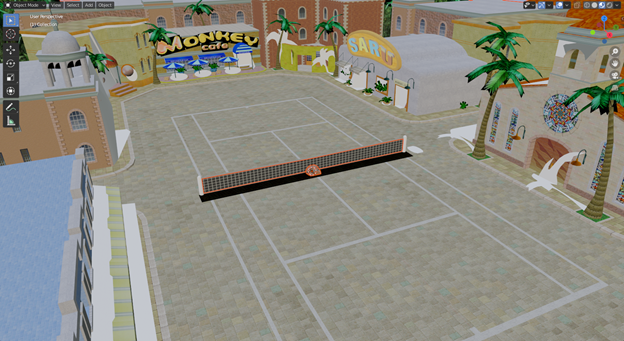
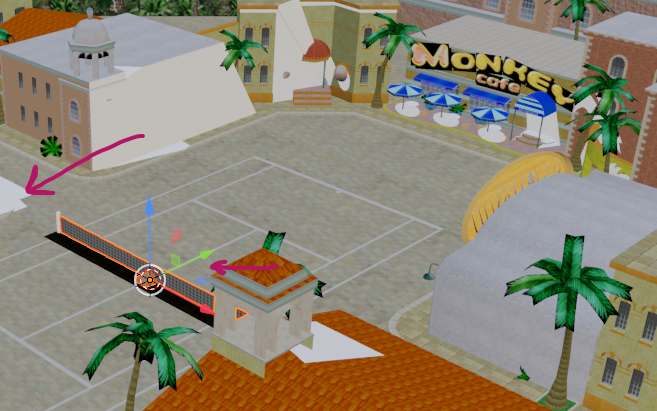
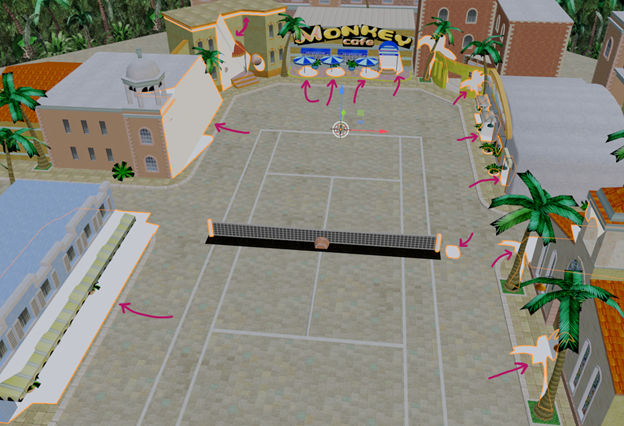
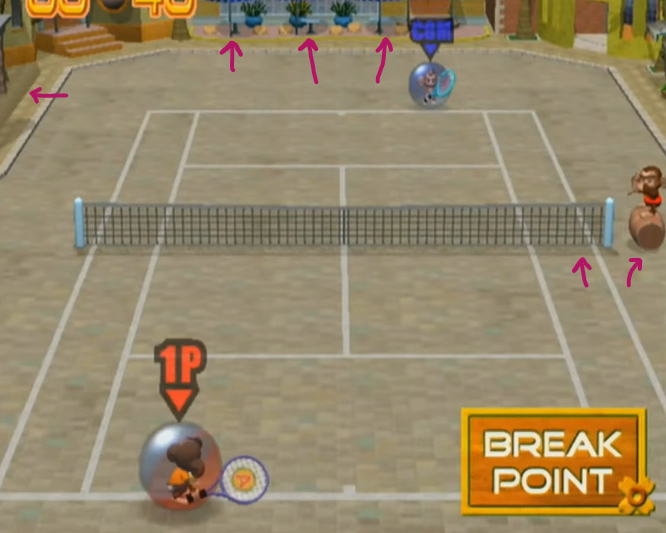
This is in the right direction and I feel good about starting here at least. One thing though, I'd like to rotate the environment so that the player is facing the Monkey Café as it is in the actual game. The camera in-game is going to face the direction of that path. I've drawn the arrows on the next image to illustrate the direction of the camera and the type of rotation we're going to have to do to get this to line up.
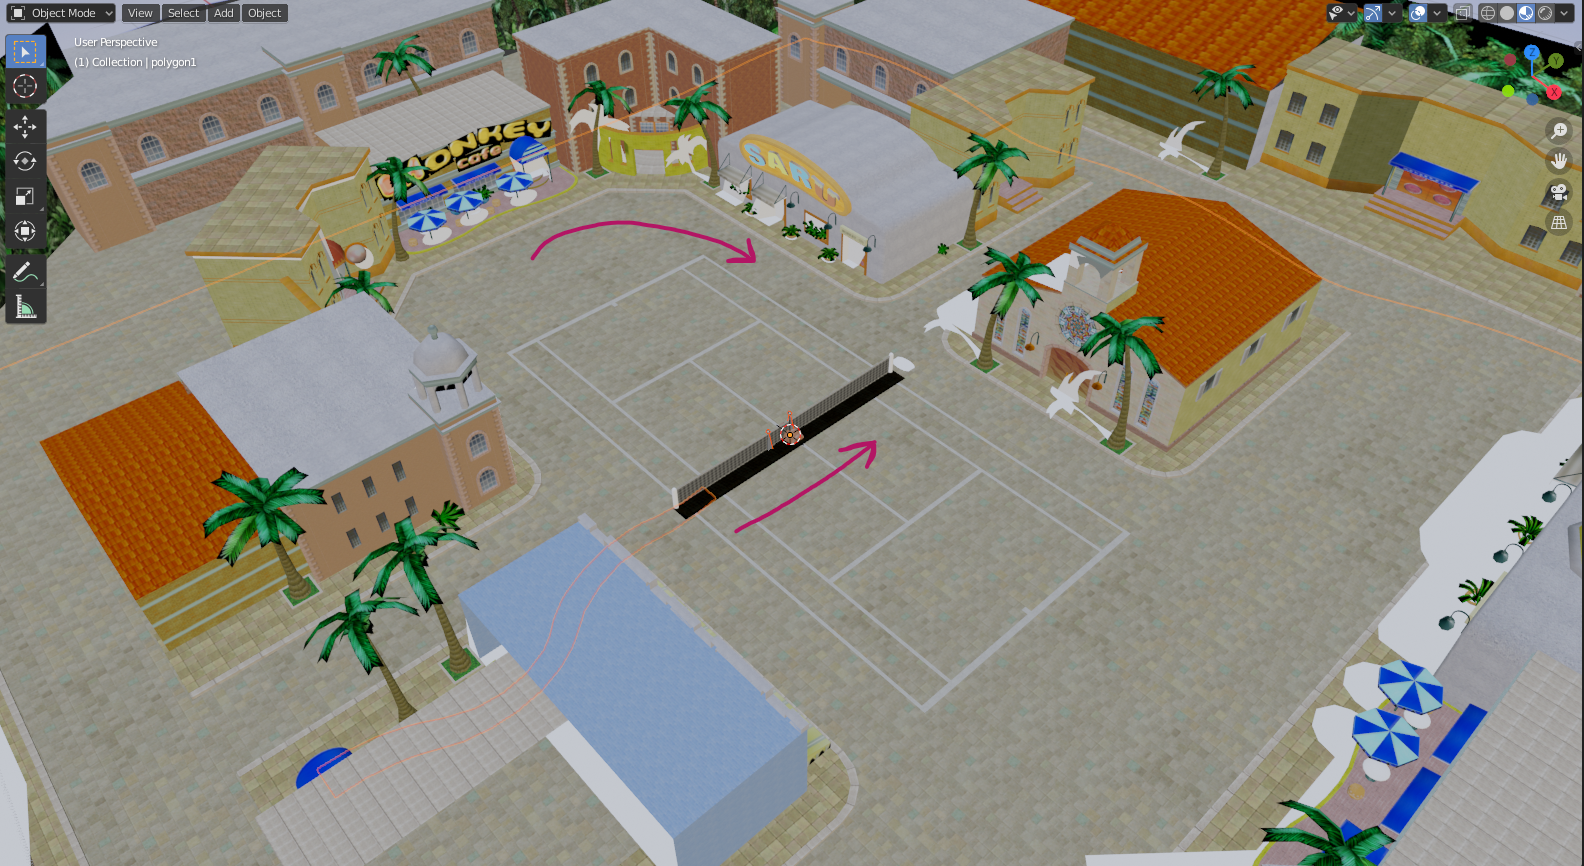
It's really hard to see here, but the path is pointing northeast, the same direction as the arrow near the net.
Delete the Castle Grounds object again, click into the Viewport, and press A again to select all the Meshes in the scene. To figure out which direction we need to go, some trial-and-error is needed. Hold Alt, then click into the Rotation X, Rotation Y, or Rotation Z fields in the Object Properties pane and drag left and right to test that axis. If you have the wrong direction, press Ctrl + Z and try the next one. From my own experiments, I found that we need to go -90 on the Rotation Z axis.
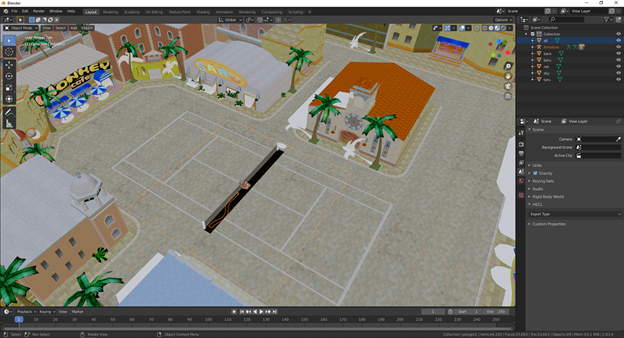
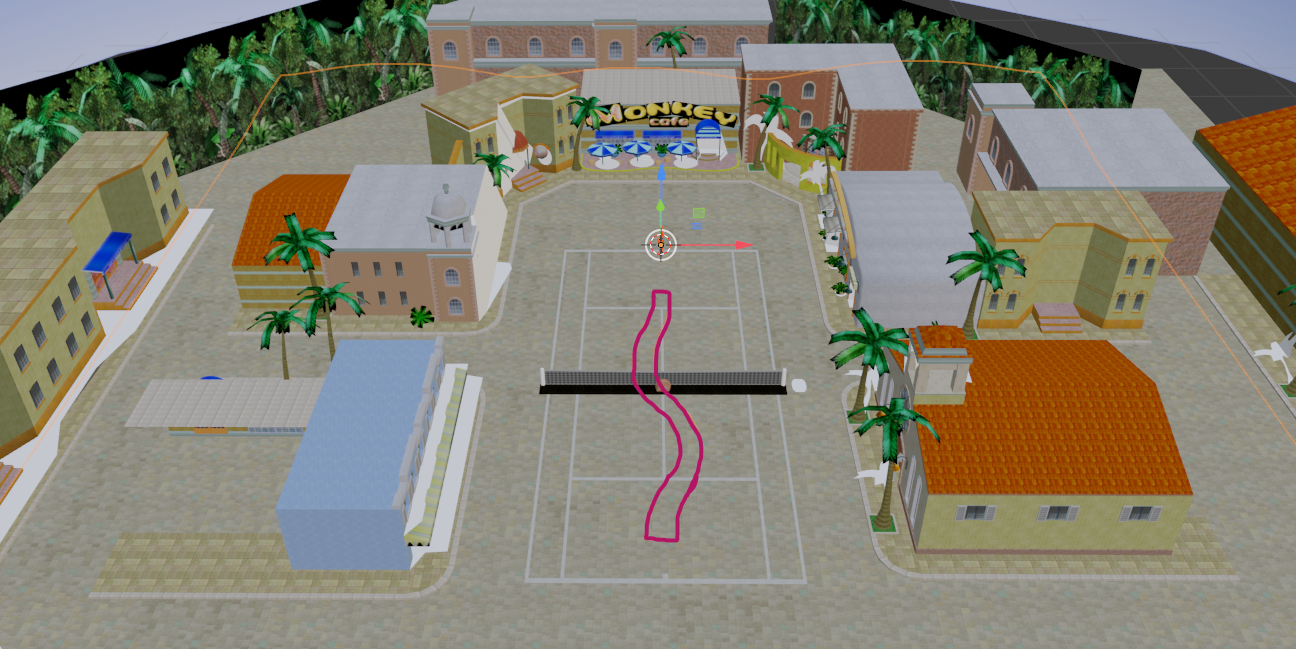
Make that change, then import the Castle Grounds again to see if it is what we expect. I've (poorly) traced the outline in this next screenshot to make it easier to see, but it does look correct.
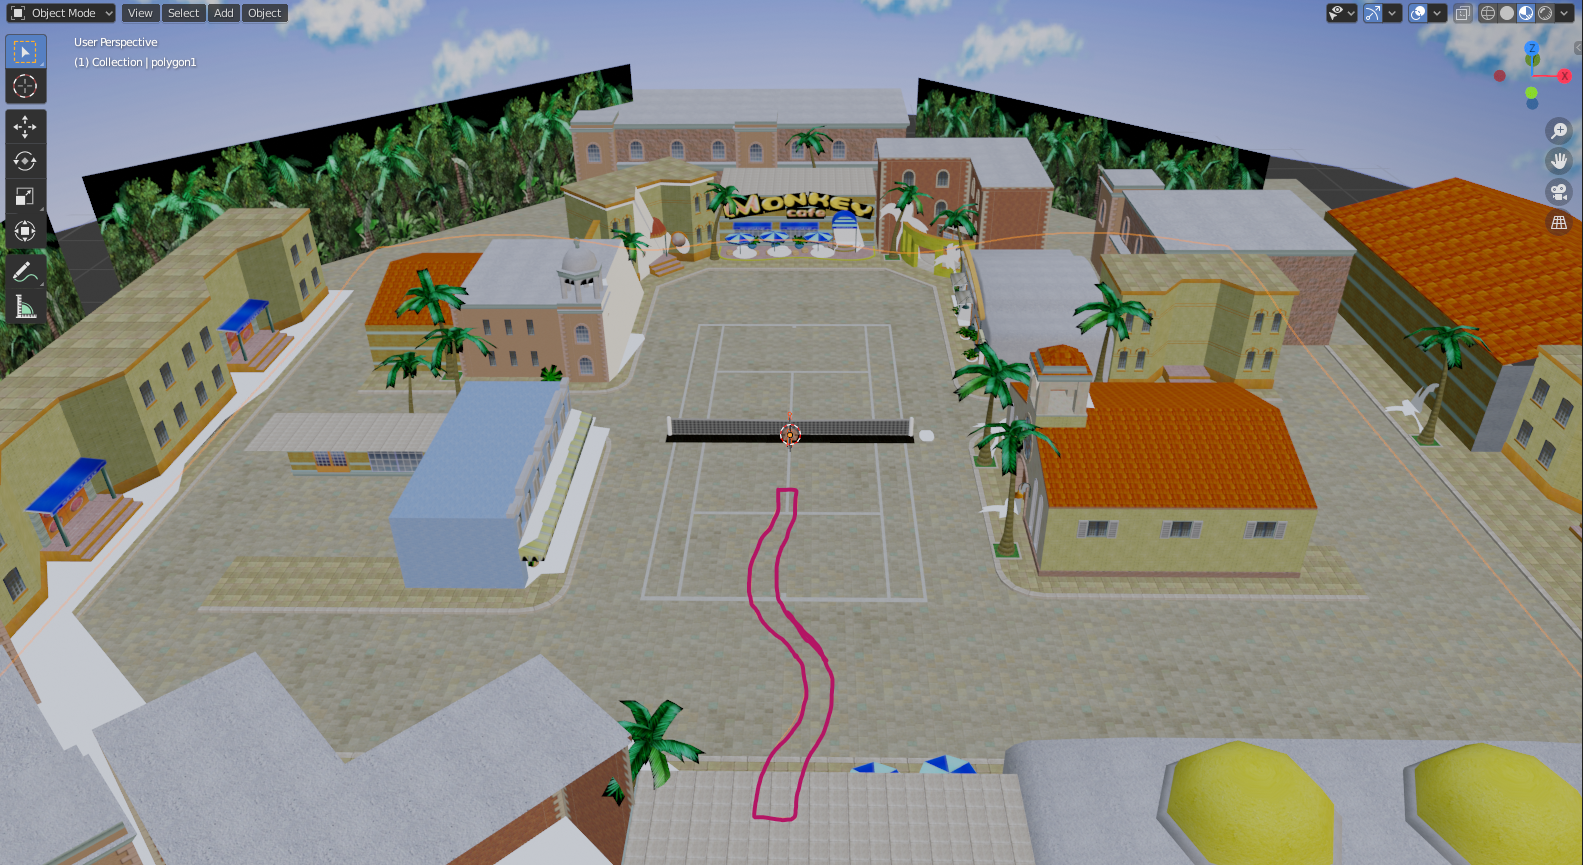
Woo!
It's a little far back though. Let's move it slightly forward by moving the environment in the opposite direction of the Monkey Café. Delete the Castle Grounds object again, click into the Viewport, make sure you are in Object Mode, then press A to select all the Meshes. Click the Move tool on the left side of the Viewport, and use the Gizmo in the middle to move the environment a bit in that direction. Click the green arrow and drag away from the Café. Do your best to estimate an amount that will allow that road to overlap the net approximately halfway.
Grab the green arrow and drag it.
I ended up going about -2.5m on the Location Y axis, if it helps to know that. Import the Castle Ground file again and see where we are. (Outlined here again for ease of viewing)
This is close!
(Editor's Note: Although I had correctly aimed for the middle of the road, in-game it looked like I had gone too far, the camera was sitting on the far side of the tennis court. Feel free to adjust and experiment with yours to achieve better results!) If you're happy with your setup, let's proceed with locking in our changes. We want the Location and Rotation values to read (0,0,0) and Scale to read (1,1,1) instead of the modified values they have now. Go ahead and delete the Castle Ground object again, click into the Viewport, then press A to select all Meshes. Make sure you are in Object Mode, then press Ctrl + A to bring up the Apply menu and choose All Transforms. The values in the Object Properties pane should return to their default values mentioned above.
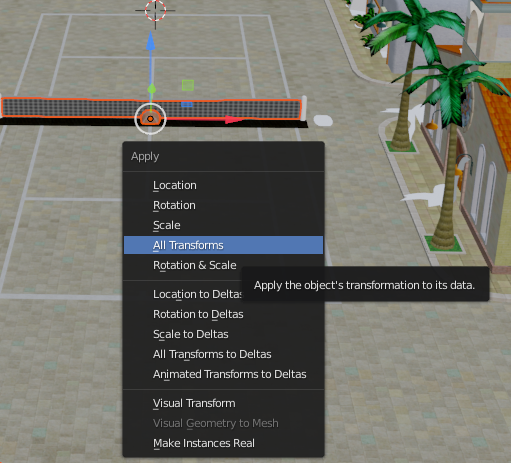
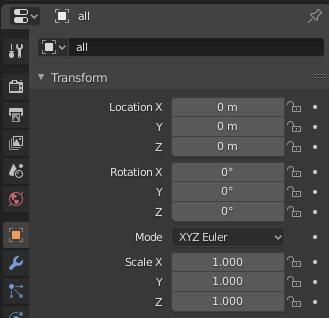
Back to defaults!
Now that this has been done, we're ready to begin the process of saving and exporting the file.
First, pack the textures into the .blend file so they don't get lost. Go to File > External Data > Pack All into .blend.
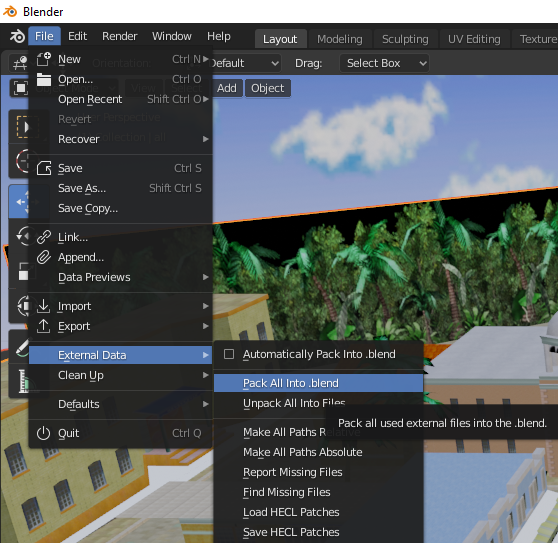
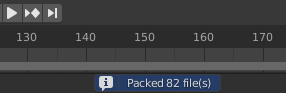
At the bottom of the window, you should see a prompt telling you the files have been packed. This embeds them into the .blend file so it doesn't rely on any external paths. This makes the file portable, shareable, and easier to deal with in general.
The dark deed you have requested is done.
Next, we want to separate everything by its material. This is because BrawlCrate reads textures on a per-object basis. So rather than the six objects we have now, we need each polygon that has its own texture to be a separate item. In the image below, the first three would work fine since the objects only have one Material, but the last one would not as it is one Object with five materials.

Luckily, Blender has a button for this. Use the drop-down menu in the top-left of the 3D Viewport to switch to Edit Mode, then under the Mesh menu, select Separate > By Material. It may take a moment, but when it completes you should see a lot of objects in the Collection pane. This is exactly what we want.
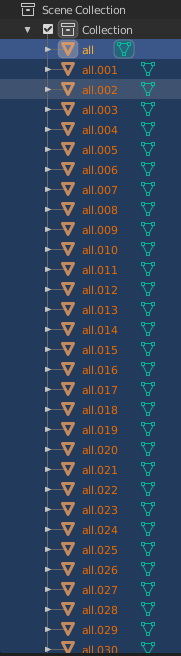
Split by Material is a little unwieldy, but it's going to make things work a lot better in BrawlCrate.
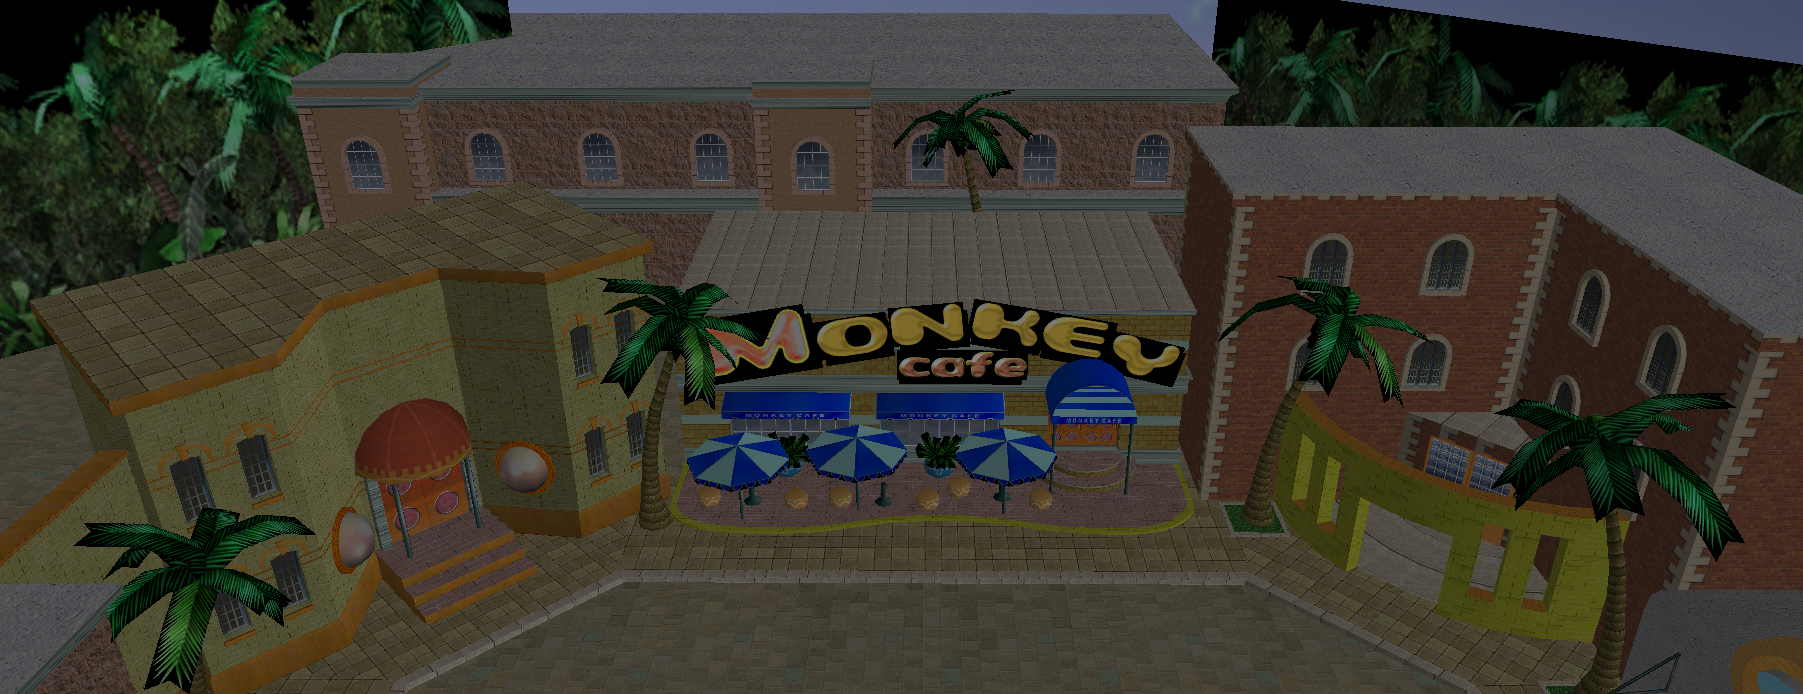
Looking at the Mesh though...there's something here that isn't right. If we compare what we see in Blender with what it looks like in its actual game, Super Monkey Ball 2, you'll see that there is a lot of untextured white mesh here.
What we see in Blender
What it looks like in-game. Notice this should be dark and semi-transparent.
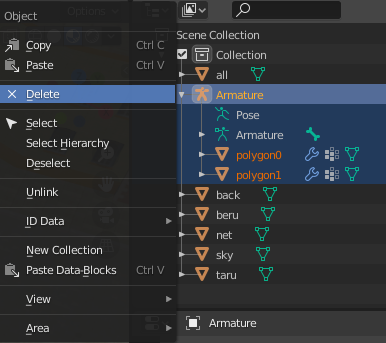
It is possible to make this look correct but doing so is outside the scope of this guide. At this point, I recommend that we delete this part of the mesh and move on. I understand this is not ideal, and but I spent many hours trying to make this work and eventually decided that this was the better path. If later you come back and figure this out, let me know and I'll add your information here and give you credit for it!
All that shadowing mesh is one object, all.032. You can either grab it by clicking on it in the Scene Collection pane, or by going to Object Mode then clicking it in the Viewport. You may need to click it more than once until it has a yellow outline. Once it is selected, right-click it in the Scene Collection pane and choose Delete. This is good enough for now.

It's fiiiiine. Right, guys?
From here, we're ready to save and export. Save the .blend file somewhere you will know where to find it by using File > Save, then click into the Scene Collection pane and press A to select everything. Then go to File > Export > FBX (.fbx). On this screen, change the Path Mode to Copy and click the tiny button just to the right of that menu to enable embedding of textures. Next, deselect all Object Types except Mesh, then under Armature, uncheck Add Leaf Bones. Name the file and save it somewhere you will be able to find it.
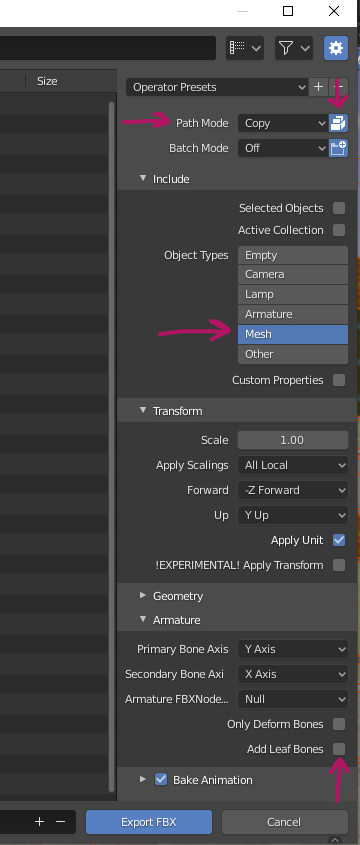
Do all these things before you export!
Now, open Autodesk FBX Converter and add the .fbx file you just exported as a Source file. Change the Destination Format to DAE Collada, then click Convert.
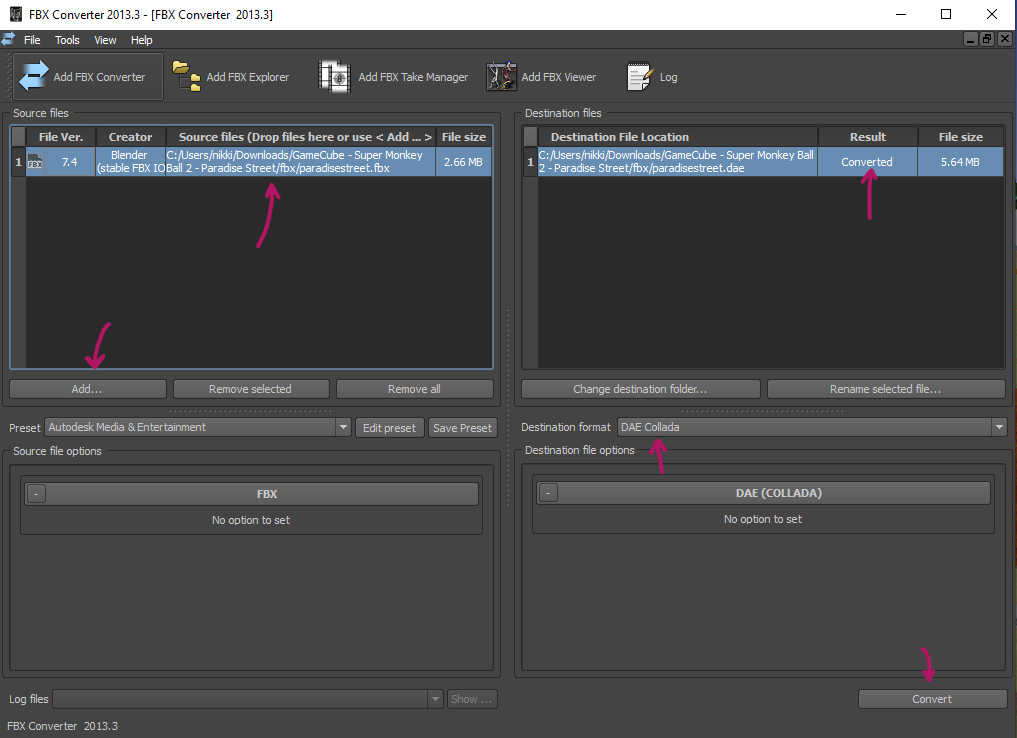
This is a lot of arrows, but it should show Converted in the end.
Once this has been done, a .dae file with the same filename should appear in the same directory as the source .fbx file. A folder with the same name but with a .fbm suffix should also appear, containing the scene's 82 texture files. These are ready to import to BrawlCrate.

The .dae file and the textures inside the .fbm folder can be imported to BrawlCrate. Textures first. We'll handle this in the next section.
In BrawlCrate, create a new BRRES file by choosing File > New > Archives > BRRES Resource Pack.
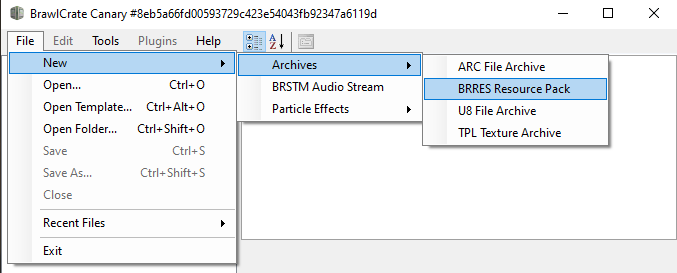
New file ahoy!
Once done, a NewBRRESNode should appear in the list on the left side. To add textures to it, right-click that node, then go to Import > Textures.
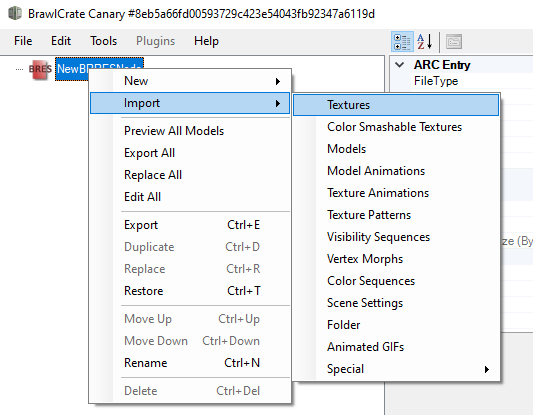
Import the textures before the model so they apply correctly. No clue if it works the other way around or not actually!
Go to the .fbm folder that was created earlier and select all 82 textures. Unfortunately, this part gets tedious and there is no way around it. For each of the 82 textures, change the Format to CMPR and click Okay.
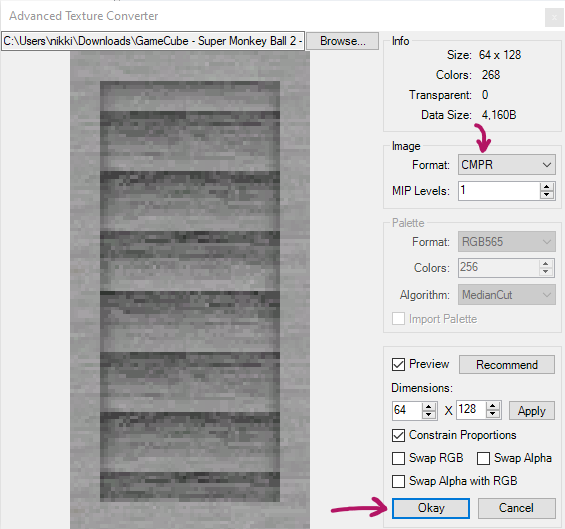
You need to do this n times where n is the number of textures you have.
Once that is complete, go ahead and save the file. Click File > Save and place it somewhere. Next, it's time to import the model.
Right-click the main node, then click Import > Models. Find and select the .dae file we exported from Autodesk FBX Converter.
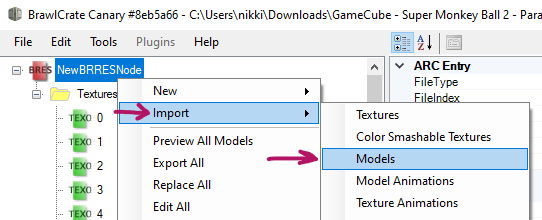
Now, import the model.
On import, make sure the model Version is 11. That one is 100% required as it affects the way the model is saved. I believe that most of the other settings are optional, but here are the settings I use if you would like to match them. Click Okay when you're ready.
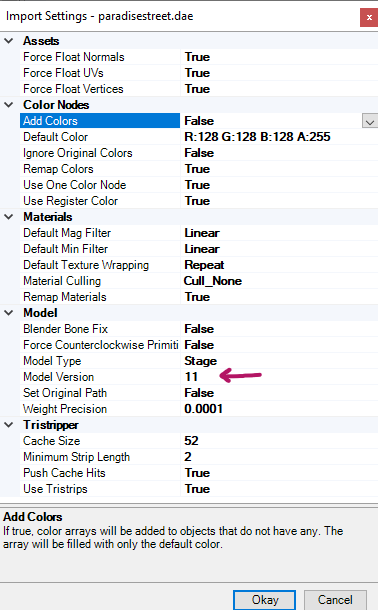
My settings. As this process is further optimized, it may come out later that some other settings are more optimal, but for now I at least know that these work.
You should now see the model appear both in the list and in the preview panel in the bottom right. This is good! We now need to change some settings in its default shader to be compatible with Fortune Street.
Click the + sign to the left of the model, then expand Shaders > Shader 0 > Stage0. Select Stage0.
In the upper-right corner, you should see a list of options. Some of these options exist under multiple headers, so be careful to choose the correct ones. Under bTEV Color Output, change Scale from MultiplyBy4 to MultiplyBy2. We may need to bump this down to MultiplyBy1 in some cases, but in almost all cases that I have seen so far, MultiplyBy4 results in a very bright and washed out image.
Next, scroll down and under cTEV Alpha Output, change Selection C to Zero and Selection D to TextureAlpha.
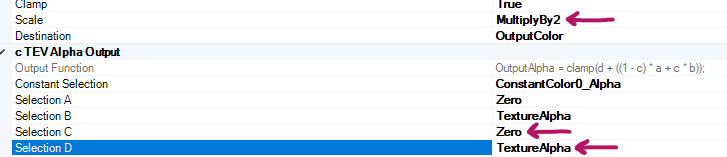
bTEV Color Output Scale \> MultiplyBy2, and cTEV Alpha Output C \> Zero and D \> TextureAlpha.
Now, we have another bit of tedium ahead of us. We haven't yet dealt with the transparency issue we mentioned earlier, so there are still black borders around everything that should be partially transparent. (You can see this by right-clicking the model and choosing Preview, though the controls to navigate the viewport are different than Blender's are and explaining them fully here is outside the scope of this guide. You can see a detailed explanation of the controls by clicking the arrow at the top of the Advanced Model Editor window, then choosing the View menu > Help.)
Ewww, no. Fix it!
The transparency issue is, unfortunately, fixed on a texture-by-texture basis. It's not actually dealt with on the texture files themselves, but rather on the model's materials. The model should contain a material for each texture, and it is on these materials that you can configure the Alpha Function.
It goes like this: for each material that looks like it should be partially or fully transparent, change the following Alpha Function properties:
Ref0: 128
Comp0: GreaterOrEqual
Ref1: 255
Comp1: LessOrEqual
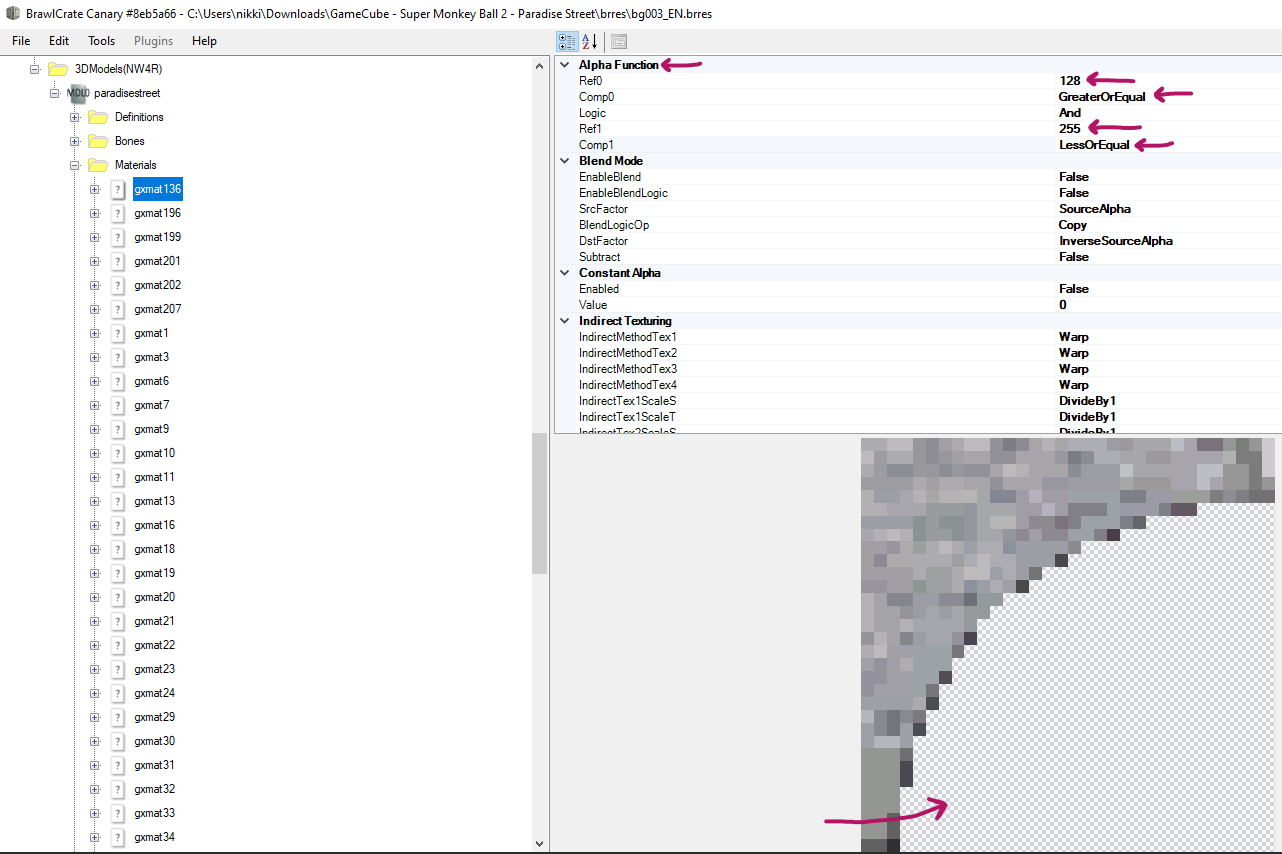
You can tell transparency is involved when this checkerboard pattern shows up. Though, sometimes transparency can also be represented by purely black pixels or purely white ones. Regardless, don't edit any of these settings if no parts of it are transparent! You'll get weird results if you do.
Now, when you right-click the model and choose Preview, you should see a mostly-correct-looking scene!
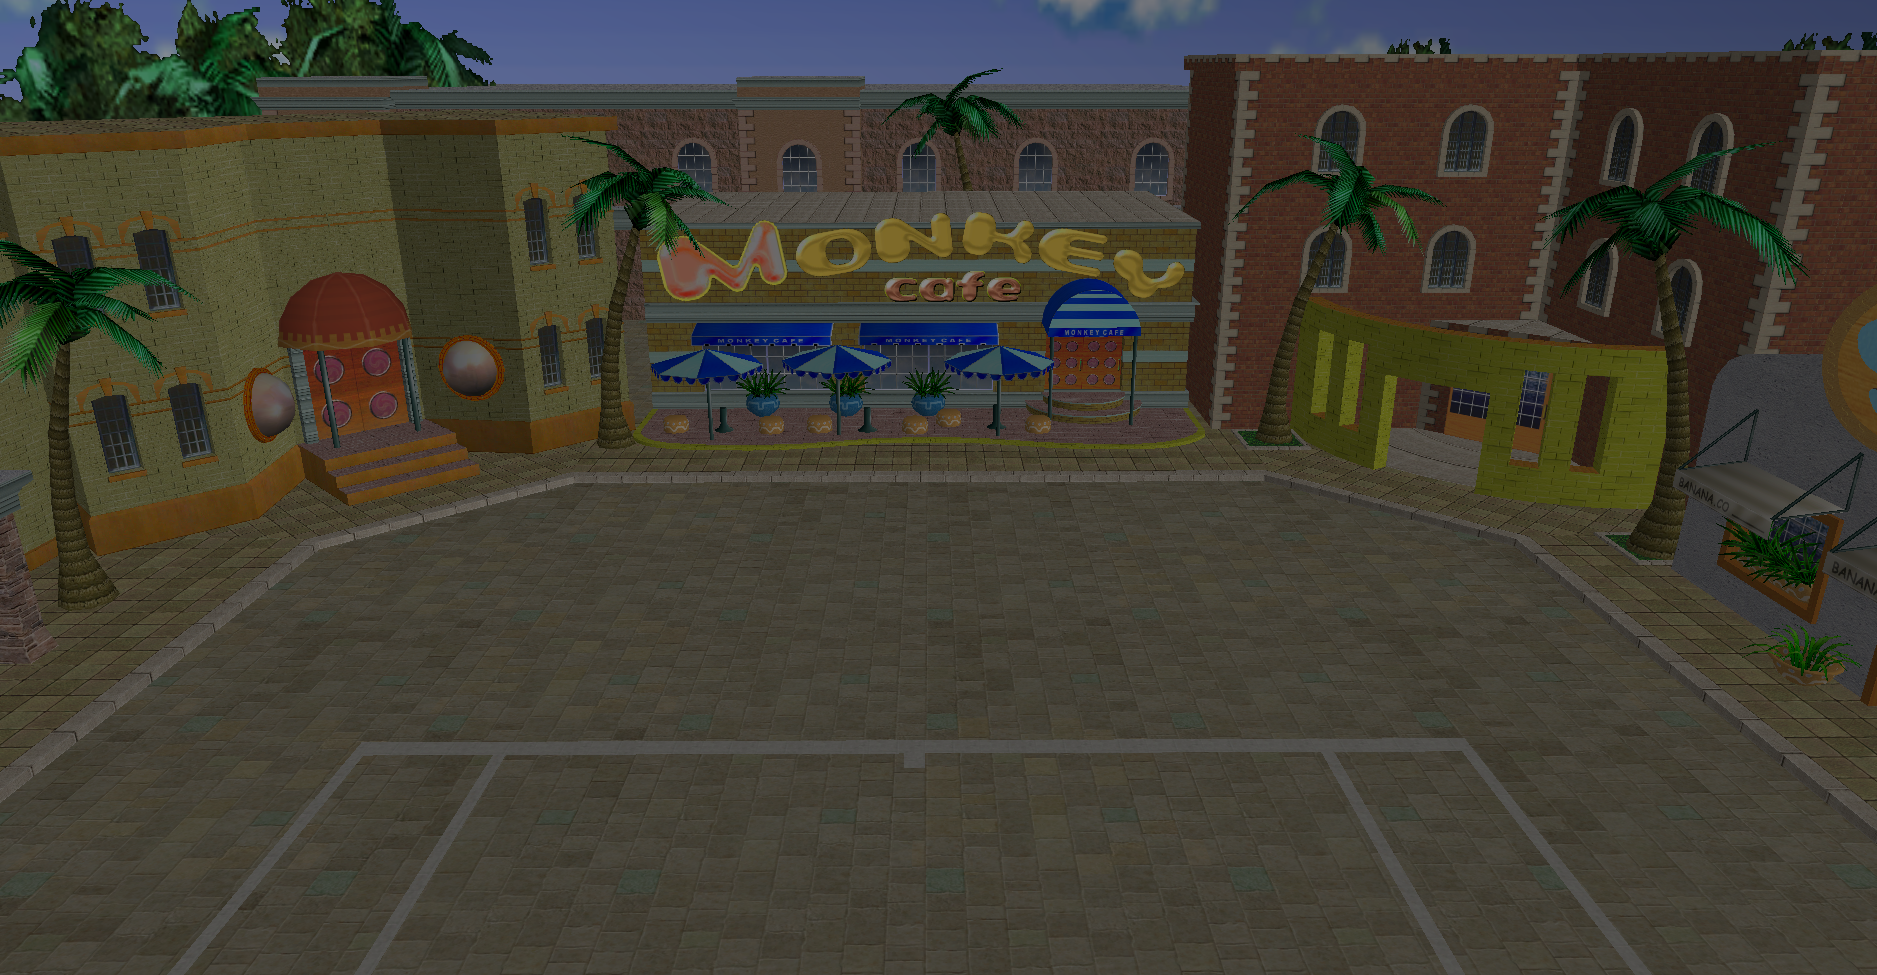
Holy carp! It looks a little dark, but it often does versus the actual game. We need to see it in-game to know if we should bump its MultiplyBy value to 4 or not.
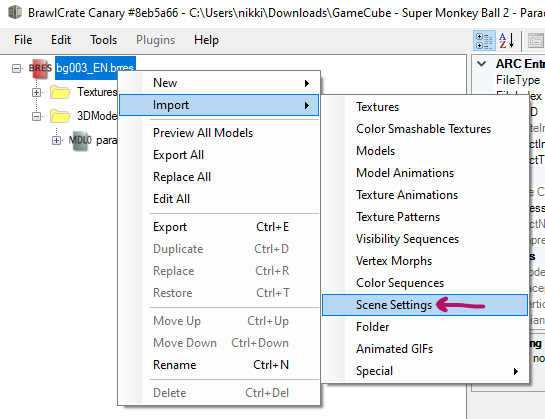
Now that it looks okay, let's add the Intro and Switch camera files. You can do this by right-clicking the main node, then choosing Import > Scene Settings, then choosing the .scn0 files in the Helper Files zip linked at the top of this document.
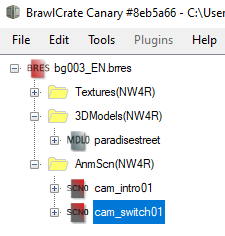
Notice that I named my file bg003_EN.brres. This is not required yet -- bg003_EN.brres is the file that contains Peach's Castle's background for the US version, Fortune Street. The country code will vary for other versions of this game. Boom Street's English language version, if I am not mistaken, uses _UK. Your version may use a different code depending on your Wii System Language. For Fortune Street, however, it is always _EN.
If you wish to edit the camera movement, there are a couple of things you need to be aware of:
- You should only edit the keyframe 1 manually, never the other frames. In keyframe 1 you may especially want to edit the Aim coordinates. It is the focal point of the camera which the camera should always aim at.
- For all subsequent keyframes, ALWAYS use the Interpolation Editor in BrawlCrate. Otherwise, the Camera may be messed up.
- Setting up the camera movement is a bit of trial and error and may need several iterations to get it to look right.
This, so far, is fantastic! But we have a .brres file that we need to turn into a .cmpres file. These file types are roughly the same but .cmpres files, as their name suggests, are compressed versions. Luckily, BrawlCrate can handle this natively. Select the main node in the left panel (the one that I named bg003_EN.brres), then on the right side, under Misc, change Compression to LZ77 or ExtendedLZ77.
Finally, save the CMPRES file by going to File > Save As. Change the Save as Type dropdown to All Files, then update the extension of the file to be .cmpres.
Our goals from here are to swap in our environment, then edit the corresponding scene file to properly reference the new file. This is simple to do. Take your .cmpres file and name it bg103_EN.cmpres, then copy it to \_working_directory\DATA\files\bg\langEN. You will be asked if you want to replace an existing file. Click Yes on that prompt.
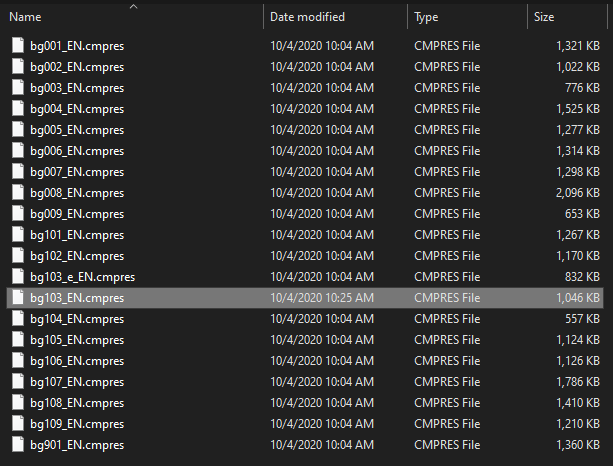
Your new file should be in the folder now, and you can tell because its Date Modified timestamp won't match the other files.
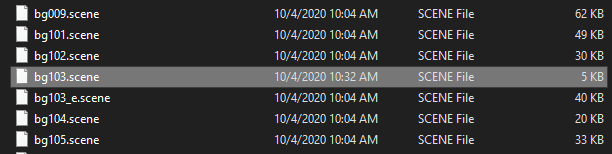
Let's move onto the .scene file. Go up a couple directories to the files folder, then navigate to the scene folder. What we want to do is take the empty/template scene file from the Helper Files zip linked at the top of this document and replace the appropriate scene file that matches our new environment. Because we swapped the background in on bg103_EN.cmpres, let's replace bg103.scene. Take the helper .scene file, name it bg103.scene, then replace the file by the same name in \_working_directory\DATA\files\scene\.
Make sure to replace the same number of both bg and scene!
Now we need to edit that .scene file to properly reference the model (or models) that we imported to the .brres file inside that .cmpres file. If you're using Notepad++, right-click the bg103.scene file and choose Edit With Notepad++.
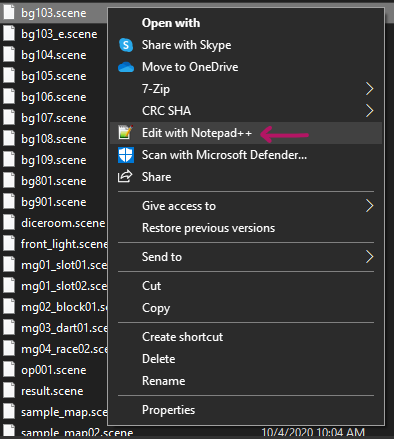
If you prefer another text editor, just open the file in that program.
Inside the .scene file, we only need to update one part. Scroll down to the entry for yourfirstmodel.rmdl:
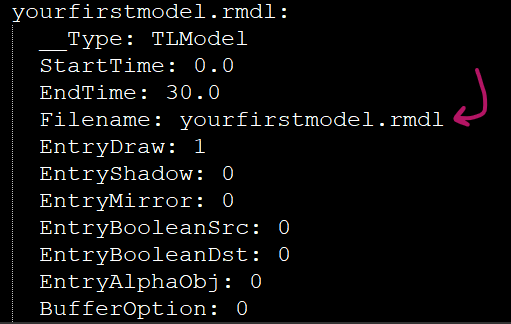
The first mention is a label, so it's the filename entry we're after. Edit both though to keep things clear.
We need to edit the Filename attribute of this entry to match the name of the 3D model(s) in our .brres file. Luckily for us, everything we imported to the .brres file counts as one "model." (You will need to separate out any models that you want to animate, but animation in BrawlCrate is beyond the scope of this guide.)
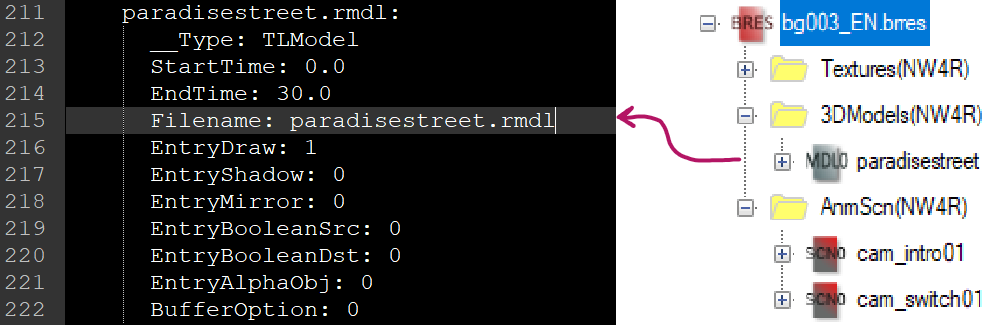
Just name it like you see it in BrawlCrate!
Save the bg103.scene file. From here, we're ready to test it out! Go back up four directories to the csmm0.94 folder and open the Windows folder. Open CustomStreetManager.exe. Click Set Input WBFS/ISO and select an input ISO. This ISO can be anything because it is basically ignored when the _working_directory folder exists. Click Set Output ISO and name it something you will remember, since this will actually be our test ISO. Click Go!. Once the process is complete, click Close and exit CSMM.
Now it is time to test it in Dolphin!!
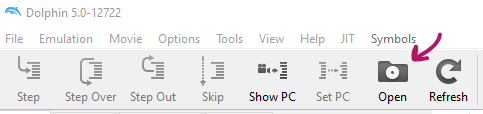
Click Open, find your ISO, load into the Colossus map, and see if it works!
If you see your custom environment, nicely done!
Though it isn’t perfect, you now have the tools you need to go back and fix this up the way you’d like, or you can start anew from here with a new model. For example, if you’d like to move the camera back a bit to focus more on the tennis court, you could move the environment the opposite way we did earlier in Blender, re-export to FBX, use FBX Converter to convert it to .dae, reimport the .dae file to BrawlCrate, fix the Shader settings, add the Alpha Function settings to all materials that need it, save the .brres file, compress back to .cmpres, transfer the file into the bg\langEN folder, compress an ISO from it, and test it.
If you'd like to have your board or environment uploaded to the repo, you'll need to do a little extra work on top of the normal upload process. First you'll need to create a zip with all the files for the environment: the .scene, the .cmpres, the three ui_menu images and a map icon and optionally music you'd like associated with your board. Start by uploading this to Google Drive. Then create a fork of the fortunestreetmodding.github.io repo on Github. In your fork, you must edit _data/background.yml to include the details of your environment at the bottom. Follow the format of the other backgrounds for guidance. Make sure to include the Google Drive link here too. Then you need to navigate to the _backgrounds folder and add a new .webp image of your environment for use on the Backgrounds webpage. Then you just need to create a pull request to the main repo requesting that your background be added to the repo, and our reviewers will look over the submission and let you know if there's any adjustments that need to be made. Once that's done, you can upload your board to the repo, referring to the uploaded background by its name in your yaml file.
If you would like to add custom music to your new environment, continue forward with our guide, Creating Custom Looping Music with Audacity and BrawlCrate!
If you need help with anything, feel free to reach out! The best place to reach out is on Discord: there are several active communities that can help with the various aspects of mod-making.
Custom Street on Discord:
https://discord.gg/DE9Hn7T
Brawl Knowledge Compendium (for help with BrawlCrate):
https://discord.gg/s7c8763
Custom Brawl Modding (for help with all non-Fortune-Street-specific
aspects of the modding process):
https://discord.gg/GbxJhbv
OpenVFX: The Blender Hub (for help with Blender):
https://discord.gg/blender
For the latest Fortune Street modding tools:
https://github.com/FortuneStreetModding
Additional Fortune Street discussion:
https://gamefaqs.gamespot.com/boards/632973-fortune-street