User Guide: Open Live Studio - EyevinnOSC/community GitHub Wiki
Instructions on how to run a live production with Open Live Studio.
Open Live Studio is the browser-based production gallery for Open Live. It replaces the hardware vision mixer, audio console, and multiviewer with a single browser tab, and it is designed so a crew can work from anywhere.
This guide follows the order you will actually work in: first you configure your inputs and outputs, then you create and activate a production, and finally you run the show from the studio.
Looking for how to deploy Open Live? See the Open Live Setup Guide. This guide assumes you already have a running instance.
- Prerequisites
- Opening Open Live Studio
- Getting around
- Step 1 — Add your sources (Optional)
- Step 2 — Add graphics (Optional)
- Step 3 — Add outputs (Optional)
- Storage connections (Optional)
- Intercom connection (Optional)
- Step 4 — Create a production
- Step 5 — Activate the production
- Using the studio
- The multiviewer and PGM monitors
- The controller — cutting the show
- Downstream keyers (DSK)
- Picture-in-Picture
- Looks — per-source effects
- Playing clips
- Guest calling
- The audio mixer
- Controller options
- The program clock
- Pop-out panels and multi-operator working
- Tally for camera operators
- Keyboard shortcuts
- Ending the production
- ISO recording (per-input)
- Recordings
- Troubleshooting
- Stream Deck control
- A running Open Live instance and Open Live Studio instance — see the Open Live Setup Guide
- A Strom media pipeline instance reachable from Open Live
- A modern Chromium-based browser (Chrome or Edge recommended — WebRTC playback and Stream Deck WebHID both depend on it)
- A screen at least 768 pixels wide to operate on. On anything narrower, such as a phone, Studio is read only. It shows tally and production status, the mixer and the buttons that change things are hidden, and the page reads USE A TABLET OR WIDER TO OPERATE
You do not need a camera or an encoder to get started. Open Live ships built-in Pinwheel and Colors test patterns, and HTML sources render a web page as video — any of these will fill a mixer input with no external feed at all. Bring in SRT or WHIP feeds when you have them.
If you are running on Open Source Cloud, log in to https://app.osaas.io/, find your Open Live Studio instance, and click the instance card to open the app. Authentication happens automatically in the background using your OSC session — there is no separate login screen.
Running locally, open http://localhost:5173.
A narrow icon rail runs down the left edge of the window. It has two destinations:
| Icon | Label | What it is for |
|---|---|---|
 |
I/O | Configure sources, graphics, outputs, storage connections, and the Open Intercom connection used for guest talkback, see your gateways, and browse your recordings. Everything here exists independently of any one production |
 |
Productions | Create, configure, activate, and enter productions |
At the bottom of the rail is a globe icon — the connection indicator. Hover it to see the health of the three things the studio depends on:
- Open Live — the backend API
- Strom — the media pipeline
- Database — the CouchDB document store
Green means everything is reachable, orange means a partial outage, red means the backend is down.
The order matters. Sources, graphics, outputs, and storage connections are reusable building blocks. You create them once under I/O, then assign them to as many productions as you like.
The tabs under I/O run in this order: Sources, Gateways, Storage, Intercom, Graphics, Outputs, Recordings. This guide follows the order you work in, so it describes storage, the intercom connection and recordings after outputs.
Go to I/O → Sources. A source is one incoming feed: a camera, a graphics machine, a pre-recorded clip, or a test pattern.
Skip this step if you only want the built-in Pinwheel, Colors, or WHIP inputs — those are assigned directly in the production form and need nothing defined here. Come back when you have real SRT, EFP, HTML, or clip sources to add. Remote guests joining from a browser do not need a source either; see Guest calling.
One catch: while no source exists at all, the Sources part of the New Production dialog reads No sources available. and offers no slots. In that case create the production first, then open Options on its card and assign Pinwheel, Colors, or WHIP Input there.

Click + New Source and fill in the form.
A human-readable name — this is what appears on the multiviewer tile, the source buttons in the controller, and the audio channel strip. Something like Camera 4 — Closeup works well.
| Type | Use it for |
|---|---|
| MPEG-TS/SRT | Standard SRT contribution feeds — hardware encoders, OBS, ffmpeg, cloud encoders |
| EFP/SRT | EFP-wrapped SRT from synchronised camera transmitters. Use this when you need frame-accurate multi-camera sync |
| HTML | A web page rendered as a video source — scoreboards, clocks, browser-based graphics |
| Clip | A pre-recorded video file played out from a URL or object storage — packages, stings, VT inserts. See Playing clips |
Two more types exist but are not created here:
- WHIP — a WebRTC ingest slot. You assign it directly in the production form (see Step 4) and Open Live generates the ingest URL for you when the production goes live.
- Pinwheel and Colors — built-in test patterns. Also assigned directly in the production form. Extremely useful for checking a pipeline before your cameras arrive.
For SRT and EFP sources, Direction decides who connects to whom:
- Listener (default): Strom waits and your encoder connects to it. You do not type an address. When you save, Open Live gives the source a free port from the range reserved for the instance. The source row then reads sender dials followed by the address to give your encoder, and a copy button labelled INGEST ADDRESS copies it. Passphrase is optional, 10 to 79 characters. If the instance has no managed port range, a Port on the Strom server box appears instead: type a UDP port that is open on the Strom server and not in use. While the instance is still waiting for its port range from Strom, wait a minute before you save.
- Caller: Strom connects out to your encoder. Enter its address in Sender's address, for example:
srt://192.168.1.10:9000?mode=caller
A caller address must include a host and a port. If it does not, you will see Enter the sender's host and port, e.g. srt://sender.example.com:9000?mode=caller. If you leave out mode=, Studio adds mode=caller.
For HTML sources, enter an http:// or https:// URL in Address. Inline data: addresses are not accepted, and addresses on private or internal networks are refused. An empty address gives Address is required, and one that is not an http or https URL gives Must be a valid http:// or https:// URL.
An HTML source also has an Interactive (Popup) option in its Edit Source dialog and when you create it. It stores a header credential, for example a bearer token, to send with the page request. Studio notes that the credential is stored but not yet applied when the page is rendered. For a page behind a login, use a signed or expiring link as the address instead.
Clip sources have no address. Instead, a Reference Type toggle chooses where the file comes from:
-
URL — enter the file's
http://orhttps://address in Clip URL, for examplehttps://example.com/clip.mp4. The URL must be reachable from the Open Live server. Addresses on private or internal networks are refused. -
S3: play a file from an S3-compatible bucket. Pick a Storage Connection, check the Bucket, and enter the Object Key, for example
highlights/clip.mp4. Or press Browse next to Object Key and choose the file from a list (see Browsing a bucket). Open Live creates a temporary signed link to the object in that bucket, using the credentials of the connection you picked. The key must not start with/. The bucket name must be 3 to 63 characters: lowercase letters, digits, dots, and hyphens, starting and ending with a letter or digit.
The Storage Connection list starts with Default (instance storage), the storage the server was set up with. After it come your own connections that have the role Clips or Clips and recordings, shown as the connection name with its default bucket in parentheses. You add connections under Storage connections. If the server has no default storage, the default entry cannot be cued, so pick one of your own connections.
Choosing a connection that has a default bucket fills in Bucket for you. You can still change it, so one connection can serve several buckets.

One clip source plays one file. Create a source per clip you want available in the show. A clip slot in the studio can cue any of them, see Choosing the clip.
Never hardcode a port that something else is already using. Each SRT source needs its own port.
Press Browse next to Object Key in an S3 clip reference to pick the file from a list instead of typing its key. The Browse bucket window is read only: you can look and choose, but not upload, rename, or delete anything.

- If the connection has a default bucket, the window lists that bucket straight away. To browse a different bucket, use a connection that has no default bucket.
- If it does not (this is always the case for Default (instance storage)), type the bucket name, starting from whatever is in Bucket, and press List.
- Folders come first. Click one to open it. The path at the top is clickable, so you can step back up.
- Files show their name, size, and last-modified time. Click a file to choose it. The window closes and fills in Bucket and Object Key.
- When a folder has more than 200 entries, a Load more button appears below the list. An empty folder reads No objects here.
If listing fails, the reason appears in red with a Retry button: the storage key lacks list permission, the bucket was not found, or the object store is unreachable.
A file in the list is not a promise that it will play. The list comes from Open Live, but the clip is fetched by Strom, and it has to be a video file Strom can open. If a clip will not cue, see A clip shows Error.
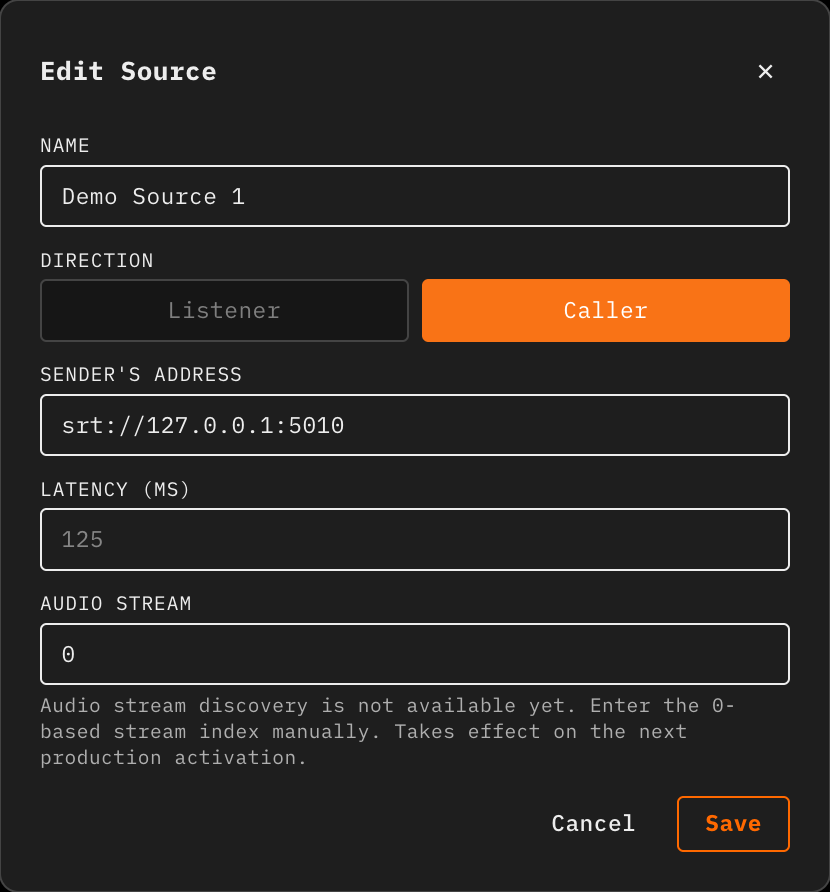
SRT and EFP sources only. The SRT receive buffer, in milliseconds. Valid range is 20 – 8000; leave it blank to use the default of 125 ms.
Higher latency survives worse networks; lower latency gets you closer to the glass. For a 5G camera on a public network, 200–500 ms is realistic. For a wired feed on the same LAN, 60–125 ms is plenty.
Click Save.
The New Source and Edit Source dialogs of an MPEG-TS/SRT source also have Audio stream, for a feed that carries more than one audio track. In New Source you type the stream number, counted from 0, and a note says the list of streams is available in Edit Source once the source is live. In Edit Source, when the source is live and Open Live can read its streams, a list offers each one as Stream with its number, codec, channel count, and language. Otherwise you type the stream number yourself, counted from 0, and a note under the box says why the list is not available. The default is stream 0, and a new choice takes effect the next time the production is activated.
Only an MPEG-TS/SRT source can use a stream other than the first. An EFP/SRT source shows an Audio stream label with a read-only note, EFP sources always use the first audio stream. If a stream above 0 was saved on an EFP source before, the dialog says it is ignored and that saving clears it, and the input's warning mark reads Audio stream selection is only supported for MPEG-TS/SRT sources. On a Strom that cannot pick a stream, Open Live falls back to the first stream and the input's button on the PGM and PVW rows shows an amber warning mark. Hover it to read why.
The list shows every source with a status dot, its type badge, and its address. For a listener source the address line reads sender dials followed by the address for your encoder. The dot turns red when the source is assigned to a production that is live.
Click any row to edit it, or use the Delete button to remove it. Both are blocked while the source is in an active production, so hover the button and you will see Cannot edit source in an active production. Deactivate the production first. Clip sources are the exception for Edit: you can change one while its production is live, unless the clip is playing or paused, and the change applies the next time you cue it. Delete stays blocked.
A source with a chip that reads via and a gateway name was registered by a venue gateway and is managed there. Studio locks Edit and Delete for it. Hover Edit to read Managed by its gateway; edit it on the gateway box. The row also shows the live uplink: bitrate, round-trip time, and dropped packets. If the gateway has stopped reporting, the dot turns yellow and the row reads offline gateway.
On a phone-sized screen the list is read only.
The list refreshes itself every 15 seconds; the header shows how long ago.
The Gateways tab lists the venue gateway boxes that have registered with Open Live. It is read only and refreshes every 5 seconds. Each card shows the gateway's name, Online, Offline, or Never seen, when it was last seen, its host, the Strom version it runs, and its device and streaming counts. A table lists its inputs with the columns INPUT, FLOW, STATE, UPLINK, OPEN LIVE, and PRODUCTION. An input that nothing is pulling shows no receiver under UPLINK. With no gateway registered, the tab reads No gateways registered. Register a venue gateway box on Open Live to see it here.
Skip this unless you need overlay graphics — the DSK slots can be left empty.
Go to I/O → Graphics. A graphic is an overlay that gets keyed over your programme output by a downstream keyer (DSK) — lower thirds, bugs, score bars, sponsor idents.

Click + New Graphic:
-
Name — e.g.
Lower Third -
URL: an
http://orhttps://address, or adata:image/png,data:image/jpeg,data:image/gif, ordata:image/webpURI for an inline image. Inline HTML (data:text/html) and SVG are refused, so an HTML graphic must be hosted at anhttps://address, and addresses on private or internal networks are refused when you save. A value that is neither an address nor an image data URI gives Must be a valid http/https URL or data URI
Graphics with transparency work as you would expect — an HTML page with a transparent background, or a PNG with an alpha channel, keys cleanly over programme.
Each production has two DSK slots, so you can have two graphics armed at once.
Skip this if you only need to watch programme in the browser — the WHEP endpoint the studio uses is created automatically. You need an output only to send programme somewhere outside Open Live.
Go to I/O → Outputs. An output is where your finished programme goes.

Click + New Output:
-
Name, for example
Program SRT - Type: MPEG-TS/SRT, EFP/SRT, RTMP, or Recording. RTMP and Recording are described below, under RTMP outputs and Recording outputs
- Direction (SRT types): Listener, the default, or Caller
With Listener, Strom waits for something to connect and pull the stream. You do not type an address. When you save, Open Live gives the output a free port from the range reserved for the instance. The output row then reads viewers dial followed by the address to give your CDN or decoder, and a copy button labelled VIEWER ADDRESS copies it. Passphrase is optional, 10 to 79 characters, and the row adds with the passphrase when one is set. If the instance has no managed port range, a Port on the Strom server box appears instead: type a UDP port that is open on the Strom server and not in use.
With Caller, Strom pushes to an address you specify. Enter it in Destination address, for example srt://cdn.example.com:9000?mode=caller. If it does not name a host and a port, you will see Enter the destination's host and port, e.g. srt://cdn.example.com:9000?mode=caller.
Use listener when your CDN or decoder will pull; use caller when you are pushing to a fixed ingest point.
A caller address can only be used by one output. Reuse one and you will get Address already used by "…". A listener port can only be held by one source or output. If you name a port that another one holds, Open Live refuses it with a message that starts SRT listener port and names the holder.
WHEP output is automatic. You do not need to create an output to watch programme in a browser. Every active production exposes a WHEP endpoint for the multiviewer and the PGM monitor. Outputs are for feeding the world outside Open Live.
Outputs, like sources, cannot be edited or deleted while they are part of an active production.

An RTMP output sends your programme to a streaming platform. Click + New Output, set Type to RTMP, and fill in:
- Name
- Platform: YouTube, Twitch, Facebook, or Custom RTMP
-
Ingest URL: only for Custom RTMP. Enter the platform's RTMP or RTMPS address without the stream key, for example
rtmps://example.com/live. For the three named platforms Open Live fills in the address itself from a fixed list, and Edit Output shows it read only - Stream key: the key from the platform. It is masked while you type, and Show reveals what you typed. It can be at most 512 characters and must not contain spaces or line breaks. Open Live stores it encrypted and never shows it again
Save stays disabled until there is a stream key, and for Custom RTMP also an ingest URL. In Edit Output the label tells you whether a key is stored. Leave the box empty to keep it, type a new key to replace it, or tick the box that clears the stored key.
The output row shows the platform, the address, and key set or no key, plus a health badge: HEALTHY, DOWN, or UNKNOWN. The badge follows the production's flow, not the platform. It reads HEALTHY while the production is active and its flow is running, and it does not tell you whether the platform accepted the stream. As with other outputs, you cannot change the platform or the key while the production is live.
A Recording output saves your programme to your own storage, so you can play it back or download it after the show. It needs a storage connection, or the default storage of the server. See Storage connections.
Click + New Output, set Type to Recording, and fill in:
-
Name, for example
Program recording - Storage: where the recording is uploaded
The Storage list offers the default storage of the server, if it has one, and your connections that have the role Recordings or Clips and recordings and a default bucket. A connection without a default bucket is listed greyed out with (no default bucket), because recordings are uploaded into the default bucket.

A Recording output has no SRT address. In the outputs list it shows the storage it uses, for example Storage: Customer clips, or Storage: Default.
If there is nothing to choose, the dialog says No storage available and offers Add one in the Storage tab. Save stays disabled until you have added a connection.
What is recorded. The programme picture and the main audio mix, with the sound encoded as AAC, saved as MP4 files. Individual inputs are not recorded unless you switch on Record this input for them. See ISO recording. By default a recording is cut into parts of about 10 minutes, and each part is its own file. Whoever runs the server can change the length, or turn parts off so that each show is one file.
The Strom instance must be recent enough to record sound. A Strom without the audio encoder block, which means one older than 0.6.9, records picture only. The production card then shows an amber warning icon after activation. Hover it to read why.
Recording starts when you activate a production that has a Recording output and stops when you deactivate it. With parts on, each part is uploaded to your storage shortly after the next one starts, while the show is still running. See Recordings for what happens next.
Skip this if you only play clips from public URLs and do not record your shows. Come back when you want to play clips from your own S3 bucket, or save recordings to it.
A storage connection tells Open Live how to reach a bucket on S3-compatible object storage: Amazon S3, MinIO, or any other store that speaks the S3 API. You create it once under I/O → Storage, and then pick it by name when you set up an S3 clip source or a Recording output.

If the server was set up with its own object storage, the list also shows Default (instance storage), tagged INSTANCE DEFAULT · READ-ONLY. You can test it but not edit or delete it. S3 clips that do not name a connection keep using it, so clips you created earlier keep working.
Each row shows the connection name, a role tag (Clips, Recordings, or Clips and recordings), the endpoint, the default bucket, and Secret key set once a secret key has been saved. The default entry has no default bucket of its own, so its row reads bucket (none). That is normal: the server's own bucket is used when you test it or record to it.
Click + New Connection and fill in the form.
| Field | What to enter |
|---|---|
| Name | Required. How the connection appears in lists, for example Customer clips
|
| Endpoint | Required. The address of the store, for example https://s3.eu-north-1.amazonaws.com
|
| Region | Optional, up to 64 characters. Left empty, Open Live uses us-east-1
|
| Use SSL (https) | Ticked by default. Untick it only for a store that is served over plain http |
| Access Key | Required |
| Secret Key | Required when you add a connection. It is write-only: Studio never shows it again, only Secret key set |
| Default Bucket | Optional for clips, required for recordings. Fills in the bucket on S3 clip sources, is the bucket that Browse lists and that Test checks unless you change it in the Test window, and is where recordings are uploaded |
| Role | Clips, Recordings, or Clips and recordings (the default). Decides which pickers list the connection |
The role is how you keep keys narrow. A key for clips needs to read objects, and to list them if you want Browse to work. A key for recordings needs to write objects, and to delete them if you want to delete recordings from Studio. Make one connection per purpose if you want to hand out only the access each one needs.
Click Save. If something is wrong, the reason appears in red inside the dialog and nothing is saved.
Private addresses are refused by default. As a safety measure, Open Live rejects an endpoint that points at a private, loopback, or link-local address. If you run your own MinIO on such an address, the dialog tells you that Studio cannot change this. The person who runs the Open Live server has to add the host to the server setting
TRUSTED_STORAGE_HOSTSfirst.
Open Live and Strom both need to reach the store. Test and Browse run from the Open Live server. A clip is played by Strom from a signed link, so Strom must be able to reach the endpoint as well.
Click Test on a row. The Test window has a Bucket field, filled in with the connection's default bucket. Change it to test another bucket, then click Test connection. For Default (instance storage) the field starts empty. Leave it empty to test the server's own configured bucket, or type a bucket name to test that one.

The result is a coloured box with a one-line message and three checks:
| Check | What it can say |
|---|---|
| Reachable | yes or no: Open Live could or could not connect to the endpoint |
| Credentials | ok, valid, no list permission, or failed |
| Bucket | found, not found, or not checked |
The box is green when all three are good. It is amber when the credentials are valid but the key cannot list the bucket: the box then warns that browsing objects from Studio will not work. Anything else is red. The box ends with Checked from open-live, which tells you the check ran from the Open Live server.
If the endpoint cannot be reached, Credentials also reads failed. Read Reachable first.
If one of your own connections has no default bucket and the Bucket field is empty, the test asks you for a bucket.
Click Edit to change a connection. Leave Secret Key empty to keep the stored key, or type a new one to replace it. A default bucket cannot be removed once it is set, but you can change it to another bucket.
Click Delete and confirm to remove a connection. This cannot be undone.
A connection that is in use cannot be deleted. The window then says how many things still use it: Storage connection is referenced by N source(s), N output(s), N recording(s) and cannot be deleted. Clip sources that point at it, Recording outputs that use it, and recordings that were uploaded through it all count. To free such a connection, delete its recordings in the Recordings tab and move or remove the clip sources and Recording outputs that use it. Or keep it, and create a new connection for your clip sources and Recording outputs instead.
Skip this if you do not need to talk to your guests. Come back when you want to talk to a guest privately while they wait or while the show is running (see Talking to a guest).
Guest talkback runs over an Open Intercom instance. This tab tells Open Live which one to use. You enter it once under I/O → Intercom, and it applies to every production on the instance, without a restart.
You need an Open Intercom instance first. On Open Source Cloud, create one from the Open Intercom service and copy its manager address, which looks like https://<tenant>.eyevinn-intercom-manager.auto.prod.osaas.io. See the Cloud Intercom User Guide and the Intercom service page.
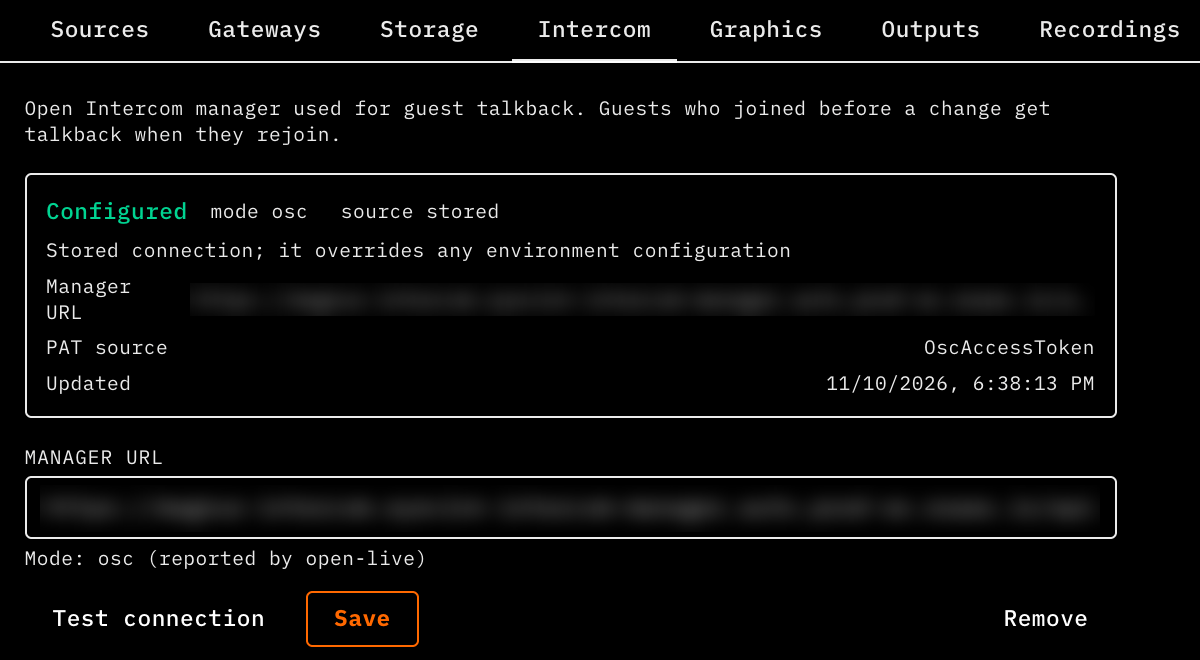
The top of the tab says which connection is in effect:
- Not configured (grey): talkback is off.
- Configured (green): talkback can use the connection.
- Not usable (amber): a connection is set but cannot be used. A line below it gives the reason.
Two small tags show the mode and the source. The source is stored (set on this tab, and it wins over anything else), env (the server administrator set it as an environment variable on the server) or none. Below the tags the box repeats the manager address and when it was last updated.
- Open I/O → Intercom.
- Type or paste the address of your Open Intercom manager in Manager URL. You can include
/api/v1at the end or leave it off. - Click Test connection. The result appears below the buttons (see the table).
- Click Save.
Open Live picks the mode from the address. An address on osaas.io is osc mode: the address is all you enter, and Open Live uses its own access token to talk to your Open Intercom. Any other address is direct mode, for an Open Intercom you run yourself. In direct mode, two more fields appear once Studio knows the mode: Manager API key, and under Advanced an optional WHIP key. Press Test connection first if they are not showing. The keys are write only. After you save, the tab shows set or not set and never shows the key again. To replace a key, type the new one. To keep it, leave the box empty; a saved key is kept only while the address stays on the same host. To remove a stored WHIP key, tick Remove the stored WHIP key on save and save.
Test connection checks what you have typed without saving it. If you have not typed anything, it tests the connection already in effect. Below the buttons you get one of these results, with a short message from Open Live:
| Result | Meaning |
|---|---|
| OK | The manager answered as an Open Intercom manager and accepted the credentials |
| Unreachable | Nothing answered at that address, or it took too long |
| Authentication failed | The manager refused the key (direct mode) or the access token (osc mode) |
| SAT exchange failed | osc mode only: Open Source Cloud refused the access token Open Live uses, or could not be reached |
| Missing credential | A key (direct) or the instance's access token (osc) is missing. Nothing was sent |
| Unexpected response | The address answered, but not as an Open Intercom manager. Check the address |
| Not configured | You tested with an empty form and no connection is set |
The result also lists the mode, the address that was tested, and whether you tested unsaved values or the stored connection. A WHIP key cannot be checked without a live line, so a result may say WHIP key could not be verified. That is normal.
If Save or Test connection says Studio cannot change this and mentions TRUSTED_INTERCOM_HOSTS, the address points at a private or local network address that the server does not allow. Only the person who runs the server can allow it.
Click Remove (it only shows for a stored connection) and confirm in Remove Intercom Connection. If the server administrator had also set the connection as an environment variable, that one applies again. Otherwise guest talkback is off.
- Guests who are already in the show keep what they had. A guest gets a talkback line when they join, so a guest who joined before you saved the connection gets talkback only when they join again. The tab says guests get talkback "when they rejoin". The Rejoin button on the guest page only appears after a dropped connection, so the dependable way is to have the guest reload their invite link and press Go live again.
- If you point Open Live at a different Open Intercom, guests who joined on the old one need to join again in the same way.
- A guest can still join if Open Intercom is unreachable. They just have no talkback.
Go to Productions and click + New Production. The dialog has two columns: Setup on the left, Configuration on the right.

-
Name — e.g.
Evening News — May 1 - Air Time (optional) — a scheduled start. Set this and the studio gives you a countdown before the show and an elapsed-time clock once you are on air, plus an On Air badge on the production card.
This is where you map your sources onto the vision mixer's inputs. Each row is one mixer input, in order — the first row is input 1, which is what keyboard key 1 will select later.
Use the dropdowns to assign a source to each slot. Sources are grouped by type, and the list also offers WHIP Input, under WebRTC, and Pinwheel and Colors, under Virtual Sources. Leave a slot as — unassigned — to skip it.
- Click + New Input to add a slot
- Click the ✕ next to a slot to remove it
- Minimum 2 inputs, maximum 16, shared with any guest slots (see below)
Clip sources are listed under CLIP in the dropdown. Assign one to an input to make it a clip slot in the Clips panel.
Inputs from an MPEG-TS/SRT, EFP/SRT, or WHIP source also get a Record this input checkbox, so you can save that feed on its own. See ISO recording.
Tip for a first run: assign Pinwheel and Colors to inputs 1 and 2 and activate. You will have a working programme output in seconds and can confirm your whole chain before touching a camera.
Two fixed slots, DSK 1 and DSK 2. Pick a graphic for each, or leave them — none —.
A guest slot is a mixer input reserved for a remote guest. Set Guest Slots to None or 1–4. Each slot takes one of the 16 mixer inputs, so if you are already using most of them you will see Reduce Source inputs to add more guest slots.
Guest slots are placed at the top of the input range, after your sources. Each slot has a source choice:
| Choice | The guest sends | The guest receives |
|---|---|---|
| WHIP (guest camera) (default) | Camera and mic from their browser | A return feed of programme |
| An MPEG-TS/SRT or EFP/SRT source (return only) | Nothing from the browser. Picture and sound come from that encoder, for example a phone on a cellular bonding app | A return feed of programme |
Use return only when the guest's picture comes from a better camera than their laptop, but they still need to hear the show. On the Guests panel such a slot carries a RETURN ONLY tag, which changes to LISTENING once the guest has joined, and a FEED: line with the name of the encoder source.
Guest slots cannot be changed while the production is active. Inviting guests happens later, in the studio; see Guest calling.
Click + New Output to add an output slot, up to 8, and assign an output to each. The list groups your outputs by type: MPEG-TS/SRT, EFP/SRT, RTMP, and Recording.
A Recording output shows a small red tag in its slot. A production records to one place only, so you can assign one Recording output per production. Other Recording outputs are greyed out in the list as (one Recording per production). Recording runs while the production is active, so adding or removing a Recording output takes effect the next time you activate the production.
The right column controls how the pipeline is built. These are the settings you most often want to get right before the first activation, because they cannot be changed while the production is live.
| Setting | Default | Notes |
|---|---|---|
| Mix Latency | 100 ms | Audio pipeline latency. Higher is more stable, lower is more responsive. Range 0–2000 ms |
| Flow Clock | Default (monotonic) | Choose TAI to synchronise EFP cameras by absolute timestamp |
| PGM Resolution | 1280×720 | Up to 4K (3840×2160) |
| PGM Frame Rate | 25 fps | 10 – 60 fps, including 23.976 / 29.97 / 59.94 |
| PGM Encoder Bitrate | 4000 kbps | Range 100 – 100000 |
| Multiview Resolution | 1280×720 | Independent of PGM |
| Multiview Frame Rate | 25 fps | |
| Multiview Encoder Bitrate | 4000 kbps | |
| Swap PVW/PGM positions | off | Flips the multiviewer and PGM monitors left-to-right in the studio |
| AUX Buses | 2 | None, 1, 2, 4, 6, or 8 |
| Group Buses | 2 | None, 1, 2, 4, 6, or 8 |
| EBU R128 Meter on Main | off | Adds loudness metering to the main bus. Turn this on for anything going to broadcast |
| PiP Slots | 0 (None) | Up to 4. The PiP editor only appears in the studio if this is above 0 |
When AUX Buses is above 0, each bus also gets a Pre-fader / Post-fader choice. Post-fader (the default) means the send follows the channel fader — right for effects and recording feeds. Pre-fader means the send is independent of the fader — right for commentator and IFB mixes, where the talent needs to keep hearing a source even after you pull it out of programme.
Every setting has an i tooltip explaining it.
When you open Options on an existing production, name, air time, sources, graphics, guest slots, and outputs are saved as you change them. Configuration changes are saved when you click Done. If you close the window another way, with ✕, Esc, or a click outside it, they are dropped. While the production is active, Options only shows what is assigned, and its footer reads This production is live. Only “Record this input” can be changed, and it applies from the next activation. Deactivate the production to change anything else. See ISO recording for Record this input.
Tick Save, give it a name like HD Standard, and the whole right-hand column is stored as a reusable config. Next time, pick it from the — load saved config — dropdown instead of setting thirteen fields by hand.
Manage your presets under Productions → Configs, where you can create, rename, edit, and delete them.

Click Create when you are done.

On the production card, click Activate. The button changes to Activating... while Open Live clones the flow template, patches in each source address, and starts the flow in Strom. This normally takes a few seconds.
Once active, the card shows:
- A solid red status dot
- A count of connected operators
- Copy buttons for every endpoint the production exposes — click one to copy the URL to your clipboard:
| Pill | What it gives you |
|---|---|
| WHIP IN: INPUT N | The WebRTC ingest URL for a WHIP source. Paste it into OBS or a browser WHIP client |
| WHEP OUT: PGM | A WHEP playback URL for the programme feed |
| SRT OUT: and the output's name | For a listener output, the address your decoder dials. For a caller output, the destination address you entered |
An RTMP or Recording output has no pill. Open Live v0.7.0 and later do not provide an address for an SRT OUT: PROGRAM pill, so you will not see one. To send the programme out over SRT, add an SRT output.
The SRT addresses are resolved for you. Strom listens on an address with an empty host (
srt://:PORT), which a caller cannot use. Studio fills in the real Strom hostname, so what you copy is what you can connect to. The copied address never includes a passphrase. Give that to the other side separately.
If activation fails, the error appears on the card in red. The most common causes are an unreachable source address and Strom being down — check the globe indicator in the nav rail.
Now click Studio.
The studio is a single screen made of panels. Along the top, next to the production name, is a row of icons — one per panel. Click an icon to show or hide that panel; active panels are orange.

They appear in this order, left to right, exactly as in the screenshot above. PiP Editor only appears when the production has PiP slots:
| Icon | Panel | What it is for |
|---|---|---|
 |
Multiviewer | Every source in a grid, with programme and preview large — your confidence monitor |
 |
PGM | The live programme output, exactly what is going to air |
 |
Controller | The vision mixer — source buses, TAKE, AUTO, FTB, transitions, and DSK |
 |
PiP Editor (only if PiP Slots > 0) | Build picture-in-picture layouts — zones, source assignment, crop and zoom |
| (film strip with a play triangle) | Clips | Cue, play, pause, stop, and scrub clips, and add a new clip. See Playing clips |
| (two people) | Guests | Invite remote guests, watch their status, and set what they hear |
 |
Audio | The audio console — faders, groups, AUX sends, monitoring, and metering |
 |
Looks | Per-source GPU shader effects, plus a master effect over programme |
Your panel layout is remembered in the browser, so the studio comes back the way you left it. By default, Multiviewer, PGM, Controller, and Audio are on.
Every panel header carries an i tooltip explaining the panel and an ✕ to hide it. Most also have a pop-out icon to open the panel in its own window. The Looks, Clips, and Guests panels do not. Some panels add a gear for their options.
The Controller header also has a ? button that opens a read-only list of the keyboard shortcuts, and a keyboard icon to change them. See Keyboard shortcuts.
The far right of the top bar has the clocks and the LIVE pill. The pill is red from the production's air time for up to 20 hours, and then grey again. If the production has no air time, it stays grey.


A grid of every source, with programme and preview shown large. Tiles are outlined red for PGM and green for PVW, and labelled accordingly. A tile that has no decoded video shows NO SIGNAL.
Controls in the header:
- Audio track selector — pick which mix you are monitoring: PGM, MON (your monitor/headphone bus), or AUX1, AUX2, … Only appears when the production carries more than one audio track
- Speaker icon — mute or unmute your monitoring
- Fullscreen icon — expand to the whole screen

Your programme output, exactly as it is going to air, delivered over WHEP with sub-500 ms glass-to-glass latency. Same audio track selector, mute, and fullscreen controls.
A pill in the bottom-right corner tells you the state of the connection:
| Pill | Meaning |
|---|---|
| LIVE | Connected and decoding frames |
| CONNECTING | Negotiating, or connected but no frames yet |
| RETRYING IN n | Lost the stream; reconnecting with a countdown |
| SIGNAL LOST | Five retries failed. A background watchdog keeps trying every 30 seconds |
NO SIGNAL stays up until real decoded frames arrive — not merely until the connection is established — so it is a trustworthy indicator that video is actually flowing.
The controller is the vision mixer. It is laid out in rows.

Red-tinted. Shows what is on air. The currently live source is lit red.
Green-tinted. Shows what is queued. Click a source to load it into preview; it lights green.
If the production has PiP slots configured, PiP 1, PiP 2, … appear as buttons on these rows alongside the source buttons.
Source buttons show the source name in capitals. When no source is assigned, each row reads NO SOURCES. A button can carry small marks:
- A muted-microphone icon, top right, when a guest has muted themselves.
- A Guest dropped warning, top left, when the guest on a live input has left or been removed. It is only a warning. Studio does not cut away for you.
- A red strip along the bottom, when Strom reports that a guest's input has stopped, naming the problem, for example no audio.
- A red dot and REC, or an amber triangle, for ISO recording. An amber mark also shows when a chosen audio stream was not applied. Hover the button to read why.
- On a PiP button, an amber warning when the PiP has no background and its zones do not cover the frame. Taking it shows black behind the boxes.
| Button | Action |
|---|---|
| TAKE | A hard cut. Preview becomes programme instantly. This is the big red button |
| AUTO | An animated transition using the selected transition type and duration |
| FTB | Fade to black. Toggles — press again to come back. Lights up while active |
After a TAKE or AUTO, what was on programme moves to preview, so you can cut back immediately.
To the right of AUTO is a grid of transition chips. There are 40 transition types in five families:
| Family | Types |
|---|---|
| Mix |
FADE, DIP (dip to black) |
| Slide |
← SLIDE, → SLIDE, ↑ SLIDE, ↓ SLIDE
|
| Push |
← PUSH, → PUSH, ↑ PUSH, ↓ PUSH
|
| Wipe (GPU) |
← WIPE, → WIPE, ↑ WIPE, ↓ WIPE, IRIS IN, IRIS OUT, CLOCK, BLINDS, CHECKER, NOISE, LUMA, BARN, STAR, PINWHEEL, CROSS HATCH, HEX, WARP, MELT, HEART
|
| FX Takes (GPU) |
GLITCH, FLASH, ← WHIP, → WHIP, PUNCH, PIXELATE, ZOOM, SPIN, ROLL, NEGATIVE, RIPPLE
|
The Wipe and FX Takes families need a GPU-backed Strom node.
Rather than showing all forty at once, the controller shows a chosen subset, up to 16 chips. Until you choose, it shows FADE, ← SLIDE, and → SLIDE. Pick which ones under Controller options. The choice is kept in this browser.
Presets for 0.5S, 1S, and 2S, plus a custom field. Click a preset to select it. Click the custom field to select it, and click it again to type an exact duration between 100 and 10000 ms. A value outside that range is ignored. The custom field starts at 1500 ms.
A slider from 0.00 to 1.00 setting the opacity of the multiviewer's overlay layer — the coloured PGM and PVW frames around the tiles, the source name labels, the clock, and the audio meters. Pull it down to strip the multiviewer back to clean pictures; leave it at 1.00 for full chrome.
OVL only affects the multiviewer. It does not touch the programme output, and it has nothing to do with DSK graphics — those are controlled by the DSK buttons below.
Below the transition controls is the DSK row, with one button per assigned graphic. Each button shows its slot (DSK 1, DSK 2) and the graphic's name underneath.
Click to key the graphic over programme; the button turns orange. Click again to remove it. K on the keyboard toggles DSK 1.
DSK sits downstream of the vision mixer, so a keyed graphic stays on screen across cuts and transitions until you take it off.

The PiP Editor appears when the production has PiP Slots above 0 and is active. A PiP is a composite layout — two-box, quad-box, over-the-shoulder — that you can cut to like any other source.

- Pick the slot to work on: PiP 1, PiP 2, …
- Click Edit to enter edit mode.
- Choose a Background — a full-frame source behind the boxes, or None.
- Add Zones with + Add. A zone is a rectangle on the 16:9 canvas that one or more sources will occupy. Drag a zone to move it, drag its handles to resize. Zones are colour-coded and labelled
Z1,Z2, … - With a zone selected, click source chips to assign sources to it. A chip in the active zone is orange; a chip already used in another zone is greyed and italic.
- Fine-tune position with the X / Y / W / H fields, in programme pixels. Leave SNAP ticked to snap to the grid.
- Give a zone a border colour and width (0–64 px) if you want a visible frame around the boxes.
- Use the Crop / Zoom dropdown to pick a source and reframe it inside its zone — drag the crop box, use the zoom slider, or type exact values. Lock maintains the source's native aspect ratio while you drag.
- Click Done when finished.
Changes apply live after a short pause — there is no Apply button.
Optionally set a capacity on a zone to cap how many sources it will hold; leave it as ∞ for no limit.
Select the PiP on the PVW row and TAKE it like any other source, or press Shift + to hot-cut straight to it. PiPs are numbered after your real sources — with four cameras, PiP 1 is 5.
If a PiP has no Background and its zones do not cover the frame, the editor shows a warning that starts NO BG, the PiP buttons on the controller carry an amber mark, and Studio shows a message when you take it. Programme then shows black behind the boxes.
PiP layouts live only while the production is active. Strom resets its PiP configuration when the flow is torn down, so zones are not preserved across a deactivation. Rebuild them, or script them from Companion, at the start of each session.

The Looks panel applies GPU shader effects to individual sources, or to the whole programme via the MASTER card.
Pick an effect from a source's dropdown, then expand the card to adjust its parameters:
| Effect | Parameters |
|---|---|
| Color Correct | Brightness, Contrast, Saturation, Hue, Gamma, Temperature, Tint |
| Chroma Key | Key colour, Similarity, Smoothness, Spill |
| Vignette | Amount, Softness |
| Duotone | Shadow colour, Highlight colour, Mix |
| Blur | Radius |
| Pixelate | Block size |
| VHS | Intensity |
| Old Film | Intensity |
| Edge Glow | Glow colour, Intensity |
| CRT | Intensity |
| Halftone | Dot size |
| Thermal | Intensity |
| Night Vision | Intensity |
| Posterize | Levels |
| Underwater | Intensity |
Set an effect to None to remove it.
Color Correct is the one you will use on a real show — matching cameras that do not quite agree on white balance. Chroma Key lets you pull a green screen live.
If Strom is not running on a GPU node you will see Shader effects require GPU backend — applies on supported nodes only. The editor stays visible but the effects will not render.

A clip is a pre-recorded video file on one of your mixer inputs: a package, a sting, a VT insert. Create it under I/O → Sources with Stream Type Clip (see Step 1) and assign it to an input in the production form. That input is a clip slot. Turn the Clips panel on with its icon in the top bar; it is off by default.
The icon is always there. Without a clip slot the panel reads NO CLIP SLOTS and tells you to assign a clip source to a slot in Setup before you activate the production.
The panel has one row per clip slot, showing the name of the clip, its current state, a clip list, the transport buttons, a scrub bar, and the position as m:ss / m:ss.
Each row has a list with every clip source you have created, not only the one assigned to the slot. Pick a clip, then press CUE. The list reads Select clip... until something is chosen, and CUE stays greyed out until you pick one. While the slot is playing, the list and CUE are locked, so stop or pause it first. One slot can therefore play a different clip each time.
To add a clip without leaving the studio, press + NEW CLIP at the top of the panel. The New clip window asks for a Name and a Reference Type of URL or S3, with the same fields as in Step 1. After Save it reads Clip added and offers Cue into slot, with a Slot list, or Not now. The new clip joins the list in every row.
| Button | What it does |
|---|---|
| CUE | Preloads the selected clip so it is ready to roll. Cueing does not put anything on air |
| PLAY | Starts playback. Available when the clip is CUED or PAUSED. After STOPPED or COMPLETED, cue the clip again first |
| PAUSE | Holds the clip where it is. Available while it plays |
| STOP | Stops playback and clears the cue |
Drag the scrub bar and release to jump to a position. The state and the playhead come from the server, so every operator sees the same thing.
The state label reads IDLE, CUED, PLAYING, PAUSED, STOPPED, COMPLETED, or ERROR. On ERROR, the reason is shown under the row (see Troubleshooting).
The clip is an ordinary input on the vision mixer, so you put it on air the same way as a camera. A typical roll-in:
- CUE the clip in the Clips panel while you are still on the presenter.
- Select the clip's input on the PVW row.
- On the presenter's cue, press PLAY and TAKE (or AUTO).
- When the clip ends it reads COMPLETED. Cut back to the studio.
Taking a clip does not start it. Playback only runs when you press PLAY, so you can choose to roll it a beat before or after the cut. Clips play once; there is no loop.
The clip's sound arrives in the Audio panel as its own channel strip, named after the source. Turn on AFV on that strip if you want the clip's audio to open and close with the picture.
A cued clip, and its position, is remembered with the production. If you deactivate and reactivate, or the server restarts, the clip comes back as CUED at the same position the next time an operator opens the studio. It never starts playing on its own. STOP, or the clip reaching its end, clears the cue.

Guest calling lets a remote contributor join your show from a web browser, with no app to install. You send them a link; they open it, allow their camera and mic, and press Go live. Their picture and sound land on a mixer input, and they hear the programme back so they can follow the show. If you have set up an Intercom connection, you can also talk to the guest privately, off air, and they can talk back (see Talking to a guest).
Before you start, give the production one or more Guest Slots (see Step 4). Then open the Guests panel with its icon in the top bar; it is off by default.
The panel shows one card per slot. A free slot reads Free and has an Invite button.
- Click Invite.
- Optionally type a name in Guest label (optional). This is what the guest will be called on the multiviewer, on the mixer buttons, and in the panel, so use something your crew will recognise, such as
Anna, Gothenburg. - Choose how long the link stays valid: 1 hour, 4 hours, 1 day (default), or 1 week.
- Click Create.
- Click Copy link and send it to the guest by email, chat, or text message.
While the invite is waiting, the card shows the label and when the link expires. Click ✕ to revoke it. A slot holds one invite at a time; creating a new invite for the slot cancels the old link.
Treat the link like a key. Anyone who has it can join the slot until it expires or you revoke it. The production must be active for the guest to join.
The link opens a page titled Join the broadcast. The guest:
- Allows camera and microphone access when the browser asks.
- Checks themselves in the self-preview (muted, so they do not hear themselves) and can pick a different Camera or Microphone.
- Presses Go live.
Once live, the page shows You are live. The studio can see and hear you. and plays a return feed from the studio. Under What you hear the guest can choose between Program without you (recommended) and Full program, in which they hear their own voice about half a second late. They also have Mute mic and Leave.
If the guest's connection drops, the page tells them and offers Rejoin. If their camera or mic stops working, for example because they unplugged a headset, the page alerts them and offers to reconnect the device.
The guest page needs a recent Chrome, Safari, or Firefox.
Talkback with the producer. When talkback is set up, a box titled Talkback with the producer appears once the guest is live. It is a private line to you. By design, talkback is a separate connection to the intercom and is not mixed into the programme or the return feed.
- When you talk to the guest, they hear you through the speakers or headphones they already use for the return feed. They do nothing. The page suggests Use headphones for the best sound, because your voice would otherwise be picked up again by their microphone.
- To talk back, the guest presses Talk to producer. The button lights up and the page says Producer can hear you. Pressing it again stops it. It starts off every time they join or rejoin, so you never hear a guest who has not chosen to talk.
- Talk to producer is separate from Mute mic. Muting the programme mic does not stop talkback, and talkback does not unmute the programme mic.
- On a return only slot the guest can listen but has no button to talk back.
- If talkback cannot connect, the box says Talkback to the producer is unavailable. The page tries once more after a few seconds. Their picture, their sound and the return feed carry on as normal either way.
For a return only slot, the page does not ask for a camera or mic. The guest presses Join to hear the studio, while their picture comes from the encoder you assigned to the slot.
Once the return feed is playing on a slot with a camera, the guest also gets a Show my camera as picture-in-picture checkbox. It puts their own preview in a corner of the return video, and tapping it moves it to another corner.
As soon as a guest joins, their card shows their name and a status:
| Status | Meaning |
|---|---|
| JOINED | Connected, not on either bus |
| PREVIEW | On the PVW row |
| ON AIR | On programme |
| ERROR | The connection failed |
Guests go straight into their slot when they join; there is no waiting room. A muted-mic icon appears when the guest has muted themselves, emphasised while they are on PVW or PGM so you do not cut to a silent guest. A Talkback chip shows on the card when the guest has a talkback line. It is the button that opens talkback to that guest (see Talking to a guest).
When a guest leaves or you remove them, the card goes back to Free. If that guest was on a live input, the source button shows a Guest dropped warning. If Strom reports that a guest's input has stopped, for example no audio, the card shows a red line such as GUEST 1: NO AUDIO and the source button gets a red strip with the same problem.
Each guest is an ordinary mixer input. Free slots appear on the PVW and PGM rows as GUEST 1, GUEST 2, …; once someone joins, the button and the multiviewer tile show their label. Select them on PVW and TAKE or AUTO as usual. Their audio has its own strip in the Audio panel, labelled Guest 1, Guest 2, …, with the usual ON and AFV controls.
Talkback is a private line between you and one guest. By design, talkback is a separate connection to the intercom and is not mixed into the programme or the return feed.
You need:
- an Intercom connection saved under I/O → Intercom,
- an active production, and
- a guest who joined after the connection was saved. If the guest joined earlier, ask them to reload their invite link and press Go live again.
The Talkback chip, in blue, then shows on the guest's card. Until the production is active it is greyed out and its tooltip says to activate the production.

- Click the Talkback chip. The first time, your browser asks to use your microphone. Allow it. The Talk button reads Connecting… for a moment.
- A row appears on the card: Talk, Latch, Listen and Close.
- Hold Talk while you speak and let go when you are done. The button turns red and reads Talking while you hold it. With the button focused you can also hold Space or Enter. The hold also ends if you switch to another window or tab, so a stuck key never leaves your microphone open.
- Latch keeps your microphone on the guest's line without holding anything. Click again to release it. Only one guest can be latched at a time: latching another guest releases the first.
- Listen is on by default and lets you hear what the guest says on their talkback line. Click it to mute that line (the label is crossed out), click again to hear it again. This is separate from the guest's programme sound in the Audio panel.
- Close ends talkback to that guest and gives the microphone back. Clicking the blue chip again does the same.
You hear the guest only when they have pressed Talk to producer on their page.
While the production is active and at least one guest has a talkback line, a Mic picker appears at the top of the Guests panel, to choose which microphone you talk into (System default unless you pick one). Next to it an Out picker, to choose where you hear the guest, appears only in browsers that let a page choose its speakers and when the browser lists output devices. If you change Mic while talkback is open, the new microphone is used straight away.
Talkback closes by itself when the guest leaves or you remove them, when you deactivate the production, and when you leave the production page.
If one guest's talkback fails, that card shows Talkback unavailable in amber, with Retry and a ✕ to dismiss it. Hover the message to see the reason. This affects that guest only. Other guests' talkback, the programme and the mixer carry on as normal.
In Open Intercom's participant list, each person on a talkback line appears twice, once for the talking connection and once for the listening connection. It is one guest.
Talkback is a live WebRTC connection, like the guest's picture. On a very strict corporate network it may not connect, and you will see Talkback unavailable. A phone on mobile data is the quickest test.
The Return toggle on each guest card sets their return feed:
- PGM-N1 (default) — mix-minus: the programme without the guest's own audio. This is what you normally want, because it avoids echo and the delay of hearing yourself.
- PGM — the full programme mix, including themselves.
The guest's choice under What you hear and your Return toggle control the same setting, so either side can change it. The guest page picks up a change made in the studio within a few seconds.
Click the ✕ on the guest's row. Its tooltip reads Remove guest. This ends the guest's session and frees the slot for a new invite. For a return-only slot, it ends only the return feed; the encoder keeps sending its picture until you stop it.
Invites do not survive deactivation. Deactivating the production cancels every invite and disconnects every guest, so send new links after you reactivate.
The Audio panel is a full broadcast console. Tabs run vertically down its left edge: MAIN, then one per AUX bus (AUX 1, AUX 2, …).
Within a tab, strips are grouped into sections you can collapse by clicking the coloured vertical bar:
| Section | Contents |
|---|---|
| OUT | The MAIN master and the MON monitor strip |
| GRP | Group masters — GRP 1, GRP 2, … (only if Group Buses > 0) |
| IN | One strip per input channel |
Collapse state is remembered between sessions.

Each strip has a vertical fader running from −∞ to +20 dB, with unity (0 dB) at the marked line near the top and tick marks at +20, +10, 0, −10, −20, −30, and −∞. Drag it, or click anywhere on the track to jump there. Arrow keys nudge it once focused.
At the bottom of each strip:
- ON — the channel's contribution to the mix. Orange/coloured means on, dark grey means muted.
- AFV — audio follows video. When lit, the channel automatically opens when its source is on programme and closes when it is not.
ON mutes the routing, not the fader. Your fader position is never disturbed by a mute, an unmute, or an AFV state change — so your carefully set level is exactly where you left it when the channel comes back.
Clicking AFV while AFV is active turns it off and mutes the channel, so you never get an unexpected open mic. Press ON to bring it back manually.
AFV fade times are set under the audio panel's gear icon → Audio Options:
- Ramp Up — fade-in when a channel comes on air (default 300 ms)
- Ramp Down — fade-out when it goes off air (default 50 ms)
Both range 0–5000 ms. Asymmetric defaults are deliberate: a fast drop stops you hearing the old source through the cut, while a slightly slower rise avoids a hard click on the new one.
Two buttons on input strips route that channel to your monitor bus so you can listen in isolation:
- PFL — pre-fader listen. Hear the channel regardless of its fader, even fully muted. Use it to check a mic before opening it.
- AFL — after-fader listen. Hear the channel as it sits in the mix.
They are mutually exclusive. Click a lit button to cancel.
Input strips show G1, G2, … buttons. Click to assign the channel to that group; the button turns green. Group masters live in the GRP section, and their fader and ON button control every channel assigned to them at once.
Groups are for anything you want to ride as a unit — all the crowd mics, the whole band, a bank of effects.
Click an AUX tab to see that bus:
- The OUT section holds the bus master — its output fader and ON button
- The IN section holds one send strip per input channel, each with its own send level fader and ON button
Each send shows PRE (orange) or POST (blue) above the fader, reflecting the pre/post choice made in the production configuration.
Toggling a send off leaves its level untouched, so you can drop a source out of a commentator's mix and bring it back at the same level.
AUX buses are how you feed commentary positions, IFB returns, recording feeds, and venue PA.
The MON strip in the OUT section sets your own listening level and does not affect the programme mix at all. PFL and AFL land here.
Every strip has a PPM-style meter scaled −60 to 0 dB, green up to −18, amber to −6, red above that, with a peak-hold line and a numeric peak readout underneath. True silence reads −∞ in grey.
Enable EBU R128 Meter on Main in the production configuration and the MAIN strip gains a loudness meter beside its VU:
- The target zone is −26 to −20 LUFS, shown in green; amber either side, red at the extremes
- The number below is integrated loudness — your programme loudness
- If true peak exceeds −1 dBTP, a red border latches around the meter. Click it to reset.
For broadcast delivery, ride the integrated number to whatever your specification demands (−23 LUFS for EBU R128) and treat a latched true-peak border as something to investigate, not to dismiss.
Each strip in the OUT and IN sections of the MAIN tab has a small FX button at the bottom. That means the MAIN strip and every input strip. Group masters, MON, and the AUX tabs do not have one.
Click FX to open a Processing panel that slides in from the right edge, so the mixer keeps its full height. Its title reads PROCESSING · followed by the strip name, for example PROCESSING · MAIN. Click FX again, press Esc, or press ✕ to close it. The FX button turns teal when any processing on that strip is switched on, or when input gain is not 0.
The panel lists the stages that apply to that strip, top to bottom:
| Stage | On | Settings, range, and default |
|---|---|---|
| INPUT GAIN | Input strips | Gain −20 to +20 dB, default 0 |
| HIGH-PASS | Input strips | Cutoff 20 to 500 Hz, default 80 |
| GATE | Input strips | Threshold −60 to 0 dB, default −40. Attack 0.1 to 200 ms, default 5. Release 10 to 1000 ms, default 100 |
| COMPRESSOR | Input strips and MAIN | Threshold −60 to 0 dB, default −20. Ratio 1 to 20 :1, default 4. Attack 0.1 to 200 ms, default 10. Release 10 to 1000 ms, default 100. Makeup 0 to 24 dB, default 0. Knee −24 to 0 dB, default −6 |
| EQ | Input strips and MAIN | Four bands: BAND 1 · LOW, BAND 2 · LOW-MID, BAND 3 · HI-MID, BAND 4 · HIGH. Each has Freq 20 to 20000 Hz (defaults 80, 400, 2000, 8000), Gain −15 to +15 dB (default 0), and Q 0.1 to 10 (default 1) |
| LIMITER | MAIN only | Threshold −20 to 0 dB, default −3 |
How the controls work:
- Every stage except INPUT GAIN has an OFF / ON button. Stages start off. Press the button to switch the stage on. The dot next to the stage name is teal while the stage is doing something.
- Every setting has a slider and a number box with its unit. Drag the slider, or type a value and press Enter or click away. Press Esc while typing to cancel. Frequency and time sliders use a logarithmic scale.
- If you type a value outside the range, the box turns red, a line such as Must be 20 to 500 Hz appears, and the value is not sent. Hover the number box to see its range.
- RESET on a stage sets it back to the defaults in the table, which includes switching it off.
- If Open Live refuses a change, a red message with the reason appears under the stage name.
- Changes are sent to Open Live as you make them, and the panel shows the values Open Live reports back. Open Live stores the settings on the production.
Two notes about timing and level:
- High-pass: the panel carries a note that reads High-pass on/off applies on the next activation. The cutoff is live.
- Limiter: the panel also carries a note, which we paraphrase here: the limiter currently acts before the master fader, so raising the master can still clip. This is a known Strom limit.
Channel strip processing needs Open Live v0.6.0 or later, and Open Live Studio v0.7.0 or later.
Click the gear on the Controller panel header.
Toggle chips on and off to choose which of the 40 transition types appear in the controller, up to 16. At least one must stay active. The counter shows n/16. Wipe and FX Takes families are flagged GPU.
Keep this short. Four or five transitions you actually use beat forty you have to hunt through with your hand on the wrong button.
One row per assigned source, with two fields:
- V — delay the video track, in milliseconds
- A — delay the audio track, in milliseconds
Use these to fix lip sync per source. If a remote guest's audio arrives ahead of their picture, add delay to A. A field with a non-zero value is outlined orange so you can see at a glance which sources are offset.
Changes are held locally until you press Done, then applied live.

Top-right of the studio, beside the LIVE pill:
- Wall clock — current time, with its timezone above it
- Program clock — driven by the production's air time
The program clock changes label and colour as the show approaches:
| Label | When | Shows |
|---|---|---|
| PROGRAM | No air time set | --:--:-- |
| SCHED | More than 4 hours out | The scheduled wall time |
| COUNTDOWN | Within 4 hours | Time remaining, counting down, in yellow |
| ON AIR | From the air time up to 20 hours after | Elapsed time, in red |
| PAST | More than 20 hours after | The scheduled time, greyed out |
Click the program clock to set or clear the air time without leaving the studio.
Every major panel has a pop-out icon in its header. Clicking it opens that panel alone in a new window or tab:
| Panel | URL |
|---|---|
| Multiviewer | /pane/multiviewer?production=<id> |
| PGM | /pane/pgm?production=<id> |
| Controller | /pane/controller?production=<id> |
| Audio | /pane/audio?production=<id> |
| PiP Editor | /pane/pip?production=<id> |
The Clips and Guests panels cannot be popped out yet; use them in the full studio.
This is what makes Open Live a real gallery rather than a one-person tool. Drag the multiviewer to a second display as a confidence monitor. Give the audio panel to your sound operator on their own machine. Put the controller on a laptop next to the director.
Every operator sees the same state in real time — faders, tally, DSK, PiP — because it is all synchronised through the backend. The production card shows how many operators are connected.
The pop-out controller responds to Space (TAKE) and Enter (AUTO), so a director with just the controller pane open can still cut on the spacebar. The other shortcuts — F, K, and the number keys — work only in the full studio.
Open the multiviewer in its own window — the pop-out icon on its header, or /pane/multiviewer?production=<id> — and put it on a display at the camera position. Every tile is outlined red for PGM and green for PVW and labelled accordingly, updating the instant you cut.
This works because the pane connects to the production itself and stays in sync.
Available whenever the controller has focus and you are not typing in a field. The table shows the default keys. You can change them, see Changing the shortcuts. On a phone-sized screen the shortcuts are switched off.
| Key | Action |
|---|---|
Space |
TAKE — cut preview to programme |
Enter |
AUTO — run the selected transition |
F |
FTB — toggle fade to black |
K |
Toggle DSK 1 |
1 – 9
|
Select that source to preview |
Shift + 1 – 9
|
Hot-cut that source straight to programme |
Numbering follows your mixer inputs, with PiP slots after the real sources. Pressing the number of the source already on programme does nothing — it will not accidentally load your live source into preview.
Shift + number on a PiP performs an atomic take, bringing the PiP on air in one operation rather than a select-then-take, which avoids any risk of the PiP briefly appearing on both buses.
Click the keyboard icon in the Controller header to open Keyboard Shortcuts. Click a shortcut, then press the keys you want. Press Esc to cancel. Combinations the browser keeps for itself, Ctrl or Cmd with 1 to 9, W, or T, cannot be used. Each row has an ✕ to clear its binding, and Reset to defaults puts the original keys back. Import… and Export read and write a JSON file, and Save keeps your changes in this browser.
Press ? on the controller, or click the ? in its header, to see a read-only list of the shortcuts that are active now.
Go back to Productions and click Deactivate on the card. You will be asked to confirm. The window shows Active users with the number of operators still connected, and the number turns orange when it is above zero, so you do not pull the flow out from under your own crew.
Deactivating stops and deletes the Strom flow. That releases the GPU and CPU resources, and on OSC it stops the meter. Deactivate when you are done.
Deactivating also disconnects any guests, closes any talkback to them, and cancels all guest invites. Cued clips are kept and come back cued when you reactivate.
If the production has a Recording output, deactivating also closes the recording and uploads what is still on the Strom server to the storage you chose: the last part, and any earlier part that could not be uploaded during the show. On a server with parts turned off, that is the whole recording. Open Live finishes these uploads before it finishes deactivating.
If you recorded inputs, their files are uploaded first and the programme files after them. Afterwards, check the Recordings tab that everything arrived.
If a production is left active with nobody connected, Open Live deactivates it automatically after 5 minutes. Whoever runs the server can change that time.
The countdown is only shown for the last minute. Then the card shows an amber badge such as IDLE: DE-ACTIVATING IN 0:45, and an amber bar warns that the production will go idle, with a Keep active button in the studio. The browser tab title shows the countdown as well. Afterwards the card carries an IDLE TIMEOUT badge so you know why it stopped.
Reconnecting an operator cancels the countdown. Any open Studio tab for the production counts as connected, also when it is on the Productions or I/O page.
Click Delete on the card and confirm. This cannot be undone, and it is blocked while the production is active. Your sources, graphics, and outputs are not affected — only the production that referenced them.
The other way round is allowed too. You can delete a source, graphic, or output that an inactive production uses. The production's card then shows a yellow warning icon, and hovering it lists what was deleted.
An ISO recording saves one input on its own, next to the programme recording. Use it when you want the uncut feeds after the show, for example to re-edit the show, to cut highlights from angles you never put on air, or to check what a guest really sent.
Each recorded input gets its own MP4 file with picture and sound. Recording is off by default and you choose it per input.
The file holds the feed as it arrived at Open Live, before any V or A delay from Source timing is applied.
- A Recording output on the production. It decides where the files are stored, and the inputs use the same storage as the programme. Without one, nothing is recorded for the inputs. See Recording outputs.
- An SRT, EFP, or WHIP input. This includes a guest slot that takes a guest's browser (WHIP). Pinwheel, Colors, HTML, and clip sources cannot be recorded.
- Open Live and Open Live Studio v0.7.0 or later.
- A recent Strom. Recording inputs at all needs Strom v0.7.0 or later, which has the Live Recorder. On a Strom older than that, the programme still records but the inputs do not, and you get a warning. For picture in the input files on a GPU Strom you need Strom v0.7.2 or later. On a GPU Strom that is v0.7.0 or v0.7.1, the input files come out with sound but no picture. Ask whoever runs the instance which Strom version you have.
- Go to Productions and click Options on the production card.
- Under Setup, Sources, find the input. For a guest, look under Guest Slots.
- Tick Record this input below that input. Studio saves it straight away and shows Saving… while it does.
- Under Outputs, check that the production has a Recording output.
- Click Done, then activate the production.
The checkbox is in Options on an existing production. It is not in the New Production dialog, so create the production first and open Options afterwards. An input with no source assigned has no checkbox. If the checkbox is greyed out for a source that is not SRT, EFP, or WHIP, the text under it reads Only WHIP, SRT and EFP sources can be recorded.
The setting is read when you activate. You can still change it while the production is live, but the note under the checkbox then reads This production is live: the change applies from the next activation. Inputs record what they were activated with until then. An input that is recording right now shows RECORDING NOW next to its checkbox.
By default, up to 4 inputs can be recorded at the same time on one production. Whoever runs the server can change that. If you tick more, the message reads The maximum number of recorded inputs for this production is reached. At most 4 inputs can be recorded per production (RECORDING_MAX_INPUTS), with the number the server is set to. If the server has input recording turned off, the message ends Input recording is turned off on this instance (RECORDING_MAX_INPUTS=0) and you cannot record inputs.
If an input is set to record and the production has no Recording output, you see an amber warning under that input's checkbox: No Recording output is assigned to this production. Add one, or this input is not recorded when the production is activated. The same line shows on the production card while the production is not active.
The source buttons on the PGM and PVW rows of the controller show a small red dot and REC in the lower left corner when that input is being recorded. Hover the button to read Recording this input.
If an input was set to record but is not being recorded, the button shows a small amber warning triangle in the lower right corner instead. Hover it to read why. See An input was not recorded.
Recordings of inputs are cut into parts and uploaded in the same way as the programme recording, with the same part length. When you deactivate, the inputs are uploaded first and then the programme. Everything appears in I/O → Recordings, grouped by activation, with the programme files first and then one set of files per input. See Recordings.
In your storage, an input file is kept in its own folder under the production, named after the input, for example <production id>/video_in_2/. The file name starts with the production id and the input. Input 1 is video_in_0, input 2 is video_in_1, and so on.
- Start times can be about one second off. The Started time of an input file can differ by up to about a second from the programme recording. This is a known limit. If you line files up in an editor, use the picture or the sound to match them, not the start time.
- The programme comes first. Open Live is built so that an input recording may drop frames before the programme does.
- Changes apply from the next activation. Switching recording on or off for an input does not affect a production that is already live.
The Recordings tab lists the recordings your productions have saved to storage. Open it under I/O → Recordings, or press Recordings on a production card to open it already filtered to that production.

Add a Recording output to the production, activate it, and run the show as usual. The recording runs while the production is active. By default it is cut into parts of about 10 minutes. Each part is a separate file in storage and a separate row in the list.
Shortly after a new part starts, Open Live uploads the finished one to the storage of the Recording output while the show goes on, and adds it to the list. A part is only removed from the Strom server once the upload is complete and the size matches. If a part cannot be uploaded during the show, it stays on Strom and is tried again later in the show or when you deactivate. When you deactivate, Open Live closes the part that is being written and uploads it.
Whoever runs the server can turn parts off. Each show is then one file, uploaded only when you deactivate, and nothing appears in the list during the show.
If you switched on Record this input for any inputs, each of them is recorded and uploaded the same way, as its own files. See ISO recording.
The list does not update by itself during the show. Press Refresh to see the parts uploaded so far. While a deactivation you started in this browser is running, the tab reads Uploading recordings. They appear here when deactivation finishes., and the list updates when it finishes.
Before anything has been recorded, the tab reads No recordings yet. A recording is saved when a production with a Recording output is deactivated.
Recordings are listed newest first. Use the Production list at the top to show one production or All productions.
| Column | What it shows |
|---|---|
| File | The name of the file in storage |
| Production | The production it came from, or Deleted production followed by its id if the production has been removed |
| Started | When the recording started |
| Duration | The length of the file, or unknown if it could not be read |
| Size | The size of the file |
| Storage | The connection it was uploaded to, or Default |
You can play, download, and delete recordings. You cannot rename them.
When inputs were recorded. Once the list holds files from recorded inputs, the list changes:
- A Source column appears after File. It reads Program for the programme recording. For an input it shows the name the input had in the multiviewer when you activated, with a guest's name in brackets for a guest. A recording in parts shows the part number after it, for example #2.
- The rows are grouped by activation. Each group has a heading with the production name, the time of the activation, and the number of files. The programme files come first, then each input in input order.
- A Files list appears at the top with Program and inputs, Program, and Inputs.
- When you have chosen one production, an Input list appears with All inputs and each recorded input, for example Camera 2 · Input 3. It is hidden while Files is set to Program.
Play, download, and delete work the same for input files. The delete window also shows the Source. A list with no input recordings looks exactly as before.
Press Play to watch a recording in a window inside Studio. Press Download to save the file to your computer. It is saved under the last part of its name in storage, with any character other than letters, digits, dot, hyphen and underscore changed to _, and always ending in .mp4. The button reads Preparing while the link is made.
Both buttons ask Open Live for a fresh signed link every time you press them. A link expires after a while, one hour unless whoever runs the server has changed it, so a link you copied earlier may stop working. If the player says the link has expired, press Reload link.
Playback and download go straight from the storage to your browser. The storage address must therefore be reachable from your browser, not only from the Open Live server. Because Studio is served over https, the storage address must use https as well.
If a recording cannot be played, its row says Playback unavailable and gives the reason, and both buttons are greyed out:
| Reason | What to do |
|---|---|
| its storage connection no longer exists | The recording is still in the bucket, but Studio can no longer sign a link to it. Add a connection that points at the same store and bucket |
| its storage connection has no bucket | Edit the connection and set a Default Bucket |
| the instance default storage is not configured | The recording went to the default storage, which the server no longer has set up. Ask whoever runs the instance |
| it is in a bucket other than the instance default bucket | The default storage now points at a different bucket than the recording. Ask whoever runs the instance |
| the playback link could not be signed | Try again. If it keeps failing, ask whoever runs the instance |
Press Delete on a row. A window shows the production, when the recording started, and its size, with the warning This removes the file from storage. It cannot be undone. Press Delete to confirm. The file is deleted from the bucket and the row disappears from the list. Recordings are deleted one at a time.
If the delete fails, the reason is shown under the file name. The most common messages:
| Message | What to do |
|---|---|
| Cannot delete: ... followed by Nothing was deleted. | The recording's storage can no longer be reached, for the same reasons that make it unplayable. See the table above |
| The storage key is not allowed to delete this file. The recording was kept. | The key of the connection may write but not delete. Give it delete permission, or delete the file in the store itself |
| The storage could not delete the file. The recording was kept. Try again. | Try again. If it keeps failing, use Test on the connection |
| Recording not found. It may already have been deleted. Refresh the list. | Press Refresh |
| The database is unavailable, so the recording could not be removed from the list. Try Delete again. | The file may already be gone from storage; only the list entry is left. Press Delete again |
A part that fails to upload during the show is tried again automatically, and Studio shows nothing for it. What Studio reports is the upload at deactivation, which also covers every part still left from the show. If that upload fails, the production still deactivates, and the parts stay on the Strom server. Studio does not show the failure on the production card. To see it, open I/O → Recordings and choose the production in the Production list. An amber box appears at the top:
- A headline: N recording files failed to upload., or Recordings were not uploaded. when nothing was attempted.
- The reason, as reported by Open Live.
- A reminder that the files stay on the Strom server and are tried again the next time this production is activated with a Recording output and then deactivated.
| Reason you may see | What to do |
|---|---|
| No storage connection is set on the recording output and MINIO_* object storage is not configured | Edit the Recording output and choose a storage connection |
| Storage connection ... was not found | Edit the Recording output and choose a connection that exists |
| Storage connection ... has no default bucket | Edit the connection and set a Default Bucket |
| The object store rejected the credentials or permission | Use Test on the connection. The key must be allowed to write to the bucket. The upload stops at the first rejection |
| The storage target could not be resolved | Open Live could not look up the connection. Check the Recording output and the connection, then deactivate again after the next show |
| MINIO_* object storage is not configured | The Recording output uses the default storage and the server has none. Edit the output and choose a storage connection |
| The recording upload failed | The message carries the detail from the store. Use Test on the connection, then deactivate again after the next show |
The box stays until the next deactivation of that production that had a recording. After you have fixed the cause, run the production again with the Recording output and deactivate it: the files left on Strom are uploaded together with the new recording.
Check the Recordings tab after every recorded show. It is the only place the upload result is shown.
A persistent notification in the bottom-right corner listing which dependencies are unreachable:
- Cannot reach Open Live backend
- Database unreachable
- Media pipeline unreachable
Click Reconnect to retry. This re-runs the backend's database connection and re-checks Strom, then refreshes the status. If it keeps failing, check the instances in your OSC dashboard or your cluster.
The connection is up but no frames are decoding. Check, in order:
- Is the production actually active?
- Is your source encoder running and pointed at the right SRT address and port?
- Does the source's Latency setting give the network enough headroom? A too-low value on a lossy link drops everything.
- Is Strom healthy? Check the globe indicator.
Usually network. Raise the source Latency. Note that reconnects deliberately keep Strom's encoding pipeline warm, so recovery is fast — a RETRYING IN n pill is not cause for alarm on its own.
It belongs to an active production. Deactivate it first. This is intentional: changing an address under a running flow would break it mid-show. Two exceptions: a clip source can be edited while its production is live, as long as the clip is not playing or paused, and a source with a via chip is managed by its gateway and cannot be edited or deleted in Studio at all.
Those need a GPU-backed Strom node. Check the Looks panel — if it shows the GPU warning, your Strom instance is CPU-only. Use the Mix, Slide, and Push families instead.
Expected. Group and monitor metering is post-fader, so pulling that bus's fader to zero makes its meter read silence even though signal is arriving. The channels feeding it are fine — check their own meters, or use PFL to listen.
Note this does not apply to muting an input channel with ON: that closes the routing rather than the fader, so the channel keeps metering while muted. Which is useful — you can see a mic is live and healthy before you open it.
The reason is shown under the clip's row. The common ones:
| Message | What to do |
|---|---|
| Production is not activated | Activate the production first; clips can only be cued on a live production |
| Clip URL could not be reached / Clip URL returned HTTP … | Check the URL opens from outside your own network. Links that need a login, or point at a private address, will not work |
| Clip URL redirect blocked / Clip URL exceeded the redirect limit (3) | Use the final address of the file rather than a redirecting short link |
| Clip media could not be loaded | The file was reached but could not be opened within 5 seconds. Check it is a playable video file, such as an MP4 |
| Clip playback stalled — position has not advanced | The file stopped arriving or decoding. Stop, cue again, and play |
| Object storage is not configured | The clip uses Default (instance storage) and the server has none. Edit the clip source and pick one of your own storage connections, use a URL clip instead, or ask whoever runs the instance |
| A message saying a storage connection was not found | The clip source points at a connection that no longer exists. Edit the source and pick another connection |
| Clip URL returned HTTP 403 or HTTP 404, ending with the bucket and key | For an S3 clip the message names the bucket and key it tried. 403 usually means the key may not read that object. 404 usually means the bucket or key is wrong. Use Browse to find the exact key, and Test on the connection to check the credentials |
| Clip URL could not be reached, ending with the bucket and key | Open Live could not connect to the storage endpoint. Use Test on the connection |
The reason appears in red inside the dialog. Name, Endpoint, and Access Key are required, and so is Secret Key when you add a connection. Region can be at most 64 characters. A default bucket cannot be removed once it is set. If the message mentions a private, loopback, or link-local address, or TRUSTED_STORAGE_HOSTS, the server administrator has to allow that host first (see Adding a connection).
| Result | What it means |
|---|---|
| Endpoint unreachable (DNS/connect/TLS). | Open Live could not connect. Check the endpoint, the Use SSL (https) box, and that the store is reachable from the Open Live server |
| Authentication failed, followed by a code in brackets | The access key or secret key is wrong. Edit the connection and enter the key again |
| Bucket ... not found. | The bucket name is wrong. Check the Bucket field in the test window and the endpoint |
| Amber box, valid, no list permission | The key works but may not list the bucket. Browse will not work with this key. Playing a known clip, or uploading a recording, may still work |
| Unexpected response from the object store with a status number | The endpoint answered, but not with a reply Open Live recognises as an S3 error. Check that the endpoint is the S3 address of the store |
It is in use. The message counts the sources, outputs, and recordings that still use it. See Editing and deleting a connection.
The server has no default storage, and you have no connection with the role Recordings or Clips and recordings that has a default bucket. Press Add one in the Storage tab, add a connection with a Default Bucket, and come back.
The Strom instance is older than 0.6.9 and cannot encode the audio for the recording. After activation, hover the amber warning icon on the production card to read the message. Upgrade Strom, then record again.
Open I/O → Recordings and choose the production. If an amber box is shown, the upload failed: see When an upload fails. If there is none, check that the production had a Recording output assigned when it was activated, and press Refresh. A long show is listed as several parts, one row per part, so look for all of them.
If the player says The playback link has expired or the storage denied access (403), press Reload link. If it says The storage host is not reachable from this browser, the storage address must be reachable from your browser and use https. If it says This browser cannot play the recording file (unsupported format), press Download and play the file on your computer.
Hover the amber warning triangle in the lower right corner of the input's button on the PGM or PVW row. The message says why. The common ones:
| Message | What to do |
|---|---|
| Inputs ... are set to record, but the production has no recording output, so nothing is recorded for them. Assign a recording output to record inputs. | Assign a Recording output in Options, deactivate, and activate again |
| Inputs ... are not recorded: input recording needs Strom's Live Recorder (builtin.liverecorder, Strom 0.7.0 or later). Program is still recorded. | The Strom instance is older than v0.7.0 and has no Live Recorder. Ask whoever runs the instance to upgrade it. For picture on a GPU Strom you need v0.7.2 or later, see An input recording has no picture |
| Inputs ... are not recorded: at most N inputs can be recorded per production (RECORDING_MAX_INPUTS). (N is the server's limit) | Switch recording off for an input you do not need, or ask whoever runs the instance to raise the limit |
| Input ... ("name") is not recorded: only WHIP, SRT and EFP sources can be recorded to their own files. | The source was changed to another type after you ticked the box. Assign a source of a supported type |
If there is no warning and no REC mark, you probably ticked Record this input after you activated. The setting applies from the next activation, so deactivate and activate again.
This applies to a GPU Strom older than v0.7.2. Strom v0.7.0 and v0.7.1 record the input files, but without picture on a GPU Strom, so you get sound only. Ask whoever runs the instance to upgrade Strom to v0.7.2 or later, then record again.
The guest page tells them why. This invite link is invalid or has expired or This invite has expired: create a new invite. The production has ended: the production was deactivated; reactivate and send a new link. Your slot is not available right now: someone else is already in that slot; check the Guests panel. This link is missing its access token: the link was cut short when it was pasted; copy it again with Copy link and send the whole thing.
If the guest sees Could not access your camera or microphone, they need to allow access in their browser's site settings and reload.
The chip shows only on a guest who has a talkback line. Check, in this order:
- Open I/O → Intercom. If the status says Not configured, add the connection. If it says Not usable, read the line under it.
- Click Test connection and read the result (see the table in Intercom connection).
- If you saved the connection after the guest joined, ask the guest to reload their invite link and press Go live again.
If Open Intercom could not be reached when the guest joined, the guest still joined, just without talkback. Fix the connection and ask them to reload their invite link and press Go live again.
The card for that guest shows Talkback unavailable. Hover the message to read the reason, then click Retry. If it keeps failing, click Test connection under I/O → Intercom, and check that the guest is still in the slot.
The guest is heard only after they press Talk to producer, so ask them to press it and check that the page says Producer can hear you. Check Listen on their card is not crossed out, and that Mic and Out at the top of the Guests panel are the devices you expect. If you hold Talk and the guest hears nothing, check the browser allowed your microphone. Ask the guest to use headphones if they hear echo.
Check the guest's card in the Guests panel. A muted-mic icon means they muted themselves; ask them to press Unmute mic. If the slot has gone back to Free, or the card reads ERROR, they have dropped; their page offers Rejoin. If they are on a strict corporate network, try a phone on mobile data.
Open Live has a Bitfocus Companion module, so you can drive cuts, transitions, DSK, PiP, and audio from a physical Stream Deck.
See the dedicated guide: Open Live Companion Module Setup
- Open Live Setup Guide — deploying Open Live on OSC or locally
- Open Live Companion Module — Stream Deck control
- Strom Local Setup — running your own media pipeline
- Service: Open Live — service reference
- Cloud Intercom User Guide — talkback for your crew