Meshlab Tutorial - ExeVirus/boxgen GitHub Wiki
What will I learn here?
I am no expert in meshlab, nor in mesh manipulation. I have successfully made watertight meshes out of all sorts of different projects over the years using the tool, and basically there is no one-way to solve any given mesh or set of points. Instead, mesh work often rhymes and is both and art and a science. What I will be covering in this tutorial is the various filters, the meshlab basics, and tips/tricks I have found most useful for doing mesh work and leave the art part of watertight meshwork to you.
Meshlab Overview
Meshlab is an open source project that is almost more of an academic tool than an industry tool. Nearly everything in the project is based on published papers in academia. These papers describe the various filters and settings in meshlab in much better detail than I ever could, but also are written in standard "academic speak" (un-readable). So I will do my best to give understandable plain english descriptions of the various pieces of meshlab.
Meshlab (and meshes in general) work on three basic concepts: verticies (points), edges, and faces (triangles). A mesh is a bunch of triangles, and is often the end goal of any 3D graphics. Often, though, we don't start with nice triangle meshes and either are given point-clouds or have to convert to point clouds and then back into triangle meshes. Point Clouds are simply a collection of points, but often these have color, texture, and normals in addition to position. Meshlab is great for taking 3D scanned point clouds and generating meshes from them.
Meshlab works on all platforms, even web nowdays, but I fully reccomend using your platform specific version, as processing time is much faster, and meshlab will even use GPU when available.
Meshlab filters can be 100% scripted with .mlx scripts, and if you have a workflow that you are using for a group of meshes (like for a mod), then I highly reccomend using these scripts. I'll give a brief rundown of using them later in this tutorial, as these are super time savers.
Meshlab has no undo button, so be prepared to reload your meshes and do the workflow again to that point. I highly reccomend you either save temporary files or use "Filters->show current filter script" to recreate what you've done to this point.
Most-Used Filters
These are organized by filter section below:
Selection
- Delete selected Faces and Verticies - Exactly what it says. {shift+delete}
- Select all, {Cntl, shift, A}
- Select None, {Cntl, shift, D}
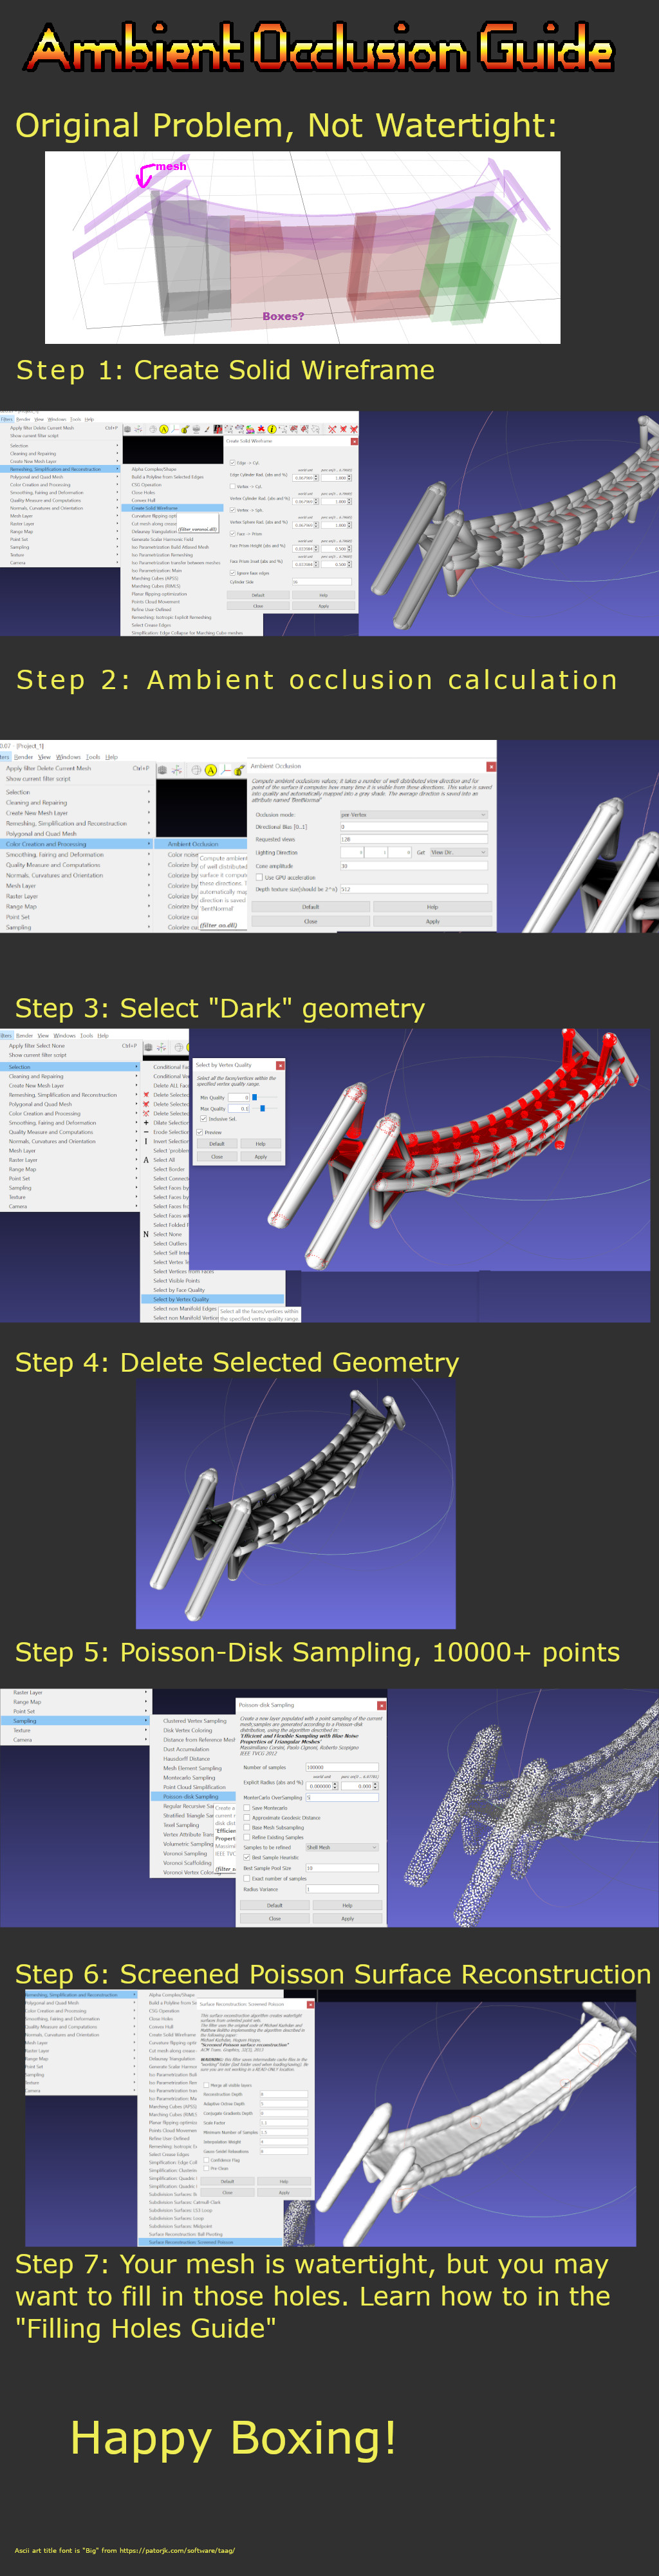
- Select by vertex quality - Used in conjunction with ambient occlusion to delete geometry below the surface.
Cleaning and Repairing
- Remove Isolated Pieces (wrt. face num) - Useful for deleting small blobs that aren't a part of the mesh you are trying to capture. Like a handle on a door to a house.
Remeshing, Simplification, and Reconstruction
- CSG Operation - Used to combine two or more meshes, typically I am doing unions.
- Close Holes - This can be useful for when you are doing VCG with vertex splatting, as it can fill some missing geomtry.
- Convex Hull - Forms a sort of bounding box of your mesh, but with another mesh that is purely convex. Useful for filling in empty areas by selecting the geometry you'd like to fill.
- Create Solid Wireframe - Great for our purposes, as it will turn thin walls into prisms. Keep in mind it generates a lot of faces beneath the mesh surface that makes the mesh not "watertight"
- Simplification - Clustering Edge Collapse Decimation - By far the best way to simplify the number of faces in your model. You can get exactly the number of faces you desire, every time.
- Surface Reconstruction - Screened Poission - The best filter in basically all mesh algorithms, this filter will take a point set (with decently correct normals, important), and attempt to create a watertight mesh out of them. You can be certain this mesh is 100% watertight.
- Surface Reconstruction - VCG - I only use this method with vertex splatting and only when I have a really, really dirty point set. It will attempt to treat areas with lots of vertexes as "filled" and generate a watertight mesh. I do this in the advanced tutorial, but as I say again below, this is not the best method, though it is reliable.
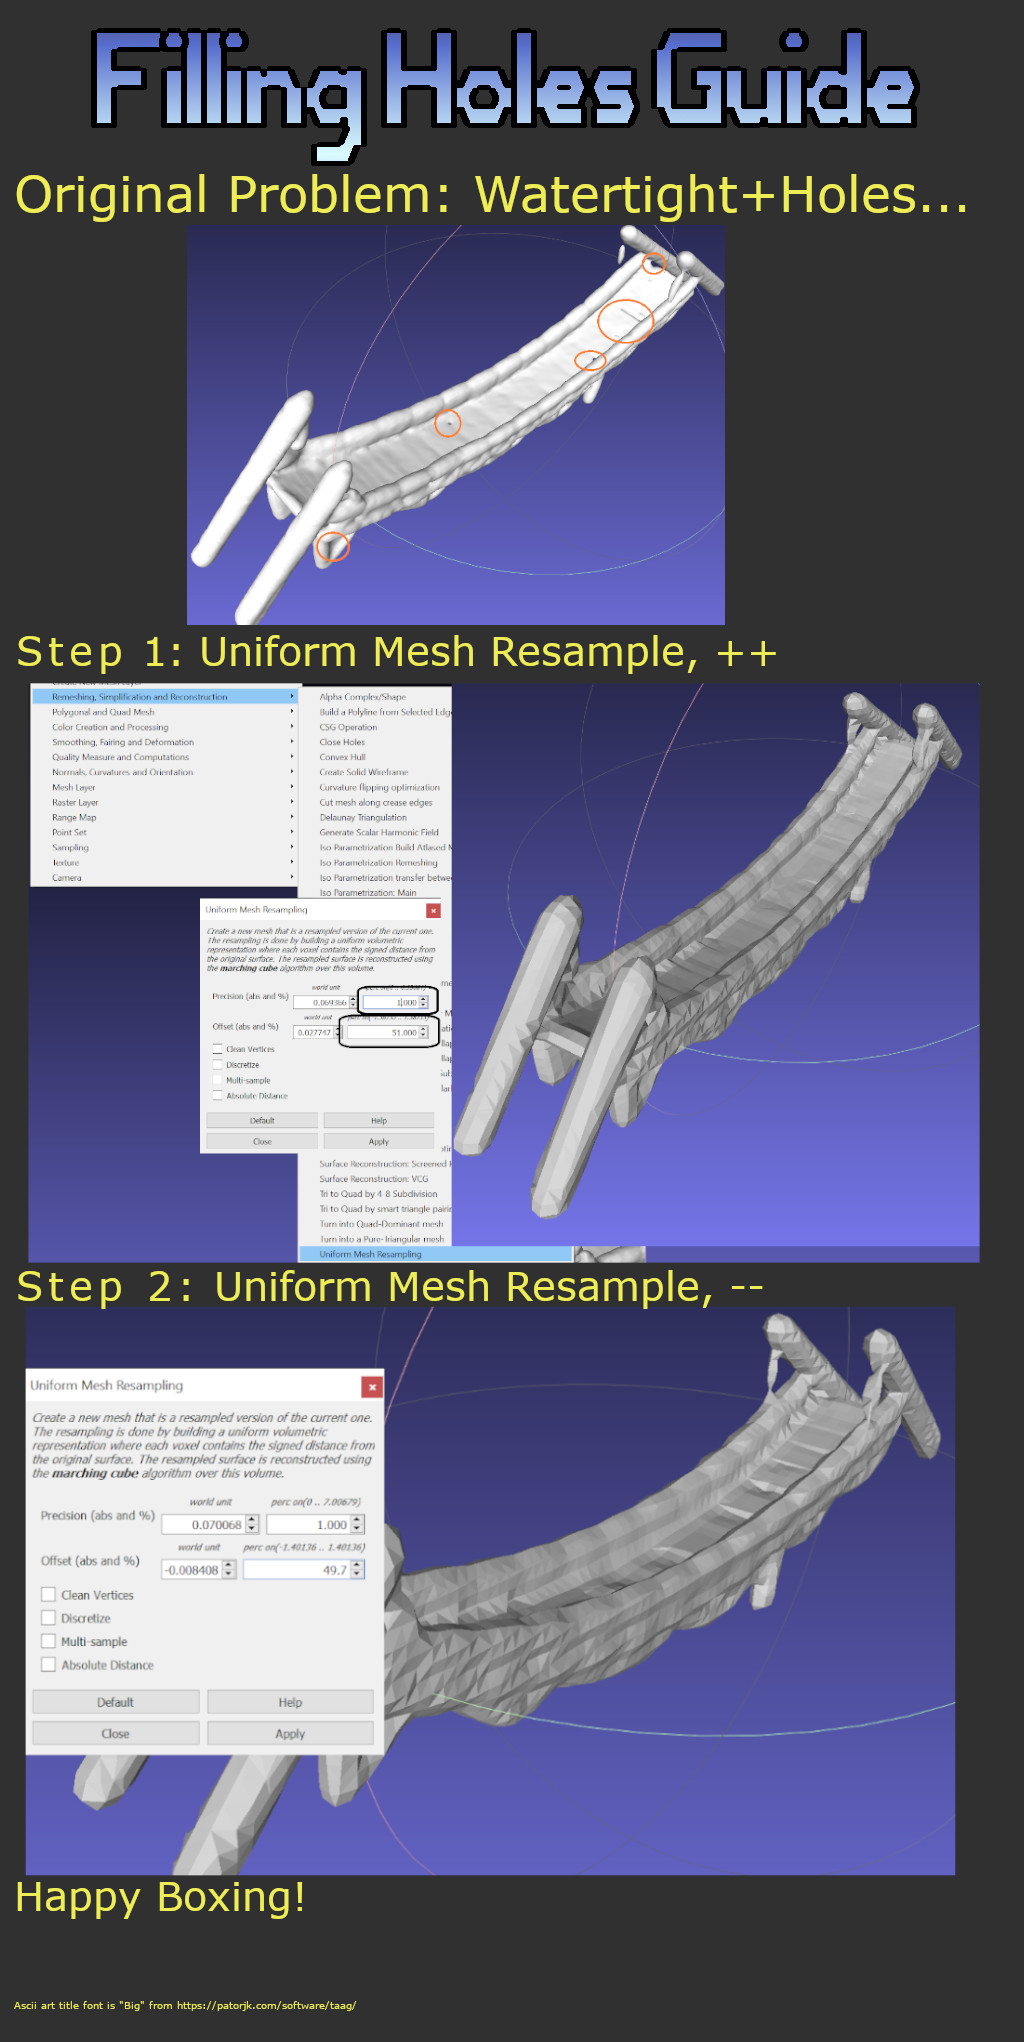
- Uniform Mesh Resample - This filter is the best way to fill in holes and gaps from the above two surface reconstruction methods, and makes a nice, uniform mesh to boot! It only works on watertight meshes, but you can change the offset to blow up your model like a balloon or shrink it similarly. I often will inflate and deflate my final mesh before simplifying and exporting.
Color Creation and Processing
- Ambient Occlusion - A relatively old method that is fundamental to rendering realistic scenes, ambient occuluison will calculate which vertexes would recieve the most light when placed in a well lit room and which ones wouldn't. It stores this value in the "vertex quality" allowing us to find vertecies below the surface of a mesh. (use with create solid wireframe)
- Volumetric Obscurance - Similar in style to ambient occlussion, this is another method to accomplish similar things.
Smoothing, Fairing, and Deformation
- Laplacian Smooth - My go-to smoothing algorithm.
Normals, Curvature, and Orientation
- Calculate Normals for Point Sets - Use this only when your vertexes in a point cloud have no normals.
Sampling
-
Montecarlo Sampling - A great, simple, fast brute force method to generate a bunch of points that would be on the faces of your mesh with normals from those faces. Typically, you then attempt to reconstruct the surface.
-
Poission-disk sampling - A smarter sampling that will perform a montecarlo of the mesh and then calculate a relatively regular sampling of the mesh. This should help speed up the screened poission reonstruction speed.
Common Problems and solutions
I have a thin-wall mesh, how do I make them volumetric (and therefore watertight)?
The first method is to brute force and clean more manually, like we do in the Advanced Walkthrough. That's one method.
A newly discovered method that I find more reliable is to start the same with "create solid wireframe", but take that output and run through the workflow below:
I have a mesh that looks correct on the surface, but I get bad output from boxgen. My model may have geometry underneath the surface...
This is common when working with stuff exported from games (like minecraft) or from lego model builders, etc. Essentially these are exporting every block/brick and so you have all these extra triangles underneath the surface of your model.
The best way to fix this is to use a technique called ambient occlusion, which basically shines light everywhere on your mesh and sees what wouldn't get as much light. These are "occluded", and would get a lower "light value" than ones on or near the surface. In meshlab, this value is stored in "vertex quality" and we just select all geometry (faces+vertexes) that are lower than a given quality (i.e. under the surface), and delete them.
Then we take the leftover geometry, run a poission sampling (just a good sample method), and run a screened poisson surface recontstruction on it to regenerate the surface of our mesh. Here's a link to a visual guide to accomplish this:
My Poission Screened Surface Reconstruction has lots of holes....
A Poission surface will always be watertight, which is super handy because that lets use "Uniform Mesh Resampling" to create an "offset mesh". The default offset of 50% will yield the same sized mesh, so 51% or even 52% will blow up the mesh you are seeing like a balloon and combine it together, therefore deleting the holes. Then you can smooth the result using a smoothing method of your choice, and do a uniform mesh resample again but with a reverse value of say 49%. Now you will be back to roughly the same size but with holes filled.
Here's the visual guide to do this:
My model is watertight, but it's taking forever to use in boxgen...
Ah, you probably have far too many triangles in your model for what you actually need. Essentially, except in extreme cases, you can limit your models to no more than 3000 triangles, and more normally less than 1500. All you need to do is load your mesh into meshlab, run a "Simplification - Quadratic Edge Collapse Decimation" with your target number of triangles, and you'll recieve a much simpler (mushy) representation of your object that boxgen will operate a LOT faster on.
My model is an empty shell, and the bottom of it is completely open....
You have a very optimized model from older style videogames, and we are going to have to fix that. Essentially you already have a watertight mesh, we just need to fill in the bottom. The easiest way I've found to do this, is to delete all faces from the top section of your mesh and leave only the bottom faces. Then perform a convex hull operation on these remaining faces. Then reload your original mesh and perform a CSG Operation (union) between these two meshes. Here's the visual guide:
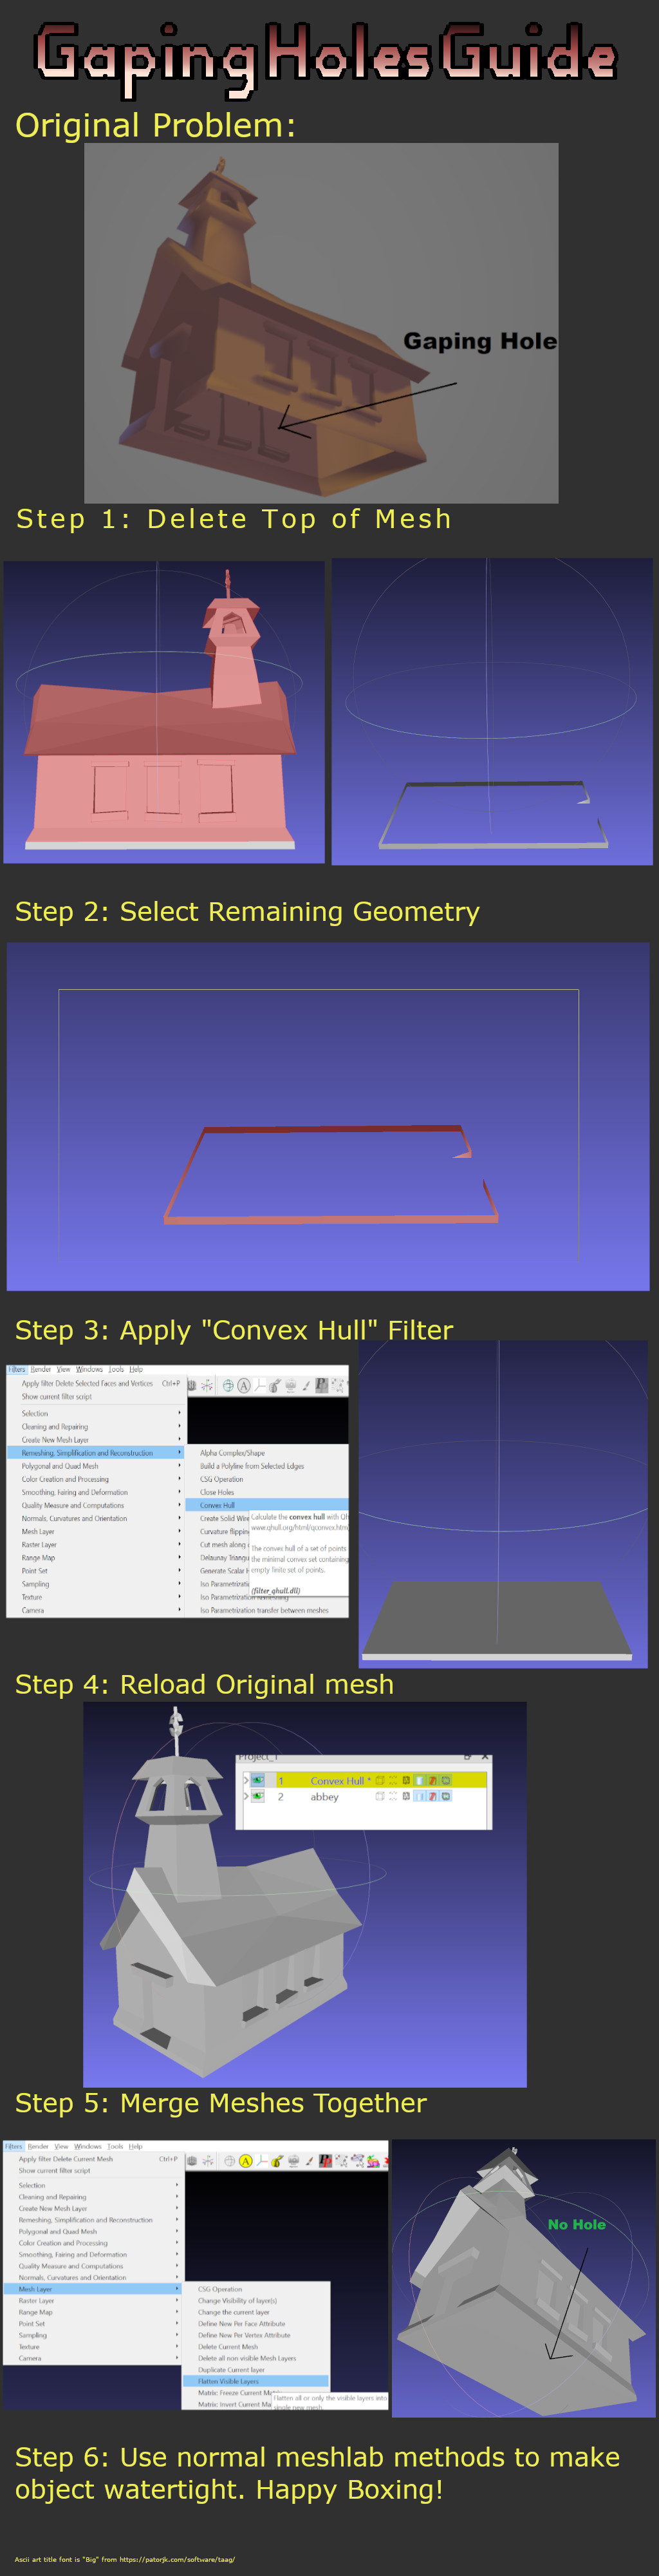
I have many meshes I want to combine into a single mesh scene
First off, you can do this with meshlab, but I reccomend using blender for this, and then meshlab works with the combined .obj. In meshlab, you import all the meshes, position as you are able with the manipulators tool, and then in the right toolbar, right click any mesh and perform the "flatten visible layers" operation. You should now have a combined mesh you can export for boxgen.
Tips and Tricks
-
Save often, with temporary files.
-
Nearly every filter has a "help" button, by clicking it you will get a decent plain english description for every setting in meshlab. Typically...
-
The right toolbar has your meshes/point clouds, and you can toggle their visibility with the "eye" symbol on the left. You can also view only vertices or only faces or only edges with the other buttons on the right. The drop down arrow will tell you how many verticies and faces your mesh has.
-
Uniform Mesh Resample is your best friend, once you have a watertight mesh. For that, you must either use screened poisson or VCG with vertex splatting, there's not many other good options.
-
You can get really, really accurate with a screened poission, using more depth, but you'll start running into major ram requirements. In fact, I upgraded my computer's RAM mainly for this reason years ago. So make sure you watch your system's task manager like a hawk when using high amounts of processing or accuracy, you might bring your computer to a halt otherwise.
-
These steps are super-duper useful for making 3D prints, which is where I originally learned all this from. Most 3D printer people actually don't know how to use this free program like we are, and I encourage you to get the word out.
Scripts
Once you open meshlab and start a new project (default), it will begin tracking every filter you apply in a nice script format. This can be accessed through "filters->show current filter script". In there you can edit individual filter parameters, save the script, open a different script, and apply that script. This allows you to quickly process a bunch of meshes quickly.
To further automate the process, you can create a .bat or .sh file that uses meshlabserver.exe (comes with meshlab) to automatically process files in a folder and output them to a different folder. You could then do the same with boxgen, but typically you'll want to do that by hand yourself.
Here's a quick guide on automation if this doesn't make sense to you: github- TheNerdJedi/MeshlabAuto