Custom Tilesets - EverestAPI/Resources GitHub Wiki
Click to expand the Table of Contents
When creating a tileset, you can either use the vanilla template or the improved template by 0x0ade. If you're creating a tileset from scratch it is recommended you use 0x0ade's template. If you're editing an existing tileset you may have to use the vanilla template.
It is also possible to create your own template, though that won't be discussed here.
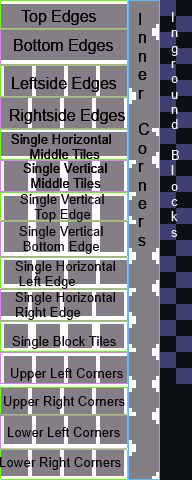
The template below can be copied and edited in a standard image editor. Note that it must be saved as a png, and it cannot be resized.

Here is an annotated version of the template:
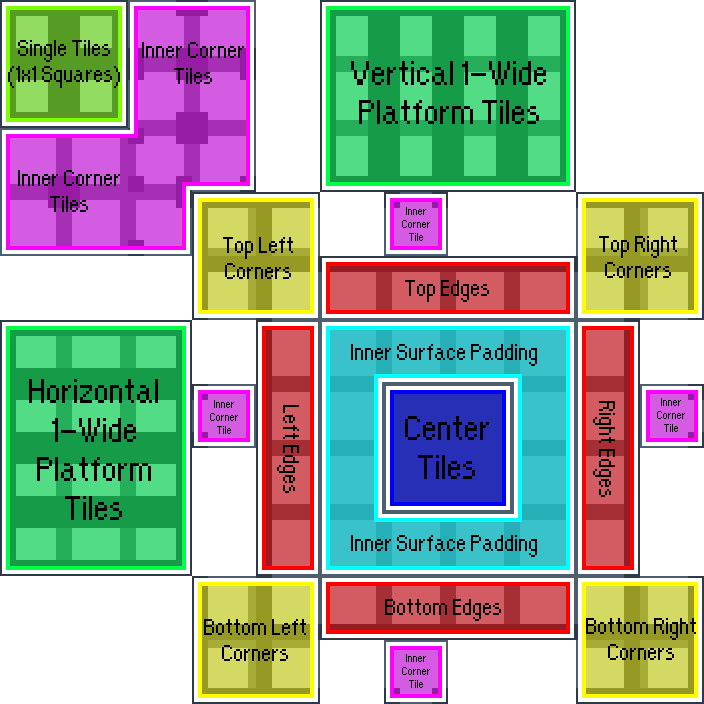
Because of this template's relative complexity, it is only recommended you use it if you are editing an existing tileset. If for some reason you do wish to make a custom tileset with it, the template can be found here 🔗.
Here is an annotated version of the template:
Celeste stores information about each tileset in an xml file, which can be opened/edited with a regular text editor. By default your map will get tileset information from the vanilla xml, but you can configure it in the map editor to use a custom xml instead.
- Download the vanilla ForegroundTiles.xml 🔗 (alternatively find it in your Celeste folder -> Content -> Graphics)
- Go to
YourModFolder, and create a folder calledGraphics - Create new folders there (for example yournickname -> campaignname) to avoid naming conflicts
- Paste the
ForegroundTiles.xmlfile into the new folder
After this, your XML should be at YourModFolder/Graphics/YourNickname/CampaignName/ForegroundTiles.xml (replacing the YourModFolder, YourNickname, and CampaignName with your own values).
Note
Note when adding custom files, it is usually recommended to place them in 2 subfolders with your nickname and your map / campaign name.
This is to avoid conflicting with maps from other people but also to prevent your maps from conflicting with each other.
If you are using 0x0ade's template you will need to add some lines to your xml. If you are using the vanilla template, skip this step.
Open the ForegroundTiles.xml file you just downloaded. Just below <Data> at the beginning of the file, copy-paste the entirety of this text 🔗.
If you want you can edit the path to be for the first tileset in your mod yournickname/campaignname/tilesetname.
At the end of the ForegroundTiles.xml file, just before the </Data> line, copy-paste the following line:
<Tileset id="w" copy="z" path="yournickname/campaignname/tilesetname" sound="8"/>- Replace
wwith any single character that isn't already used. Reserved IDs are listed below.- Vanilla tilesets use IDs from
3to9and fromatoo, as well as IDs1,z, andG. - 0x0ade's template uses
y. - Air uses
0. - See the note below for specifics on available tileset IDs.
- Vanilla tilesets use IDs from
- The
copyvalue sets which template the tileset uses. Useyfor 0x0ade's template, or usezfor the vanilla template. - Replace
yournickname/campaignname/tilesetNameby your nickname, your map or campaign name, and what you want to call your tileset. Remember those names, you will need them in the next step. - Replace
8by whatever sound you want (see below for the list).
Note
You can use lowercase or uppercase letters, symbols, accented characters, or almost anything you can think of.
Just make sure that the tileset ID isn't already used, because that will crash Celeste.
If you'd like to know the specifics, the character can be any valid Unicode character in the Basic Multilingual Plane 🔗.
This means characters between U+0000 and U+D7FF, and between U+E000 and U+FFFF are acceptable.
(and for the last time, no, you cannot put emoji as a tileset id, as they're not in that range.)
Note that some characters have a meaning in XML, and thus may be parsed incorrectly by Lönn if not escaped.
Then, save and close the file.
- Go back to
YourModName/Graphics/Atlases/Gameplay - Create a
tilesetsfolder, then ayournicknameand acampaignnamefolder in them (the names should match what you used inForegroundTiles.xmlin the previous step) - Copy your tileset there, and name it the same thing you put in ForegroundTiles.xml (
tilesetName.pngin this example)
- Open Lönn and load your map
- Go to Map -> Metadata
- In the Foreground Tiles field, click the folder icon and select your
ForegroundTiles.xml. - Click "Save changes". Save and reload your map.
Thanks Xaphan and Coffe for the tutorial!
Warning
When entering file paths in Lönn be sure to use forward slash (/) and not back slash (\)
A custom debris texture can be added to your tileset by including the optional debris attribute.
Using the example above, your tileset definition should look like this:
<Tileset id="w" copy="y" path="name" sound="8" debris="Xaphan/debrisTexture"/>Where the debris texture is located at Mods/yourmod/Graphics/Atlases/Gameplay/debris/Xaphan/debrisTexture.png.
Multiple debris textures for a single tileset, which will be selected from randomly, can be added by renaming the images as follows:
debrisTexture00.png
debrisTexture01.png
debrisTexture02.png
...
Refer to the Animated Tiles section of the Tileset Format Reference page.
Note the ignores tag in the tileset below:
<Tileset id="1" copy="z" path="dirt" ignores="g"/>If you add this tag to your tileset, it will not connect to tilesets of given tileset id's.
You may list several id's as follows: ignores="a,b,c"
If you want to ignore every possible tile you can add: ignores="*"
If you want to exclude certain id's from being ignored you can add: ignoreExceptions="a" at the end
Add the displayName="Tileset name" tag to your tileset to give it a custom name in Lönn.
<Tileset id="1" copy="z" path="dirt" displayName="Muddy Dirt"/>Double check the ForegroundTiles.xml path you put in Lönn is correct.
Your XML has loaded correctly, but something is wrong with your tileset. Most likely you put the wrong file path to the image in the XML. It is also possible your tileset doesn't match the template if it's the wrong size, etc.
Your file structure should look like this:

The corresponding path for the tileset in the XML file is then: "Rain/Monochrome/Whitespace".
Replace Rain with your nickname, Monochrome with your campaign name and Whitespace with the name of the png file, minus the .png extension.
Most likely you accidentally messed up the formatting of the XML. See if there is an important line like <Data> you deleted. If you can't find the error, try starting with a fresh xml.
The same way as Foreground, except you use BackgroundTiles.xml instead of ForegroundTiles.xml, and you don't give them a sound parameter. It's also a good practice to name them in bgTilesetName.png format.
The following IDs were copied from the Celeste FMOD Studio project.
They can be found in event:/char/madeline/footstep - thanks to Kevin Regamey from PowerUp Audio!
Entries marked as (unused) don't have any sound associated to them.
Click to expand Tileset Sound IDs
- null
- asphalt
- car
- dirt (used in tilesets: dirt, core)
- snow (used in tilesets: snow, summit)
- wood
- bridge
- girder (used in tileset: girder)
- brick (used in tilesets: tower, stone, cement, rock, woodStoneEdges, poolEdges, templeA, templeB, cliffsideAlt, reflection, summitNoSnow)
- traffic block
- (unused)
- dreamblock inactive
- dreamblock active
- resort wood (used in tileset: wood)
- resort roof
- resort platforms
- resort basement
- resort laundry
- resort boxes
- resort books
- resort forcefield
- resort clutterswitch
- resort elevator
- cliffside snow (used in tileset: cliffside)
- (unused)
- cliffside grass (used in tileset: deadgrass)
- (unused)
- cliffside whiteblock
- gondola
- (unused)
- (unused)
- (unused)
- glass
- grass (used in tileset: grass)
- (unused)
- cassette block
- core ice
- core rock
- (unused)
- (unused)
- glitch (used in tileset: scifi)
- (unused)
- internet café
- cloud
- moon (used in tileset: lostlevels)
Click to expand Tileset Sound ID Table
| Tileset ID | Tileset Name | Sound ID | Sound Name |
|---|---|---|---|
| 1 | dirt | 3 | dirt |
| 3 | snow | 4 | soft snow |
| 4 | girder | 7 | metal girder |
| 5 | tower | 8 | brick |
| 6 | stone | 8 | brick |
| 7 | cement | 8 | brick |
| 8 | rock | 8 | brick |
| 9 | wood | 13 | resort wood |
| a | wood stone edges | 8 | brick |
| b | cliffside | 23 | cliffside snow |
| c | pool edges | 8 | brick |
| d | temple A | 8 | brick |
| e | temple B | 8 | brick |
| f | cliffside Alt | 8 | brick |
| g | reflection | 8 | brick |
| h | grass | 33 | reflection grass |
| i | summit | 4 | soft snow |
| j | summit No Snow | 8 | brick |
| k | core | 3 | dirt |
| l | deadgrass | 25 | dry grass |
| m | lostlevels | 44 | moon |
| n | scifi | 40 | glitch |
| o | {was never used} | 43 | cloud |