Xamarin Android WebRTC Tutorial - DreamTeamMobile/Xamarin.AntMedia.Samples GitHub Wiki
To start any work with Ant Media Mobile SDKs you need AntMedia Server in web, how to setup that server described in Ant Media Documentation
if you have server on some domain address we recommend valid ssl certificate on domain to start work
domain-name.com:5080
Just Click New > In Section App under Android > Blank Android App .

Click Next button and Fill App Name as below.

Click Next and Choose if you need something in the next window, usually leave as is

Click Create and finish creating the project.
After creating the project. Let's add necessary Nuget package to the project.
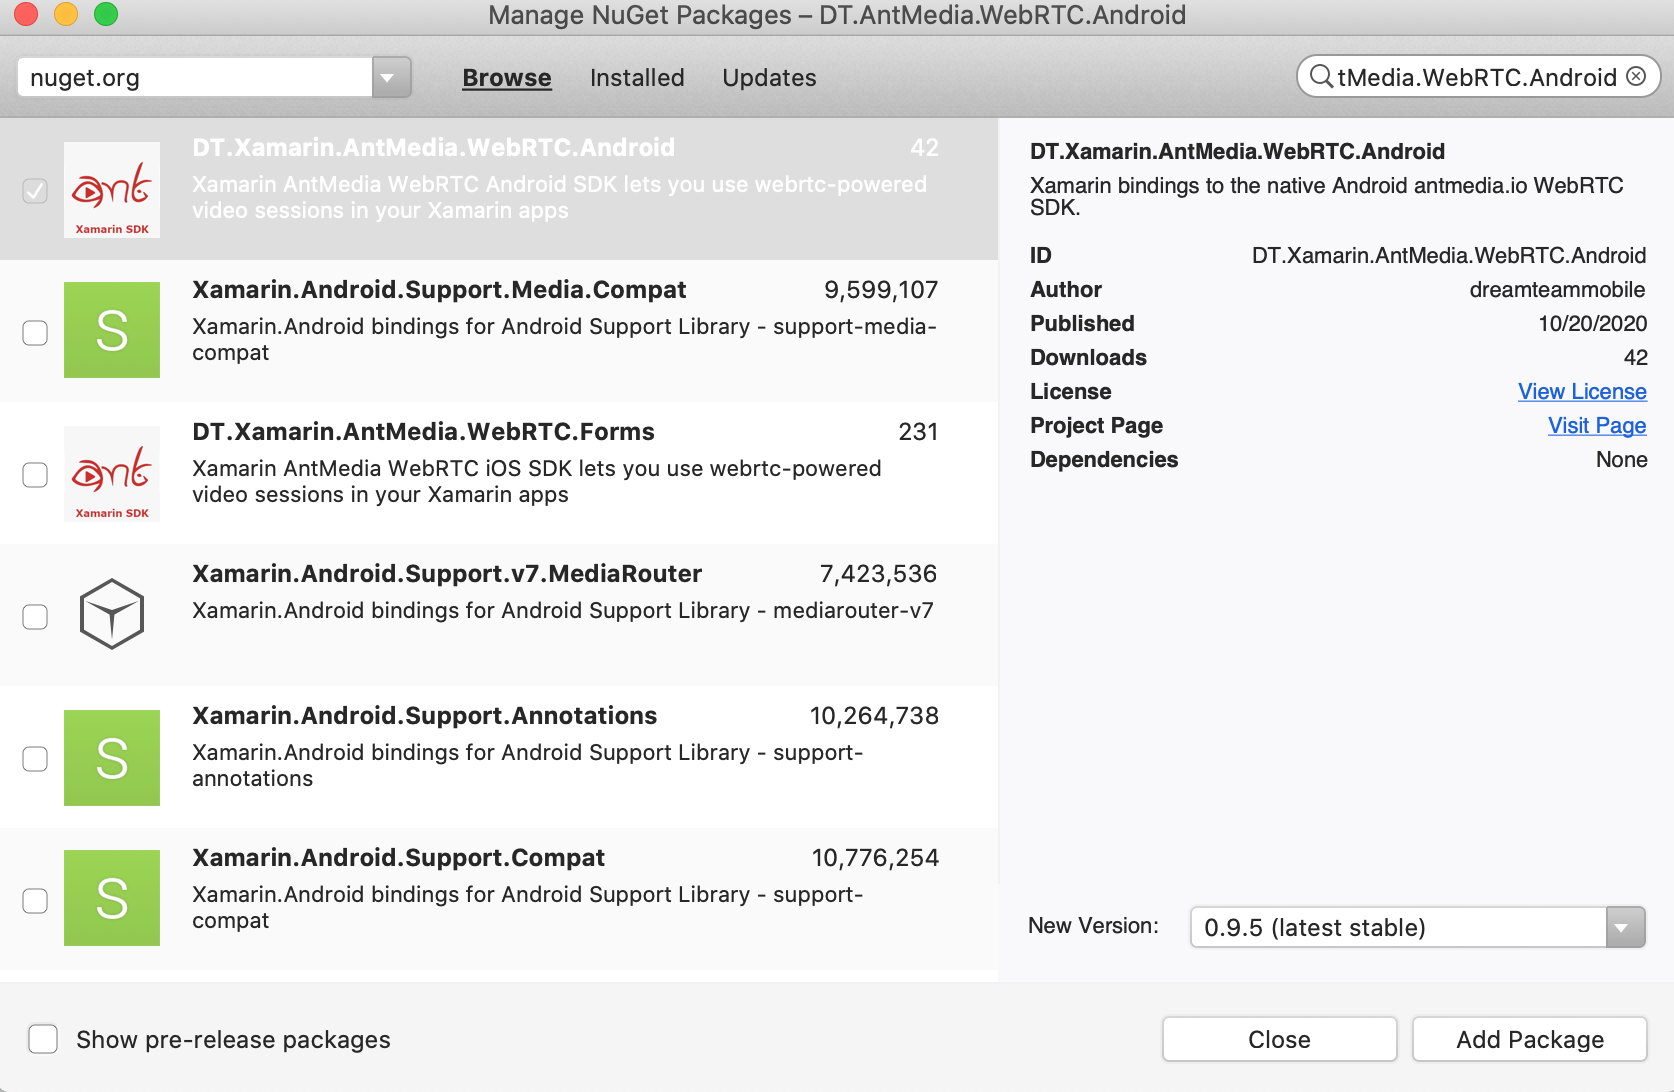
Add nuget package DT.Xamarin.AntMedia.WebRTC.Android to DT.AntMedia.WebRTC.Android For doing that click right button on DT.AntMedia.WebRTC.Android at Solution and Choose Manage Nuget Packages...

In Opened window at right top paste DT.Xamarin.AntMedia.WebRTC.Android and click enter, you will find correct package, then check package at the right and click Add Package
Modify Properties/AndroidManifest.xml
<?xml version="1.0" encoding="utf-8"?>
<manifest xmlns:android="http://schemas.android.com/apk/res/android" android:versionCode="1" android:versionName="1.0" package="com.dreamteammobile.antmedia.dt_antmedia_webrtc_android">
    <uses-sdk android:minSdkVersion="21" android:targetSdkVersion="28" />
    <application android:label="DT.AntMedia.Tutorial.Forms.Android" android:theme="@style/MainTheme"></application>
    <uses-feature android:name="android.hardware.camera" />
    <uses-feature android:name="android.hardware.camera.autofocus" />
    <uses-feature android:glEsVersion="0x00020000" android:required="true" />
    <uses-permission android:name="android.permission.CAMERA" />
    <uses-permission android:name="android.permission.CHANGE_NETWORK_STATE" />
    <uses-permission android:name="android.permission.MODIFY_AUDIO_SETTINGS" />
    <uses-permission android:name="android.permission.RECORD_AUDIO" />
    <uses-permission android:name="android.permission.BLUETOOTH" />
    <uses-permission android:name="android.permission.INTERNET" />
    <uses-permission android:name="android.permission.WRITE_EXTERNAL_STORAGE" />
    <uses-permission android:name="android.permission.ACCESS_NETWORK_STATE" />
    <uses-permission android:name="android.permission.READ_PHONE_STATE" />
    <uses-permission android:name="android.permission.READ_EXTERNAL_STORAGE" />
</manifest>
Next chapters will be updated later, just leaving java tutorial code, will be replaced with c# asap, completed tutorial source code available here DT.WebRTC.Droid
Open the MainActivity and implement it as below. You should change SERVER_URL according to your Ant Media Server address. Secondly, the third parameter in the last line of the code below is IWebRTCClient.MODE_PUBLISH that publishes the stream to the server. You can use IWebRTCClient.MODE_PLAY for playing stream and IWebRTCClient.MODE_JOIN for P2P communication. If token control is enabled, you should define tokenId parameter.
public class MainActivity extends AbstractWebRTCActivity {

    public static final String SERVER_URL = "ws://192.168.1.21:5080/WebRTCAppEE/websocket";
    private CallFragment callFragment;


    @Override
    protected void onCreate(Bundle savedInstanceState) {
        super.onCreate(savedInstanceState);

        //below exception handler show the exception in a popup window
        //it is better to use in development, do not use in production
        Thread.setDefaultUncaughtExceptionHandler(new UnhandledExceptionHandler(this));

        // Set window styles for fullscreen-window size. Needs to be done before
        // adding content.
        requestWindowFeature(Window.FEATURE_NO_TITLE);
        getWindow().addFlags(WindowManager.LayoutParams.FLAG_FULLSCREEN | WindowManager.LayoutParams.FLAG_KEEP_SCREEN_ON
                | WindowManager.LayoutParams.FLAG_DISMISS_KEYGUARD | WindowManager.LayoutParams.FLAG_SHOW_WHEN_LOCKED
                | WindowManager.LayoutParams.FLAG_TURN_SCREEN_ON);
        getWindow().getDecorView().setSystemUiVisibility(getSystemUiVisibility());

        setContentView(R.layout.activity_main);

        webRTCClient = new WebRTCClient( this,this);

        String streamId = "stream" + (int)(Math.random() * 999);
        String tokenId = "tokenID";

        SurfaceViewRenderer cameraViewRenderer = findViewById(R.id.camera_view_renderer);

        SurfaceViewRenderer pipViewRenderer = findViewById(R.id.pip_view_renderer);

        webRTCClient.setVideoRenderers(pipViewRenderer, cameraViewRenderer);

        // if you want to play mode, you should change IWebRTCClient.MODE_PLAY instead to IWebRTCClient.MODE_PUBLISH
        webRTCClient.init(SERVER_URL, streamId, IWebRTCClient.MODE_PUBLISH, tokenId);

        webRTCClient.startStream();
    }
}void WebRTCClient.init(String url, String streamId, String mode, String token)
@param url is WebSocket url to connect
@param streamId is the stream id in the server to process
@param mode one of the MODE_PUBLISH, MODE_PLAY, MODE_JOIN
@param token is one time token string
If mode is MODE_PUBLISH, stream with streamId field will be published to the Server
if mode is MODE_PLAY, stream with streamId field will be played from the Server
void WebRTCClient.setOpenFrontCamera(boolean openFrontCamera)

      Camera open order
      By default front camera is attempted to be opened at first,
      if it is set to false, another camera that is not front will be tried to be open
      @param openFrontCamera if it is true, the front camera will be tried to be opened
                             if it is false, another camera that is not front will be tried to be opened
void WebRTCClient.startStream()
Starts the streaming according to the modevoid WebRTCClient.stopStream()
Stops the streamingvoid WebRTCClient.switchCamera()
Switches the camerasvoid WebRTCClient.switchVideoScaling(RendererCommon.ScalingType scalingType)
Switches the video according to type and its aspect ratio
@param scalingTypeboolean WebRTCClient.toggleMic()
toggle microphone
@return Microphone Current Status (boolean)void WebRTCClient.stopVideoSource()
Stops the video sourcevoid WebRTCClient.startVideoSource()
Starts or restarts the video sourcevoid WebRTCClient.setSwappedFeeds(boolean b)
Swapped the fullscreen renderer and pip renderer
@param bvoid WebRTCClient.setVideoRenderers(SurfaceViewRenderer pipRenderer, SurfaceViewRenderer fullscreenRenderer)
Set's the video renderers,
@param pipRenderer can be nullable
@param fullscreenRenderer cannot be nullableString WebRTCClient.getError()
Get the error
@return error or null if not<?xml version="1.0" encoding="utf-8"?>
<FrameLayout xmlns:android="http://schemas.android.com/apk/res/android"
xmlns:app="http://schemas.android.com/apk/res-auto"
xmlns:tools="http://schemas.android.com/tools"
android:layout_width="match_parent"
android:layout_height="match_parent"
tools:context=".MainActivity">
<org.webrtc.SurfaceViewRenderer
android:id="@+id/camera_view_renderer"
android:layout_width="wrap_content"
android:layout_height="wrap_content"
android:layout_gravity="center" />
<FrameLayout
android:id="@+id/call_fragment_container"
android:layout_width="match_parent"
android:layout_height="match_parent" />
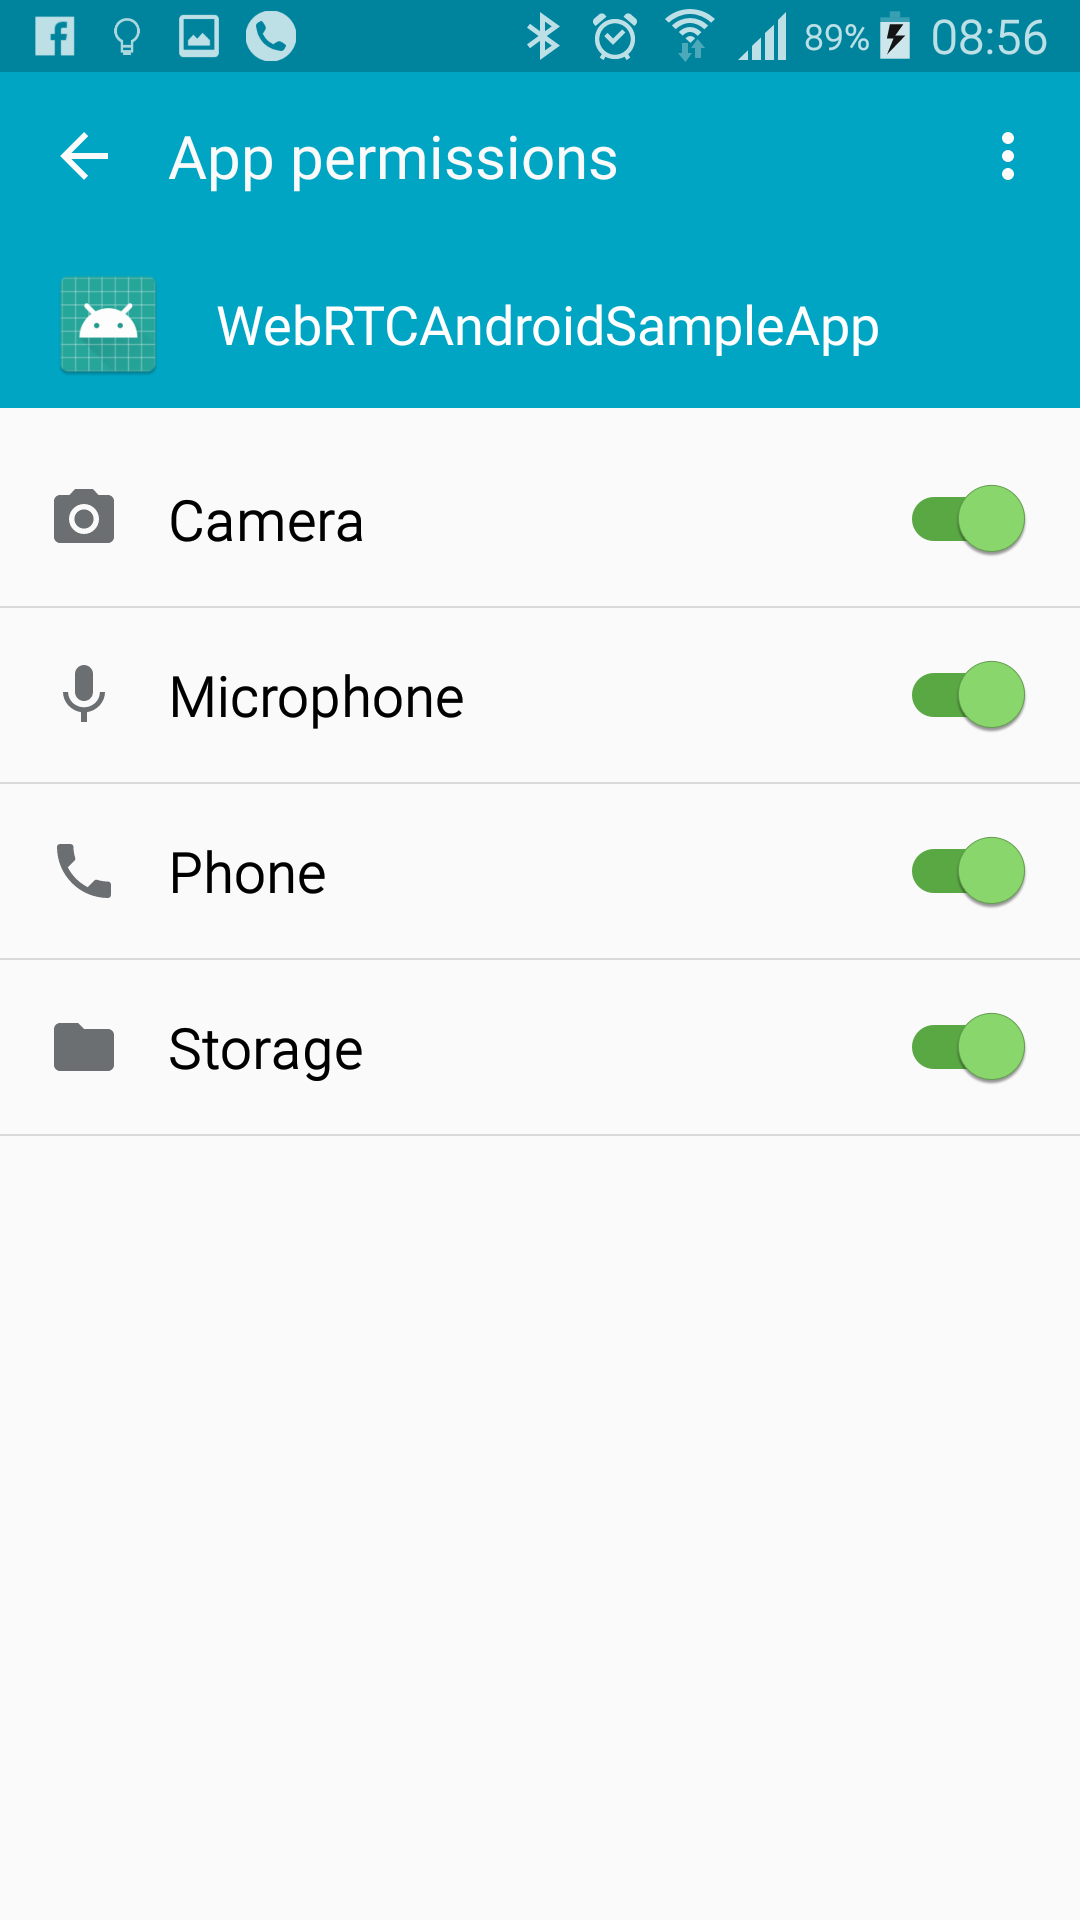
</FrameLayout>App directly publishes stream to the server before that we need to let the app has the permissions for that. Make sure that you let the app has permissions as shown below.
Then restart the app and it should open the camera and start streaming. You should see stream id on the screen as below. You can go to the http://SERVER_URL:5080/WebRTCAppEE/player.html, write stream id to the text box and click Play button.
Android Sample app here you can find source code of that tutorial where you can find how to add Mute buttons, Switch camera, Play/Stop and so on