Service Integration Make AS22 - DigiBP/digibp.github.io GitHub Wiki
- Pre-requisites - Make (Integromat), Google account
- 1. Get Pizza Menu Service
- 2. Add Pizza Service
- Please register to Make (Integromat) and create a Google account before running this tutorial.
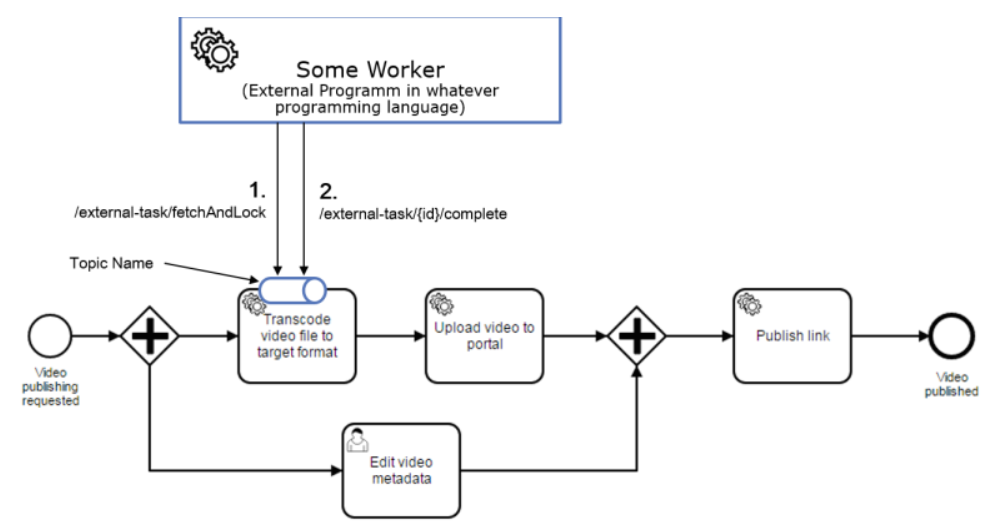
In this tutorial we will be integrating custom services into our process model using an external task worker. The external task worker will poll* all requests sent to a certain topic. For this reason, the external service worker needs to be configured by defining a topic. We will then use the Camunda REST API to retrieve the open external tasks subscribed to this topic. The following picture explains how the interaction between a process model and an external service worker takes place. For more details, you can visit this guide or this page.
* Polling means that the external worker will periodically ask the workflow engine if there are any units of work waiting for processing.
In this use case we model a simple process that will display the menu of Mario's Pizzeria.
Open the Camunda Modeller and create the process model as follows:
HINT: We are modeling an executable process, so our process should have a specific ID. When the process is deployed, we can quickly identify the process on Task List based on this ID. Click on the canvas (outside your modeled process) and change the ID on Properties Panel tab General.
The property ID is used by the workflow engine as an identifier for the executable process, and it’s best practice to set it to a human-readable name.
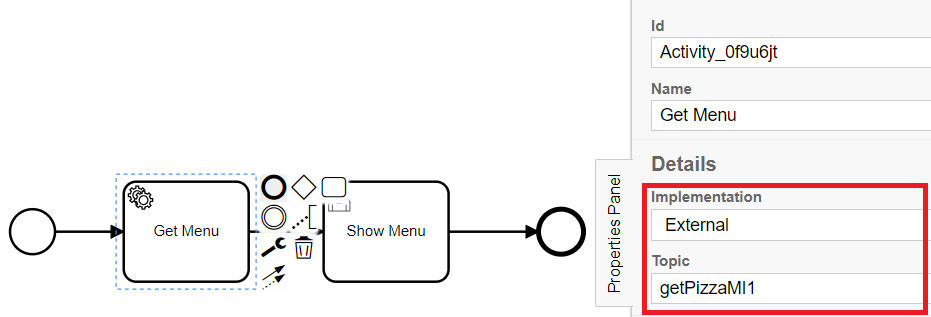
Select "Get Menu" service task and choose implementation "External" from the General tab. Set a topic name.
HINT: Topic name does not have spaces in it. A topic is needed for the communication between the workflow engine and the external task worker. As part of the configuration of the external worker (which we are going to build later in this tutorial), the topic will be used to communicate with the workflow engine what type of work it can perform.
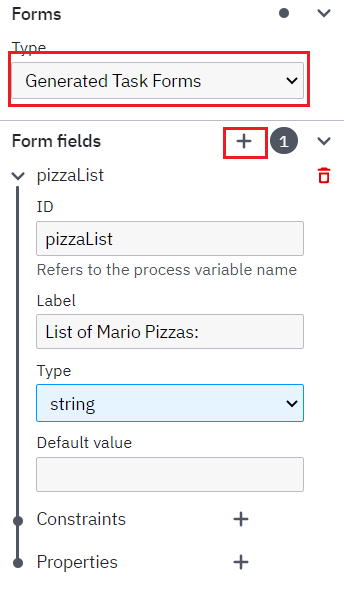
Select "Show Menu" user task and click on the property Forms located on Properties Panel. From the dropdown, choose the option Generated Task Forms. Next, click on the plus icon next to the option Form Fields and add a new form field with ID pizzaList. The Type should be string.
This form field will be populated with the available pizzas from the Menu once the process runs.
Now we are ready to deploy the process. For that, we are going to use the DigiBP classroom instance. For now, we are not going to run the process. We still have some work to do 😉.
- Enter deployment name and your Tenant ID.
- Enter the deployment endpoint (copy&paste):
https://digibp.herokuapp.com/engine-rest - Go to the DigiBP classroom instance welcome and landing page: https://digibp.herokuapp.com
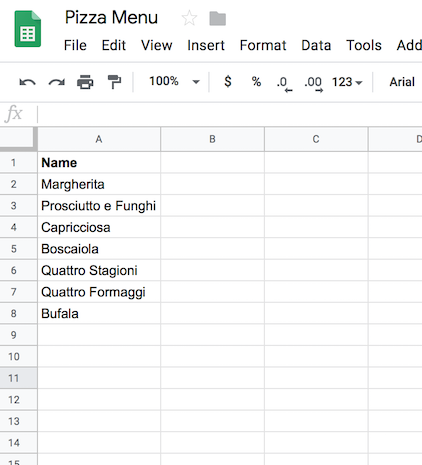
Before starting with the external task worker, we need to create our "database" to store the names of pizzas available in Mario's pizzeria. Please create a new Google sheet Pizza Menu and create a very simple data structure with just one column "Name" and add data as shown in the figure below.
Please note that similar data should be stored in the same column. You can extend the data structure by adding more columns like Price, Toppings etc.
In your project, you can use a database like MySQL or PostgreSQL to store and retrieve data.
The next step is to create our service using an external task worker. We will be using Make to create a scenario that will fetch the list of pizzas available in Mario's Pizzeria.
Sign in to Make.
Click on Create a new Scenario button (see the figure below).
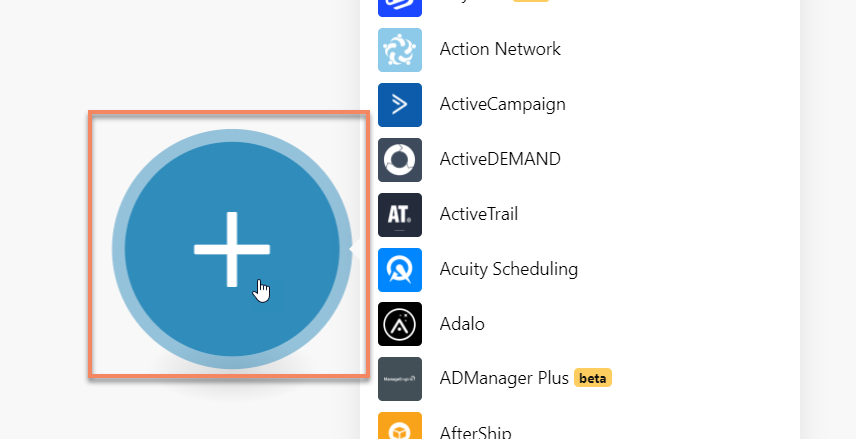
You will land on a page with a plus sign in the middle of page and by clicking on it, a collection of services that can be integrated in your scenario is displayed. In Make, every service consists of modules which can be combined in a sequence to create a scenario.
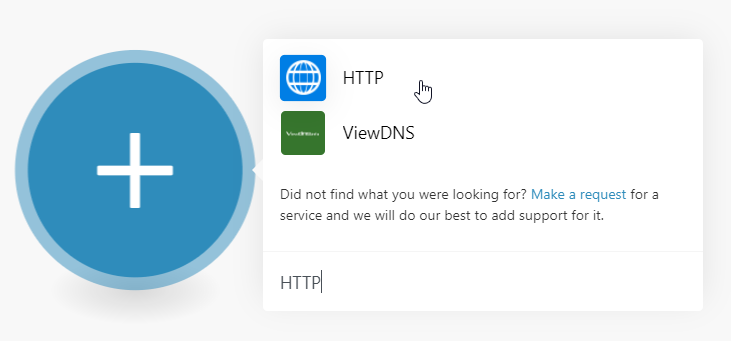
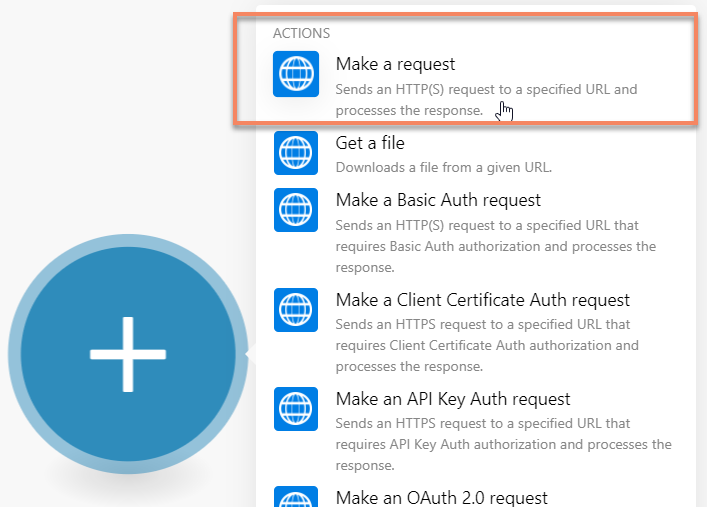
The first service we need is HTTP. Search for HTTP, click on the HTTP icon and then click on Make a request.
HINT: Don't forget to save your scenario!
We suggest you to save your scenario. On the left upper corner, you can change the scenario name. On the left bottom corner, you will find CONTROLS, press the save icon 💾.
We perform a REST API call in order to check if some units of work (identified by Topic name) is waiting for the worker.
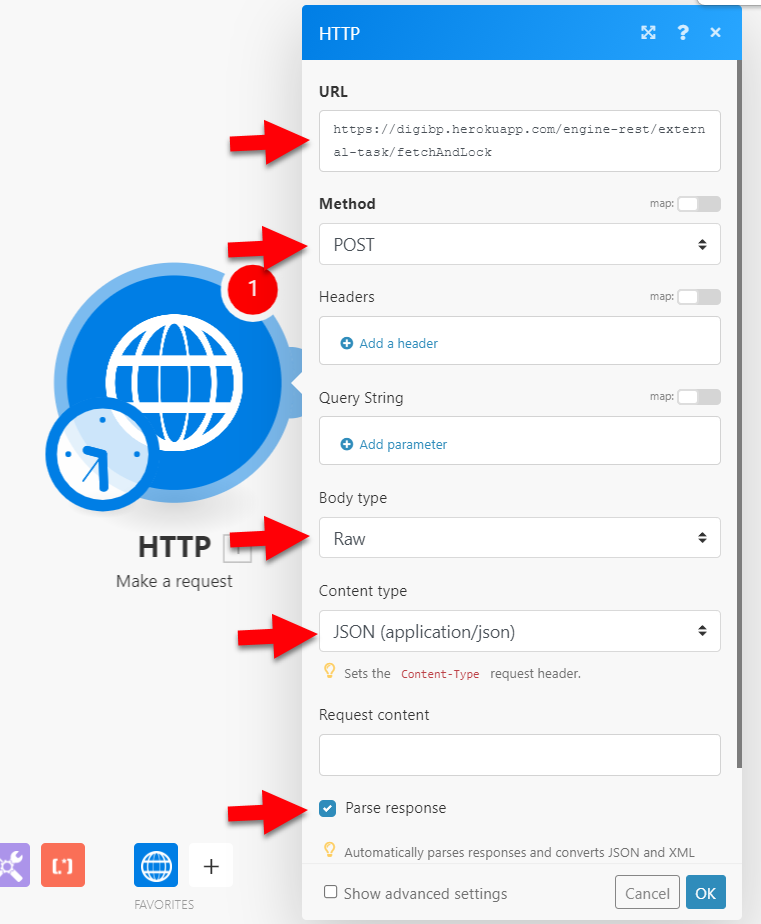
The worker will fetch the tasks and lock the tasks for a certain duration to prevent that one task is being fetched by multiple workers at the same time. To be able to fetch and lock a task, we need to define the URL. The URL is our DigiBP classroom instance on Heroku extended with the REST API endpoint /external-task/fetchAndLock
- Enter the URL (copy&paste):
https://digibp.herokuapp.com/engine-rest/external-task/fetchAndLock - Select Method POST
- Body type Raw
- Content type JSON (application/json)
- Tick Parse response
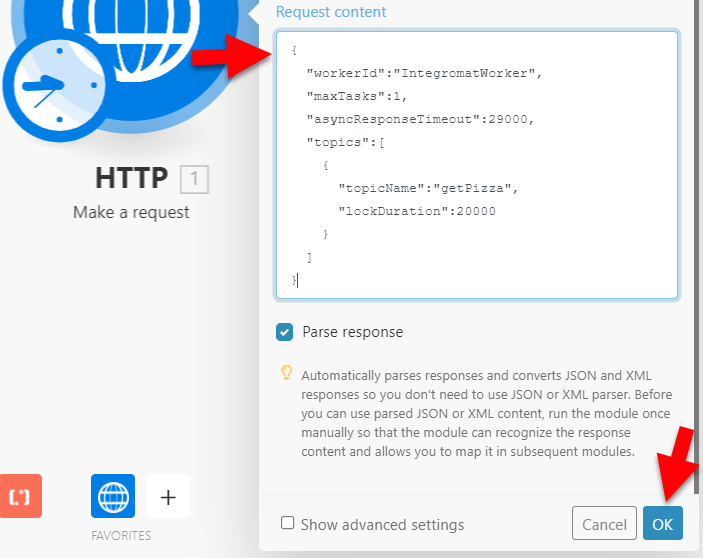
Now we have to define the Request content, also the body (Please copy&paste).
This is done based on Camunda REST API documentation for external task. For a detailed definition of the properties used in the body, please have a look here.
{
  "workerId":"IntegromatWorker",
  "maxTasks":1,
  "asyncResponseTimeout":29000,
  "topics":[
    {
      "topicName":"getPizza<yourName>",
      "lockDuration":20000,
      "tenantId":"<yourTenantId>"
    }
  ]
}
HINT: Don't forget to change the tenantId! User you own tenantId within the quotes.
The property topicName (in our case getPizza<yourName>) must be the same as you defined in Camunda modeler for the Get Menu service task. If you used a different name to define the topic in Camunda modeler, please change it accordingly.
Now press OK in the lower right corner to save your settings. If you do not press OK (which is generally true for all modules you need to configure in Make), all the settings you made will disappear.
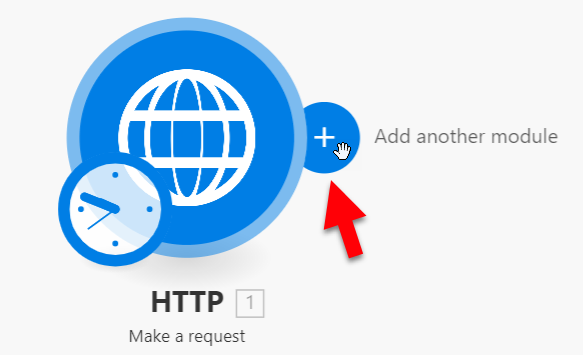
Click to add a new module (+ symbol):
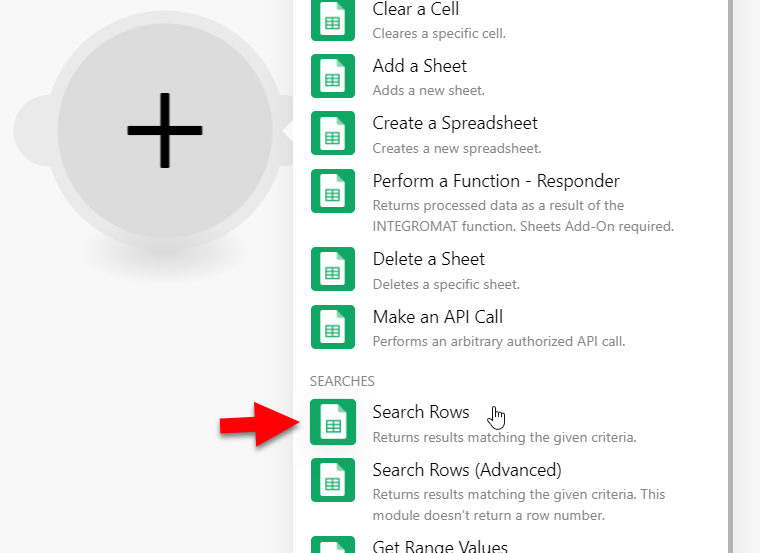
As there are many modules, search for and select Google Sheets:
As we want to read the contents of the Pizza Menu sheet, choose the action Search Rows.
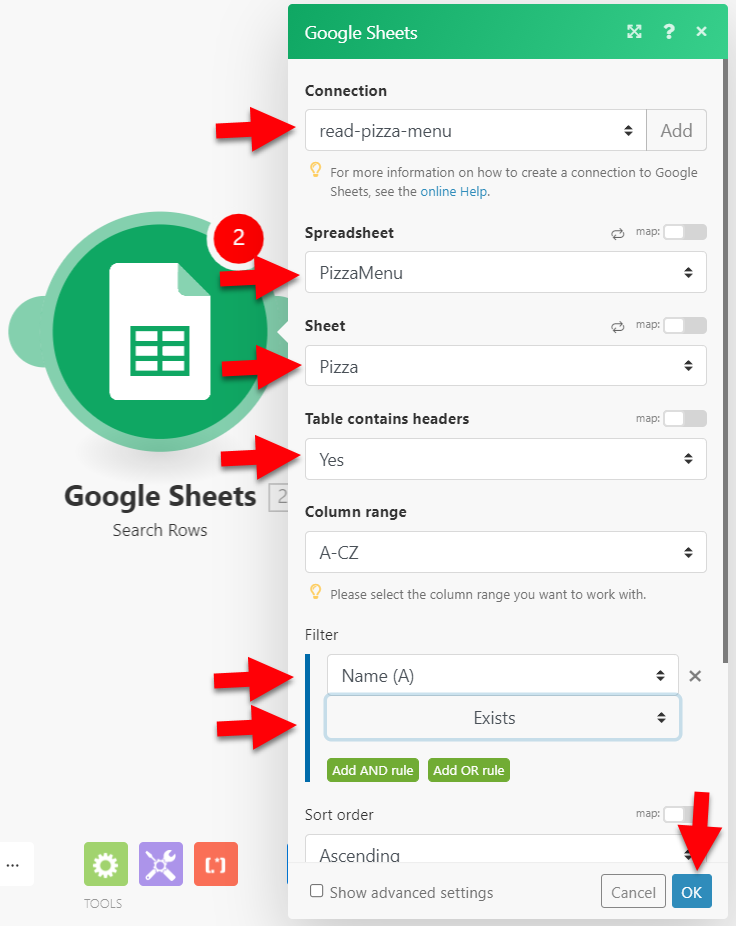
Click on Add and create a new connection "read-pizza-menu" and click Continue. You will be redirected to the Google sign-in page asking you to trust Make. Click on Allow button.
Back in Make, choose the spreadsheet Pizza Menu and the sheet Pizza (or however you named your sheet - default is Sheet1 if you did not modify the sheet name). Add Filter to check that the column Name exists. Scroll down and set the Maximum number of returned rows to 50. Press OK.
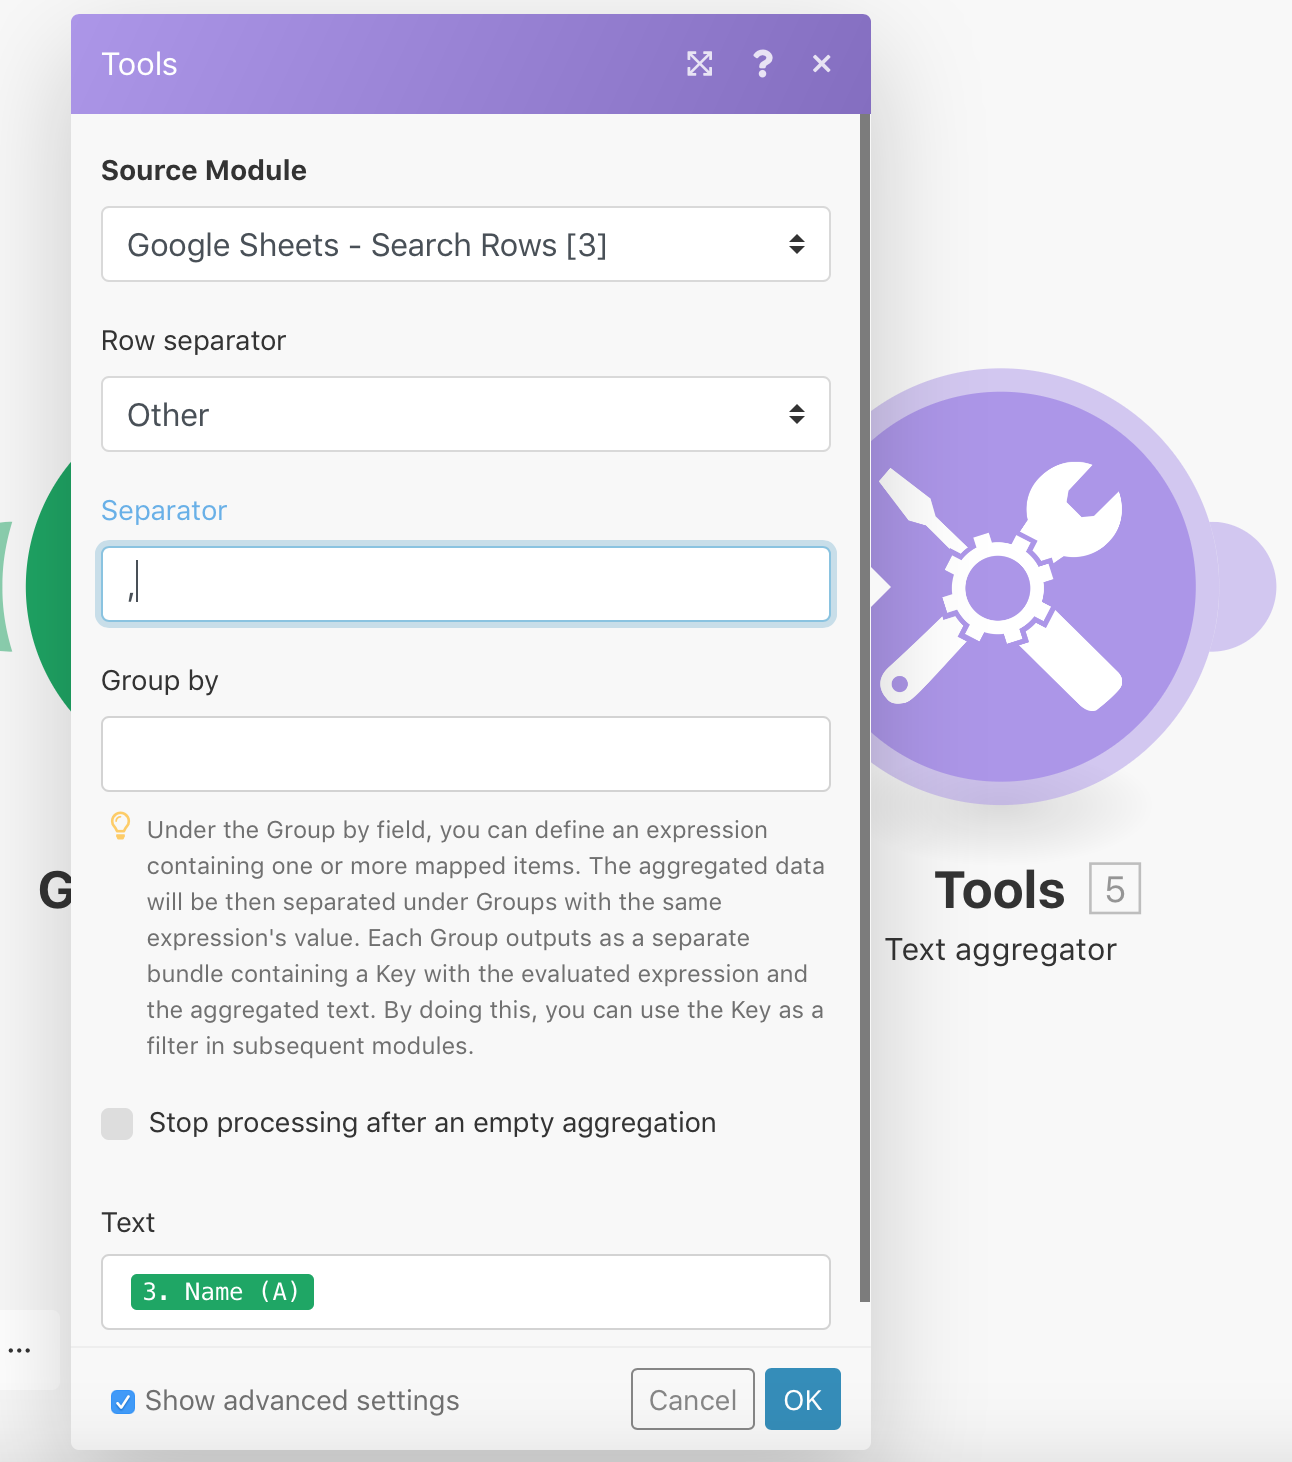
Next, add a new module by searching Tools and selecting the Text Aggregator. Click on Show advanced settings and add details as shown in the figure below. This will create a comma-separated list of the pizza names.
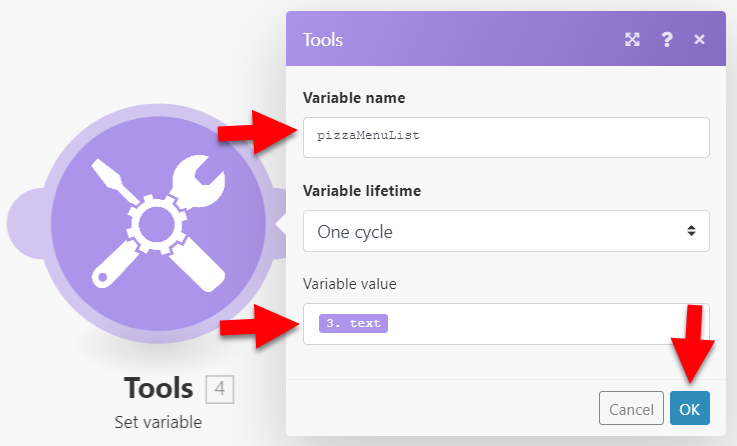
Add a new module by searching again for Tools and selecting Set variable. In the step before we created a comma separated list of all the pizza names and now we create a variable to store this list.
Finally, add the last module for the response. Add a new module by searching for HTTP and selecting Make a request. This module is going to send the pizza list back to our running process. Before we configure our last module, we need to run our scenario as an "unfinished" scenario. Don't forget to save your scenario - you will get an error message, press Save anyway!
To complete the external task we need to know the ID of this specific external task. If you had a look on the Camunda documentation for fetch and lock external tasks, our first module HTTP Make a request is going to receive this ID. We would like to reuse this ID in order to send the response back. Now, we have to run our process on DigiBP classroom instance and we have to execute our scenario in Make (even if its not finished yet).
- Go to DigiBP classroom instance
- Login with your userid
- Select Tasklist
- Start process by selecting your own process (if you changed the name of the process, you will have no issue to find it 😉).
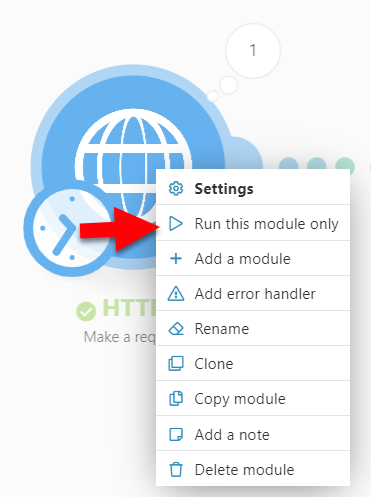
- Go back to Make and start only the first module of your scenario:
HINT: If one of the modules in your Make scenario received data - indicated by the number in the upper right corner of the module (see picture above) - you can have a look on the input as well the output of this specific module when you click on this number (in the picture above is 1).
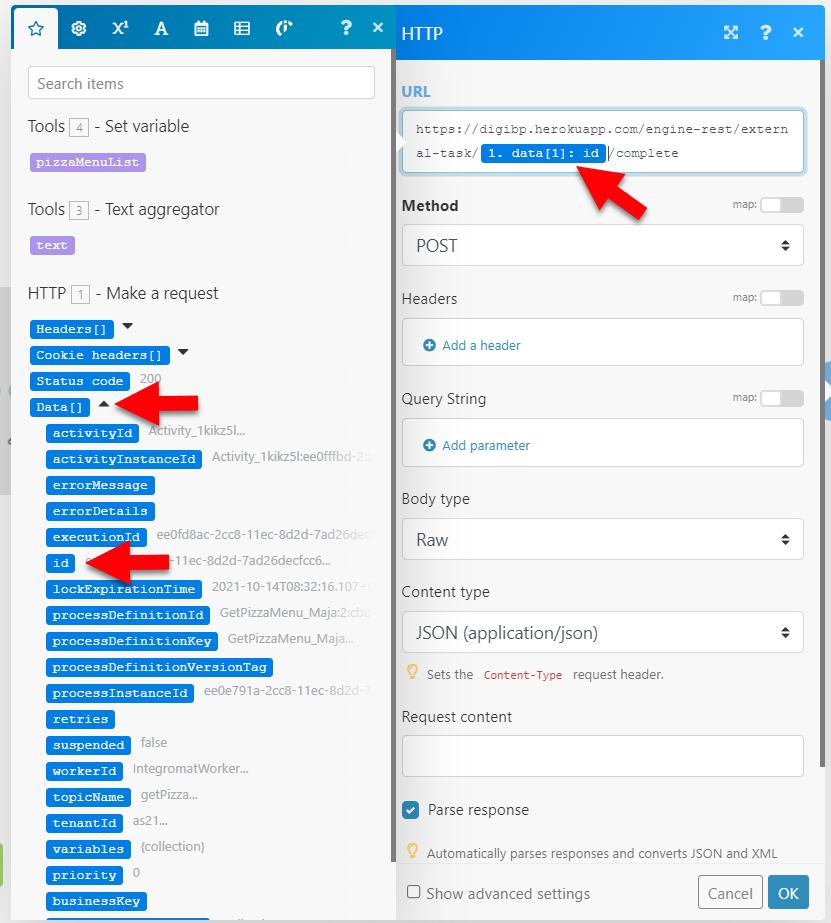
Now is the time to configure our last module. Click on the last Module in your scenario HTTP Make a request. As we need to complete the external task, we need to send a request to the REST API endpoint /external-task/{id}/complete. For more information, have a look on Camunda documentation.
- Enter the URL:
https://digibp.herokuapp.com/engine-rest/external-task/{id}/complete- The {id} needs to be adjusted. Delete {id} from the URL and select the ID from the list which apears on the left side.
- Select Method POST
- Select Body type Raw
- Select Content type JSON (application/json)
- Tick the box Parse response
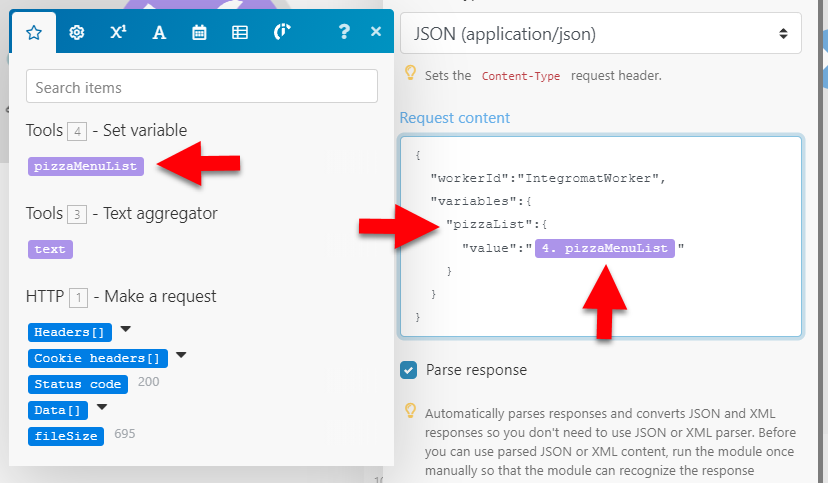
Almost done! The last task is to configure the Request content. Copy and paste following content:
{
  "workerId":"IntegromatWorker",
  "variables":{
    "pizzaList":{
      "value":"{{4.pizzaMenuList}}"
    }
  }
}
As the property {{4.pizzaMenuList}} need to be connected to the variable we created before, make sure that you change this part of the request content as you did before for the ID in the URL. Don't forget to press OK.
HINT: When we modeled our process in Camunda, we defined a form field for the user task and gave it a specific ID. In this tutorial we have specified the ID as pizzaList. In order to display the response of our service, in our case the pizza list, in this form field, we have to make sure that exactly this ID (case-sensitive) is used again in the request content. In this way, the data is sent to the correct variable in the process and can then be displayed.
Now we are done! Congratulations!
Run your scenario (by clicking on Run once) and go back to DigiBP classroom instance and hopefully, you will see your pizza list.
If not, don't worry, go back to the beginning of this tutorial and try it again (start from scratch).
Oops, still one more task is remaining 😉!
In the previous step, you executed your scenario by clicking on the Run once option. As you can imagine, it can be very cumbersome to click this option every time you would like to run your process and get a response from your custom Get Pizza service. To avoid this, you can schedule your scenario by moving the SCHEDULING slider (bottom left) to ON. You can view the Schedule Settings by clicking the watch symbol (:clock4:) next to the slider. Here you will see that this scenario can be executed only every 15 minutes, and not before that. What if you would like to execute the scenario as soon as the process asks for a response? For that, you can use the following workaround!
Remember that your scenario is currently polling the workflow engine every 15 minutes to check if there is any task waiting for the topic getPizza<yourName>. To change this behavior, you can add a webhook before the HTTP request fetch and lock module (the first module in your current scenario).
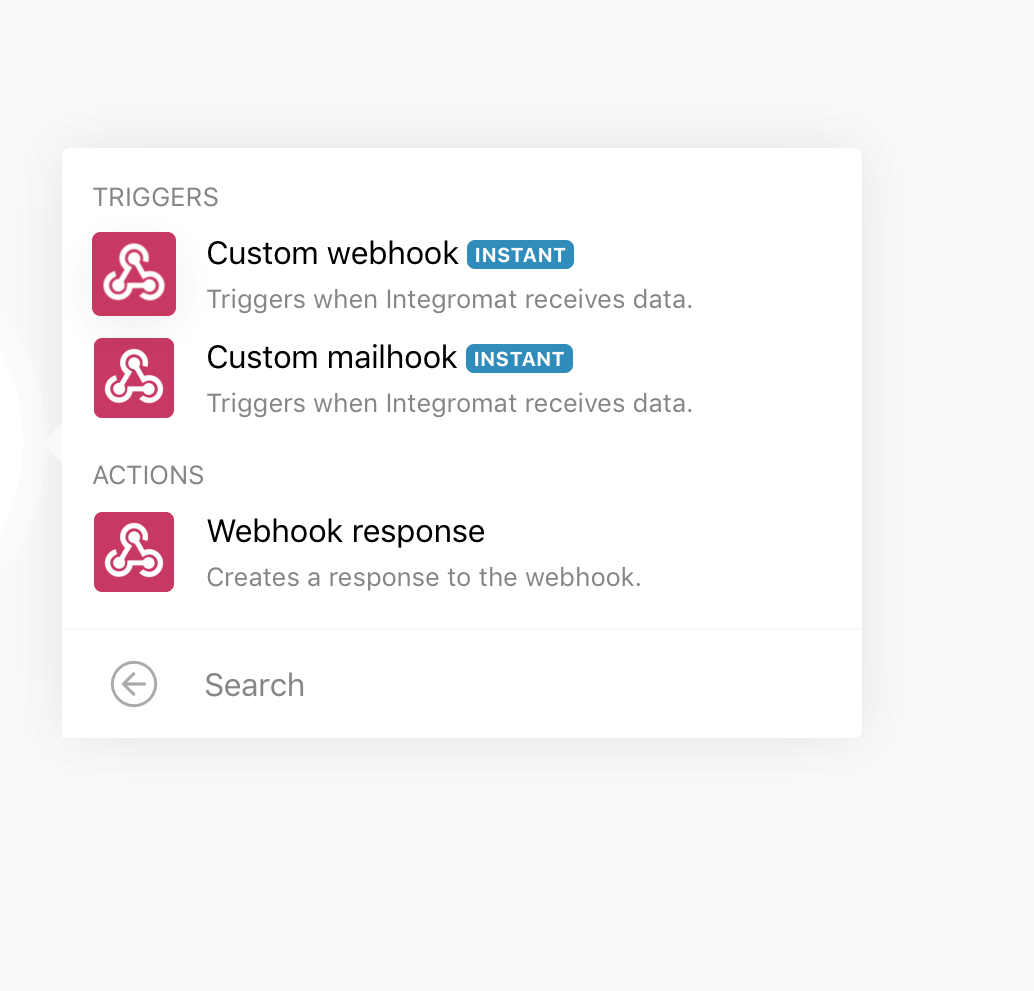
- Search for "webhook" by clicking on the + symbol at the bottom. Choose the Custom Webhook module and connect it to the HTTP request fetch and lock module such that the Custom Webhook is the first module in your scenario.
- Now your scenario should look as shown in the below image.
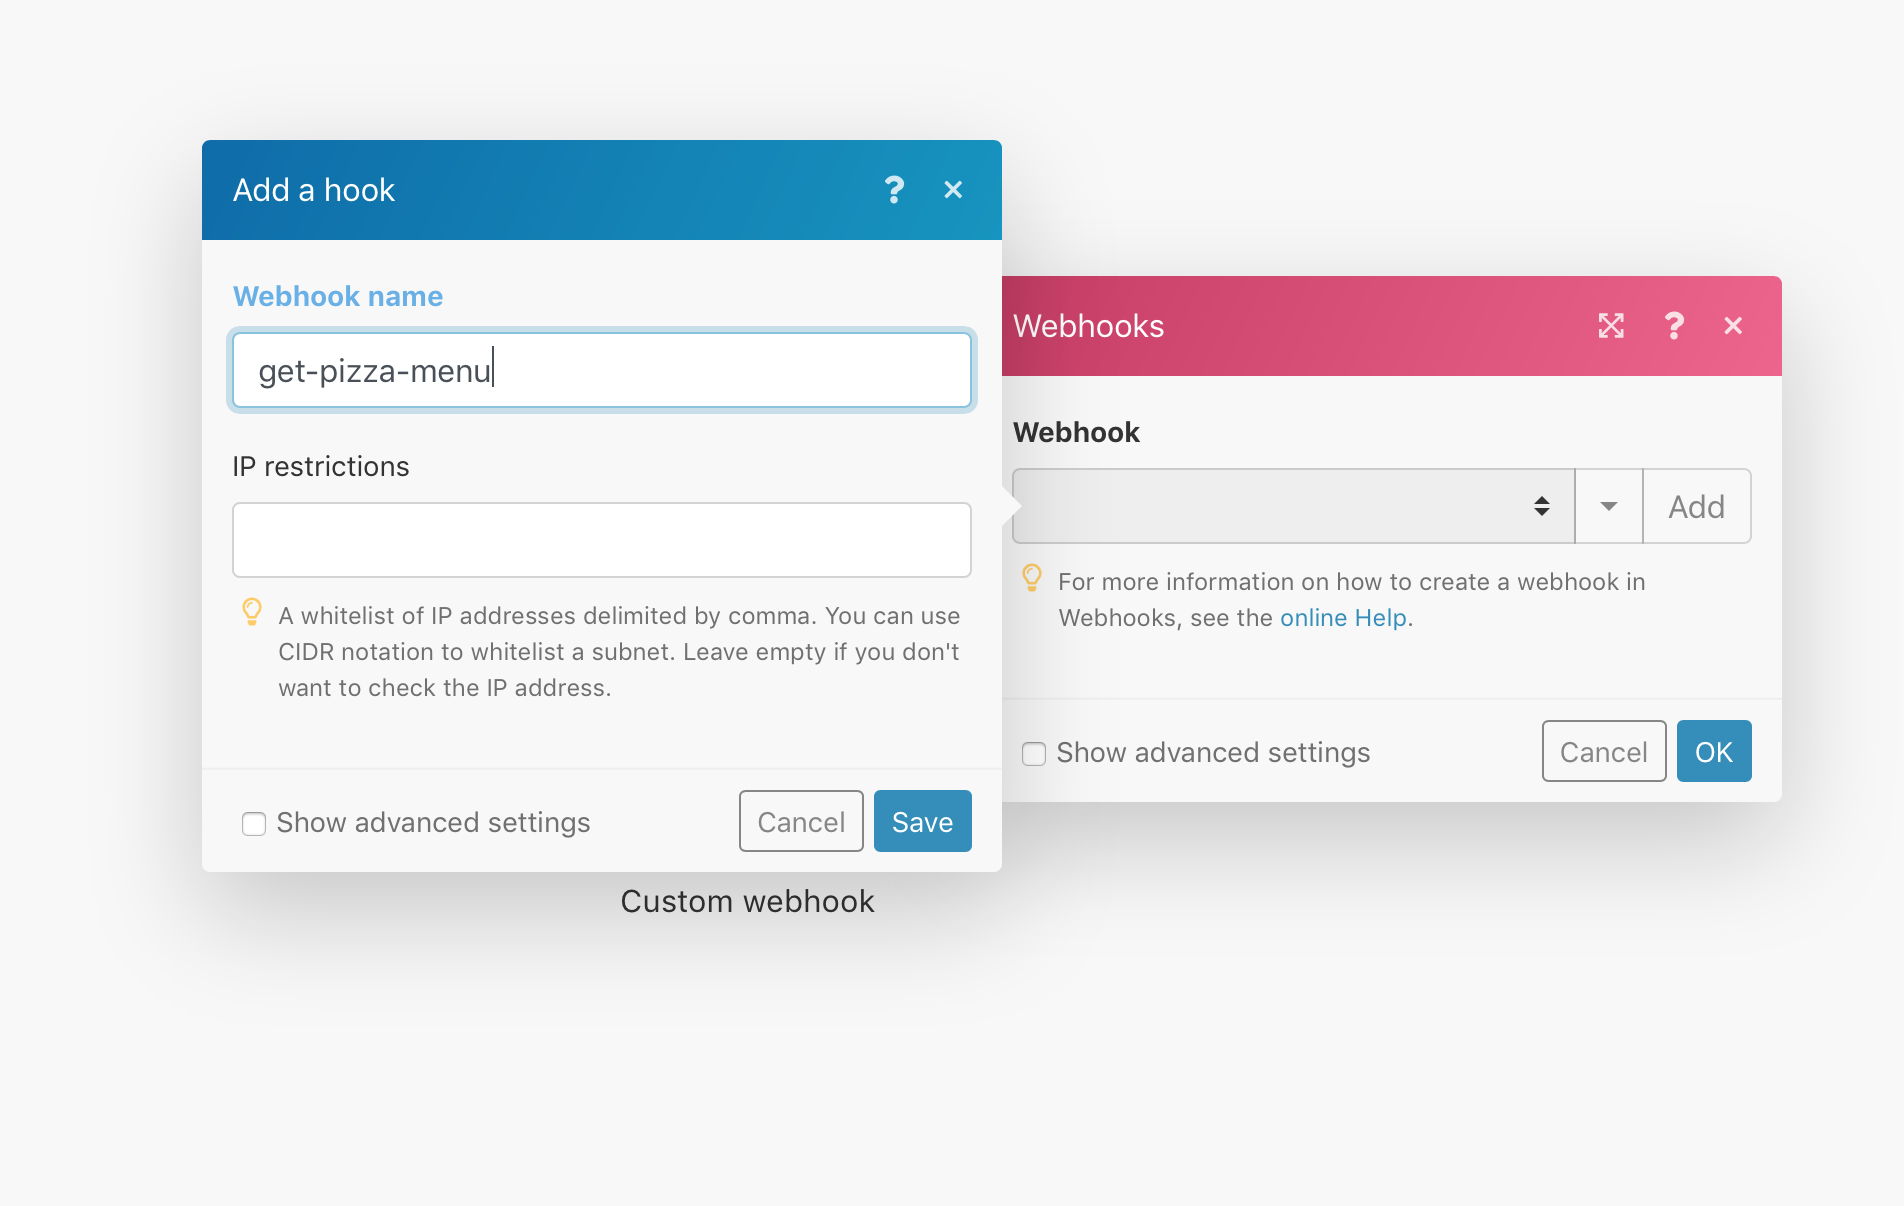
- Next, click on the Add button on the webhook, enter the webhook name "get-pizza-menu" as shown in the image and click Save.
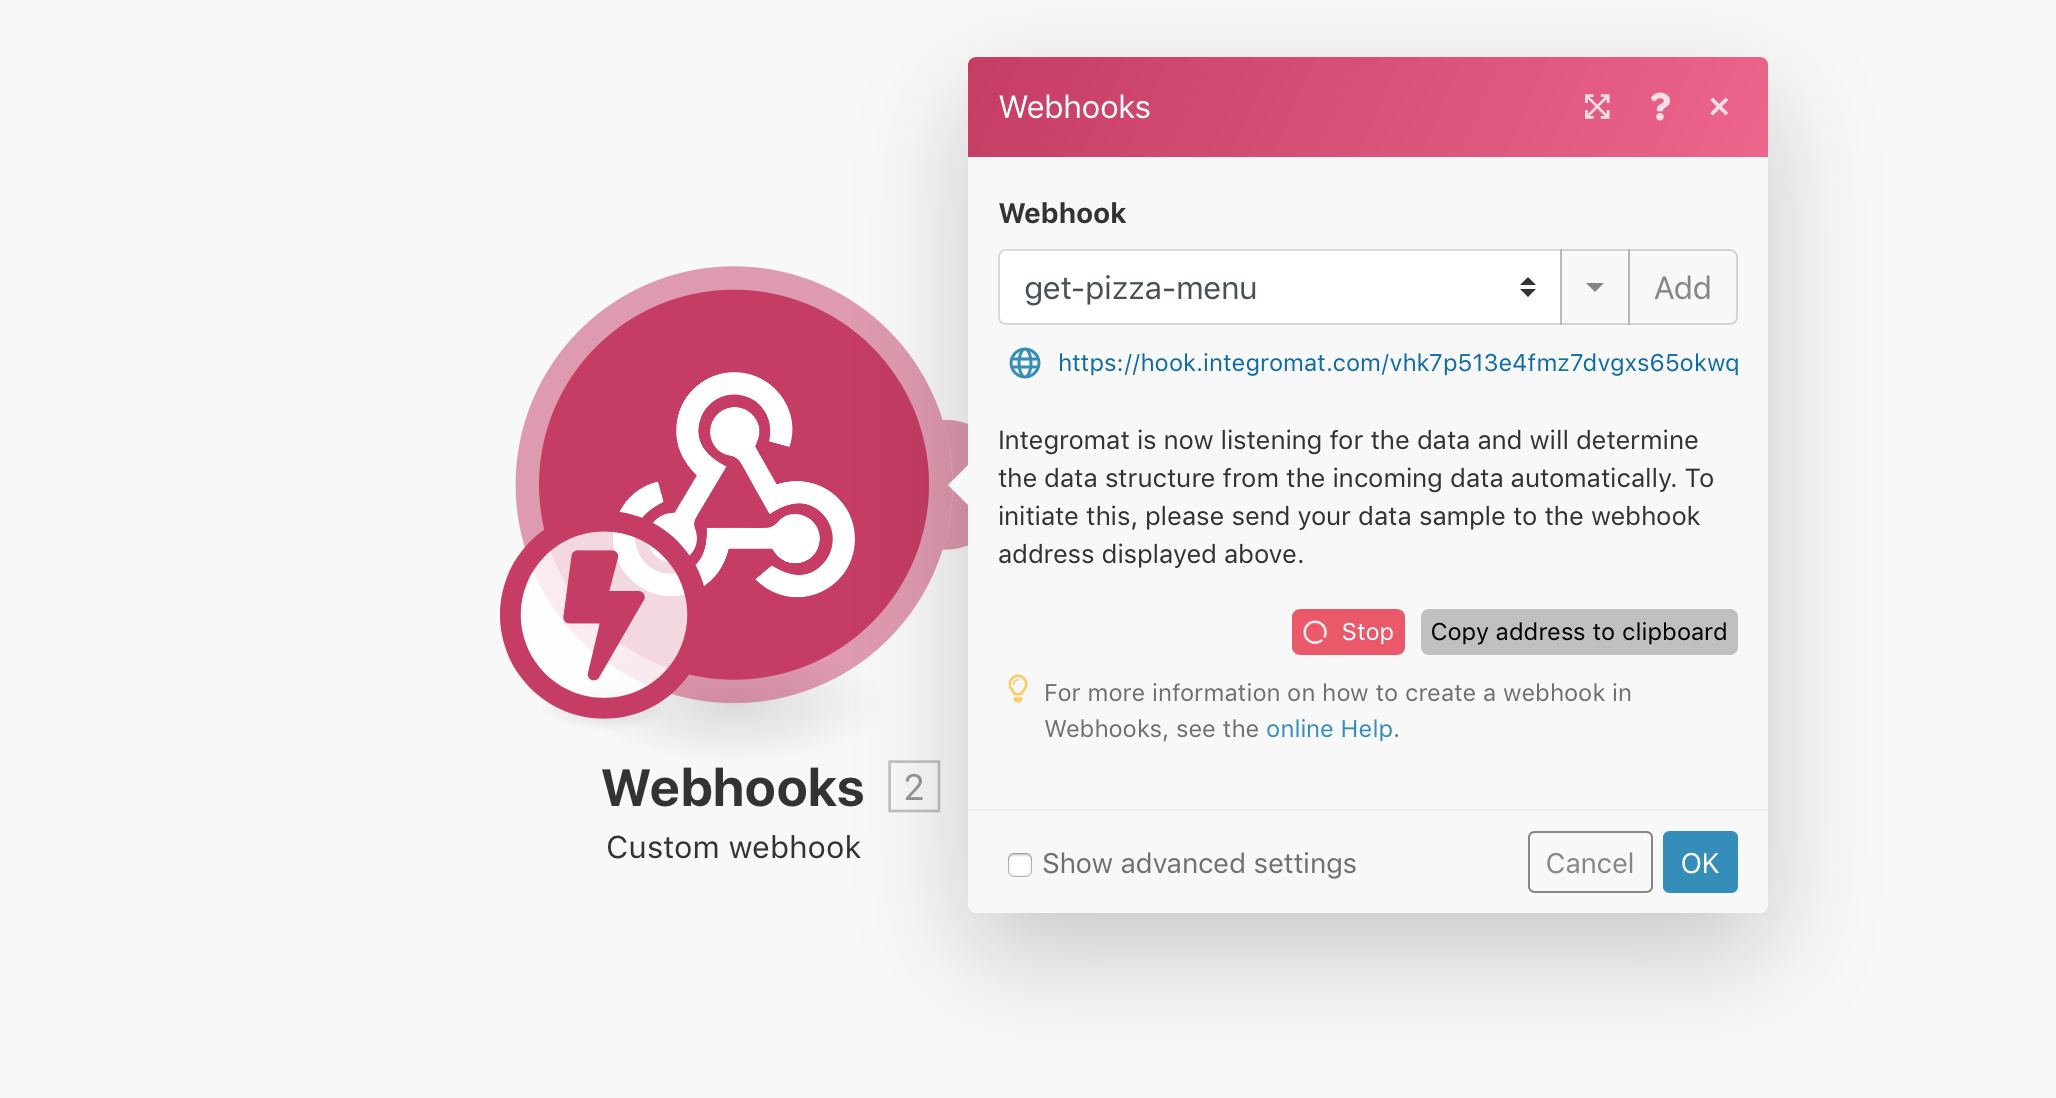
- You will now see a URL generated by Make - this is the endpoint to which we will notify from the Camunda model every time our process needs a response from our custom Get Pizza service. Click OK.
Please note that every webhook has a unique URL. You should use the one from your own webhook by clicking on Copy address to clipboard button, and not the one shown in the image below.
After adding a webhook to your scenario, you need to make some changes to your process model to send a notification to the Get Pizza service scenario. As soon as the scenario receives the notification, the HTTP request fetch and lock module will poll to check if there is any task waiting.
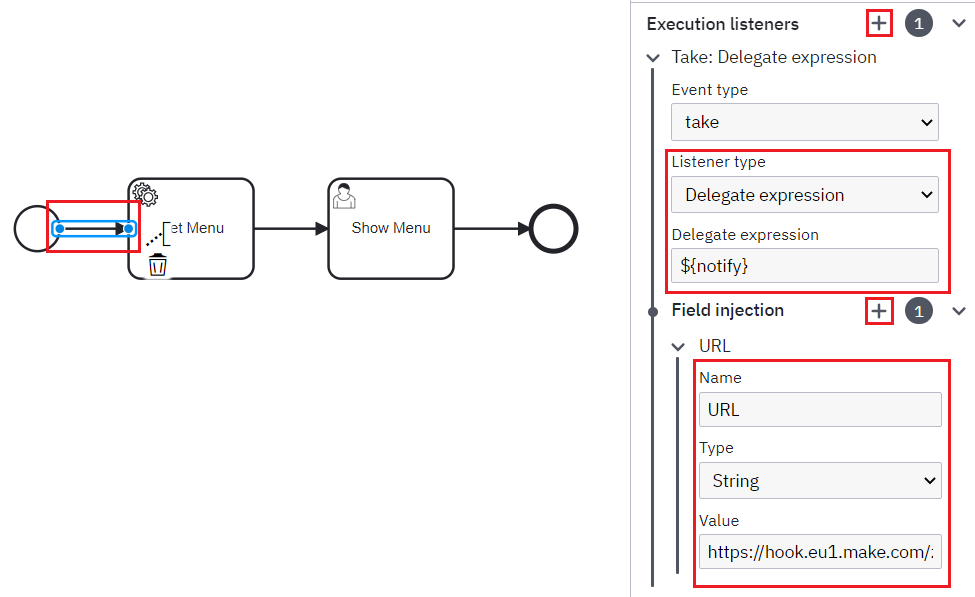
- Open the process that you modeled earlier and click on the sequence flow between the start event and the Get Menu service task.
- Next, add a new execution listener by clicking on the plus icon next to Execution Listener option in the Properties Panel.
-
The Event Type should be "take". Choose Delegate Expression in the Listener type dropdown and enter the expression
${notify}(copy&paste) into the Delegate expression textbox. -
Scroll down and add a new Field Injection by clicking on the plus icon next to it, enter the name
URL(copy&paste) into the Name textbox. The type should be String. -
Finally, enter the unique url of your webhook that you added in Make in the Value textbox.
-
You know what you need to do next 😉 - you will have to re-deploy your model! From the DigiBP classroom instance, start your process again and hopefully you will get the list of pizzas right away!
In the previous tutorial we got a list with the available pizzas, but now Mario's Pizzeria has expanded and the list of available pizzas needs to be extended.
In this use case we are going to learn how to add a new pizza to the existing database (in our case Google sheets).
Open the Camunda Modeller and create the process model as follows:
HINT: Use your process model created in the previous tutorial, add a new service task Add Pizza and save the process under a new name. Don't forget to change the process id (eg. Add_Pizza).
The configuration of the service task Get Menu and user task Show Menu remain the same. In this process we use knowledge acquired in the previous tutorial and additionally learn how new data can be stored in a database.
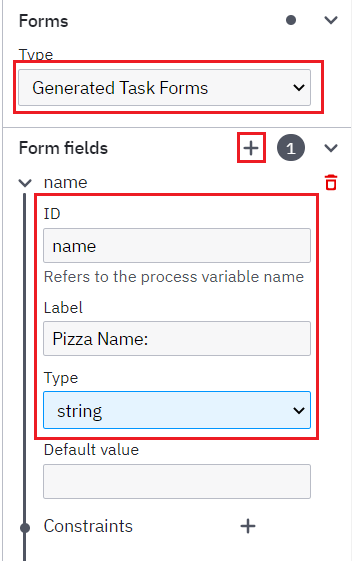
We want to get a form field to add a new pizza as soon we start our process. For this reason, we need to add a form field directly to the start event.
Select the Start Event and create a new form field name:
The procedure is the same as we did to get the pizza list. Select "Add Menu" service task and choose implementation "External" from the General tab. Set a topic name.
Now we are ready to deploy the process. For that, we are going to use the DigiBP classroom instance. For now, we are not going to run the process. We still have some work to do 😉.
- Enter deployment name and your Tenant ID.
- Enter the deployment endpoint (copy&paste):
https://digibp.herokuapp.com/engine-rest - Go to the DigiBP classroom instance welcome and landing page: https://digibp.herokuapp.com
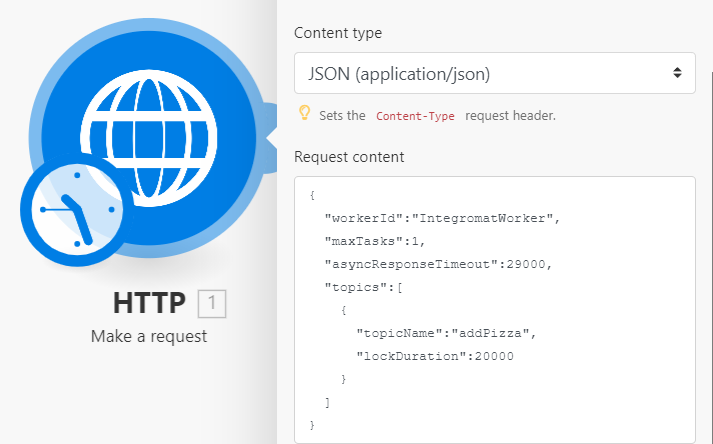
We will be creating an external task worker that will poll all requests sent to a new topic - addPizza<yourName>.
Open Make and create a new scenario as we did before for "Get Pizza" tutorial.
HINT: Make offers the possability to
Clonean existing scenario. If you want to try out Make without jeopardizing your existing scenario, this function is beneficial.
The URL is our class room instance on Heroku extended with the REST API /external-task/fetchAndLock
- Enter the URL (copy&paste):
https://digibp.herokuapp.com/engine-rest/external-task/fetchAndLock - Select Methode POST
- Body type Raw
- Content type **JSON (application/json)
- Tick Parse response
Now we have to define the Request content, also the body (Please copy&paste).
This is done based on Camunda REST API documentation for external task. For a detailed definition of the properties used in the body, please have a look here.
{
  "workerId":"IntegromatWorker",
  "maxTasks":1,
  "asyncResponseTimeout":29000,
  "topics":[
    {
      "topicName":"addPizza<yourName>",
      "lockDuration":20000,
      "tenantId":"<yourTenantId>"
    }
  ]
}
HINT: Don't forget to change the tenantId! User you own tenantId.
The property topicName (in our case addPizza<yourName>) must be the same as you defined in Camunda modeler for the Add Menu service task. If you used a different name to define the Topic in Camunda modeler, please change it accordingly.
Now press OK in the lower right corner to save your settings. If you do not press OK (which is generally true for all modules you need to configure in Make), all the settings you made will disappear.
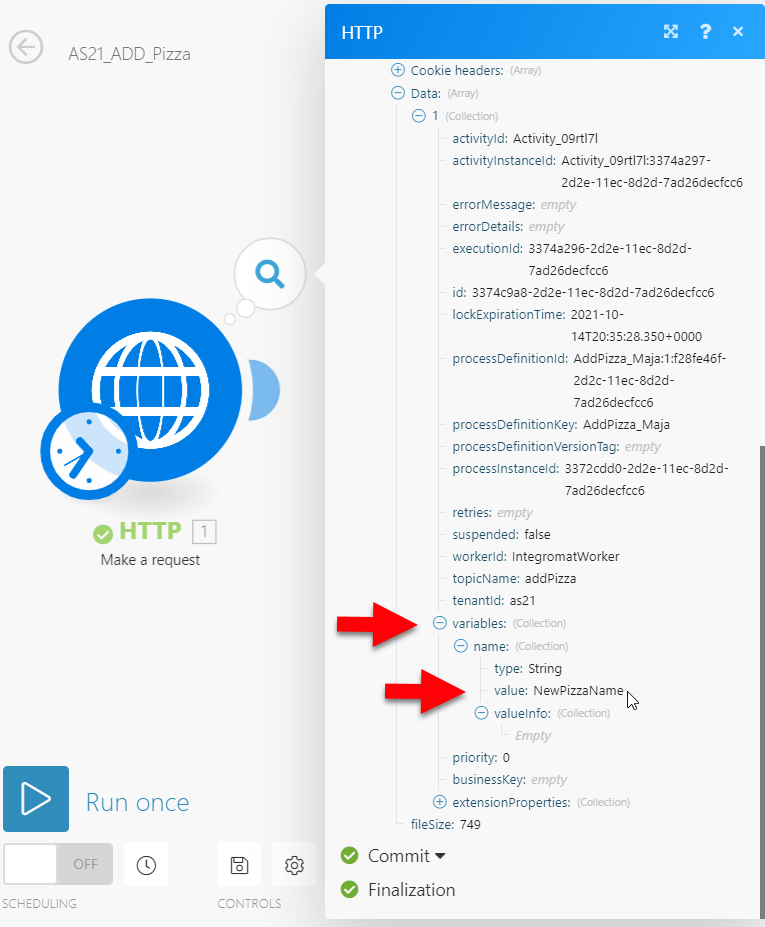
To be able to add the new pizza name to our database (in our case it would be Google Sheets), we need to run our process in order to provide content of the defined variable name to our Make scenario.
- Go to Camunda Heroku classroom instance
- Login with your tenant
- Select Tasklist
- Start process by selecting your own process (if you changed the name of the process, you will have no issue to find it 😉).
- A textbox will appear where you have to enter one pizza name (you can choose whatever you want, even Hawaii 😂).
- Go back to Make and start only the first module of your scenario:
Click to add a new module (+ symbol):
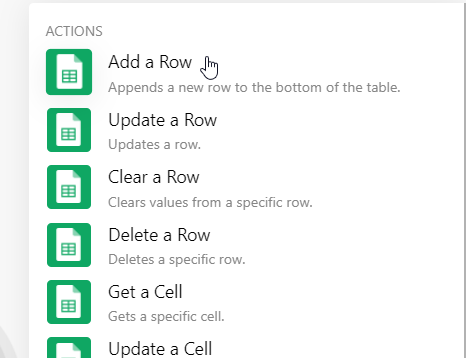
As there are many modules, search for and select Google Sheets. As we want to add new content to our Google sheet, choose the action Add a Row.
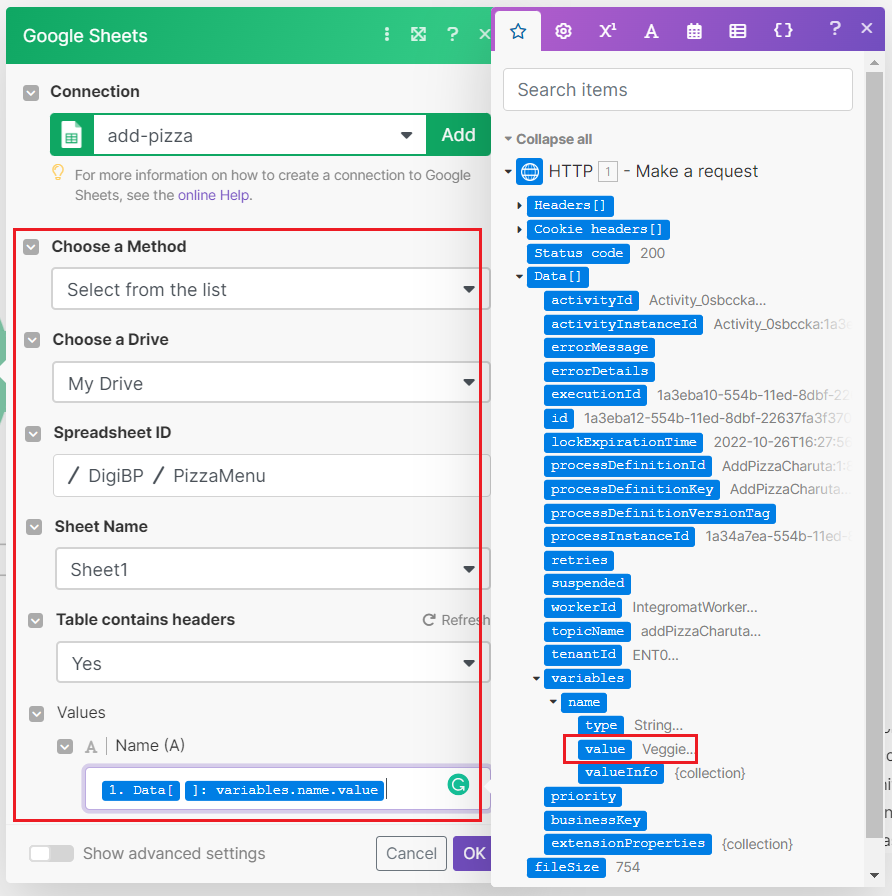
Add a new connection add-pizza and connect to Google Sheets by allowing access to Make. Choose spreadsheet PizzaMenu and Sheet1 (or in this case Sheet1 was renamed to Pizza). In the values, choose the value from the variable name as determined by the HTTP module as a result of the successful POST request. When adding new pizza name to the Google sheet, the next free row will be selected automatically and the value will be stored there.
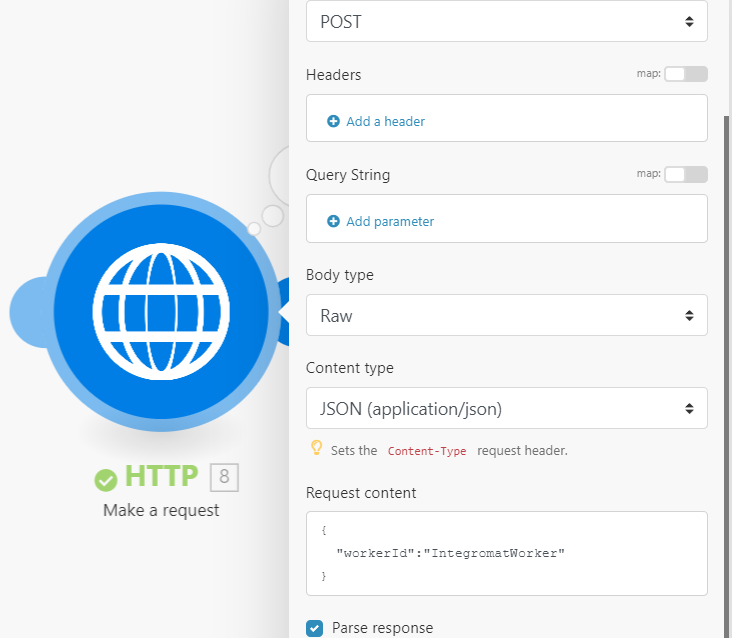
Our external task worker needs to send a POST request back to confirm that the task is done. The last module is going to be again HTTP Make a request.
- Enter the URL:
https://digibp.herokuapp.com/engine-rest/external-task/{id}/complete- The {id} need to be adjusted. Delete {id} from the URL and select the ID from the list which appears on the left side.
- Select Methode POST
- Select Body type Raw
- Select Content type JSON (application/json)
- Tick the box Parse response
Almost done! The last task is to configure the Request content. As we are not sending any variable back to the process, our request body looks almost empty. We just mention the worker Id. Copy and paste following content:
{
  "workerId":"IntegromatWorker"
}
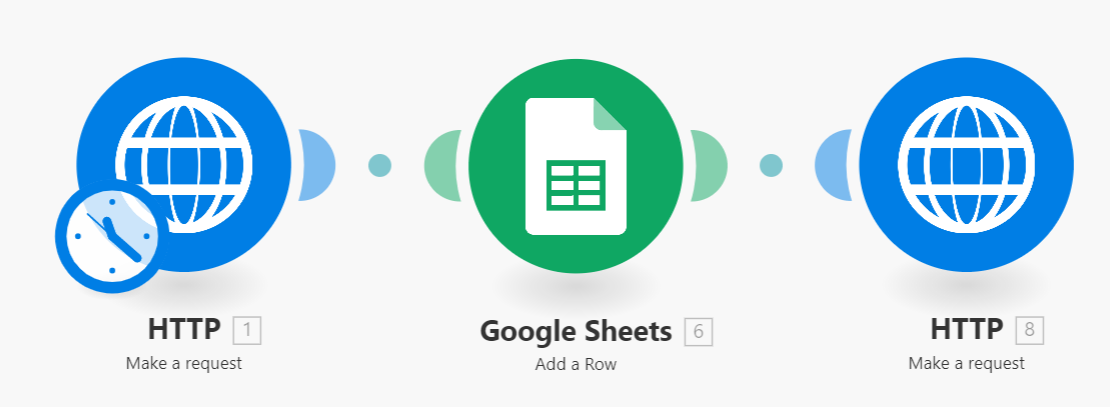
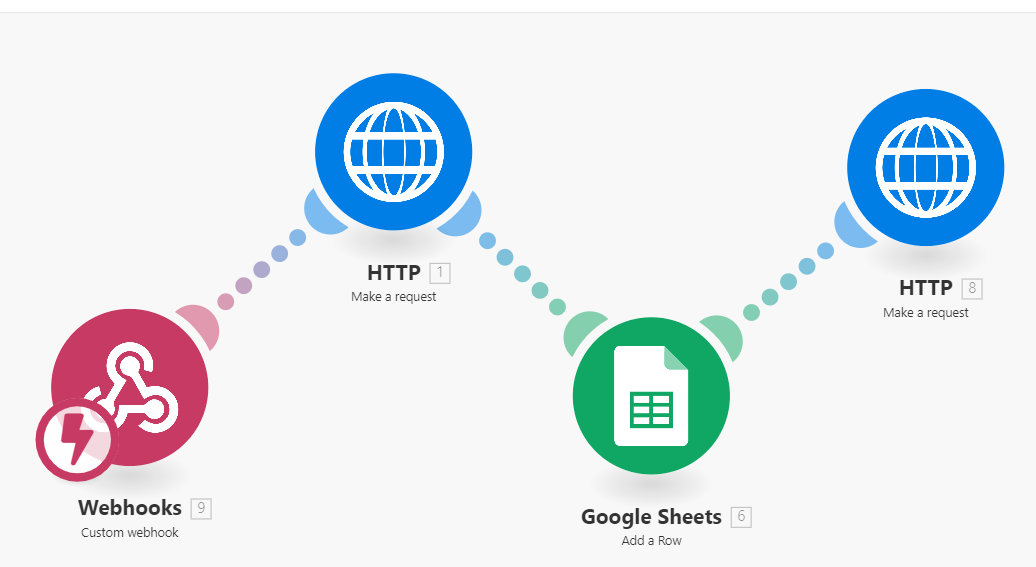
At the end, your add pizza Make scenario should look like this:
If we run our process at this stage, the token is going to move forward to the next task "Get Menu". See picture:
In order to execute the whole process we need to start the scenraio we created before. Go to your get pizza menu Make scenario and run it once.
The toke is going to move to the next task Show Menuand a new user task will appear on your Camunda Tasklist containing the new added pizza name.
Now we are done! Congratulations!
If your process or Make scenario does not work, don't worry, go back to the beginning of this tutorial and try it again (start from scratch).
Ah, don't forget to schedule your scenario like before! Please follow the exact same steps as in Step 8 of the Get Pizza use case. Remember to send a separate notification before the Add Pizza service task and the Get Menu service task!
Once done, your scenario should look like this:
- Now your scenario should like like in the below image.
