Basic Usage - DevNatan/inventory-framework GitHub Wiki
On this page you will learn only the basic functionality of a view.
- Configuration
- Rendering Static Items
- Rendering Dynamic Items
- Registering your Views
- Opening and Closing
Let's get started and create a simple view. Create a regular class and extend the View class.
import me.devnatan.inventoryframework.View;

class CoolView extends View {

    /* ...everything goes here... */
}
Configuration is done through onInit(ViewConfigBuilder), it's called before your view gets initialized. Override that function and use this to change things link title, size, type and so on.
Let's change the title of our view to "Octopus", use title(...)
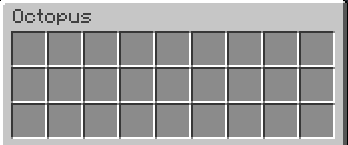
@Override
public void onInit(ViewConfigBuilder config) {
    config.title("Octopus");
}
Inventory Framework supports several types of inventory like anvil, villager, enchantment, etc. Change them in the configuration as well. ViewType is used to determine which type of inventory you need.
In the example above we change our inventory type to Item Hopper

@Override
public void onInit(ViewConfigBuilder config) {
    config.type(ViewType.HOPPER);
}
The default type is CHEST for cases that you do not specific it explicitly.
Note: Some types cannot be used like PLAYER (that represented the Player Inventory) or doesn't allow further combination with another options, for example, you can not change the title of some types due to Minecraft Protocol limitation.
For size, you can use the number of rows e.g.: 6 (that is 54 slots) or the number of slots that tthe inventory will have e.g.: 54 (that is 6 rows).
@Override
public void onInit(ViewConfigBuilder config) {
    // Both works and achieve same result
    config.size(5);
    config.size(45);
}You may have noticed that we didn't have access to anything other than the configuration parameter earlier and... The title of my inventory will be the player's name, how I do that???!
Ok for this, we resort to the second function of our learning which is onOpen! As the name suggests it's called on open (obviously), but it's called before the inventory is even created so we have the chance to configure some things before the player can see it.
What we need looks like this in the source code:
public void onOpen(OpenContext openContext);In the example below we will change the title of the inventory to the name of the player that's opening it
Use modifyConfig() to change configuration before opening the inventory, the options are the same as the configuration topic.

@Override
public void onOpen(OpenContext open) {
    final Player player = open.getPlayer();
    open.modifyConfig()
            .title("Hi, " + player.getName() + "!");
}
Also, this is the first time we see a context, you can learn more about what contexts are later on Advanced Usage page.
To add items to the inventory, override the onFirstRender function and use the methods suffixed with slot. The onFirstRender function is called once during the lifecycle of the inventory!
Item definition functions return a constructor used for handling interactions and other things.
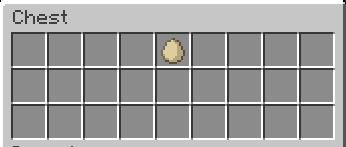
@Override
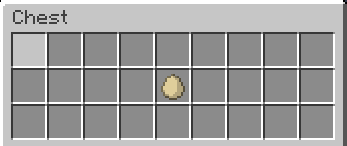
public void onFirstRender(RenderContext render) {
render.slot(4, new ItemStack(Material.EGG));
}It is also possible to define the position of the item based on row and column.
@Override
public void onFirstRender(RenderContext render) {
    render.slot(2, 5, new ItemStack(Material.EGG));
}
In case you need to add an item to the first or last slot of the inventory, using the firstSlot and lastSlot.
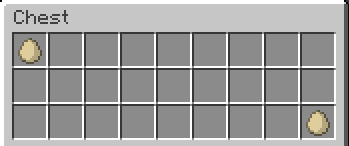
@Override
public void onFirstRender(RenderContext render) {
    render.firstSlot(new ItemStack(Material.EGG));
    render.lastSlot(new ItemStack(Material.EGG));
}
Using these functions is highly recommended as this function is based on the container's settings and is self-adaptive, i.e. if you change the type or size of the container or have a conditionally defined size this function will always set the item in the right place.
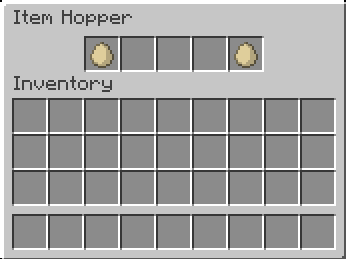
@Override
public void onInit(ViewConfigBuilder config) {
    config.type(ViewType.HOPPER);
}

@Override
public void onFirstRender(RenderContext render) {
    render.firstSlot(new ItemStack(Material.EGG));
    render.lastSlot(new ItemStack(Material.EGG));
}
Through the availableSlot function you can resemble the behavior of the Inventory.addItem of Bukkit that sets the item in the next available slot of the inventory.
But, this function does more than just that, it adapts to your view conditions, for example: if you have a layout it sets the item in the next available slot in the layout, now, if you have pagination it sets the item in the next available slot respecting paging limits.
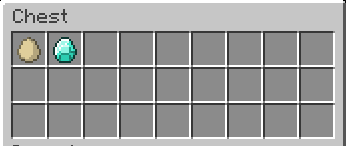
@Override
public void onFirstRender(RenderContext render) {
    render.firstSlot(new ItemStack(Material.EGG));
    render.availableSlot(new ItemStack(Material.DIAMOND));
}
It is especially useful in cases where there is a series of data to be iterated and defined items from this data.

@Override
public void onFirstRender(RenderContext render) {
    // will not be ignored in the iteration below
    render.slot(1, new ItemStack(Material.EGG));

    for (int i = 1; i <= 5; i++) {
        render.availableSlot(new ItemStack(Material.DIAMOND, i));
}row/column let you fill a specific row or column, in order.
Each call fills exactly one item, into the next available slot of that row/column — it does not fill the whole row/column by itself. To fill an entire row/column, call it once per item (e.g. in a loop), the same way you would with
availableSlot.
Slots are 1-indexed and filled left-to-right for rows, top-to-bottom for columns, skipping any slot that's already occupied (e.g. by a layout item). Calling it more times than the row/column can hold throws a SlotFillExceededException.
@Override
public void onFirstRender(RenderContext render) {
    // Each iteration fills ONE slot; 9 calls are needed to fill a 9-wide row.
    for (int i = 0; i < render.getContainer().getColumnsCount(); i++) {
        render.row(1).withItem(new ItemStack(Material.LIME_STAINED_GLASS_PANE));
    }
}
Use firstRow()/lastRow()/firstColumn()/lastColumn() as shortcuts for the first/last row or column, so you don't need to know the container's dimensions or hardcode 1. These also fill one item per call.
@Override
public void onFirstRender(RenderContext render) {
    render.firstRow().withItem(new ItemStack(Material.LIME_STAINED_GLASS_PANE));
    render.lastColumn().withItem(new ItemStack(Material.ORANGE_STAINED_GLASS_PANE));
}Both overloads (and their column/firstRow/lastRow/firstColumn/lastColumn counterparts) still fill one item per call — the factory variant doesn't fill more slots, it just changes when the item builder is created:
-
row(1)creates the builder immediately and returns it, so you configure it inline with whatever's already in scope:render.row(1).withItem(...).onClick(...). -
row(1, (index, builder) -> ...)defers creating the builder until the slot is actually resolved, and passes youindex— the position of that call within the row/column (0, 1, 2...) — as a parameter, instead of you tracking a loop variable yourself. This is mainly handy for pulling from a list by index or reusing a method reference across calls:render.row(1, this::renderRowItem).
render.row(1, (index, builder) -> builder.withItem(items.get(index)));
render.lastColumn((index, builder) -> builder.withItem(...));The declaration for rendering dynamic items is similar to static the only difference is that you will need to pass a render function parameter to the item instead of the item itself.
You will need dynamically rendered items when:
- Want them to change with every update;
- Are working with tate Management.
@Override
public void onFirstRender(RenderContext render) {
    render.slot(1, new ItemStack(Material.EGG));
}Data is defined initially through the opening function to be later retrieved within the view using initialState of the Advanced State Management feature.
In the example below we have an initial text that will be the title of the inventory as soon as the player opens it.
class MyView extends View {
    private final State<String> textState = initialState("text");

    @Override
    public void onOpen(OpenContext open) {
        open.modifyConfig().title(textState.get(open));
    }
}
Now open the inventory using the state key in the initial opening data map.
viewFrame.open(MyView.class, player, ImmutableMap.of("text", "Hello World"));You can use the type directly without specifying a key.
class MyView extends View {
    private final State<String> textState = initialState();

    @Override
    public void onOpen(OpenContext open) {
        open.modifyConfig().title(textState.get(open));
    }
}viewFrame.open(MyView.class, player, "Hello World");In order for the IF to recognize your view and for you to display it to a player, you need to register it, and for that you will need what we call a ViewFrame.
On plugin onEnable, create a new ViewFrame instance.
final class MyPlugin extends JavaPlugin {

    @Override
    public void onEnable() {
        ViewFrame viewFrame = ViewFrame.create(this);
    }

}
Now that you have a ViewFrame instance, you need to add your views to the ViewFrame instance, use with(...) to do it.
final class MyPlugin extends JavaPlugin {

    @Override
    public void onEnable() {
        ViewFrame viewFrame = ViewFrame.create(this)
            .with(new MyView());
    }

}
You still don't have your views registered, ViewFrame.open will not work, now you need to call the register function to complete the operation.
final class MyPlugin extends JavaPlugin {

    @Override
    public void onEnable() {
        ViewFrame viewFrame = ViewFrame.create(this)
            .with(new MyView()) // add view to ViewFrame instance
            .register(); // registers this ViewFrame instance
    }

}
As soon as you register a ViewFrame it is available in Bukkit's ServicesManager in case you need to access it from elsewhere.
Also, there is a function called unregister in ViewFrame for dynamic unregistering, it is not necessary that you call it in onDisable the IF already does it automatically.
Now you can open your view for a player, for that, access your recently created ViewFrame instance from the Registering our Views section and call open.
viewFrame.open(MyView.class, player);The example below opens MyView for the player every time he writes something in the chat.
final class MyPlugin extends JavaPlugin implements Listener {

    // Move to a final value to use it later
    private final ViewFrame viewFrame = ViewFrame.create(this).with(new MyView());

    @Override
    public void onEnable() {
        viewFrame.register();
        getServer().getPluginManager().registerEvents(this, this);
    }

    @EventHandler
    public void onChat(AsyncPlayerChatEvent event) {
        viewFrame.open(MyView.class, event.getPlayer());
    }

}
For closing a view, there are three different functions: two are conteext-confined and one is global.
-
context.closeForPlayer(...)only closes for the player participating in an interaction, e.g. if the player clicks on an item and you use this function it will close only for the player who interacted with the item. -
context.closeForEveryone(...)closes inventory for all viewers in that context, e.g. if the player clicks on an item and you use this function it will close for all players in that context (for shared contexts) -
view.closeGlobally(...)closes the root, this function is not available through the context but in the scope of the view, that is, if you have access to the view instance you can access it. Closes for all contexts, all players in the server that's viewing this inventory
As soon as the player closes the view's inventory the global function onClose is called.
import me.devnatan.inventoryframework.View;

class CoolView extends View {

    @Override
    public void onClose(CloseContext close) {
        // do something on close
    }

}
It is possible to prevent the inventory from being closed by canceling the context.
import me.devnatan.inventoryframework.View;

class CoolView extends View {

    @Override
    public void onClose(CloseContext close) {
        close.setCancelled(true);
    }

}See also about Interaction Handling to handle player interactions on your recently created items!