3. Game Design Document - DevCrumbs/Warcraft-II GitHub Wiki
- Game Design Document
Warcraft II: The Stolen Artifacts is a RTS game, with rogue-like and dungeon crawler elements. We want to make a dynamic and fast game, with runs of 15-30 minuntes of duration, keeping the RTS pillars and mechanics. The player will have to manage and control troops and buildings with the objective of reclaim one of the artifacts that have been stolen by the enemies.
The player will have to face different situations every run, think new strategies every time and adapt to the environment. The game creates unique and challenging experiences where the player is forced to use his experience and wisdom in order to success on his mission.
This story goes back to the time when Ner’zhul, the Elder Shaman, began having visions of death. Isolated with his clan in Shadowmoon Valley, he decided to paint his face with a skull. The skull was white, contrasting the dark he had just started growing inside. In Shadowmoon Valley, day and night, molten fel energy erupted from the land and lighted the sky with bilious green flames. Fel... The magic of disorder, the highly destructive, brutal and extremely addictive energy fueled by drawing life from living beings. “Isn’t it awesome?”, admires Ner’zhul.

Landscape of the Shadowmoon Valley, with the sky flooded by the fel
One day, Teron Gorefiend, a being of undeath, came to Ner’zhul. He persuaded him into opening some new portals to other worlds, untouched places for the Horde to conquer. “What if...”, suggests Gorefiend in a convincing tone. To carry out the plan, though, it was required the possession of powerful items, four legendary artifacts that could only be found in Azeroth. These were the Skull of Gul’dan, the Book of Medivh, the Jeweled Scepter of Sargeras, and the Eye of Dalaran. “Leave it in my hands”, agreeds Ner’zhul.

Teron, with a malefic face
Thirsty of power, Ner’zhul seized control of the remaining Horde forces and sent them into Azeroth through the Dark Portal, which rift still existed, once again. While sowing the panic, they succeeded in stealing the needed artifacts. “Hihihi...”, laughs an orc while crossing the portal with the Skull of Gul’dan in his hands.

They say that the orc that crossed the Dark Portal with the Skull of Gul’dan in his hands was laugthing
The first item the Elder Shaman acquired, the Skull of Gul’dan, a demoniac artifact made from the skull of the orc warlock Gul’dan, began to influence him in a terrific way. Suddenly, he was more concerned with his own strength and well being that of the Horde. The second was the Book of Medivh, a spellbook written by the Magus Medivh, the Last Guardian, and taught him to cast the most dangerous spells. Then, it was the turn for the third artifact, the Jeweled Scepter of Sargeras, which used to belong to the Dark Titan Sargeras and had the power to rip open dimensional gateways between worlds. The fourth and last one, known as the Eye of Dalaran, completed the recipe. This device, crafted by the mages of Dalaran, finally allowed Ner’zhul to focus his dark power of the underworld towards his one unique goal. He no longer cared.

The four ancestral items
Convinced that Ner’zhul was planning a new offensive against the Alliance, King Terenas sent his armies into Draenor to end the orcish threat once and for all. Here is where the Alliance Expedition was born, a military venture led by Khadgar and General Turalyon, with the help of Ranger Alleria, dwarf Kurdran and the veteran soldier Danath. But, since the moment they went beyond the Dark Portal, they were never heard from again. “Oh, no... What have I done...”, blames King Terenas in great pain.

The legendary Alliance Expedition! All of them seem determined and “happy”
Blind by having control of Draenor’s magic, he started opening not only a few, but a multitude of new rifts to fresh new worlds. “I am so powerful! I can feel the fel flowing through my veins... This is by far the best thing I’ve ever experienced! No one will ever stop me!”, shouts Ner’zhul in pleasure. However, it didn’t take too long for the vast energies that the spell created to tore the planet apart, transforming what had been the homeworld of the orcish, Draenor, into the shattered realm of Outland.

Ner’zhul, filled with fel, is casting spells towards all directions, opening a new portal with each one
Later in Azeroth, King Terenas, who felt incredibly responsible for the Alliance Expedition’s disappearance, asked a small group of the remnant’s of Azeroth’s armies to adventure on a journey into Outland to find and bring back the lost members of the Alliance expeditionary force. “For the Alliance and for Azeroth, I beg you to go find the Alliance Expedition and bring them back. You’re our last hope!”, asks a determined King Terenas.

The player’s starting team. It looks determined and "happy" like the Alliance Expedition, doesn't it?
Would have been Ner’zhul’s visions a foreshadow of the future fate from the start? But, whose future? The Ner’zhul’s or the Alliance’s? How to end this chapter of the story? It relies on you.

The story is over but the adventure has just started. The game title appears in capital letters: WARCRAFT II: THE STOLEN ARTIFACTS. Then, the four items appear inside floating bubbles, surrounding in a circle the game title and rotating
These are the elements/concepts that are the base of our game:
- Replayable: because of the multiple maps avaliable, all the valid strategies and the reward system, the game invite to replay it.
- Unit management.
- Exploration: the dungeon pattern of the map, the way to get the gold, and the objective of rescuing allies reinforces the exploration of the different zones. The more explored, the more stronger the player can be.
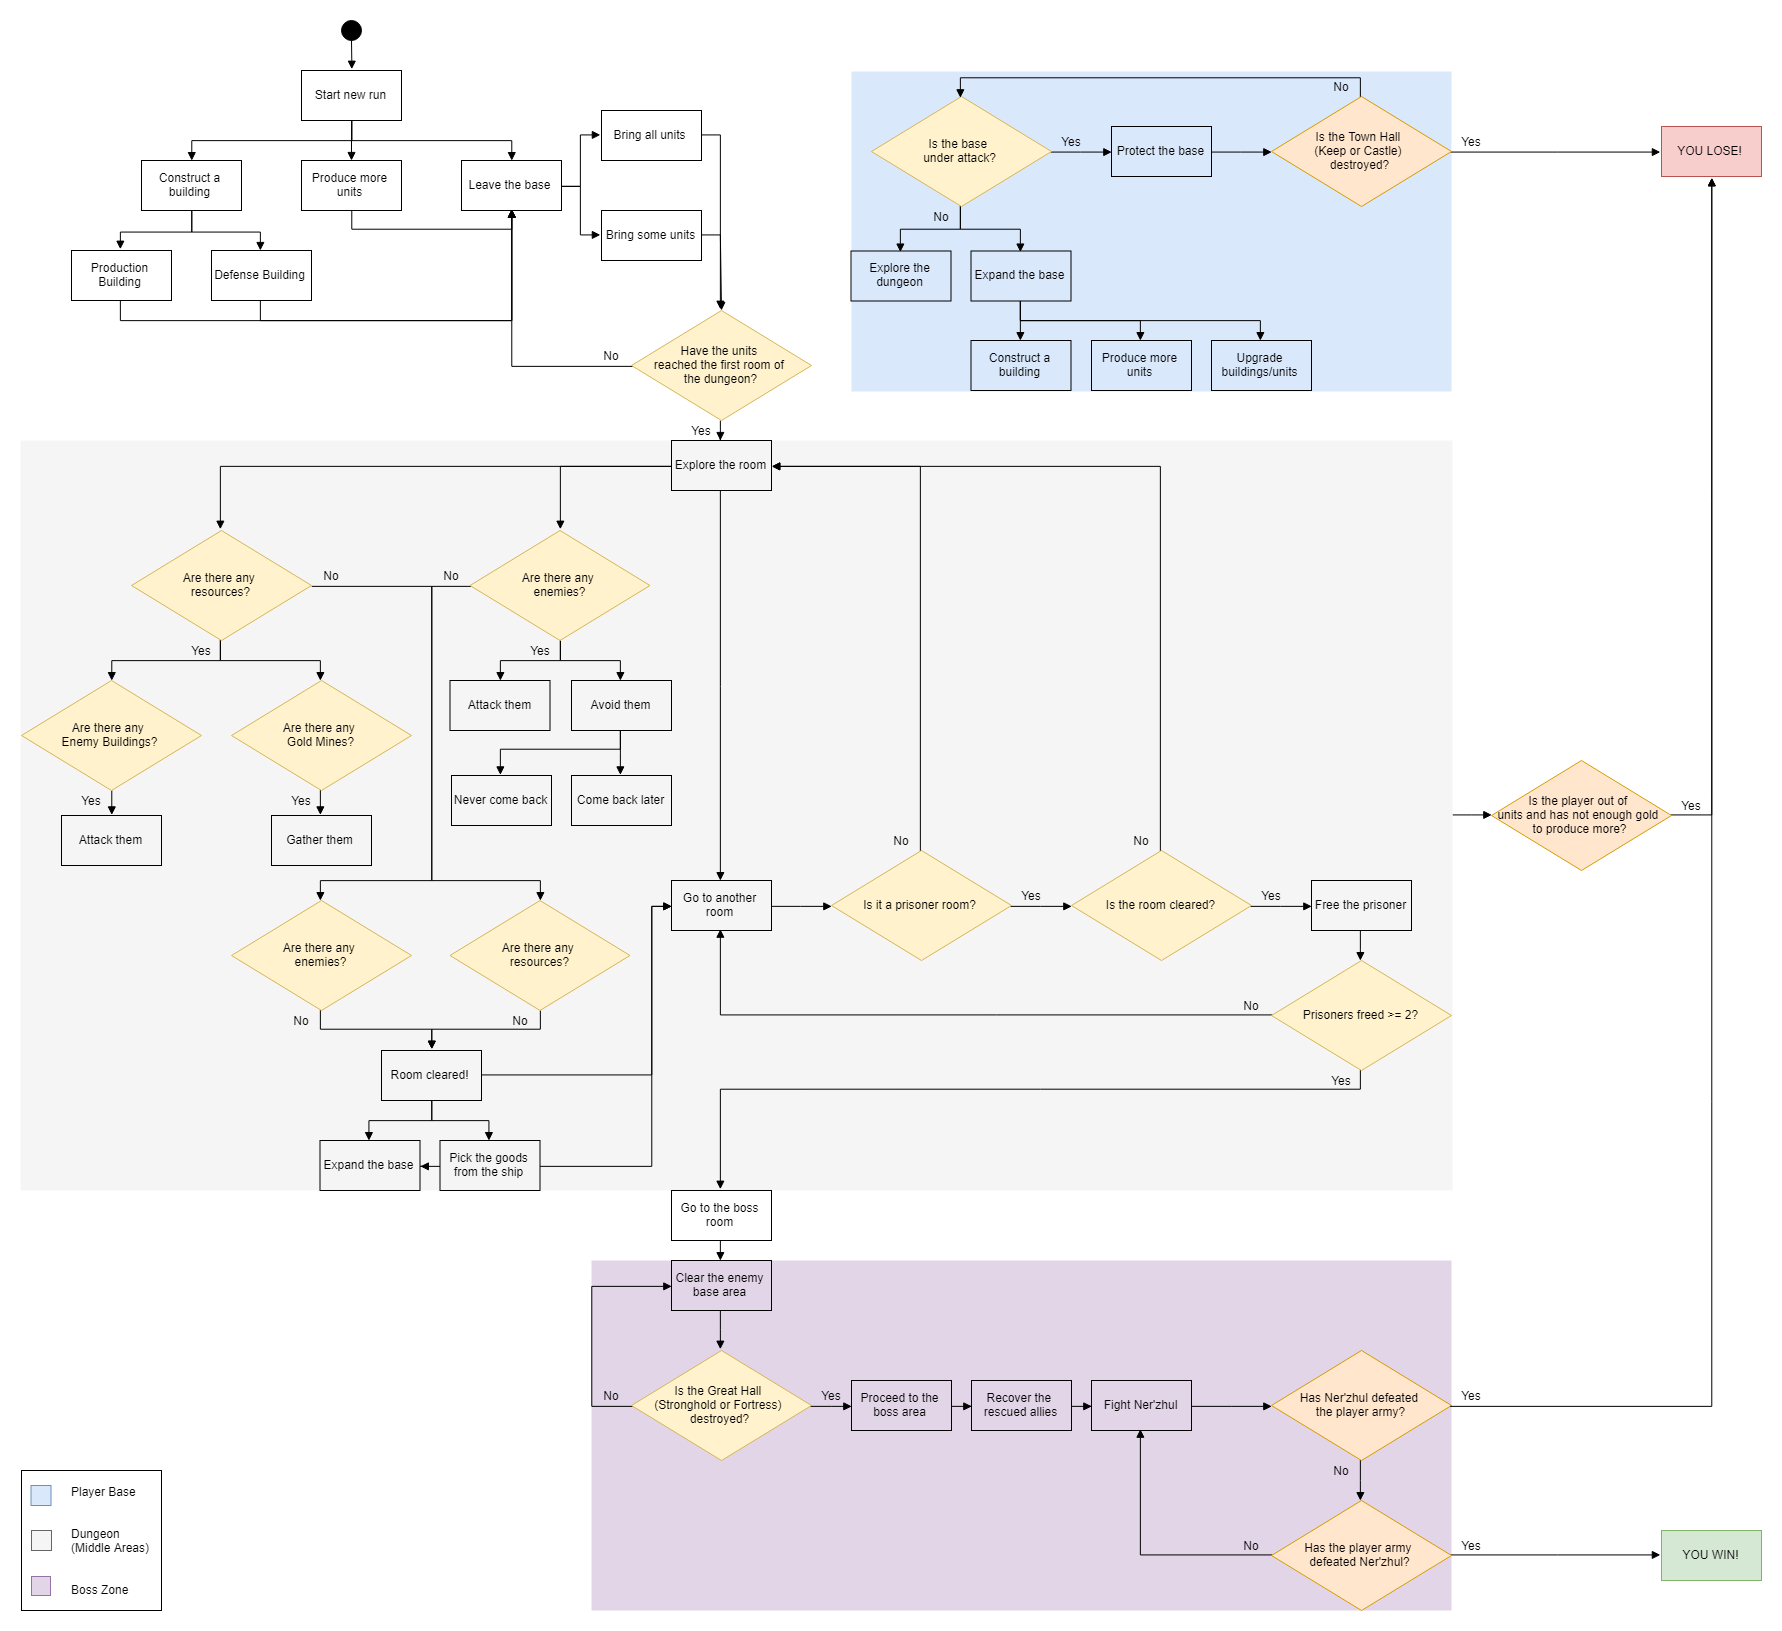
This is how we expect a normal game to flow. This drawing can vary depending on the game (the actions taken and the decisions made by the player), but it should always follow a similar path. Since the game has a huge part of RTS, many gameplay systems are flowing at the same time.
 Game flow diagram. To see it in high resolution, click HERE
Every new run starts at the player base. The player is given the following things:
- A group made of 5 units: 3 Footmen and 2 Elven Archers.
- A Town Hall, a Barracks and 2 Chicken Farms (since every Chicken Farm produces food for 4 units, the two of them can maintain the existing group of 5 units).
- A Gold Mine located in the base, which, if gathered, gives a little amount of gold.
From here, the player can perform different actions in the base:
- Leave the base and go out to explore the first room of the dungeon.
- Produce more units with the gold given. Afterwards, leave the base and go out to explore.
- Construct something (a production building or a defense building). Afterwards, leave the base and go out to explore.
- The player can decide whether to bring all of the units to explore or leave some of them guarding the base.
Once the player has reached the first room of the dungeon with a group of units: a) If there are enemies in the room:
- Attack them: the player can kill all of them at once, loose a few of the units in the process or loose the confrontation.
- Avoid them and run away: the player can come back later with a stronger group of units or keep avoiding them. b) If there are resources in the room:
- If there are enemy buildings, destroy them to gather the gold.
- If there is a gold mine, gather the gold.
From here, the player can decide whether to wait until clearing the first room or explore a new room without having cleared the first one.
At the same time, the player can keep expanding the base with the resources gathered (gold). With new buildings, the player will be able to make more units. With new defense towers and troops, the player will be able to defend the base in a more efficient way.
The player wins once the two prisoners are free.
The main objective of the game is to rescue the two prisoners trapped in Draenor.
1. Short-term objectives: explore, find resources, defeat the enemy's army and protect the player base.
2. Mid-term objectives: construct buildings, expand the army, become stronger.
3. Long-term objectives: rescue the two prisoners (Turalyon and Alleria), the lost members of the Alliance Expedition.
In order to complete all these objectives, the player will have to be smart and patient, think the best strategy for each situation and explore almost every corner of the map. A minimap will help the player orient in the dungeon and don't get lost along the journey, among other things.
If the player succeeds in finding and rescuing Turalyon and Alleria, the victory is achieved. However, if one of the following conditions is given, the player will be instantly defeated by the Horde, losing:
- The player's Town Hall (or Keep) is destroyed.
- The player is out of units and has not enough gold to produce more units.
The gameplay of the game is based on exploration (dungeon crawler), troops management (RTS) and base building (RTS).
We don’t have any method to produce our own resources, so we have to search for them. To do so, it is needed to explore the rooms of the dungeon, where the resources can be found. While some of the rooms will contain no resources, others will offer a great quantity of them.
The word resources alludes to all the units/constructions which, once killed/performed a certain action (destroy or gather), give gold to the player. The amount of gold obtained will vary depending on the resource; destroying upgraded buildings will give more gold than killing a single unit.
With the resources gathered, we can create our own army of troops. We start every new game with a default group made of 5 units: 3 Footman and 2 Elven Archer. However, we must expand in a coordinated and strategic manner by using the different buildings that we have in our base. In exchange for a certain amount of gold, some buildings will produce specific types of troops.
Next, it will be time to manage the units we have created. There are many ways to do that. We can select a single unit by clicking it (left mouse button, click), or select a group of units by drawing a rectangle with the mouse over them (left mouse button, drag). We can also select more than one unit with clicks and group them having LeftCtrl pressed. These are the conventional ways to select units. Apart from that, we have some shortcuts (Bottom-left on the screen) to select groups of units in a more efficient way.
"Type" selection. We can select our units by type (footman, elven archer, or gryphon rider) with the buttons that show those icons. Once we press them (or their shortcut) we will select all the units in screen of the desired type.
Player groups. Apart from that, we can also create our own groups by selecting a group of units and pressing LeftCtrl + 1,2 or 3. Once we have our group created, we can select it by pressing Shift + group number.
To move the unit/s around, the only thing we need to do is to click the spot where we want our units to go to, marking their goal. If we want our unit/s to attack a certain enemy or group of enemies, we just have to click the enemy (right mouse button, click). The units can defend themselfs, so, if we move them and an enemy attacks them or they see a group of enemies, our units will attack by their own.
- The maximum number of units that fit in a selection is 10.
Besides moving and attacking, all units two commands, Patrol and Stop. If we have a group of units selected, the ability panel will show these abilities. These commands can be used by, once selected, clicking on the unit/building/spot that is desired or with the shortcut.
- If a unit loses all its life, it dies. Units have a health bar over their heads which shows their current health.
The building system is compound by two categories: player buildings and enemy buildings. The player buildings category splits up into production buildings and defense structures. The enemy buildings category will group together the previous two types of buildings into a single category. There are also neutral structures.
Except for the neutral structures, which cannot be destroyed, the rest of the buildings have 3 states of decay. If a building is attacked, it will loose health. The more health it looses, in a more decadent state it will be. If it loses all health, it will be destroyed forever.
- The player can repair a building which is in one of the three states of decay.
- A building cannot be repaired if it is completely destroyed.
- If a building is completely destroyed, it will disappear soon from the map.
These are the buildings that allow the player to make more units. At the start of the game, the player already owns a prebuilt Town Hall, a Barracks and 2 Chicken Farms in the base.
Some of the buildings will require the possession of other buildings in order to be acquired. Each building has a set of options (unit production, destroy, repare, etc.), which can be accessed by clicking on the building. These options will appear in the ability panel, on the bottom-right corner of the screen.
-
The buildings which produce units can produce more than one unit at time. When ordering a new unit, the order will occupy one of the slots of the available building orders. Units take a few seconds to be produced. When finished, they pop out right next to the building in the player base.
-
We can only have one production building of every type in the base, except for the Chicken Farms, which the player can place as many as desired.

HP: 1200.
Cost: Already built.
Main building (if it gets destroyed, you lose).
Upgrades to Keep.

HP: 1400.
Cost: 500 gold.
Main building (if it gets destroyed, you lose).
Unlocks GRYPHON AVIARY.

HP: 400.
Cost: 400 gold.
Feeds 4 units.

HP: 800.
Cost: Already built. If it gets destroyed, cost: 400 gold.
Creates:
· Footman

· Elven Archer

HP: 500.
Cost: 400 gold.
Creates:
· Gryphon Rider
Requires KEEP.
These are basically towers that we can built in order to defend our base.

HP: 170
Cost: 400
Damage: 7

HP: 195
Cost: 600
Damage: 13

HP: 220
Cost: 800
Damage: 17
We can also find enemy buildings, which are already built by them. Apparently they are decorative, with the object of making the player feel the environment more real, but if the player destroys them, as a resource, they give gold.
ENEMY'S BARRACKS This particular enemy building can produce units. Every 2 minutes (aprox) it will produce a random group of enemies, so the game will be harder if you play too slow.
There are two neutral structures that we could find inside the rooms of the dungeon. These are the Gold Mine and the Runestone.

HP: Indestructible.
Gives 1500-3000 gold by clicking on the "mine" icon that will appear when you select the gold mine.

HP: Indestructible.
Heal 25-50% of all units.
This is the Technology Tree for the human buildings that will be used in the game. It is a graphical representation of which buildings can be upgraded into one another, and which building is required to build another one. The arrows that point from one building to another, are the buildings that can be upgraded to one another; and the arrows that cross buildings indicate the buildings that can be built if the building in the begining of the arrow is in the game terrain.

| Image | Unit Name | HP | Cost | Sight | Movement Speed | Range | Damage |
|
|
Footman | 60 | 500 gold | 7 | 90 | 1 | 7 |
|
|
Elven Archer | 50 | 400 gold | 9 | 100 | 8 | 6 |
|
|
Gryphon Rider | 100 | 750 gold | 12 | 120 | 7 | 4 |


| Image | Unit Name | HP | Sight | Movement Speed | Range | Damage |
|
|
Grunt | 50 | 7 | 70 | 1 | 6 |
|
|
Troll Axethrower | 40 | 8 | 90 | 5 | 6 |
|
|
Dragon | 100 | 12 | 120 | 6 | 3 |


Critters are neutral creatures that wander around the rooms of the dungeon. They are harmless. If they are attacked by units, they will not fight back. If a critter is killed, it will increase a little bit the health of the unit that has killed it. Enemy units will also try to kill them in order to restore their lives when they are in a critical condition, so the player must be aware of the surroundings of its units and take advantadge of this innocent creatures.
The races availabe are sheeps and boars. Sheeps are more common to find and easier to kill, but boars heal more life when killed.
In order to balance the game's normal units between them, in other words, to make that all the game's units are useful to the player and that all of the enemy units represent a threat; we'll be using a payoff table. This payoff table indicates which unit wins against another one. Seeing this in the player's perspective, if the unit wins the other one, it will be represented with a positive number (payoff) in the table; if this unit loses, it will be represented with a negative payoff. When there's a payoff of 0 on the table that means that the two units that confront each other have symetrical attribures, and thus in the hypotetical case they confronted each other in the same conditions they would both lose in the same time.
The propieties had in account when calculating each payoff, are the HP, cost and DPS (damage per second) of a unit; so the units that only have positive payoffs, are countered by the units that have only negative payoffs when they use their special abilities, that are not taken in account in this table.

This is the table that we'll be taking in account in order to know which attributes to modify when balancing the game
We can play 5 different maps. 2 easy, 2 normal and 1 hard map. We can select the map we want to play each time in the level menu.
Once in game, we have 2 types of zones. The player base and the middle areas. These areas are conected by organic paths and delimited with natural elements such as trees, rocks or rivers. Although we want a dungeon-pattern map, we want to keep an organic view of it, where the player can explore without any "fade" between zones (that will the RTS gameplay).

Map example
The base remains the same in every game. It is the management centre of the player. From the base, the player can build constructions, produce troops, etc. The coin of the game is the gold, so the economy system of the buildings also works with it - constructing a new building and buying a certain product from an existing building. At the start of the game, the player is given a certain amount of gold, so it can start managing it.
- The player can only build constructions in the base. Although the constructions menu will be accessible from any part of the dungeon, the player will only be able to place a certain construction within the base area (if the spot is valid, the construction will be highlighted green. Otherwise, it will turn red).
The base will occasionally be under the siege of the enemy, so the player must build a tough defense around it and always leave some troops patrolling the surroundings when exploring the dungeon. Here is where defensive towers become the most useful.
- The base will be surrounded by sea, so the enemies will come some times in their ships to destroy our base and defeat us.

Player base
There are 10 different patterns for the map. When we start a game, one of those 10 is chosen randomly. Every zone (room), except the base and the boss zone, is numbered from 1 to 7. Every number has a pool of 10 different zones and one of them is chosen randomly.
Also, there are two little zones, only with some enemies neutral/enemy structures to get resources from or even a prisoner.
Normal rooms:
- To clear a room, the player has to kill all the enemy units and destroy all the enemy buildings from that room.
- When the player clears a room, a message will pop in screen saying "Room Clear", and will recieve a reward (gold).
- The player can move freely through the dungeon, though it may not be a very wise option to explore further rooms without having cleared others.
Prisoner rooms:
- They follow the same rules than the normal rooms of the dungeon, but they are built as a prison, so they are better guarded (this translates to more defense structures and more enemy troops). Consequently, the player must be more cautious when moving through these rooms.
- Dragons can only be found in these rooms. If the player sees a dragon, it means that it is inside a prison room.
- There is a total of 2 prisoner rooms - aka prisons - in the dungeon. Each one has locked up one of the lost Alliance Expedition members (Turalyon or Alleria), which the player has to rescue.
- When rescued a prisoner from a prisoner room, the no-longer-prisoner will open a magic circle and disappear, as if by magic.
The Fog of War will be present throughout all the game. Its color indicates the states of the map areas, with the following meanings:
- Black: unexplored areas of the map are represented by a blackened shroud.
- Gray: areas that have been explored at some point during the game but are not currently within sight range of owned units or buildings are represented by a gray shroud. Terrain can be seen through these areas, but only the buildings standing at the time the area was explored are known, while enemy troop movements remain hidden. To reveal any new units or buildings, the player must once again explore these areas.
- Visible: areas that have been explored and are currently within the sight range of owned units or buildings are fully visible.
In relation to the dungeon structure, the progress that the Fog of War will perfom will be the following:
-
At the start of the game, the minimap will be fully black except for the player base. None of the dungeon rooms will be visible, since they will be covered by a layer of Fog of War.

First Fog of War. Only the player base is seen -
When the player explores the rooms, the Fog of War will clear from the path of the player both on the map and the minimap.

Second Fog of War. The player base and the paths explored are seen

Third Fog of War. The player base and the paths explored are seen
- When the player clears a room, the Fog of War will clear from every corner of that room, showing its complete shape on the minimap and also on the current map.

Fourth Fog of War. The player base, the paths explored and the room cleared are seen
Top-left on the screen, we will see a minimap that shows a generic view of the map. It will also show the different states of the fow of war (black, grey or visible). The dungeon pattern of the maps is very important to be oriented but if the minimap shows only the entire map, it will be very little. That's why we have "two" minimaps. Next to the minimap we have a button that (by pressing it) allows the player to change the minimap range. So if we want a general view to be oriented, or a "1 zone" view to see better the enemies positions, etc; we can change between the two modes.
At the start of every game, an icon with the face of King Terenas will appear at the top-right corner of the screen. King Terenas will send the player an effusive message of encouragement towards the mission that the player is about to begin. He is the omniscient character who knows everything taking place in the game universe.
Apart from King Terenas, some mesages (related with pure gameplay) will apear in certain situations to guide the player. For example, if we try to produce a unit or build a structure, and we have not enough gold, a message will apear saying "not enough gold". These messages only appear briefly.
To encourage replayability and be faithful with the Warcraft universe, we have 4 differents artifacts to reclaim: Skull of Gul’dan, Eye of Dalaran, Book of Medivh and Jeweled Scepter of Sargeras. At the end of a run, it will appear one artifact of those 4, depending in how many time it takes us to arrive to the boss area.
· Book of Medivh (<12 min)

· Skull of Gul’dan (12-17 min)

· Jeweled Scepter of Sargeras (17-22min)

· Eye of Dalaran (>22 min)
In the map selection menu, we can see how many, of each artifact, we have achieved for each map.
We recommend to play the game with both mouse and keyboard, but it can be played by only using the mouse, since it grants access to all the functionalities through a simple click or drag.
Mouse: with it, we can perform absolutely everything. We can manage our buildings, select a group of units and give commands to them, make a unit or a group of units use abilities, etc. The two possible mouse states are click (single click) and drag. The mouse pointer icon is an arrow.
In-game, the mouse pointer icon will change when a single unit/group of units is/are selected. If the mouse is over a walkable tile, it will show a hand pointing to the ground, indicating that the unit/group can go there (walk action). If the mouse is over an enemy, it will show a sword, indicating that the unit/group will attack that enemy on mouse click (attack action). If the player draws a rectangle with the mouse (by dragging it), all of the enemies within that rectangle will be set as targets to attack, and the player unit/group will walk towards them to attack them. If the mouse is over a Gold Mine, it will show a pickaxe, indicating that the units can gather the gold. Because they are performed directly, the actions walk and attack are not shown in the ability panel of the units.
Keyboard: its main use are shortcuts, to speed up the player doing things like selecting units, move the camera, open menus, etc. Also, if the player presses the spacebar, the camera will automatically move to the player base. This way, if the base is under the enemy attack while the player is in another room of the dungeon, it can automatically jump to the base to take the reins.