NewRecruit Data Author Tutorial - DerTanteKethe/custom40k-homebrew-system GitHub Wiki
by Scoots
Getting Started ‐ Requirements
This document is a culmination of resources from:
https://github.com/BSData/catalogue-development/wiki
https://github.com/Kemp-J/NRDataExamples/tree/main/SimpleForce
https://docs.google.com/document/d/1isTexiUbN3CNSxfybQu39sCeMdN7quLVj9MdKI5hDUU/edit?tab=t.0#heading=h.qegopz96a5wa
as well as my own experiences and research on the NewRecruit Discord Server and the BSData Discord Server. If you want to get into creating things for NewRecruit, I strongly recommend joining both of these servers. You can get a lot of help there if you have any questions or need solutions for edge cases.
Prepare your workbench by installing newest versions of:
New Recruit Editor - here we add and edit all the things we will talk about in this tutorial.
New Recruit Builder - the end user app, where you can create an army list for playing. We will also use it as a tool to regularly check if our entries and edits actually work as intended.
You can get both Tools here: https://www.newrecruit.eu/download/
To start adding or editing Units, Rules and other things we need a fresh NewRecruit System.
A NewRecruit System consists of two basic elements:
System Catalogue - which contains the fundamental ruleset and can be considered a rulebook.
Faction Catalogue - which is specific to each individual army, faction, or race and can be considered a codex or army book.
There is also an optional third element: the Library Catalogue. I won’t go into depth about these in this tutorial but Library Catalogues are used to create “libraries” of shared data that can be used by multiple other Faction Catalogues. Entries in Library Catalogues do not appear in the Builder.
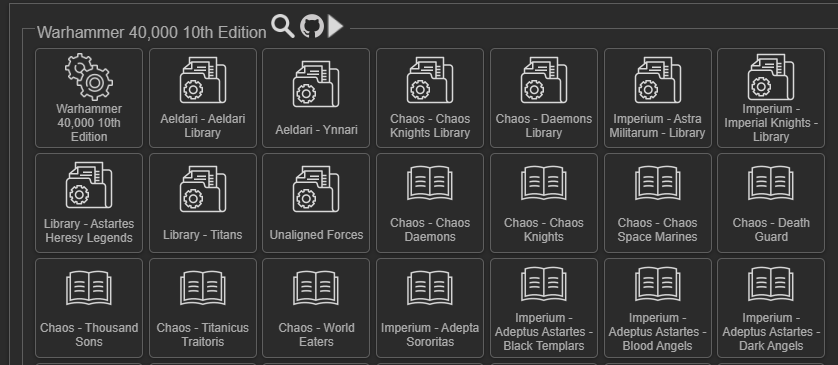
System Catalogues have two cogwheels as a symbol. The optional Library Catalogues have a document folder with a cogwheel and the Faction Catalogues an open book as a symbol.
In this tutorial, we will look at both System and Faction Catalogues, though the focus will be on Faction Catalogues, as they require the most work and maintenance, especially when rules or points change later on.
We will use generic examples, to illustrate each step and also references to the Warhammer 40,000 10th Edition System when appropriate.
Best Practice
This tutorial covers and teaches you all the methods that I consider best practice. Keep in mind that the NewRecruit community is not fully unified on what constitutes “best practice”.
If you examine different game systems and editions within NewRecruit, you’ll see that people often approach things differently.
However, my goal is to build catalogues in a way that ensures compatibility with the “40k cards”-templates for exporting army lists and that content is implemented correctly, so it displays properly when used in the builder or exported from it.
I will present different methods for approaching a problem in NewRecruit, in the examples I give later on.
1. Creating a System Catalogue
Note: This is only necessary if you want to create a game system from scratch. However, understanding how a System Catalogue works will help you grasp the fundamentals of the NewRecruit Editor.
You can find the files for this system on GitHub for cross-reference and learning.
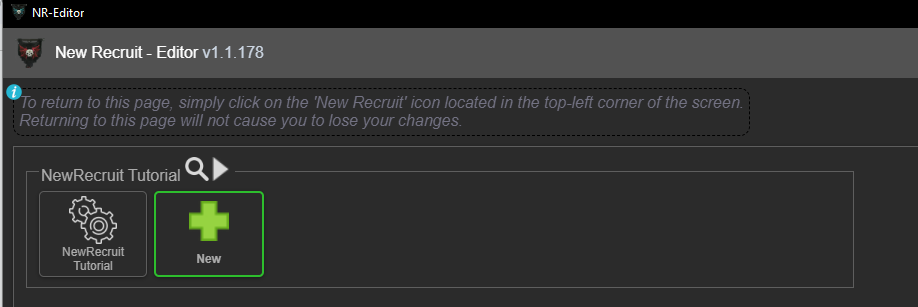
Open the NewRecruit Editor and click on “Create System.”
Give the system a name.
For this generic example, I’ve named the system “New Recruit Tutorial.”
Once you’ve created the system, click on it. You will see this screen:
After clicking on the newly created System Catalogue, you will reach this screen:
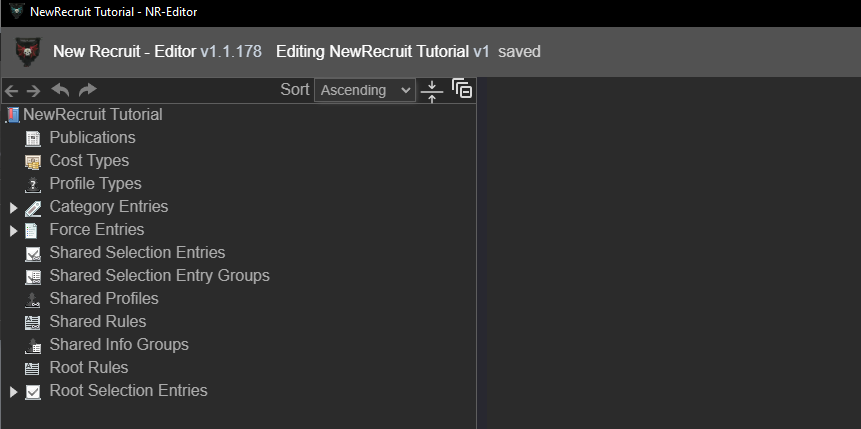
Now, let me explain what you are seeing here.
Regardless of whether you are in a System, Faction, or Library Catalogue, the types of entries you encounter will always be the same.
We will now explore each type and, at the same time, begin adding entries to them.
2. Publications
Here you can add books, magazines, or other sources from which you obtained your information. While not strictly necessary for the system to function, adding publications can be helpful for editors and users when reviewing rules later.
3. Cost Types
Most game systems assign some sort of cost to the models and units used in the game.
In Warhammer, for example, this could be "points" or "Power Level."
For our example system, we will create a single cost type called "points."
To do this, right-click on Cost Types, select Cost Type from the context menu, and give it a name.
The result should look like the image below: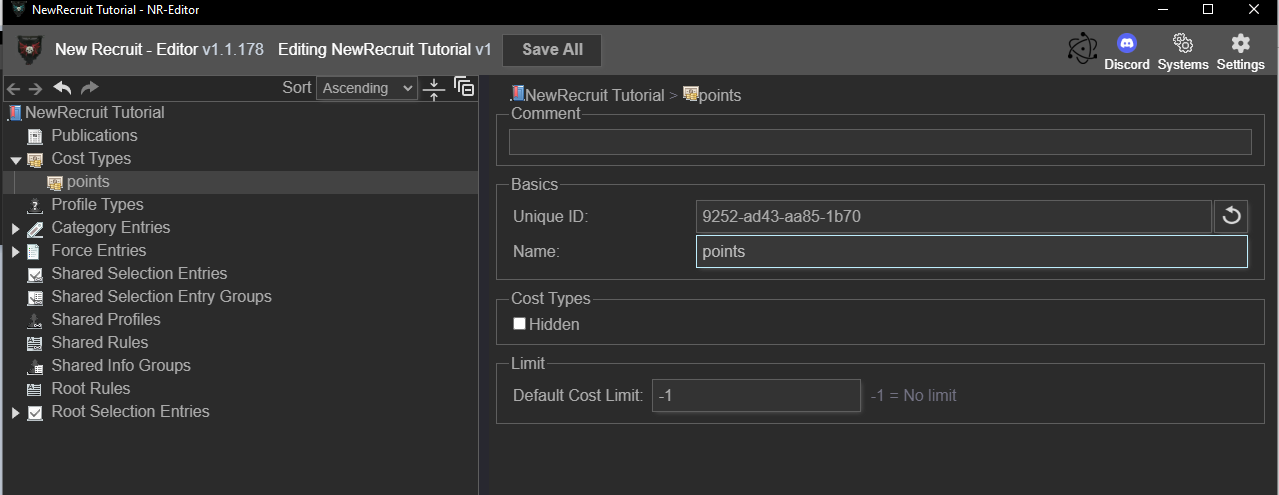
4. Profile Types
Usually units and equipment in a game system have profiles with specific values, while abilities often only have descriptions.
We will now create profiles for a Unit, Melee Weapons, Ranged Weapons, and Abilities. As with Cost Types, right-click on Profile Types, use the context menu to create a new type, and assign an appropriate name. See the example below:

Here we just created Abilities, Melee Weapons, Ranged Weapons and Unit under Profile Types.
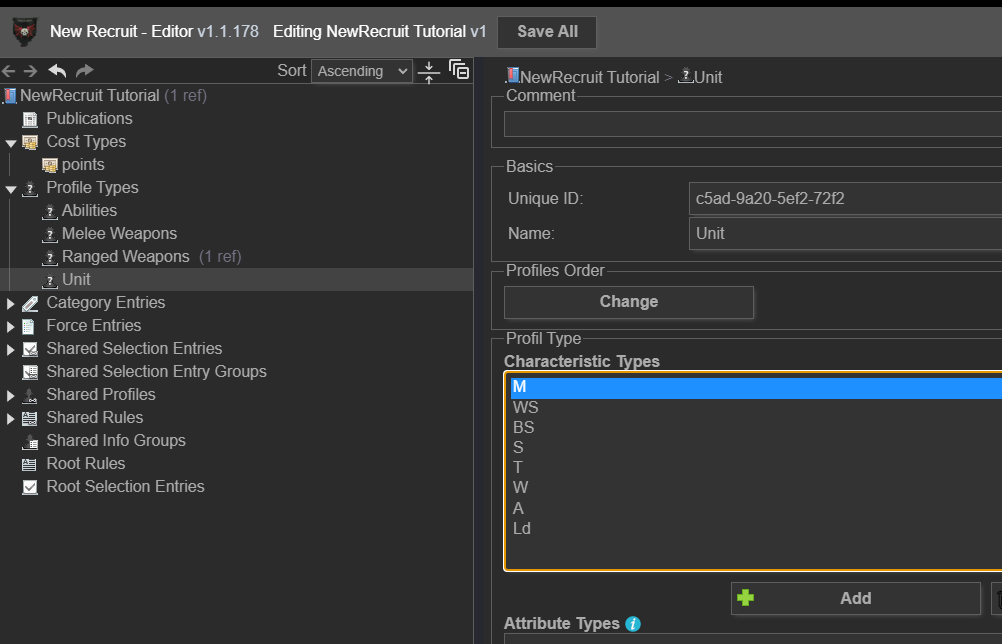
Now we need to fill the newly created Profile Types with life. For that, click on Abilities and then on the right hand side of the window on “add” below the Profil Type box. A “New Characteristic Type” entry will appear. Scroll down to find a text box where you can rename it. Rename it to "Description".
Handle the other Entries accordingly.
A Unit might need several Characteristic Types like M" (Movement), "WS" (Weapon Skill), "W" (Wounds), "Ld" (Leadership), and so on. A Weapon might need "R" (Range), "S" (Strength), "AP" (Armor Penetration), "D" (Damage), and so on.
Remember, these Characteristics are often shortened down to one or two letters, just like in the official rulebooks.
Here is an example of how a Unit profile is structured in our tutorial system:
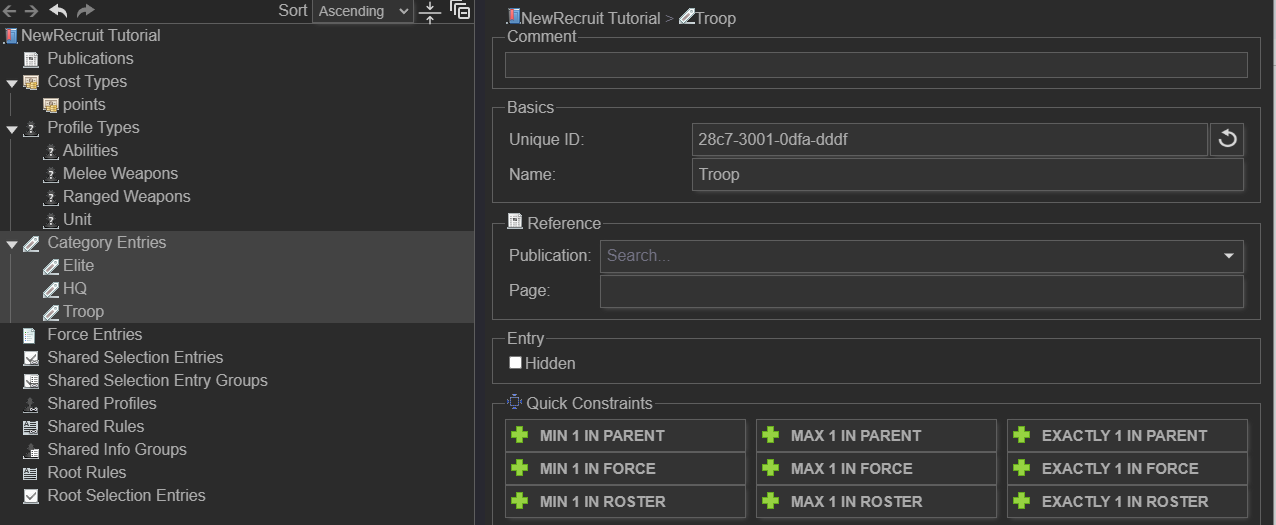
5. Category Entries
Think of Category Entries as tags. These define traits like Heavy, Infantry, HQ, Troops, Flyer, Fortification and so on. Also, in some very special cases, Categories can be used to trigger certain rule effects. But that is advanced stuff we will cover way later.
Create all the Category Entries required by your game system. It is important not to skip this step, as your future units must be assigned at least a primary category to be properly used and displayed in the army builder app. How to assign categories will be shown later.
6. Force Entries
Most game systems have rules governing how to build an army, often imposing restrictions on the number of units from specific categories you can include. In Warhammer, for example, this is managed by a Force Organisation Chart, which might limit an army to 2 HQ units and a maximum of 3 Elites, while allowing an unrestricted number of Troops. Force Entries are where you define these fundamental army construction rules.
For our example, we will create two Force Entries:
One with specific unit restrictions for fair and competitive play and one that is an unrestricted "free-for-all" force with no limitations.
Let's name them "Tournament Compliant Force" and "Unrestricted Force".

Note: When building an army list in the builder app, the user will be able to choose which type of Force (and its associated restrictions) they want to use.
Next, right-click on the "Tournament Compliant Force" and select Category from the context menu. A "New Category (link)" will appear. On the right side under "Target," select the category you created earlier (e.g., HQ, Troops, Elites) to link it.
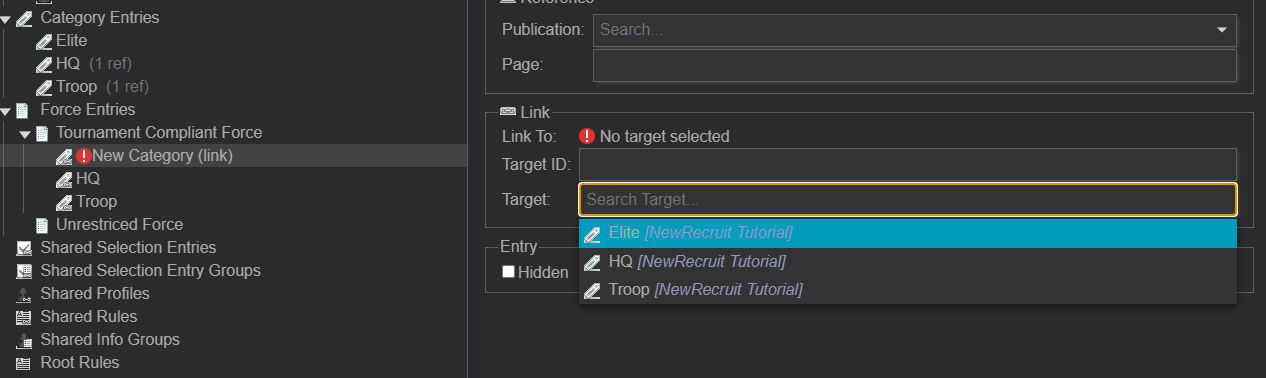
Hint: Instead of typing the Name of the target into the Target Box you can also use the unique Target ID(which every element in the Editor has) in the box above instead. This will come in handy when your catalogues grow bigger and bigger and you might have entries sharing the same name(but not the same ID).
Now we just need to add some restrictions to our Tournament Compliant Force. For that right-click on the Categories within Tournament Compliant Force and then choose “Constraint”.
We then adjust these Constraints so that they will fit to what we or the fundamental rules we want to replicate dictates.
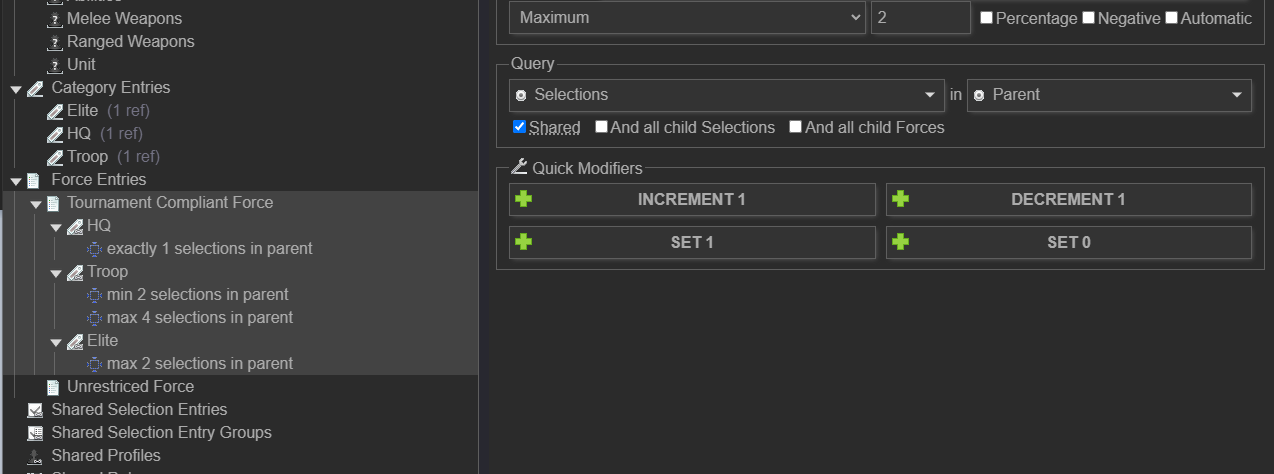
In the example above we can have only one Unit/Model with the HQ Category in our Tournament compliant Force. We can choose between 2 \- 4 Troops and we can have between 0 and 2 Elites Choices.
Since the Unrestricted Force shall be, well unrestricted, we do not do anything further with it.
7. Shared Selection Entries
This section is the core of your system, containing entries for Units, Heroes, Weapons, Monsters, and other elements. While the majority of these will be created in their respective Faction Catalogues, it is sometimes useful to place entries that are used by multiple factions in the System Catalogue. A good example from Warhammer 40,000 would be a Bolter or Chainsword, as these weapons are used by factions like Space Marines, Sisters of Battle, and Imperial Guard.
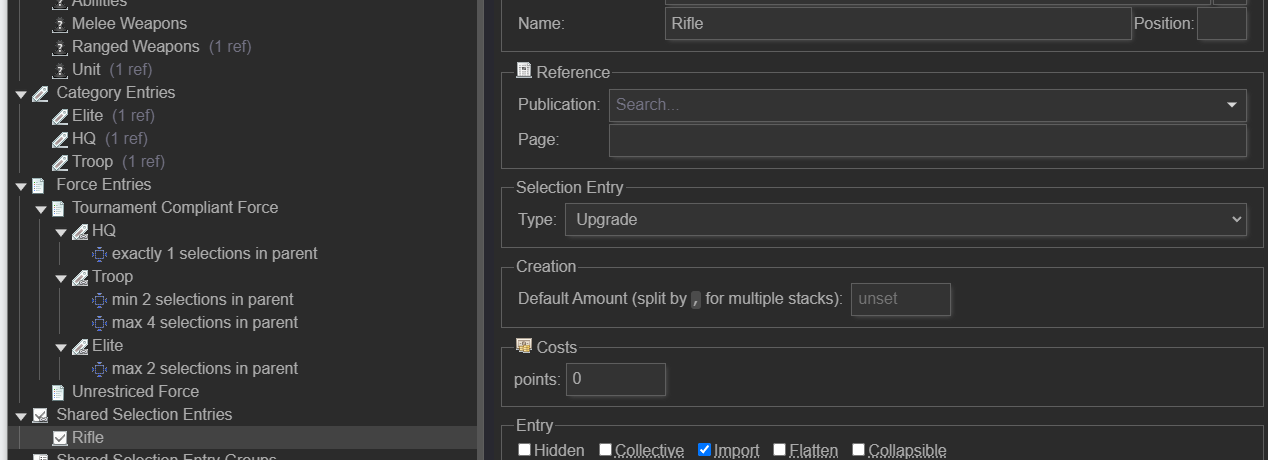
To create entries right-click on Shared Selection Entries and select “Entry” in the context menu.
Then give that entry a proper name and choose a type in the drop-down menu on the right side under “Selection Entry”.
We want to create a weapon in our tutorial and therefore chose “Upgrade”.
For the purpose of this tutorial let’s create a rifle and say that in this game system every faction uses the same type of rifle. So it makes sense that the entry is in the System Catalogue and not in the Faction Catalogue.
 Now that we have created a rifle, that rifle needs a proper profile and for that we take a look at Shared Profiles at the next step.
8. Shared Profiles
As the name suggests, Shared Profiles will make use of the Profile Types we created before and are shared between all the entries in our system.
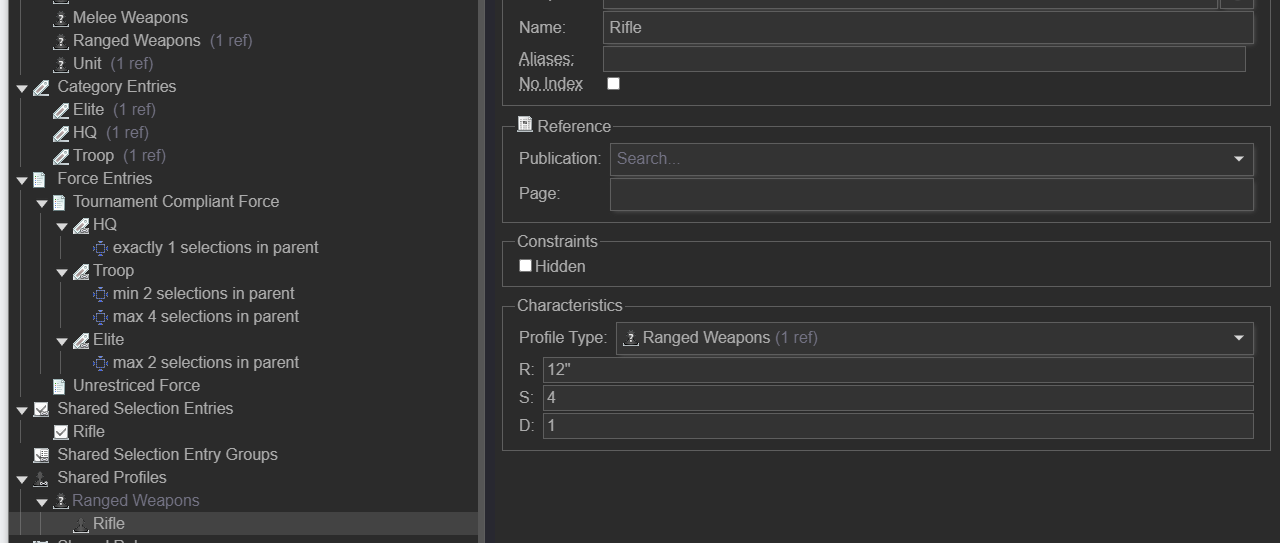
Like in the Shared Selection Entries before we create a Profile by right-clicking on Shared Profiles and choosing Profile in the context menu. Then we give it a name. In our case that is simply “Rifle”.
After that we chose a Profile Type. For a rifle, “Ranged Weapons” profile is of course the only logical choice. We then add characteristics to the Profile. In this case Range(R), Strength(S) and Damage(D).
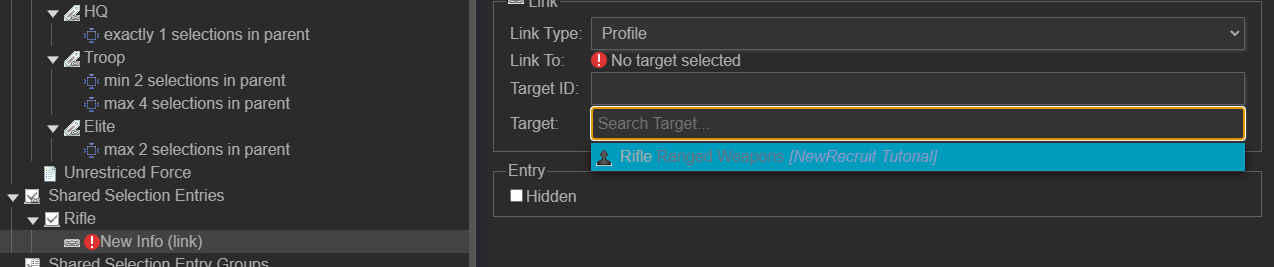
The last step is to connect the Rifle Profile to the Rifle Selection Entry. To do that right-click the Rifle Entry in Shared Selection Entries and then choose Link and Profiles.
Then click on the newly appeared Profile Link and choose Rifle in the drop down menu on the right.
 After that it should look like this:
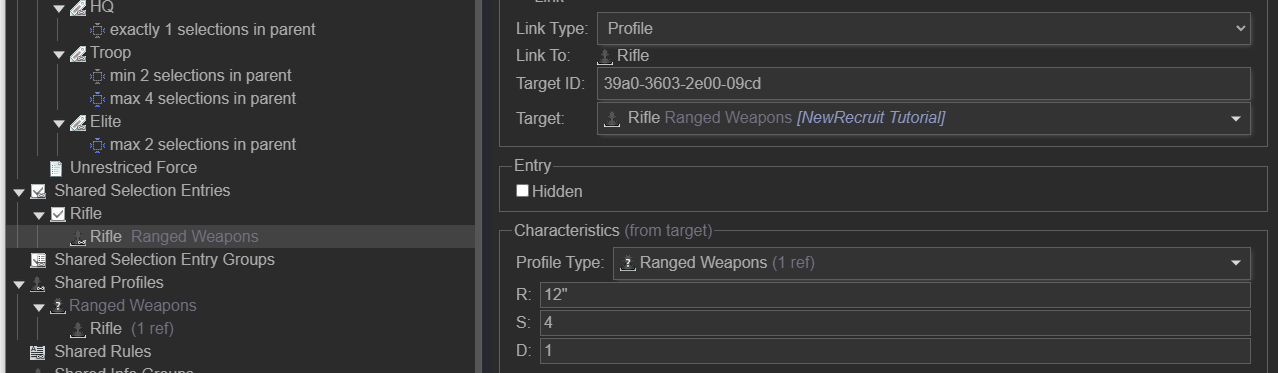
You will now notice that the "Rifle" entry under Shared Profiles has a "(1 ref)" indicator attached to its name. This signifies that the profile is currently being referenced by one entry in the system. To see exactly where this profile is being used, simply right-click on the profile and select References from the context menu. This will display a list of all entries that are linked to it. You can even click on any reference in this list to navigate directly to the target entry.
9. Shared Rules
Now, let's add a Game Rule to our System.
To do this, right-click on Shared Rules and select Rule from the context menu.
Give the Rule a name and Description on the right-hand side.
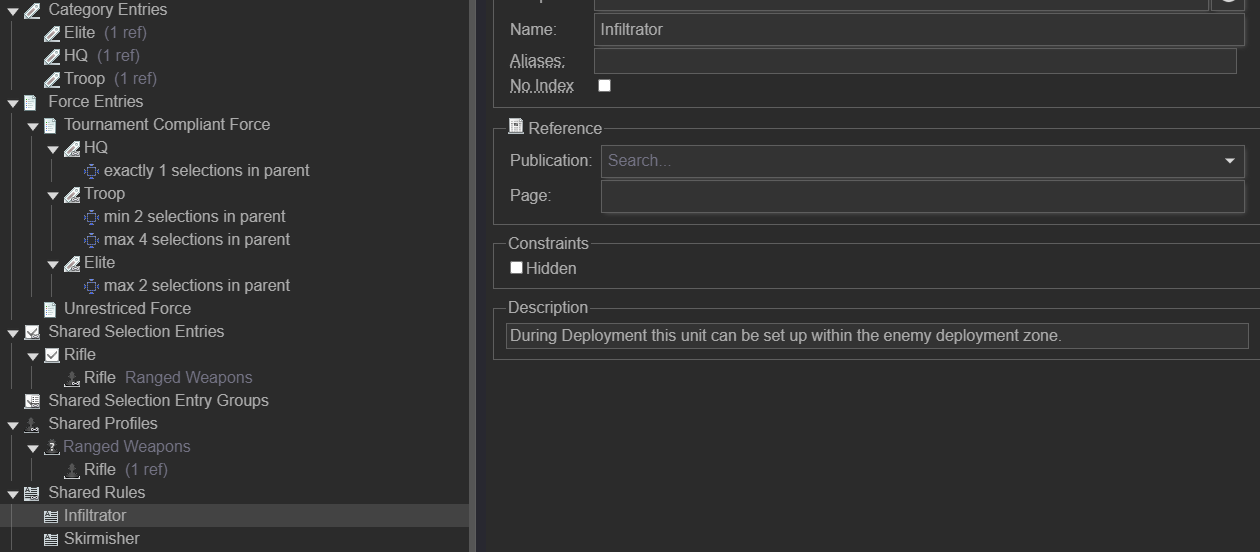
In this example we added an Infiltrator and Skirmisher rule.
Note that Shared Rules should contain Special Rules that are more or less universal and generic. They could plausibly appear in any faction of your game system.
Whereas Abilities(created earlier under Profile Types) are best used for more unique circumstances, weapons and special skills.
Some common examples of Shared Rules would be: Infiltrator, Skirmisher, Flying, Toxic, Teleport.
Some examples for Abilities: The Sword of the Emperor, Author of the Codex, Kurt Cobain's Guitar.
And with that we are for now done with the System Catalogue!
10. Faction Catalogue
Now we can finally start with a faction.
Click on the top left symbol to go back to the System screen.
Then click on the big green + Symbol.
Here we create our first Faction Catalogue. Give it a proper name(in this example it is “Royal Guard”) and open it.
We now create our first unit.
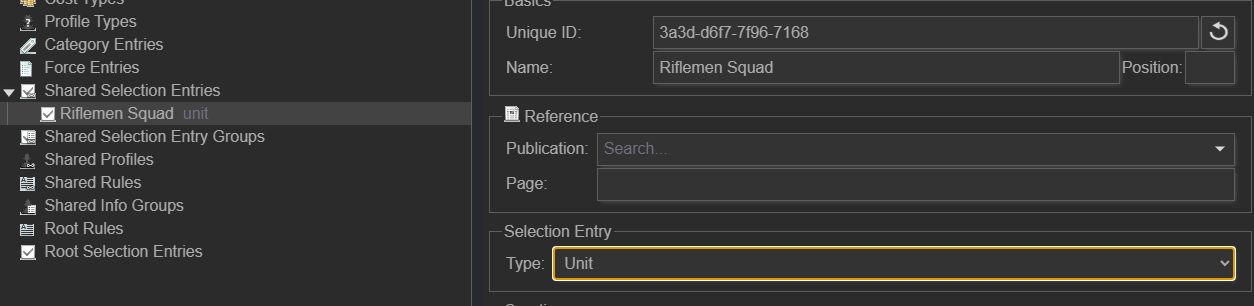
For that, just like with the rifle before, go to Shared Selection Entries, create a new Entry and give it a name. For this Tutorial it will be “Riflemen Squad”.
This time we have to change the type. In the dropdown menu under Selection Entry on the right side select “Unit” as Type.
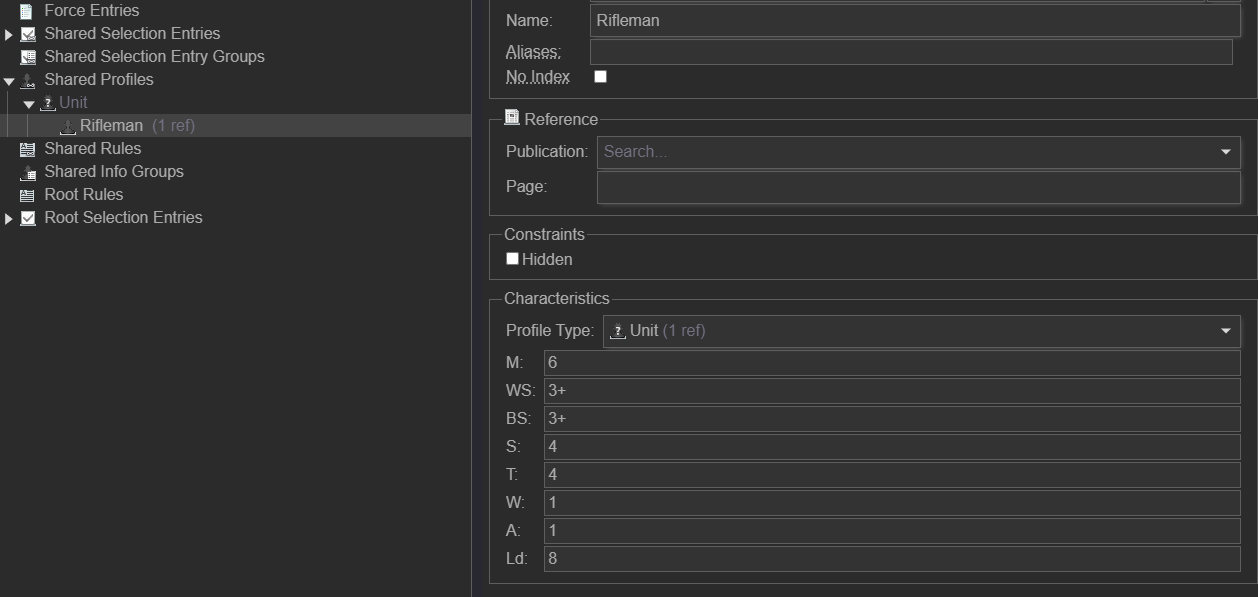
After that we go to Shared Profiles and create a Profile for the members of that unit. We just call them “Rifleman”. Remember to choose the appropriate Profile Type. In this case it is “Unit”.
Then, enter some values for that Profile for Movement, Strength and so on under the Characteristics section.
A Riflemen Squad is obviously made of several Rifleman, and each one has his own Rifle.
To implement that go back to the Riflemen Squad in Shared Selection Entries. There add a Profile Link to the Riflemen Squad with a right-click. The target for that Link will be the “Rifleman” profile we just created.
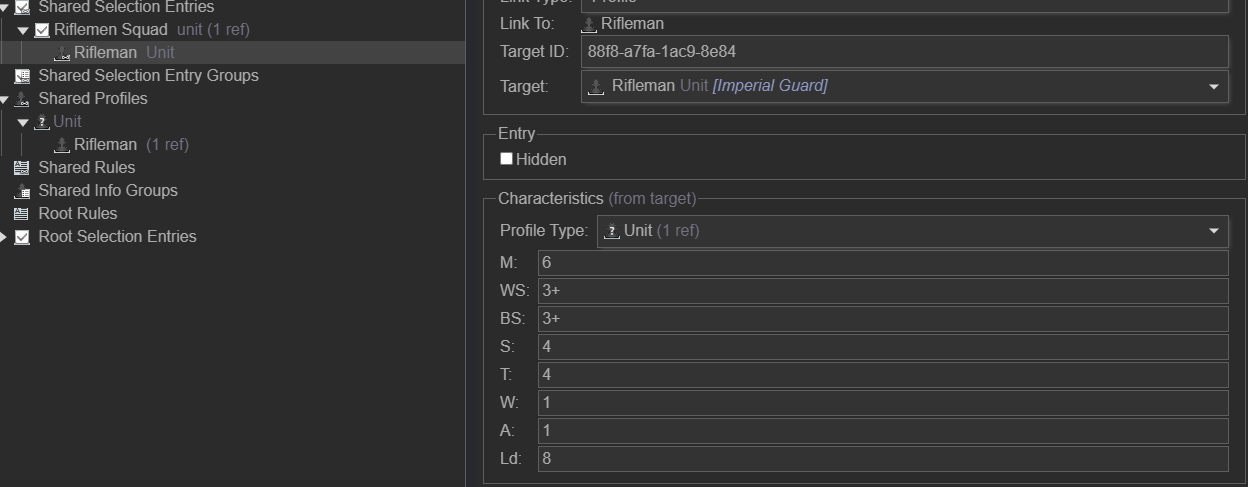
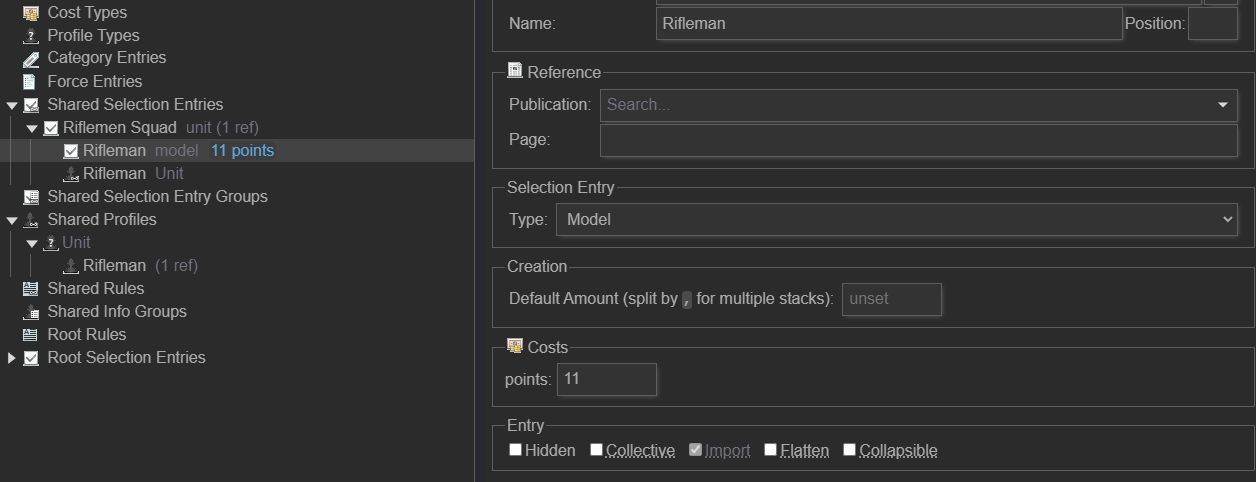
After that, right-click on the Riflemen Squad again and add an Entry. Name that entry “Rifleman” and select "Model" as the Type. Now, give that entry a points value under Costs on the right side.
At this point the Riflemen Squad is ready to go but they are still missing their name-giving rifles.
Remember how we created the Rifle Entry in the System Catalogue? Now it comes in handy!
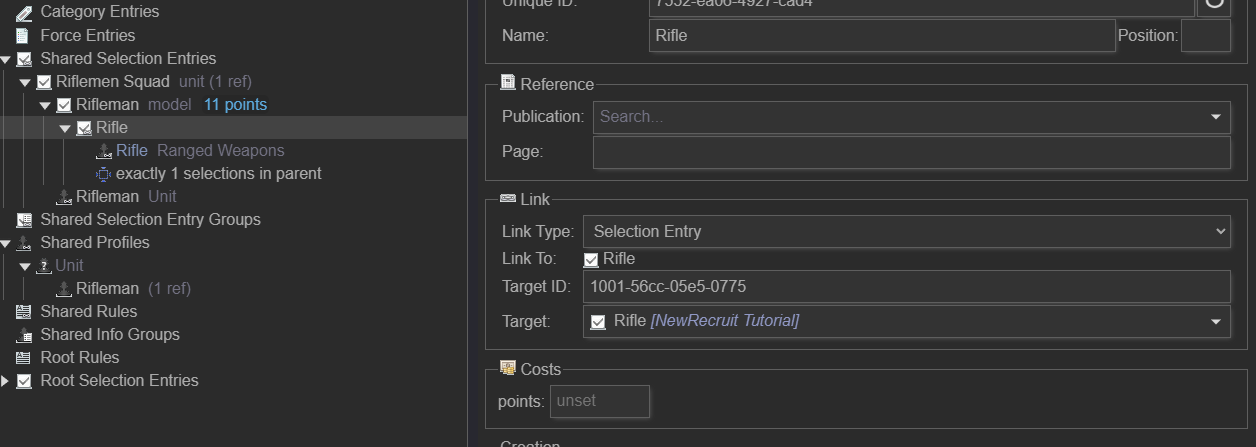
Right-Click the Rifleman within the Riflemen Squad, then create an Entry Link with the target of Rifle.
Now, add a Constraint to that Rifle. Set it to "exactly one in parent”. This ensures each Rifleman must wield exactly one rifle.
Keep in mind that we could have created the “Rifle” Entry just as well right here in the Faction Catalogue, instead of the System Catalogue.But as explained in 7\. Shared Selection Entries before: “For the purpose of this tutorial let’s create a rifle and say that in this game system every faction uses the same type of rifle. So it makes sense that the entry is in the *System Catalogue* and not in the *Faction Catalogue*.”
Now the only thing left to do is to give the Riflemen Squad a primary category and add it to the Root Selection Entries.
Select the Riflemen Squad. On the right side, find the Categories section. Click the green + under Categories.
Important: You must right-click the "Troops" category to assign it as the primary choice. A left-click will only add it as a normal tag. After that, right-click on the Riflemen Squad itself and choose “Add Root Link” in the context menu. This makes the unit available in the army builder.
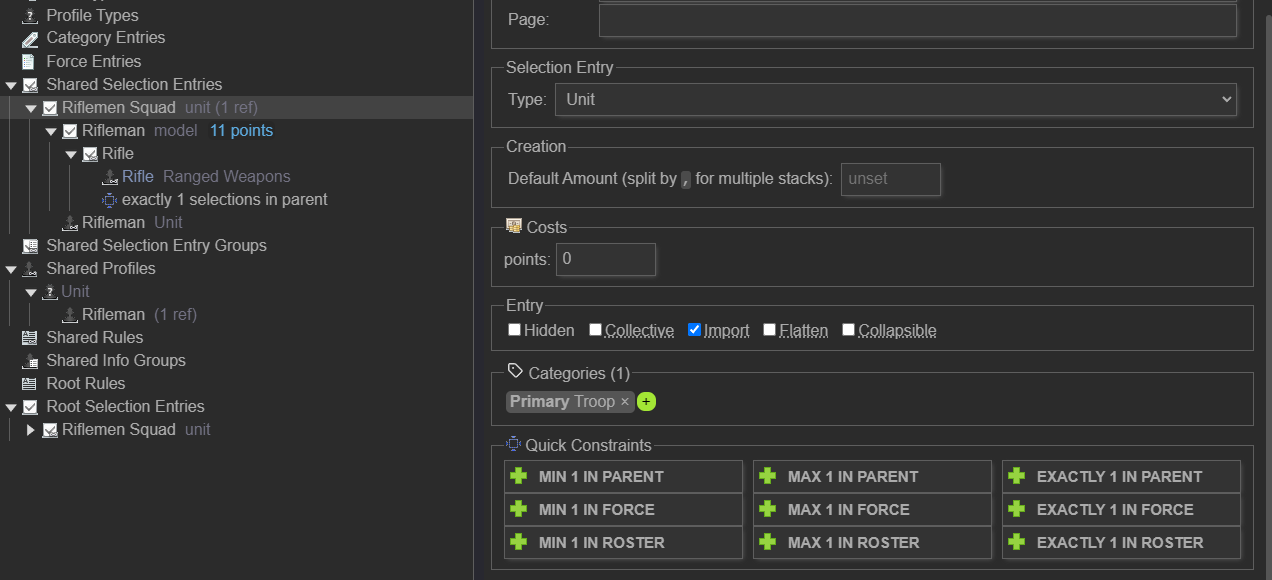
The Unit should now also appear under Root Selection Entries.
Now save your progress and start the NewRecruit Builder.
Perfect. If you now load your game system into the NewRecruit Builder, you should be able to create a new army list.
To do this: Choose a Force (like "Tournament Compliant Force").
You can then add and edit the Riflemen Squad within that force.
Examples
The purpose of this section is to present useful example structures(like Squad A below), as well as to highlight common pitfalls and errors that are easily made. These mistakes often lead to problems and display issues. I encourage you to review the Examples Catalogue to see these in practice and to experiment with them yourself.
I used the following setup for all examples: A Squad can have between 2 to 6 Soldiers.
Each Soldier costs 10 Points. A Soldier can be equipped with one of the following:
-Sword for 1 Point
-Pistol for 3 Points
-Rifle for 6 Points.
Additionally an optional Squad Leader can be added to the Squad for 12 points.
He is always equipped with both a Pistol and a Sword.
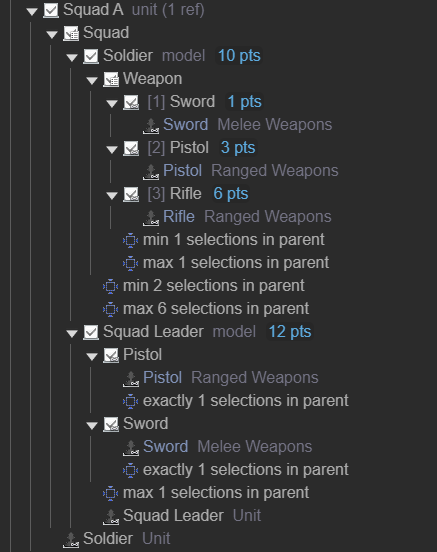
1. Method 1(Squad A)
I strongly recommend following this initial example as closely as possible when creating units, particularly regarding the placement of entries, entry choices, and profiles. Deviating from this structure may cause display issues in the builder or the export templates.
a) Note that the Profile for the Soldier is embedded in the Squad Entry and not the Soldier Entry itself, while the Profile for the Squad Leader is in fact embedded in the Squad Leader Entry.
This structure ensures that the export template displays the information correctly.
(In Example Number 2 we will explore what happens when you choose a different structure.)
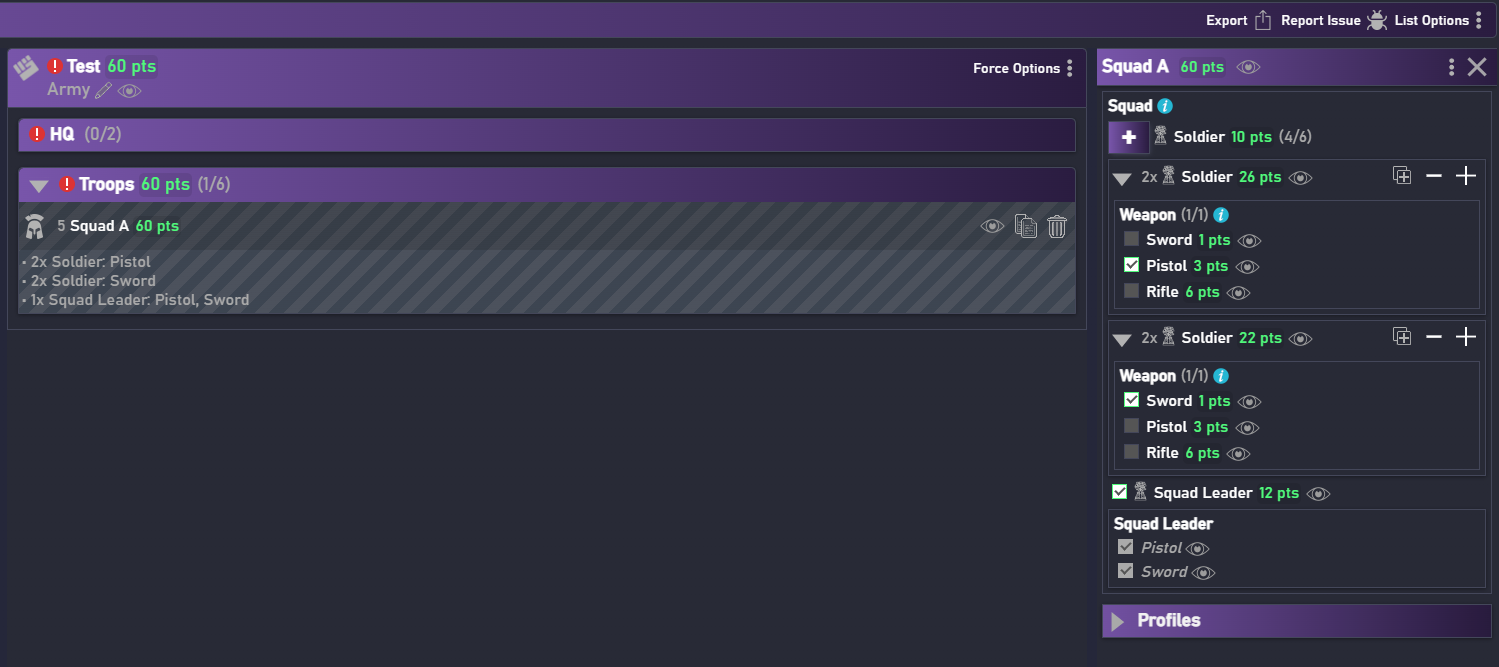
b) Here you can see the example from above in the Builder. Two Soldiers with Pistols were selected, along with another two equipped with Swords and the optional Squad Leader, who comes with both a Sword and a Pistol by default.
c) And here is the example from above, showing the selected choices from the builder, as displayed in the “40k cards” export template:
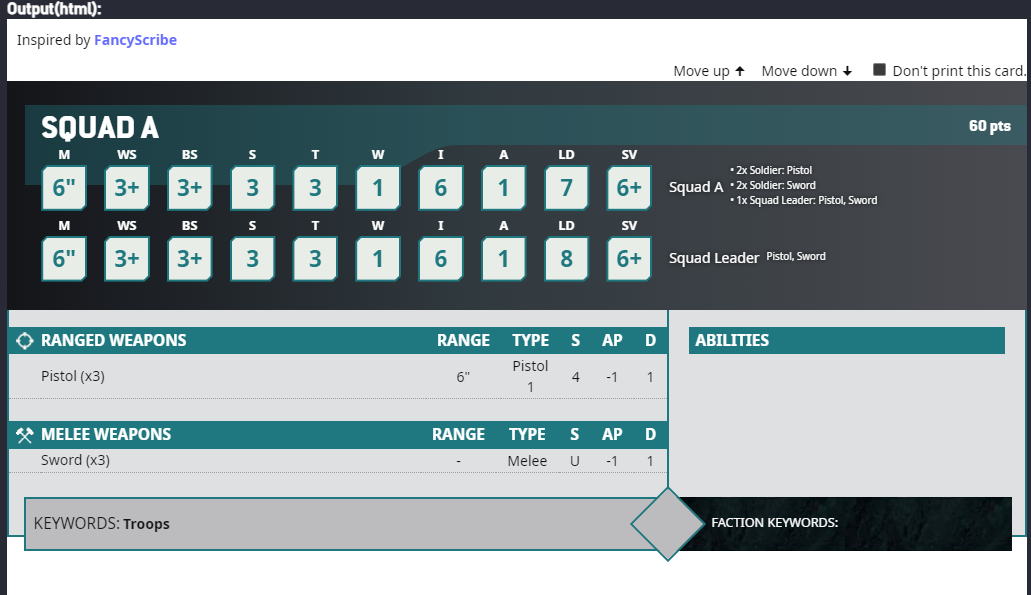 Note that all information is displayed correctly and in detail within its appropriate sections and with the correct corresponding amounts.
2. Method 2 (Squad B)
In this method, every possible combination of gear is preconfigured.
You do not choose the gear or weapons themselves. Instead, you choose a soldier who is already equipped with a specific set of gear and weapons. This approach is transparent for showing what options are available.
However, it has two major drawbacks:
-it obscures the points cost in the builder. The system adds the cost of the soldier and all his gear together into a single total. You can no longer see what a rifle, a pistol, or even an unequipped soldier costs individually.
-If you have a lot of possible combinations of gear and weapons and want to display them all, this method becomes convoluted very fast. A squad with just 3 different weapon options and 3 different gear options(including the option to take no gear at all) would mean you have to create a separate, pre-built entry for every single possible combination. You would need to create: 3 weapons x 4 gear = 12 unique soldier entries
3. Method 3 (Squad C)
Here Associations are used instead.
In the builder you first decide how many soldiers you want in the squad (this is very helpful for rules like "for every 5 soldiers, one can take a special weapon" but not the only way to implement that rule).
At this point, these soldiers are still unarmed.
The next step is to choose the gear and weapons you want to assign to the squad, and the soldiers "take" them. This approach is clean and transparent for points costs, as you see the cost for each weapon and piece of gear added separately.
However, I fear it breaks down with more complex options. For example, if a rule states "a soldier can have a weapon in his right hand and a different one in his left hand," this system cannot handle it. You cannot choose which specific soldier gets the second weapon; New Recruit will assign it for you, essentially at random.
Testing your Implentation
You should test if you have implementet your changes, units etc. correctly by trying to export the whole unit as a 40k Card. Usually if this export does not look right something in your implementation is not correct.
FAQ
Why does my unit not show up in the Builder?
It is likely that you forgot to:
- add a Primary Category to the unit
- forgot to add the unit to the Root Selection Entries
without both of these you won't be able to see a unit inside the builder
When should I use Rules and when Abilities?
Consider Rules as Universal Special Rules(USR) from Warhammer 40k. They are used all across the game system by virtually all the factions. Abilities however are more special and connected to individual units and their powers. It is not unlikely that a certain ability will only appear once in the whole game for a certain unit.
On a second note: when using the 40k template option for exporting your army list, Abilities will appear in name and full text description on the right side of the template. The rules however will only appear in name on the template but in full text description for the whole army at the end of the exported file.