How to install Debian on TeraStation PRO II TS HTGL R5 - DavidDah/Debian_on_Buffalo GitHub Wiki
Currently there is several way’s to install Debian on Terastation Pro II with stock firmware.
In this case we will focus on clean install which means taking out HDD drives from Terastation
and connecting them to external PC which has 4 SATA connectors.
This guide was done on both version of Terastation PRO II (Rack mount TS-RHTGL/R5 and tower TS-HTGL/R5)
Main reason for this is because we want to change partition layout since original partition layout have
too small partitions to install Debian.
Original partition layout have /boot partition of 300MB, “/” partition of 500 MB and swap partitions of 128 MB,
rest of free space is used for data storage which is not suitable for modern Debian installations.
In this case we will use Debian 12 live from USB stick in live mode and mdadm RAID utility.
Check if mdadm is installed by typing command mdadm in terminal if you get reponse that mdadm doesn’t exist
then install it with following commands.
root@debian:~# apt-get update
root@debian:~# apt-get install mdadm
First you need to connect HDD’s to Your PC and verify that all HDD’s are recognized by the system.
run command sudo su and then
root@debian:~# lsblk|grep sd
sda      8:0    0 465.8G  0 disk
├─sda1   8:1    0 290.2M  0 part
├─sda2   8:2    0   1.9G  0 part [SWAP]
├─sda3   8:3    0   9.3G  0 part
└─sda4   8:4    0 454.3G  0 part
sdb      8:16   0 465.8G  0 disk
├─sdb1   8:17   0 290.2M  0 part
├─sdb2   8:18   0     2G  0 part [SWAP]
├─sdb3   8:19   0    10G  0 part
└─sdb4   8:20   0 453.5G  0 part
sdc      8:32   0 465.8G  0 disk
├─sdc1   8:33   0 290.2M  0 part
├─sdc2   8:34   0     2G  0 part [SWAP]
├─sdc3   8:35   0    10G  0 part
└─sdc4   8:36   0 453.5G  0 part
sdd      8:48   0 465.8G  0 disk
├─sdd1   8:49   0 290.2M  0 part
├─sdd2   8:50   0     2G  0 part [SWAP]
├─sdd3   8:51   0    10G  0 part
└─sdd4   8:52   0 453.5G  0 part
Once when you confirm that all disks are recognized You can proceed with new partition layout,
in our case we want to create 3 new partitions for Debian and rest of the FREE
space we will format once when we install Debian.
Check if Your raid has been automatically assembled by Debian live distro
with command:
cat /proc/mdstat
In case that You see output which say running, stop raid first with command
mdadm --stop /dev/md0
mdadm --stop /dev/md1
mdadm --stop /dev/md2
Note: Some debian installation will have different names for RAID devices like /dev/md126 etc..
After that remove ALL RAID devices (md0, md1, md2)
mdadm --remove /dev/md0
mdadm --remove /dev/md1
mdadm --remove /dev/md2
In this case I will use RAID 1 for all 4 drives which means that all
data will be mirrored on 2 drives so total capacity will be half of total available disk space.
/boot partition does NOT support RAID 10 unfortunately.
/boot    500MB
/        10GB
swap     1GB
Run fdisk for EACH HDD and delete all existing partitions:
root@debian:~# fdisk /dev/sdaroot@debian:~# fdisk /dev/sdbroot@debian:~# fdisk /dev/sdcroot@debian:~# fdisk /dev/sddroot@debian:~# fdisk /dev/sda
Welcome to fdisk (util-linux 2.34).
Changes will remain in memory only, until you decide to write them.
Be careful before using the write command.
Command (m for help): d
Partition number (1-6, default 6): 6
Command (m for help): d
Partition number (1-5, default 5): 5
Partition 4 has been deleted.
Command (m for help): d
Partition number (1-3, default 3): 3
Partition 3 has been deleted.
Command (m for help): d
Partition number (1,2, default 2): 2
Partition 2 has been deleted.
Command (m for help): d
Selected partition 1
Partition 1 has been deleted.
Command (m for help): p
Disk /dev/sda: 465.78 GiB, 500107862016 bytes, 976773168 sectors
Disk model: WDC WD5000AAKS-2
Units: sectors of 1 * 512 = 512 bytes
Sector size (logical/physical): 512 bytes / 512 bytes
I/O size (minimum/optimal): 512 bytes / 512 bytes
Disklabel type: dos
Disk identifier: 0x3d8ba43a
Ok let’s create some new partitions now for our Terastation
Command (m for help): n
Partition type
   p   primary (0 primary, 0 extended, 4 free)
   e   extended (container for logical partitions)
Select (default p): p
Partition number (1-4, default 1): 1
First sector (2048-976773167, default 2048):
Last sector, +/-sectors or +/-size{K,M,G,T,P} (2048-976773167, default 976773167): +500MB
Created a new partition 1 of type ‘Linux’ and of size 477 MiB.
Command (m for help): n

Partition type

   p   primary (1 primary, 0 extended, 3 free)

   e   extended (container for logical partitions)

Select (default p): p

Partition number (2-4, default 2): 2

First sector (978944-976773167, default 978944):

Last sector, +/-sectors or +/-size{K,M,G,T,P} (978944-976773167, default 976773167): +10GB
Created a new partition 2 of type ‘Linux’ and of size 10 GiB.
Command (m for help): n

Partition type

   p   primary (2 primary, 0 extended, 2 free)

   e   extended (container for logical partitions)

Select (default p): p

Partition number (3,4, default 3):

First sector (10743808-976773167, default 10743808):

Last sector, +/-sectors or +/-size{K,M,G,T,P} (10743808-976773167, default 976773167): +1GB
Created a new partition 3 of type ‘Linux’ and of size 1 GiB.
Command (m for help): p

Disk /dev/sda: 465.78 GiB, 500107862016 bytes, 976773168 sectors

Disk model: WDC WD5000AAKS-2

Units: sectors of 1 * 512 = 512 bytes

Sector size (logical/physical): 512 bytes / 512 bytes

I/O size (minimum/optimal): 512 bytes / 512 bytes

Disklabel type: dos

Disk identifier: 0×3d8ba43a
Device     Boot    Start      End Sectors  Size Id Type

/dev/sda1           2048   978943  976896  477M 83 Linux

/dev/sda2         978944 10743807 9764864  10G  83 Linux

/dev/sda3       10743808 12697599 3905536  945M 83 Linux
Command (m for help):
Now we will change partition type for /dev/sda3 to Linux Swap in fdisk
Command (m for help): t
Partition number (1-3, default 3): 3
Hex code (type L to list all codes): 82

Changed type of partition 'Linux' to 'Linux swap / Solaris'.

Command (m for help): p
Disk /dev/sda: 465.78 GiB, 500107862016 bytes, 976773168 sectors
Disk model: WDC WD5000AAKS-2
Units: sectors of 1 * 512 = 512 bytes
Sector size (logical/physical): 512 bytes / 512 bytes
I/O size (minimum/optimal): 512 bytes / 512 bytes
Disklabel type: dos
Disk identifier: 0x3d8ba43a

Device     Boot    Start      End Sectors  Size Id Type
/dev/sda1           2048   978943  976896  477M 83 Linux
/dev/sda2         978944 10743807 9764864  10 G 83 Linux
/dev/sda3       10743808 12697599 1953792  954M 82 Linux swap / Solaris
And write down all changes that we made in fdisk
Command (m for help): w
The partition table has been altered.
The kernel still uses the old partitions. The new table will be used at the next reboot.
Syncing disks.
root@debian:~#
Now repeat the same process for /dev/sdb /dev/sdc and /dev/sdd.
After we finished repartitioning of HDD’s we can start creating RAID 1 for our drives.
But before that i recommend to reboot your live Debian PC to make sure that partition tables are updated.
Then create RAID 1 for our first partition (boot) on /dev/sd*1 with metadata=0.90 (boot partition must have metadata 0.90).
mdadm --create --verbose /dev/md0 --level=1 --raid-devices=4 --metadata=0.90 /dev/sda1 /dev/sdb1 /dev/sdc1 /dev/sdd1
mdadm: layout defaults to n2
mdadm: chunk size defaults to 512K
mdadm: size set to 487936K
mdadm: array /dev/md0 started.
Format /dev/md0 to ext3 filesystem (boot MUST be formatted to ext3 since kernel doesn’t support ext4 yet).
root@debian:~# mkfs.ext3 /dev/md0
mke2fs 1.45.5 (07-Jan-2020)
Creating filesystem with 243968 4k blocks and 61056 inodes
Filesystem UUID: 5e5e346c-a384-47a3-981a-84c60cee158d
Superblock backups stored on blocks:
        32768, 98304, 163840, 229376

Allocating group tables: done
Writing inode tables: done
Creating journal (4096 blocks): done
Writing superblocks and filesystem accounting information: done
The Inode size for /boot must be set to 128 for Orion/MV78100 Devices
(TS2PRO, Terastation III, Linkstation PRO (LS-GL) etc.
mkfs.ext3 -I 128 /dev/md0
Create raid for our “/” partition
root@debian:~# mdadm --create --verbose /dev/md1 --level=1 --raid-devices=4 /dev/sda2 /dev/sdb2 /dev/sdc2 /dev/sdd2
mdadm: layout defaults to n2
mdadm: layout defaults to n2
mdadm: chunk size defaults to 512K
mdadm: size set to 4877312K
mdadm: Defaulting to version 1.2 metadata
mdadm: array /dev/md1 started.
Format /dev/md1 to ext4 FS.
root@debian:~#mkfs.ext4 /dev/md1
mke2fs 1.45.5 (07-Jan-2020)
Creating filesystem with 2438656 4k blocks and 610800 inodes
Filesystem UUID: 0a4e1b56-f24d-4be9-8704-1ff3ab7f855d
Superblock backups stored on blocks:
        32768, 98304, 163840, 229376, 294912, 819200, 884736, 1605632
Allocating group tables: done

Writing inode tables: done

Creating journal (16384 blocks): done

Writing superblocks and filesystem accounting information: done

root@debian:~#
Check resync status of /dev/md1
root@debian:~# cat /proc/mdstat
Personalities : [raid10]
md1 : active raid10 sdd2[3] sdc2[2] sdb2[1] sda2[0]
      9754624 blocks super 1.2 512K chunks 2 near-copies [4/4] [UUUU]
      [==========>..........]  resync = 52.2% (5101184/9754624) finish=1.2min speed=62856K/sec
md0 : active raid10 sdd13 sdc12 sdb11 sda10

      975872 blocks 512K chunks 2 near-copies [4/4] [UUUU]
unused devices:
Now we have our new partition layout and raid created.
Let’s mount our future boot partition and download initrd.buffalo and uImage.buffalo
directly to boot partition and rename uImage.buffalo.tspro to uImage.buffalo.
Use firefox to download initrd.buffal0 and uImage.buffalo
https://github.com/1000001101000/Debian_on_Buffalo/blob/master/Bookworm/installer_images/armel_devices/uImage.buffalo.ts2pro
root@debian:/mnt/boot# cd /home/user/Downloads
root@debian:/home/user/Downloads# mv uImage.buffalo.ts2pro uImage.buffalo
root@debian:/home/user/Downloads# mv * /mnt/boot
root@debian:/home/user/Downloads# cd /mnt/boot
root@debian:/mnt/boot# ls
initrd.buffalo lost+found uImage.buffalo
Now power off Your Debian PC and connect HDD’s back to Terastation.
Debian installer should start automatically and Terastation should get IP address from DHCP server in LAN.
Scan your LAN and find Terastation address or check on your router which IP address was assigned to Your Terastation.
Default installer username is installer and password is install
username: installer
password: install
Now define root password and select time zone.
Once when partition manager starts select first raid device and select mount point /boot

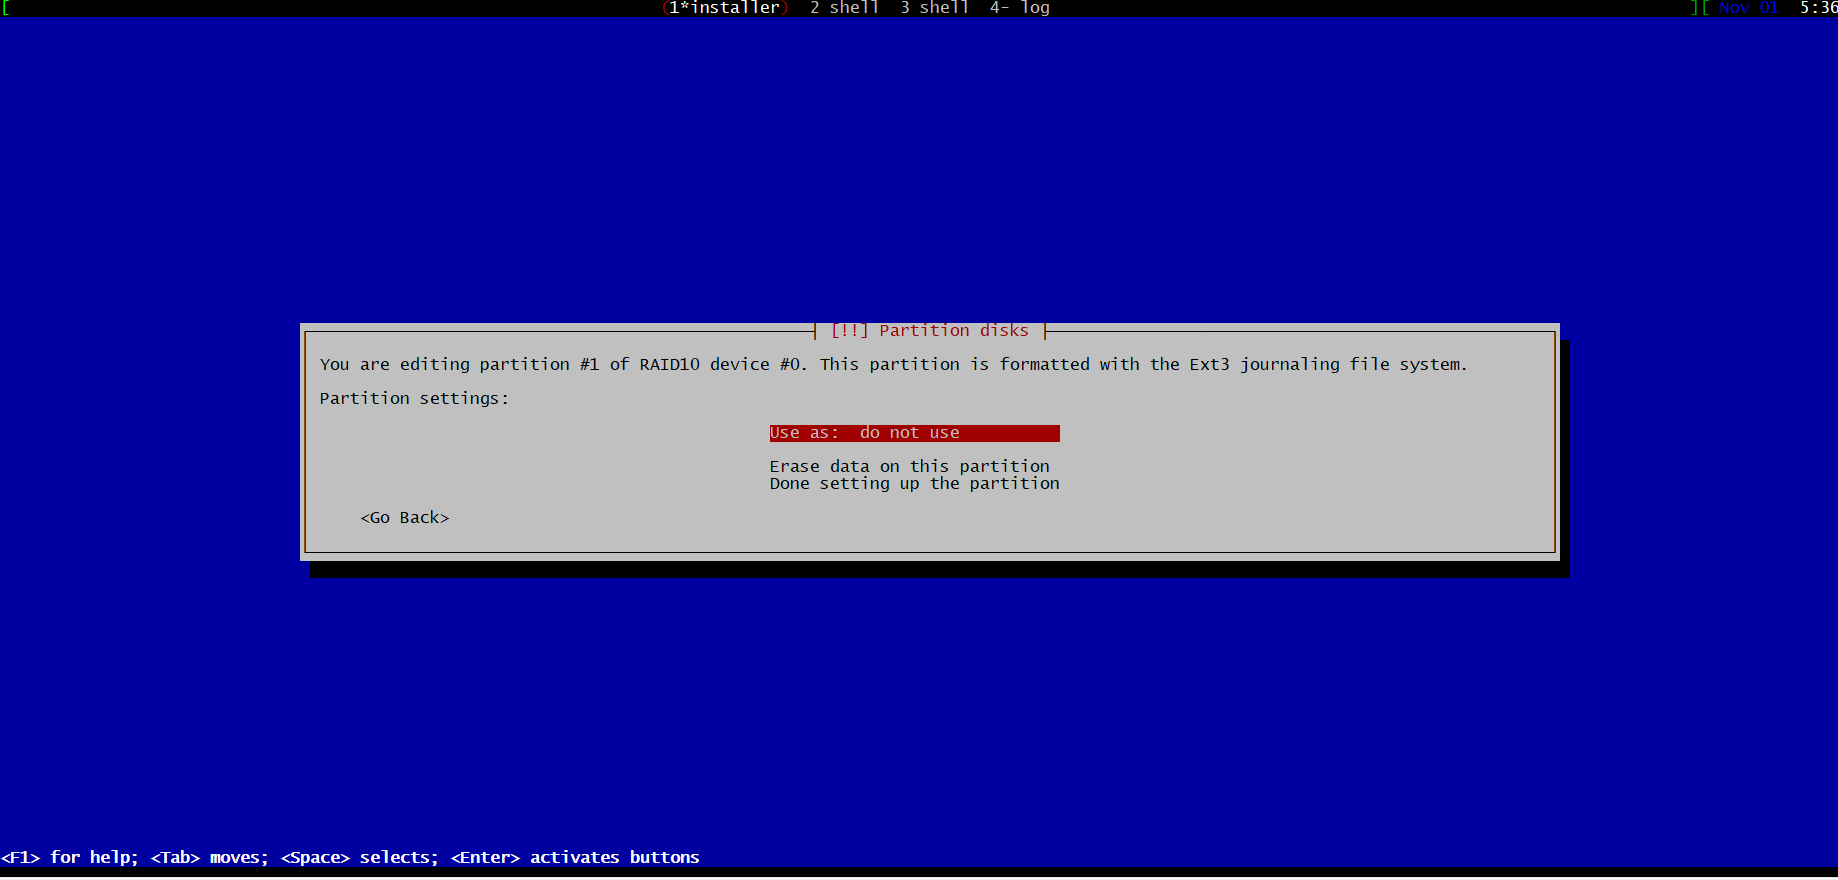


Now select second raid device (10GB) and mount it as “/” and make sure to select ext4 filesystem for this partition.


Now select swap partitions on all 4 drives and mark them as swap (do not mount them).


Finish partitioning and write changes to disk


Now wait for installer to finish (30-40 minutes)

Once installer is done we can login to our new Debian system with username and password which we defined during installation.
Congratulations, You have install Debian on Terastation PRO
After logging with ssh into your Terastation we should create new storage partition from remaining free space on HDD’s.
First create partitions on all 4 disks (sda,sdb,sdc,sdd)
root@tspro2:~# fdisk /dev/sda

Welcome to fdisk (util-linux 2.33.1).
Changes will remain in memory only, until you decide to write them.
Be careful before using the write command.


Command (m for help): n
Partition type
   p   primary (3 primary, 0 extended, 1 free)
   e   extended (container for logical partitions)
Select (default e): p

Selected partition 4
First sector (24119296-976773167, default 24119296):
Last sector, +/-sectors or +/-size{K,M,G,T,P} (24119296-976773167, default 976773167):

Created a new partition 4 of type 'Linux' and of size 454.3 GiB.

Command (m for help): w
The partition table has been altered.
Syncing disks.
Now let’s create raid 10 from partitions that we just created
mdadm --create --verbose /dev/md2 --level=10 --raid-devices=4 /dev/sda4 /dev/sdb4 /dev/sdc4 /dev/sdd4
mdadm: layout defaults to n2
mdadm: layout defaults to n2
mdadm: chunk size defaults to 512K
mdadm: size set to 476194816K
mdadm: automatically enabling write-intent bitmap on large array
mdadm: Defaulting to version 1.2 metadata
mdadm: array /dev/md2 started.
And format partition to ext4 or XFS.
root@tspro2:~# mkfs.ext4 /dev/md2
mke2fs 1.44.5 (15-Dec-2018)
Creating filesystem with 238097408 4k blocks and 59531264 inodes
Filesystem UUID: 0f98b3ae-324f-40d4-8c57-ca5929acd579
Superblock backups stored on blocks:
        32768, 98304, 163840, 229376, 294912, 819200, 884736, 1605632, 2654208,
        4096000, 7962624, 11239424, 20480000, 23887872, 71663616, 78675968,
        102400000, 214990848

Allocating group tables: done
Writing inode tables: done
Creating journal (262144 blocks): done
Writing superblocks and filesystem accounting information: done
Check status of your raid sync:
root@tspro2:~# cat /proc/mdstat
Personalities : [raid1] [linear] [multipath] [raid0] [raid6] [raid5] [raid4] [raid10]
md2 : active raid10 sdd4[3] sdc4[2] sdb4[1] sda4[0]
      952389632 blocks super 1.2 512K chunks 2 near-copies [4/4] [UUUU]
      [>....................]  resync =  0.5% (4860416/952389632) finish=327.3min speed=48239K/sec
      bitmap: 8/8 pages [32KB], 65536KB chunk

md1 : active raid1 sda3[0] sdb3[2] sdc3[1] sdd3[3]
      10476544 blocks super 1.2 [4/4] [UUUU]

md0 : active raid1 sda1[0] sdd1[1] sdc1[3] sdb1[2]
      524224 blocks [4/4] [UUUU]

unused devices: <none>
Check whether the new space is available by typing:
df -h -x devtmpfs -x tmpfs
Sync process will take couple of hours but You can use created filesystem during that time
(speed of TS will be significantly degraded until sync is done since it requires a lot of CPU power).
Add raid info to mdadm.conf.
Also, the old approach led to complications when mounting filesystems on RAID devices. They could not be put in the /etc/fstab file as usual, but would have to be mounted from the init-scripts.
The persistent superblocks solve these problems. When an array is created with the persistent-superblock option (the default now), a special superblock is written to a location (different for different superblock versions) on all disks participating in the array. This allows the kernel to read the configuration of RAID devices directly from the disks involved, instead of reading from some configuration file that may not be available at all times.
It’s not a bad idea to maintain a consistent /etc/mdadm.conf file, since you may need this file for later recovery of the array, although this is pretty much totally unnecessary today.
A persistent superblock is mandatory for auto-assembly of your RAID devices upon system boot.
Now let’s mount storage and modify /etc/fstab to make sure that storage is mounted after reboot.
root@tspro2:~# mkdir /mnt/array1
root@tspro2:~# mount /dev/md2 /mnt/array1/
Add the new filesystem mount options to the /etc/fstab file for automatic mounting at boot:
echo '/dev/md2 /mnt/array1 ext4 defaults,nofail,discard 0 0' | sudo tee -a /etc/fstab
Quicknote:
after installation Your RAID devices should look like this
/dev/md0 /boot ext3
/dev/md1 / ext4
/dev/md2 /mnt/array1 ext4
- cat /proc/mdstat
Personalities : [linear] [raid0] [raid1] [raid10] [raid6] [raid5] [raid4] [multipath] [faulty]
md2 : active raid10 sdd43 sdc42 sdb41 sda40
952389632 blocks super 1.2 512K chunks 2 near-copies [4/4] [UUUU]
bitmap: 0/8 pages [0KB], 65536KB chunk
md1 : active raid1 sdd33 sdc31 sdb32 sda30
10476544 blocks super 1.2 [4/4] [UUUU]
md0 : active raid1 sdd11 sdc13 sdb12 sda10
524224 blocks [4/4] [UUUU]
unused devices:
Use command blkid to get partition UUID for md2 device so that we are able to add line to /etc/fstab for auto mount.
root@debian:~# blkid|grep md2
/dev/md2: UUID="f612ceaf-880e-48fa-9bc0-8ebb1ac98b99" BLOCK_SIZE="4096" TYPE="ext4"
Add following line to Your /etc/fstab
echo 'UUID="f612ceaf-880e-48fa-9bc0-8ebb1ac98b99" /mnt/array1 auto nosuid,nodev,nofail,x-gvfs-show 0 0' >> /etc/fstab
DONT FORGET TO REPLACE UUID WITH YOUR UUID FROM BLKID COMMAND!!
If you need to slowdown RAID sync process (it takes 6 hours for 4 × 500 GB HDD) You can do that via following command:
sysctl -w dev.raid.speed_limit_max=5000