User Documentation [English] - DIMNISSV/JustConverter GitHub Wiki
Table of Contents
- Introduction
- Features
- Installation
- Quick Start
- GUI Overview
- Detailed Usage
- Parameters Explained & Recommendations
- Troubleshooting & FAQ
- Contributing & Support
- License
- Donate
Introduction
JustConverter + AdBurner is a graphical user interface (GUI) application designed to simplify video conversion using the powerful ffmpeg library. Beyond basic transcoding, it specializes in integrating advertisements directly into video files through various methods:
- Embedding: Inserting video ad clips at specific timecodes.
- Banner Overlays: Displaying video or image banners at specified times.
- Moving Logos: Overlaying an image logo that moves around the screen.
The tool provides default settings for common conversion tasks but allows detailed customization of encoding parameters, track metadata, and ad placement. Settings can be saved and automatically loaded for convenience.
Features
- Video Conversion: Transcode videos using various codecs (e.g., H.264, HEVC) and settings.
- Ad Embedding: Insert video advertisements seamlessly at multiple points in the main video.
- Banner Ad Overlays: Add static or animated banners (from video or image files) visible during specific time intervals.
- Moving Logo: Overlay a customizable moving logo (image) for branding or watermarking.
- Includes Motion Blur effect (using
tmix) to improve animation smoothness at lower speeds.
- Includes Motion Blur effect (using
- Settings Management: Save and load transcoding and advertisement parameters to/from a JSON file (
converter_settings.json). - Track Management: View video, audio, and subtitle tracks. Edit Title and Language metadata for tracks.
- Parameter Control: Adjust video/audio codecs, bitrates, quality (CQ/CRF), presets, FPS, and hardware acceleration.
- Hardware Acceleration: Detects and utilizes available ffmpeg hardware acceleration methods (e.g., NVENC, QSV, VAAPI) for faster encoding (if supported by hardware and ffmpeg build).
- Command Preview: View the generated
ffmpegcommands before starting the conversion. - Logging: Displays
ffmpegoutput and progress during conversion. - Cross-Platform: Built with Python and Tkinter, aiming for compatibility with Linux and Windows.
- Temporary File Management: Automatically generates and cleans up temporary files used during processing.
Installation
Prerequisites
- Python 3: Version 3.8 or higher is recommended. Make sure Python is added to your system's PATH during installation.
- FFmpeg: A recent version of
ffmpeg(which includesffprobe) must be installed and accessible from your system's PATH. This application relies heavily onffmpegfor all its operations.
Linux (Debian/Ubuntu/Fedora)
-
Install Python 3 and pip:
- On Debian/Ubuntu:
sudo apt update sudo apt install python3 python3-pip python3-tk git -y - On Fedora:
sudo dnf update
sudo dnf install python3 python3-pip python3-tkinter git -y
- On Debian/Ubuntu:
-
Install FFmpeg:
- On Debian/Ubuntu:
sudo apt install ffmpeg -y - On Fedora:
- You might need to enable the RPM Fusion repository first:
sudo dnf install https://mirrors.rpmfusion.org/free/fedora/rpmfusion-free-release-$(rpm -E %fedora).noarch.rpm https://mirrors.rpmfusion.org/nonfree/fedora/rpmfusion-nonfree-release-$(rpm -E %fedora).noarch.rpm - Then install ffmpeg:
sudo dnf install ffmpeg -y
- You might need to enable the RPM Fusion repository first:
- On Debian/Ubuntu:
-
Download the Application:
- Clone the repository using Git:
git clone https://github.com/DIMNISSV/JustConverter.git cd JustConverter - Alternatively, download the source code ZIP from GitHub and extract it.
- Clone the repository using Git:
-
Run the Application:
python3 main.py- (Or
python main.pyifpythonpoints to Python 3)
- (Or
Windows
-
Install Python 3:
- Download the latest Python 3 installer from python.org.
- Important: During installation, make sure to check the box that says "Add Python X.X to PATH".
- Install
pipandtksupport if offered as options.
-
Install FFmpeg:
- Download a pre-built static version of FFmpeg for Windows. Recommended sources:
- gyan.dev (provides full builds)
- BtbN/FFmpeg-Builds
- Extract the downloaded archive (e.g., to
C:\ffmpeg). - Important: Add the
bindirectory inside the extracted folder (e.g.,C:\ffmpeg\bin) to your system's PATH environment variable. Search for "Edit the system environment variables" in Windows search, click "Environment Variables...", find "Path" under "System variables", click "Edit...", "New", and paste the path to thebindirectory.
- Download a pre-built static version of FFmpeg for Windows. Recommended sources:
-
Download the Application:
- Clone the repository using Git (if you have Git installed):
git clone https://github.com/DIMNISSV/JustConverter.git cd JustConverter - Alternatively, download the source code ZIP from the GitHub repository page ("Code" -> "Download ZIP") and extract it to a folder.
- Clone the repository using Git (if you have Git installed):
-
Run the Application:
- Open Command Prompt (
cmd.exe) or PowerShell. - Navigate to the directory where you extracted/cloned the application using the
cdcommand. - Run the application:
python main.py
- Open Command Prompt (
Windows (using Scoop)
If you use the Scoop package manager for Windows:
-
Install Prerequisites using Scoop:
# Add the 'extras' bucket if you haven't already (needed for ffmpeg)
scoop bucket add extras

# Install Python and FFmpeg
scoop install python ffmpeg git
(Scoop automatically handles adding them to your PATH)
-
Download the Application:
git clone https://github.com/DIMNISSV/JustConverter.git cd JustConverter -
Run the Application:
python main.py
Verification
After installation, open your terminal or command prompt and run:
ffmpeg -version
ffprobe -version
python --version  # or python3 --version
If these commands run without errors and show version information, the prerequisites are likely set up correctly.
Quick Start
- Install the application and prerequisites following the steps above.
- Run the application (
python main.py). Settings will be loaded fromconverter_settings.jsonif it exists. - Go to the Files tab.
- Click Browse next to "Input File" and select your source video.
- An output filename will be suggested. You can change it using its Browse button if needed.
- (Optional) Review/adjust settings on the Advertisement and Transcoding tabs (they reflect loaded or default settings).
- (Optional) Add specific ads/banners/logo for this run on the Advertisement tab.
- (Optional) Use the Settings tab to Save current parameters for future use or Reset to defaults.
- Go to the Start tab.
- Click Start Conversion.
- Wait for the process to complete. Check the log area for progress and messages. Settings will be saved automatically on exit.
GUI Overview
The application uses a tabbed interface to organize different settings and stages of the conversion process.
Main Tabs
- Files: Select input/output files and view/edit media track information.
- Advertisement: Configure embedded video ads, banner overlays, and moving logos.
- Transcoding: Set detailed FFmpeg encoding parameters (codecs, quality, bitrate, HW acceleration, etc.).
- Settings: Manage saving, loading, and resetting application settings.
- Start: Preview the generated FFmpeg commands, view logs, and initiate the conversion process.
- About: View application information, version, author, and relevant links.
Detailed Usage
Files Tab
This is the starting point where you define your source video and examine its contents.
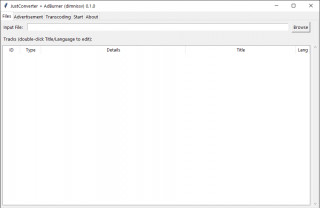
- Input File:
- Entry Field: Shows the path to the selected input video.
- Browse Button: Opens a file dialog to select the main video file you want to convert. Selecting a new input file will clear runtime state (ads, logs) but not the saved settings fields.
- Tracks:
- Treeview: Displays information about the streams (tracks) found in the input file.
- ID:
InputIndex:StreamIndex. - Type:
video,audio,subtitle. - Details: Codec, resolution, FPS string, sample rate, bitrate, etc.
- Title: Metadata title tag.
- Lang: 3-letter language code.
- ID:
- Editing: Double-click on Title or Lang cells to edit. Changes apply during conversion.
- Treeview: Displays information about the streams (tracks) found in the input file.
Advertisement Tab
Configure various ways to add advertisements or branding to your video. Settings here (except file paths) are saved/loaded.
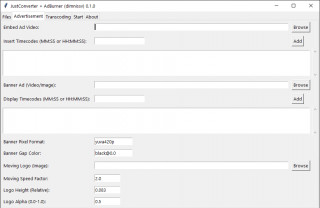
Embedded Ads
- Embed Ad Video: Select the ad video file (path is not saved in settings).
- Insert Timecodes: Enter timecode (
MM:SSorHH:MM:SS) in the original video where the ad starts. - Add Button: Adds the selected ad file and timecode to the list for this run only.
- Timecodes Listbox: Shows ads for the current run. Double-click to remove.
- Note: Requires transcoding and temporary files.
Banner Ads
- Banner Ad (Video/Image): Select the banner file (path is not saved).
- Display Timecodes: Enter start timecode (
MM:SSorHH:MM:SS) in the original video. - Add Button: Adds the start timecode for this run only.
- Timecodes Listbox: Shows banner start times for the current run. Double-click to remove.
- Banner Pixel Format: (Saved Setting) Pixel format for the temporary banner track (default:
yuva420pfor alpha support). - Banner Gap Color: (Saved Setting) Color for gaps when the banner isn't shown (default:
[email protected]for transparent).
Moving Logo
- Moving Logo (Image): Select the logo image file (path is not saved).
- Moving Speed Factor: (Saved Setting) Controls animation speed (default:
2.0). Higher is faster. - Logo Height (Relative): (Saved Setting) Logo height as a fraction of video height (default:
0.083). - Logo Alpha (0.0-1.0): (Saved Setting) Logo transparency (default:
0.5). - Motion Blur: (Controlled by
config.pycurrently) An effect is applied to reduce jerkiness during slow movement.
Transcoding Tab
Control the technical details of the encoding. All settings here are saved/loaded.
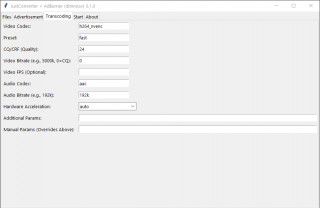
- Video Codec: Encoder for video (e.g.,
libx264,h264_nvenc,copy). - Preset: Encoding speed vs. compression (e.g.,
fast,medium,slow). - CQ/CRF (Quality): Quality-based rate control (e.g.,
23). Lower is better quality, larger file. Used if Bitrate is0. - Video Bitrate: Target bitrate (e.g.,
5000k). Overrides CQ/CRF if not0. - Video FPS (Optional Override): Force a specific output frame rate (e.g.,
25,30000/1001). Leave blank to use source FPS. Pre-filled with detected source FPS after analysis. - Audio Codec: Encoder for audio (e.g.,
aac,opus,copy). - Audio Bitrate: Target audio bitrate (e.g.,
192k). - Hardware Acceleration: Select method (
auto,cuda,qsv,none, etc.). - Additional Params: Extra ffmpeg flags for the main encoding command.
- Manual Params (Overrides Above): Completely replaces individual settings above if non-empty.
Preferences Tab
Manage application settings persistence (full functional is in development).
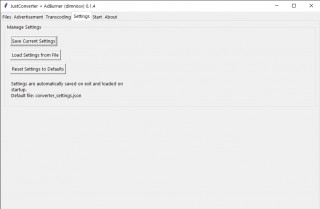
- Settings File: (Informational for now) Shows the expected location of the settings file (e.g.,
converter_settings.jsonin the application directory). - Save Settings Button: Manually saves the current values from the "Advertisement" (parameter fields only) and "Transcoding" tabs to the settings file (
converter_settings.json). Settings are also saved automatically when closing the application. - Load Settings Button: Manually reloads settings from
converter_settings.json, overwriting any current values in the corresponding GUI fields. This happens automatically on startup. - Reset to Defaults Button: Resets the settings fields on the "Advertisement" and "Transcoding" tabs back to the default values defined in the application's
config.pyfile. This does not save the reset values automatically; use "Save Settings" afterwards if you want to persist the defaults.
Start Tab
Preview commands, monitor the conversion, and initiate the process.
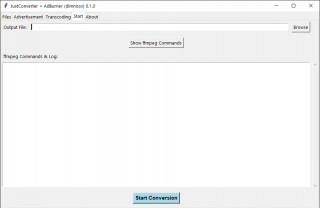
- Output File: Choose the final output file path.
- Show ffmpeg Commands Button: Generates and displays the commands without running them.
- ffmpeg Commands & Log: Displays commands or live ffmpeg output/progress/errors.
- Start Conversion Button: Confirms and starts the conversion process (preprocessing and main command).
About Tab
Displays application information and links.
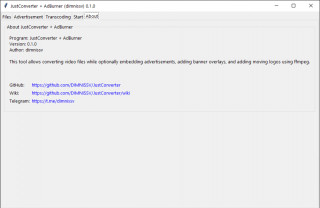
- Program Info: Title, version, author.
- Description: Brief overview.
- Links: GitHub Repository, Wiki, Telegram contact.
Parameters Explained & Recommendations
Video Encoding
- Codec (
-c:v):libx264(compatible software),libx265(efficient software),h264_nvenc/hevc_nvenc(NVIDIA HW),h264_qsv/hevc_qsv(Intel HW),h264_amf/hevc_amf(AMD HW),copy(no re-encode). - Preset (
-preset): Speed vs. compression (software:ultrafast..veryslow; HW: varies). Recommendfast/medium. - CQ/CRF (
-cq:v/-crf): Target quality. Recommend 18-28 (libx264), 24-28 (libx265). Lower is better/larger. Use if bitrate is0. - Bitrate (
-b:v): Target size (e.g.,5000k). Use0for CQ/CRF mode unless size is critical.
Audio Encoding
- Codec (
-c:a):aac(compatible),opus(efficient),copy(no re-encode). - Bitrate (
-b:a):128k(basic),192k-256k(good stereo),320k(high fidelity). Opus efficient at lower rates.
Hardware Acceleration (HWAccel)
- Uses GPU for speed. May slightly reduce quality/efficiency vs software. Requires compatible drivers/ffmpeg. Try
autoor specific method (cuda,qsv,vaapietc.). Usenonefor software.
Ad/Overlay Parameters
- Timecodes:
MM:SSorHH:MM:SS, within original video duration. - Banner Format/Gap: Defaults (
yuva420p,[email protected]) handle transparency. - Moving Logo Height/Alpha/Speed: Tune for desired appearance.
- Motion Blur: Controlled via
config.py(MOVING_LOGO_MOTION_BLUR=True,MOVING_LOGO_BLUR_INTENSITY=0.5by default). Reduces jerkiness by blending frames based on speed usingtmix. Intensity value scales the calculated blur strength.
Additional & Manual Parameters
- Additional Params: Add specific flags (
-tune,-profile) to GUI settings. - Manual Params: Completely overrides all individual transcoding settings if non-empty. For advanced users.
Troubleshooting & FAQ
- Error:
ffmpegorffprobenot found.- Solution: Install FFmpeg and add its
bindirectory to the system PATH. Verify withffmpeg -version. Restart app.
- Solution: Install FFmpeg and add its
- Conversion fails immediately or during preprocessing.
- Solution: Check logs on Start tab. Click Show ffmpeg Commands to inspect. Verify input/ad file paths. Check disk space for temporary files. Try simpler settings (no ads).
- Conversion is very slow.
- Solution: Use faster Preset. Enable Hardware Acceleration. Reduce number of embedded ads.
- Output video quality is poor.
- Solution: Decrease CQ/CRF value. Increase Video Bitrate. Use slower Preset. Try disabling Hardware Acceleration (
none).
- Solution: Decrease CQ/CRF value. Increase Video Bitrate. Use slower Preset. Try disabling Hardware Acceleration (
- Temporary files are not cleaned up.
- Solution: App cleans on normal exit/start. Manually delete files prefixed
segment_,ad_,banner_from system temp dir (/tmp,%TEMP%) if app crashed.
- Solution: App cleans on normal exit/start. Manually delete files prefixed
- Ads/Banners/Logo don't appear or appear at the wrong time.
- Solution: Double-check timecodes and file paths. Check logs for warnings.
- Error related to pixel formats or SAR.
- Solution: Tool attempts conversion. Input files might need pre-conversion if error persists. Check ffmpeg logs.
- Settings not saving/loading correctly.
- Cause: File permissions issue for
converter_settings.json, invalid JSON format in the file. - Solution: Check permissions for the directory containing the application. Try deleting
converter_settings.jsonto allow the app to recreate it with defaults. Check console for JSON parsing errors on startup.
- Cause: File permissions issue for
- Moving logo still looks jerky.
- Cause: Motion blur might not be strong enough for very slow speeds or low FPS. The calculation might need tuning.
- Solution: Motion blur using
tmixis implemented. If still jerky, this might indicate a need to adjustMOVING_LOGO_BLUR_INTENSITYinconfig.py(requires code change currently) or report the specific case as a potential bug/improvement area. Ensure source video FPS is detected correctly.
Contributing & Support
- Bug Reports & Feature Requests: GitHub Issues
- Contributing:
- Create or select issue, report that you want to do it
- Fork repository, create new branch for feature or fix, call it understandable
- Make your updates in code
- Pull request with connection to your branch and to related issue
- One of us will check compatibility and correctness
- It's will merged to master
- Look at existing Issues and PRs for example of format
- Support: Telegram: @dimnissv or GitHub Issues.
License
GNU General Public License v3.0
Permissions of this strong copyleft license are conditioned on making available complete source code of licensed works and modifications, which include larger works using a licensed work, under the same license. Copyright and license notices must be preserved. Contributors provide an express grant of patent rights.
Donate
You can donate to the development using Monero: 87QGCoHeYz74Ez22geY1QHerZqbN5J2z7JLNgyWijmrpCtDuw66kR7UQsWXWd6QCr3G86TBADcyFX5pNaqt7dpsEHE9HBJs

I will also be happy to arrange any other way for you to transfer funds, please contact me via telegram or email: [email protected]