Control Interface - DFKI-Interactive-Machine-Learning/ARETT GitHub Wiki
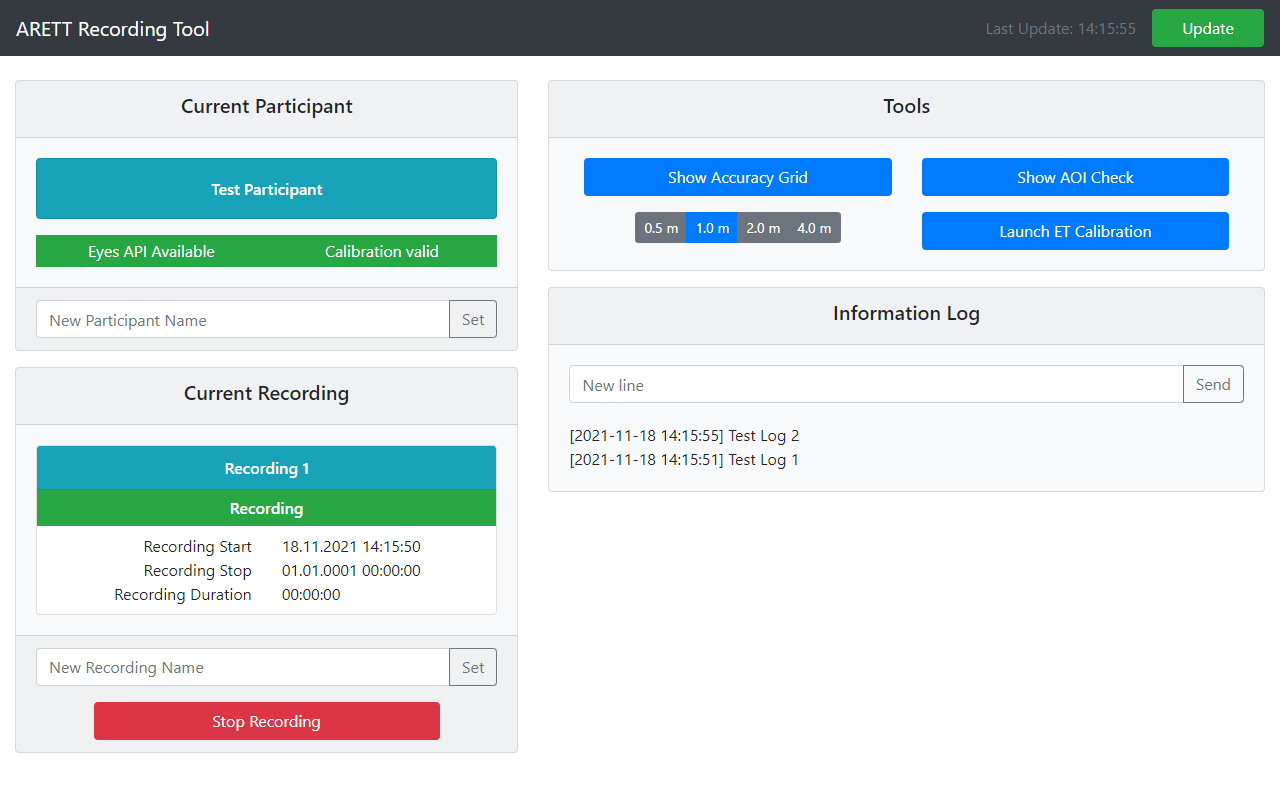
All functions of the toolkit can be controlled using the control interface provided by the integrated web server.
Accessing the Control Interface
The control interface can be accessed using a web browser using the IP address of the device on which the toolkit runs and the port configured in the web server.
The default port is 8080 so that the control interface is accessible, when running on the local machine, at http://127.0.0.1:8080/.
Function Description
Update
The interface is automatically updated in the background every 2 seconds.
Current Participant
The current participant name is displayed in the cyan box. Below the name the current participant status is displayed, indicating whether the eyes API is available on the device (i.e. the permissions are set up correctly) and if a valid calibration exists for this user.
The participant name can be set using the input field below the current name.
Note: The individual eye tracking calibration for each user is saved by the device and reused everytime the same user puts on the device. However, removing the device and putting it on again results in reduced calibration accuracy. If precise accuracy is needed, e.g. during an eye tracking study, recalibration should be completed independent of a preexisting calibration.
Current Recording
The current recording name is displayed in the cyan box and can be changed using the input field below the recording information.
The current recording status - recording or not recording - is indicated below the recording name. When a recording is started the information below it is updated with the date and time when the recording was started. After stopping the recording the stop date and time as well as the recording duration is displayed. This information stays visible until a new recording is started.
A recording can be started or stopped using the main button at the bottom of the current recording information.
Tools
Accuracy Grid
The accuracy grid can be shown and hidden on the device using the blue button. Showing the grid hides all other currently visible layers in the scene and hiding the grid restores the previous visibility and layer configuration.
The distance in which the accuracy grid is displayed can be selected with the four buttons below the show/hide button. If the grid is currently visible the distance is updated immediately. If the grid is currently hidden the distance is updated and the grid is presented at this distance when it is shown. The currently active distance is hilighted in blue.
Show AOI Check
This button en-/disables the highlighting layer on the device. Depending on the configuration of the layer in the current application this e.g. highlights all active AOIs in the scene to check their placement.
Launch ET Calibration
This button launches the eye-tracking calibration when running on the Microsoft HoloLens 2.
Important: Launching the calibration will suspend the currently running application. After calibration, the user is returned to the HoloLens environment and does not automatically return to the previously running application. Instead the application has to be restarted.
Information Log
During a recording the application can add information to the recording log using a log function. The logged information is displayed here and e.g. can make it possible for the conductor to identify at which stage of an experiment the participant currently is.
Additionally lines can also be added to the log using the input field provided. This e.g. can be used by the conductor to add information about the setup or participant during a recording.