3: The secondary sizing page - Cyrille-de-Brebisson/CBScope GitHub Wiki
This page is designed to help you select a secondary and contains a lot of information!
The first thing that you need to understand about a telescope is that it generates a “real” image at the focal plane. This image has a size (given as a diameter or radius centered around the optical axis). The role of the EP is to “send” a specific part of the image to your eye. Select a “small” part of the image and you zoom a lot. Select a large part and you zoom much less.
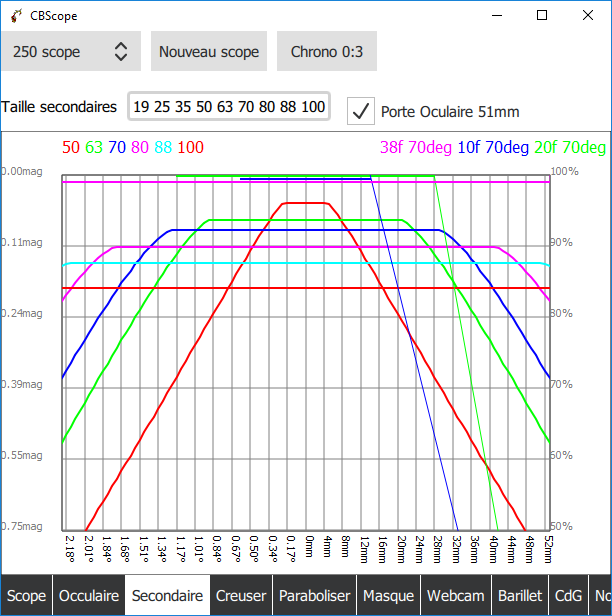
In this page, you will see on the horizontal axis the distance from the optical axis. As a diameter in mm on the right and as a sky view angle on the left.
On the top of the graph, you will see the field/radius/space which is imaged by your various EP (the EP name and horizontal lines match in color).
However, the “image” formed by the telescope on the focal plane gets less and less illuminated by the primary mirror as you go further and further from the optical axis. The vertical axis of the graph represent the % of illumination (as a % on the right and as magnitude drops on the left. Any drop of less than 0.4mag is barely noticeable to the eye).
On the top, enter the list of all the secondary sizes that you are considering for this scope (separate each entry by a space).
The graph will display a curve for each of the secondaries that are viable for this scope (secondaries that are too small will not be shown, secondary that are too large will also not be shown).
The curves (color coded with the secondary sizes displayed on the top left) will tell you, for each secondary size, how much light they put at a given distance from the optical axis. A small secondary will have a maximize the illumination, but only close the optical axis (ie at high zoom). A large secondary will be less illuminated at high zoom but will offer better wide views. Pick your poison!
Here, you can see that my 20mm70° EP will work provide pretty much max illumination if I use a 63mm secondary. A 50mm secondary would still however work but result in a much smaller fully illuminated field of view. Since I am more of a wide angle person, I will select to use a 63mm secondary.
You will also notice the straight lines starting from the ends of the EP fields. They represent the cone of incoming light that illuminate the edge of the EP. From the focal plan to the bottom of the focusser (using the focusser height provided in the Scope page). This allows you to size your focusser drawtube.
The illumination calculation function has been “lifted” from Mel Bartel’s website.