Career Development: Step 2 - Code-the-Dream-School/career-dev-class GitHub Wiki
All About Resumes
If you are starting from scratch, focus on putting together a resume draft first. Get all the information on the page first. We'll worry about the details and aesthetics later!
What are Applicant Tracking Systems (ATS)?
As we start to create your resume, it's helpful to discuss in more detail what Applicant Tracking Systems are, how they work, and why they're important.
An Applicant Tracking System, or ATS, is a software application that electronically scans your resume for certain keywords and phrases to see if you're a match for a specific job listing.
Employers often use an ATS during the first stage of the hiring process to filter out resumes (and, therefore, candidates) who don't seem like they're qualified for the job that they're applying to.
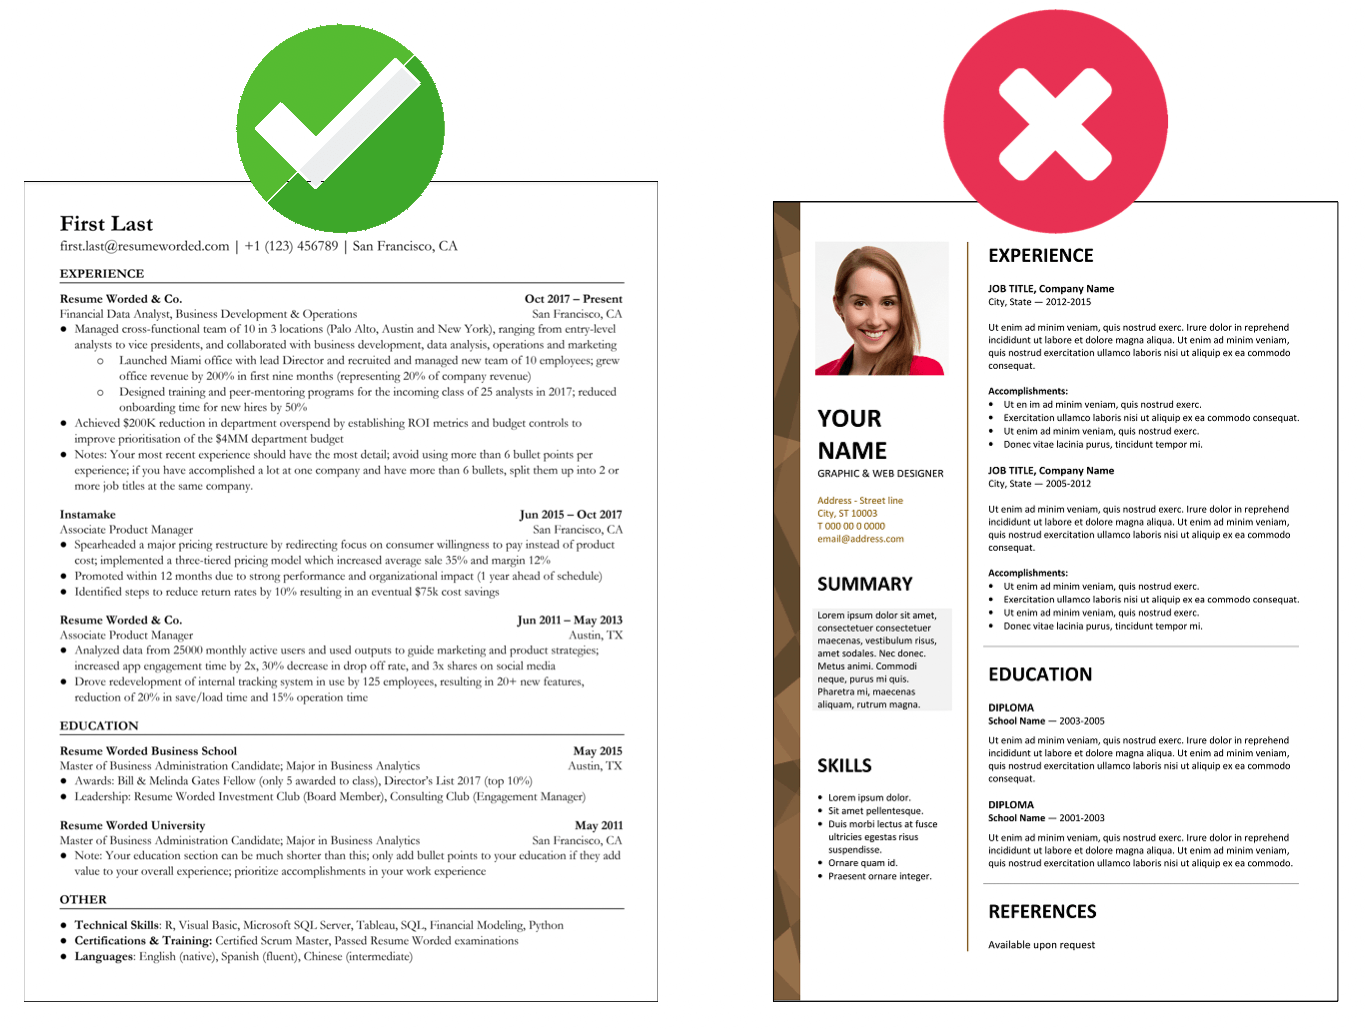
As you select your resume template, you want to ensure you are using a format that is ATS-friendly and allows the system to easily and correctly scan your document. This includes clearly labeled sections, easy-to-read fonts, and no columns or tables. Additionally, you want to have the appropriate keywords, skills, and phrases within your resume to align you with the job qualifications, but we will discuss this in detail later. Let's begin with the format and style of your resume!
Picking A Resume Style
Unless you truly love designing resumes, there is no need for you to make one from scratch. Here are Code the Dream's recommended resumes:
Traditional Resume Template (black)
You may also choose a Google Doc template with the following steps:
- Log into your Gmail account.
- Click this link: https://docs.google.com/document/u/0/?tgif=c&ftv=1
- Scroll down until you see the “Resume” category for the free templates.
- Select one that you like (you can change the color/font style for each of them). NOTE: 2-column resumes are less readable by Applicant Tracking Systems (ATS) and are more challenging to format and edit. We tend to discourage their usage.
- Add your information into the resume.
Style Guidelines
Although there is lots of room for creativity and personal preference, below are some guidelines that you should always follow for an easy-to-read resume.
Length
Many employers spend less than 6 seconds looking at your resume, so you need to keep it short. 1 page is ideal for those new to tech. If you truly need the space, you can go up to 2 pages — but only if everything on the 2 pages is relevant (e.g. professionals with relevant graduate degrees and/or more than 5+ years of relevant experience may sometimes have 2 pages).
Also, in almost all cases, you don't need to include any work experience from more than a decade ago or anything from high school.
Font
The font style and size you choose matter when developing a resume because they help with both readability and allowing your resume to be scanned by an Applicant Tracking System (ATS). Common fonts are sans serif font, like Arial, Calibri, or Verdana as well as serif font, like Times New Roman, Cambria, or Georgia. These fonts are ATS-friendly and preferred by recruiters. Do not use Comic Sans. Do not use cursive fonts or anything hard to read.
Color
You may add a dash of color if you’d like to your resume (as demonstrated by the first resume template in the list above). However, avoid overly bright colors (no neon green or fuschia) and stick with only one color at most on your resume. The color should also only be applied to the headings and/or decorative lines that separate the categories.
On a related note, do NOT add a picture of yourself (or any pictures at all). While some countries encourage this, profile pictures on resumes in the U.S. can often get your resume thrown out due to HR departments’ concern about bias and discrimination. Pictures can also mess with Applicant Tracking Systems (ATS) that recruiters often use.
Order
The majority of people read from top to bottom, and from left to right. Therefore, it's important to showcase your most attractive and most relevant information first. Here's an example of how to order your resume:
- Contact information
- Summary
- Skills
- Projects (if any)
- Experience or education (whichever is going to be most attractive)
- Experience or education (whichever you didn't list first)
Typically, your resume’s experience section should be listed reverse chronologically by section (most recent to least recent). In rare cases, you may want to break this rule if something else is more relevant, but this can get tricky – when in doubt, come talk to us!
Consistency
One of the most common resume pitfalls is a lack of consistency. Unfortunately, a messy resume is an easy way to lose a job before ever being considered.
So, whatever you choose to do, be consistent and as detail-oriented as possible. For example:
- If one of your resume bullets has a period at the end, they need to all have periods at the end.
- If you use 14 pt font for your first section title, all of your section titles should be that size as well.
- If your top margin is 0.8”, your bottom margin should also be 0.8.”
- If one of your bullets is aligned slightly differently than the others, take the time to fix it.
- If one of your dates is written out (e.g. October 2024) and the other one is written as numbers (e.g. 10/2024), you need to pick one and be consistent throughout.
Review your typefaces, font sizes, heading styling and formatting, margin alignments, dates, and bullet point styles. Ensure that all of the styles you apply are consistent throughout your resume.
Resume Content
Let's start filling in blanks in your resume template! Although every resume is different and advice on this is subjective, all resumes should include most or all of the sections described (the following sections are listed from easiest to fill out to hardest, NOT in the order that it should be on your resume!)
Contact Information
Start with the easiest section! Using the template you've chosen, fill in your contact information at the top of your resume.
This should include:
- Your first and last name (this is what you choose to go by or what you want to be called - it does NOT need to be your legal name)
- Your city and state of residence (but not your full address!)
- Your phone number
- Your email address. This email address should be a professional one, meaning that it includes some version of your name and has no reference to personal or unprofessional information. Gmail is recommended over older emails like AOL or Hotmail.
- The URL to your LinkedIn, personal website or portfolio, and/or GitHub profile.
Skills
Next, fill in your Skills section with a list of 6 to 12 of your top relevant skills, ordered from most relevant to least. This section should contain:
- All programming languages you learned from CTD and outside of CTD,
- All technical software, frameworks, or other tools that may be relevant (e.g. GitHub).
- Non-technical skills are optional, but if they are listed, they should be after the technical skills.
Education
For a general guide, the education section should include any undergraduate and graduate degrees as well as relevant certifications or courses.
For each entry, include the following:
- The type of degree that you earned (Associate, Bachelor, Masters, etc.) and the major topic of your study
- The school or organization name
- The years that you studied at that school or just the year that you graduated (if it's been more than 10 years, you don't need to include dates)
- Your GPA, if you graduated less than 3 years ago AND it's a 3.5 or above.
- Any relevant awards, honors, fellowships, or classes
For example, your Code the Dream certificate could look something like this on your resume:
Web Development Certificates | Code the Dream | 05/2022 - 09/2024
- Intro to Programming Certificate (JavaScript, HTML, CSS)
- Backend Development Certificate (Node.js, SQL)
- Frontend Development Certificate (React)
- Advanced Practicum Certificate (MERN, JavaScript, HTML, CSS)
Or if you’d like to conserve space:
Software Development (JavaScript, Ruby on Rails) | Code the Dream | 2022 - 2024
Experience
The purpose of your experience section is twofold. You want to show employers two things:
- You have relevant and transferable experience
- That you don't just do your job — you get results
This means that you should be strategic about what you include. You don't need to include every past job, task, or responsibility. Rather, you should focus on your relevant and transferable accomplishments within your previous jobs.
For each past job, include the following information:
- Your job title
- The company's name
- The dates that you worked that job
- A bulleted list that highlights three or four of your accomplishments
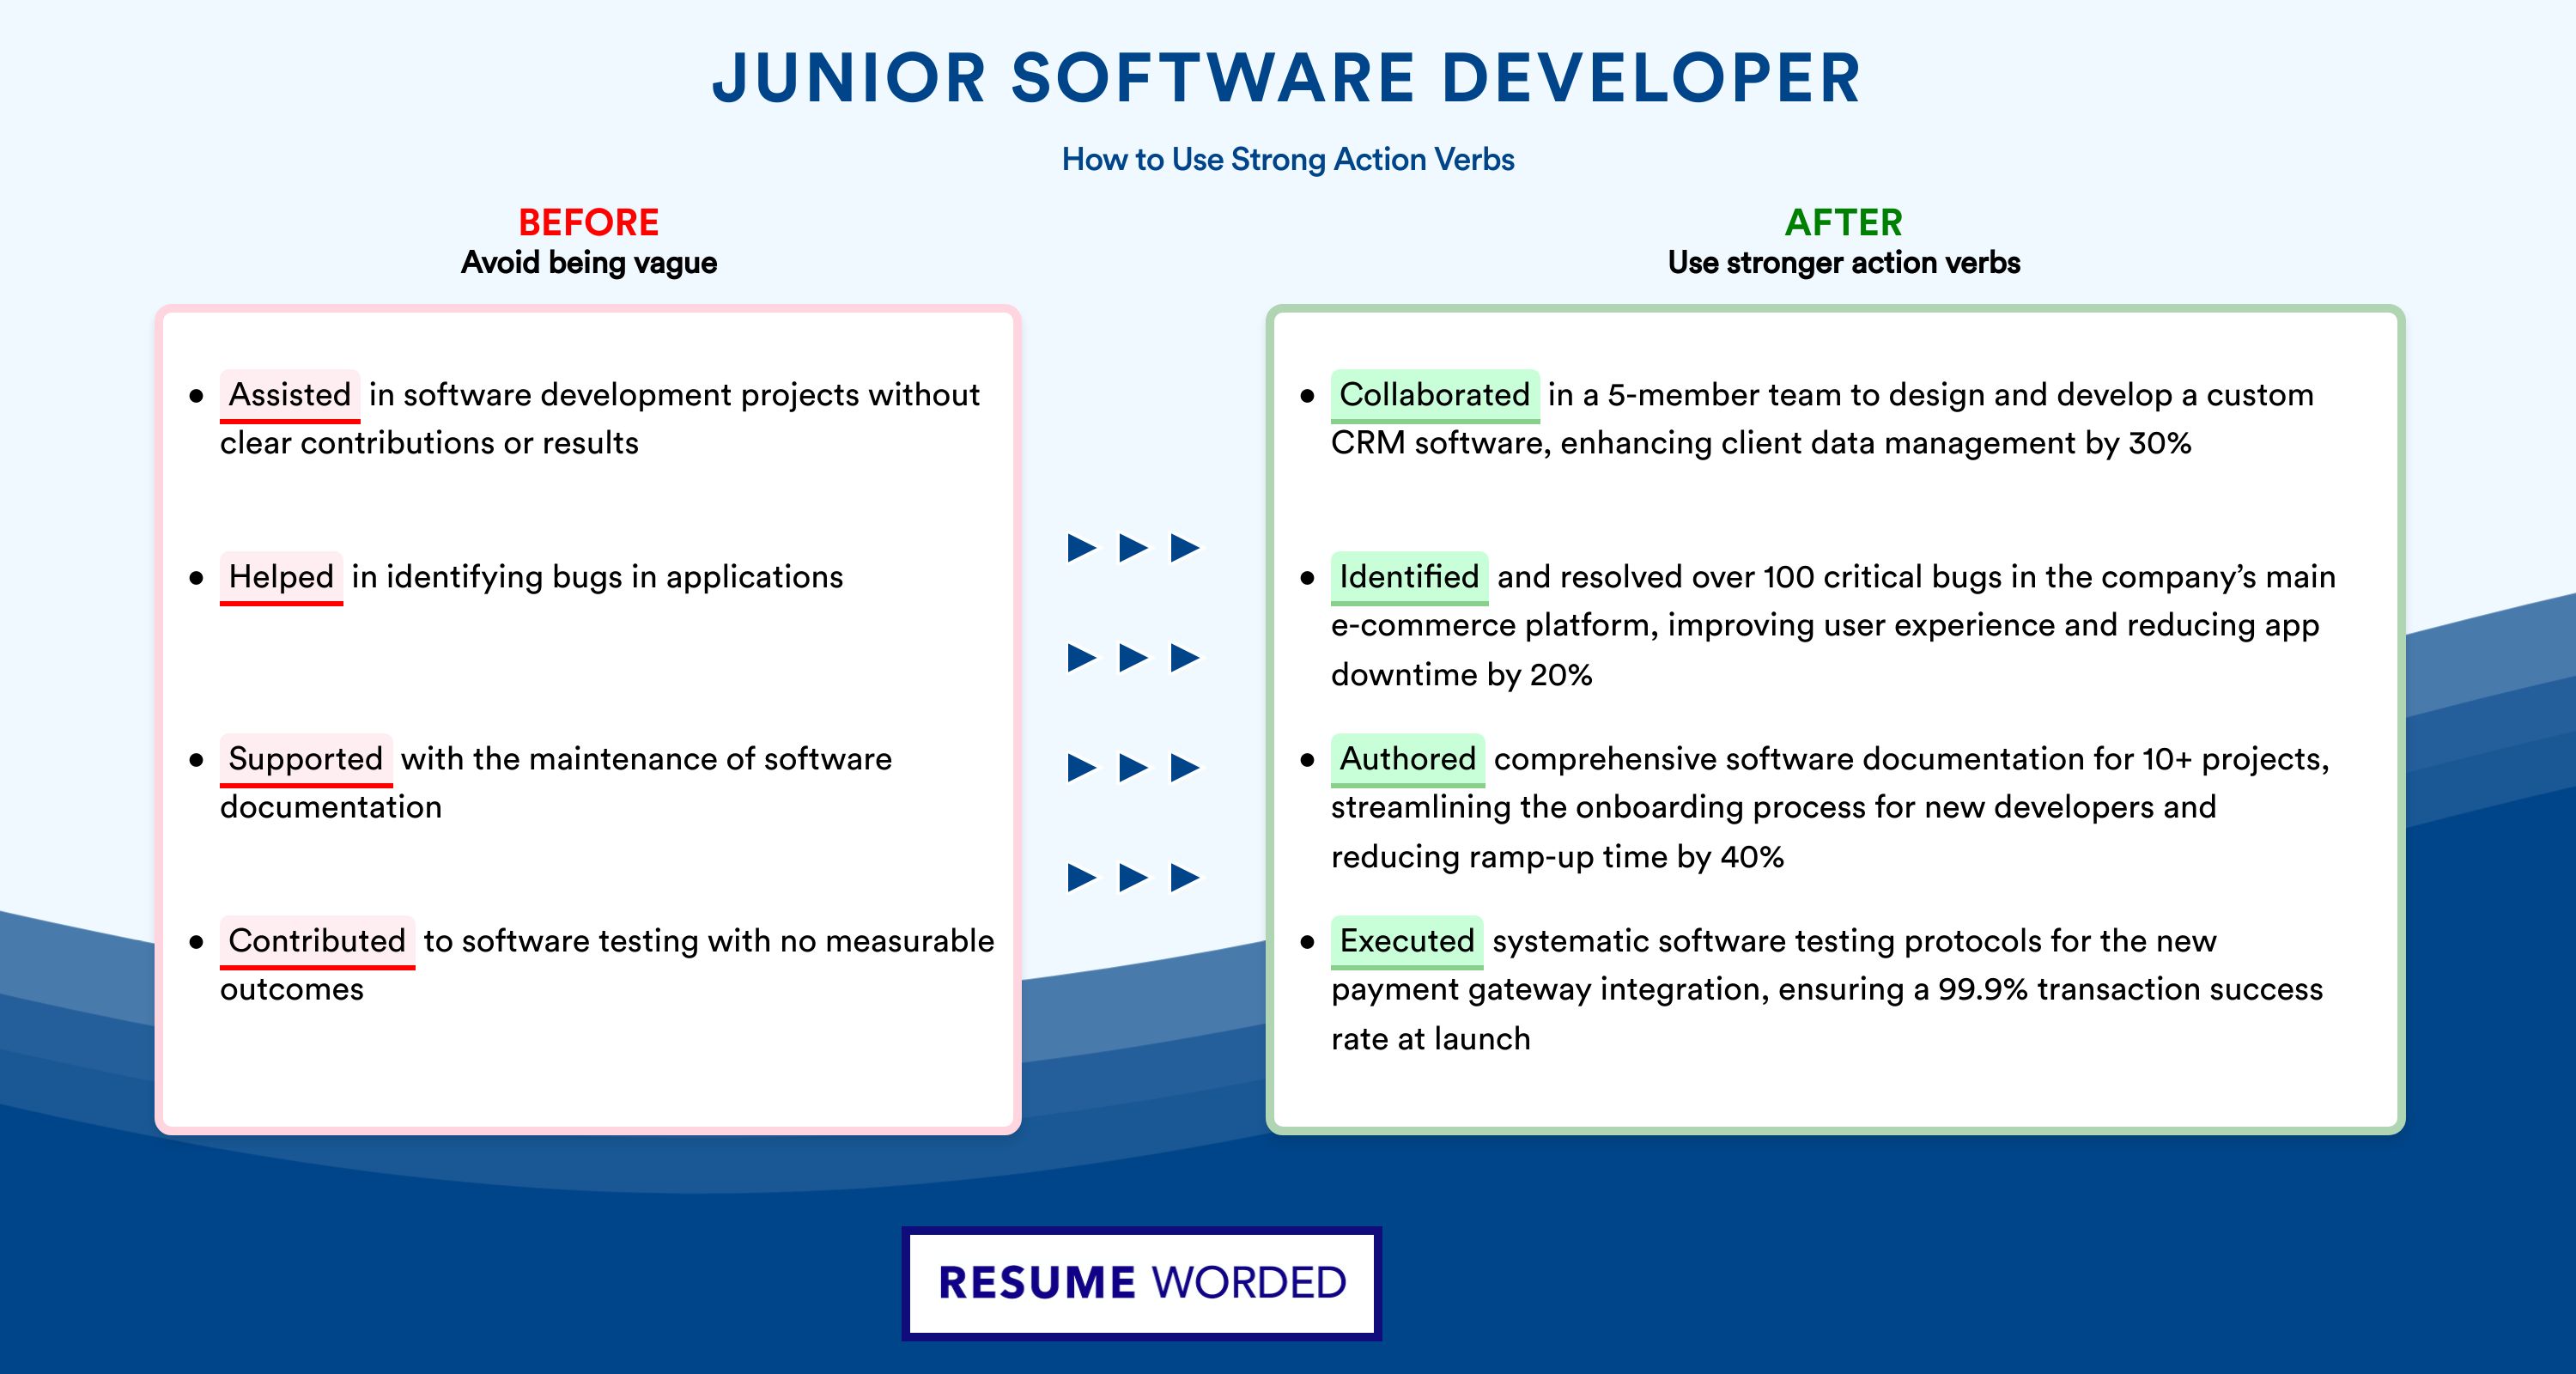
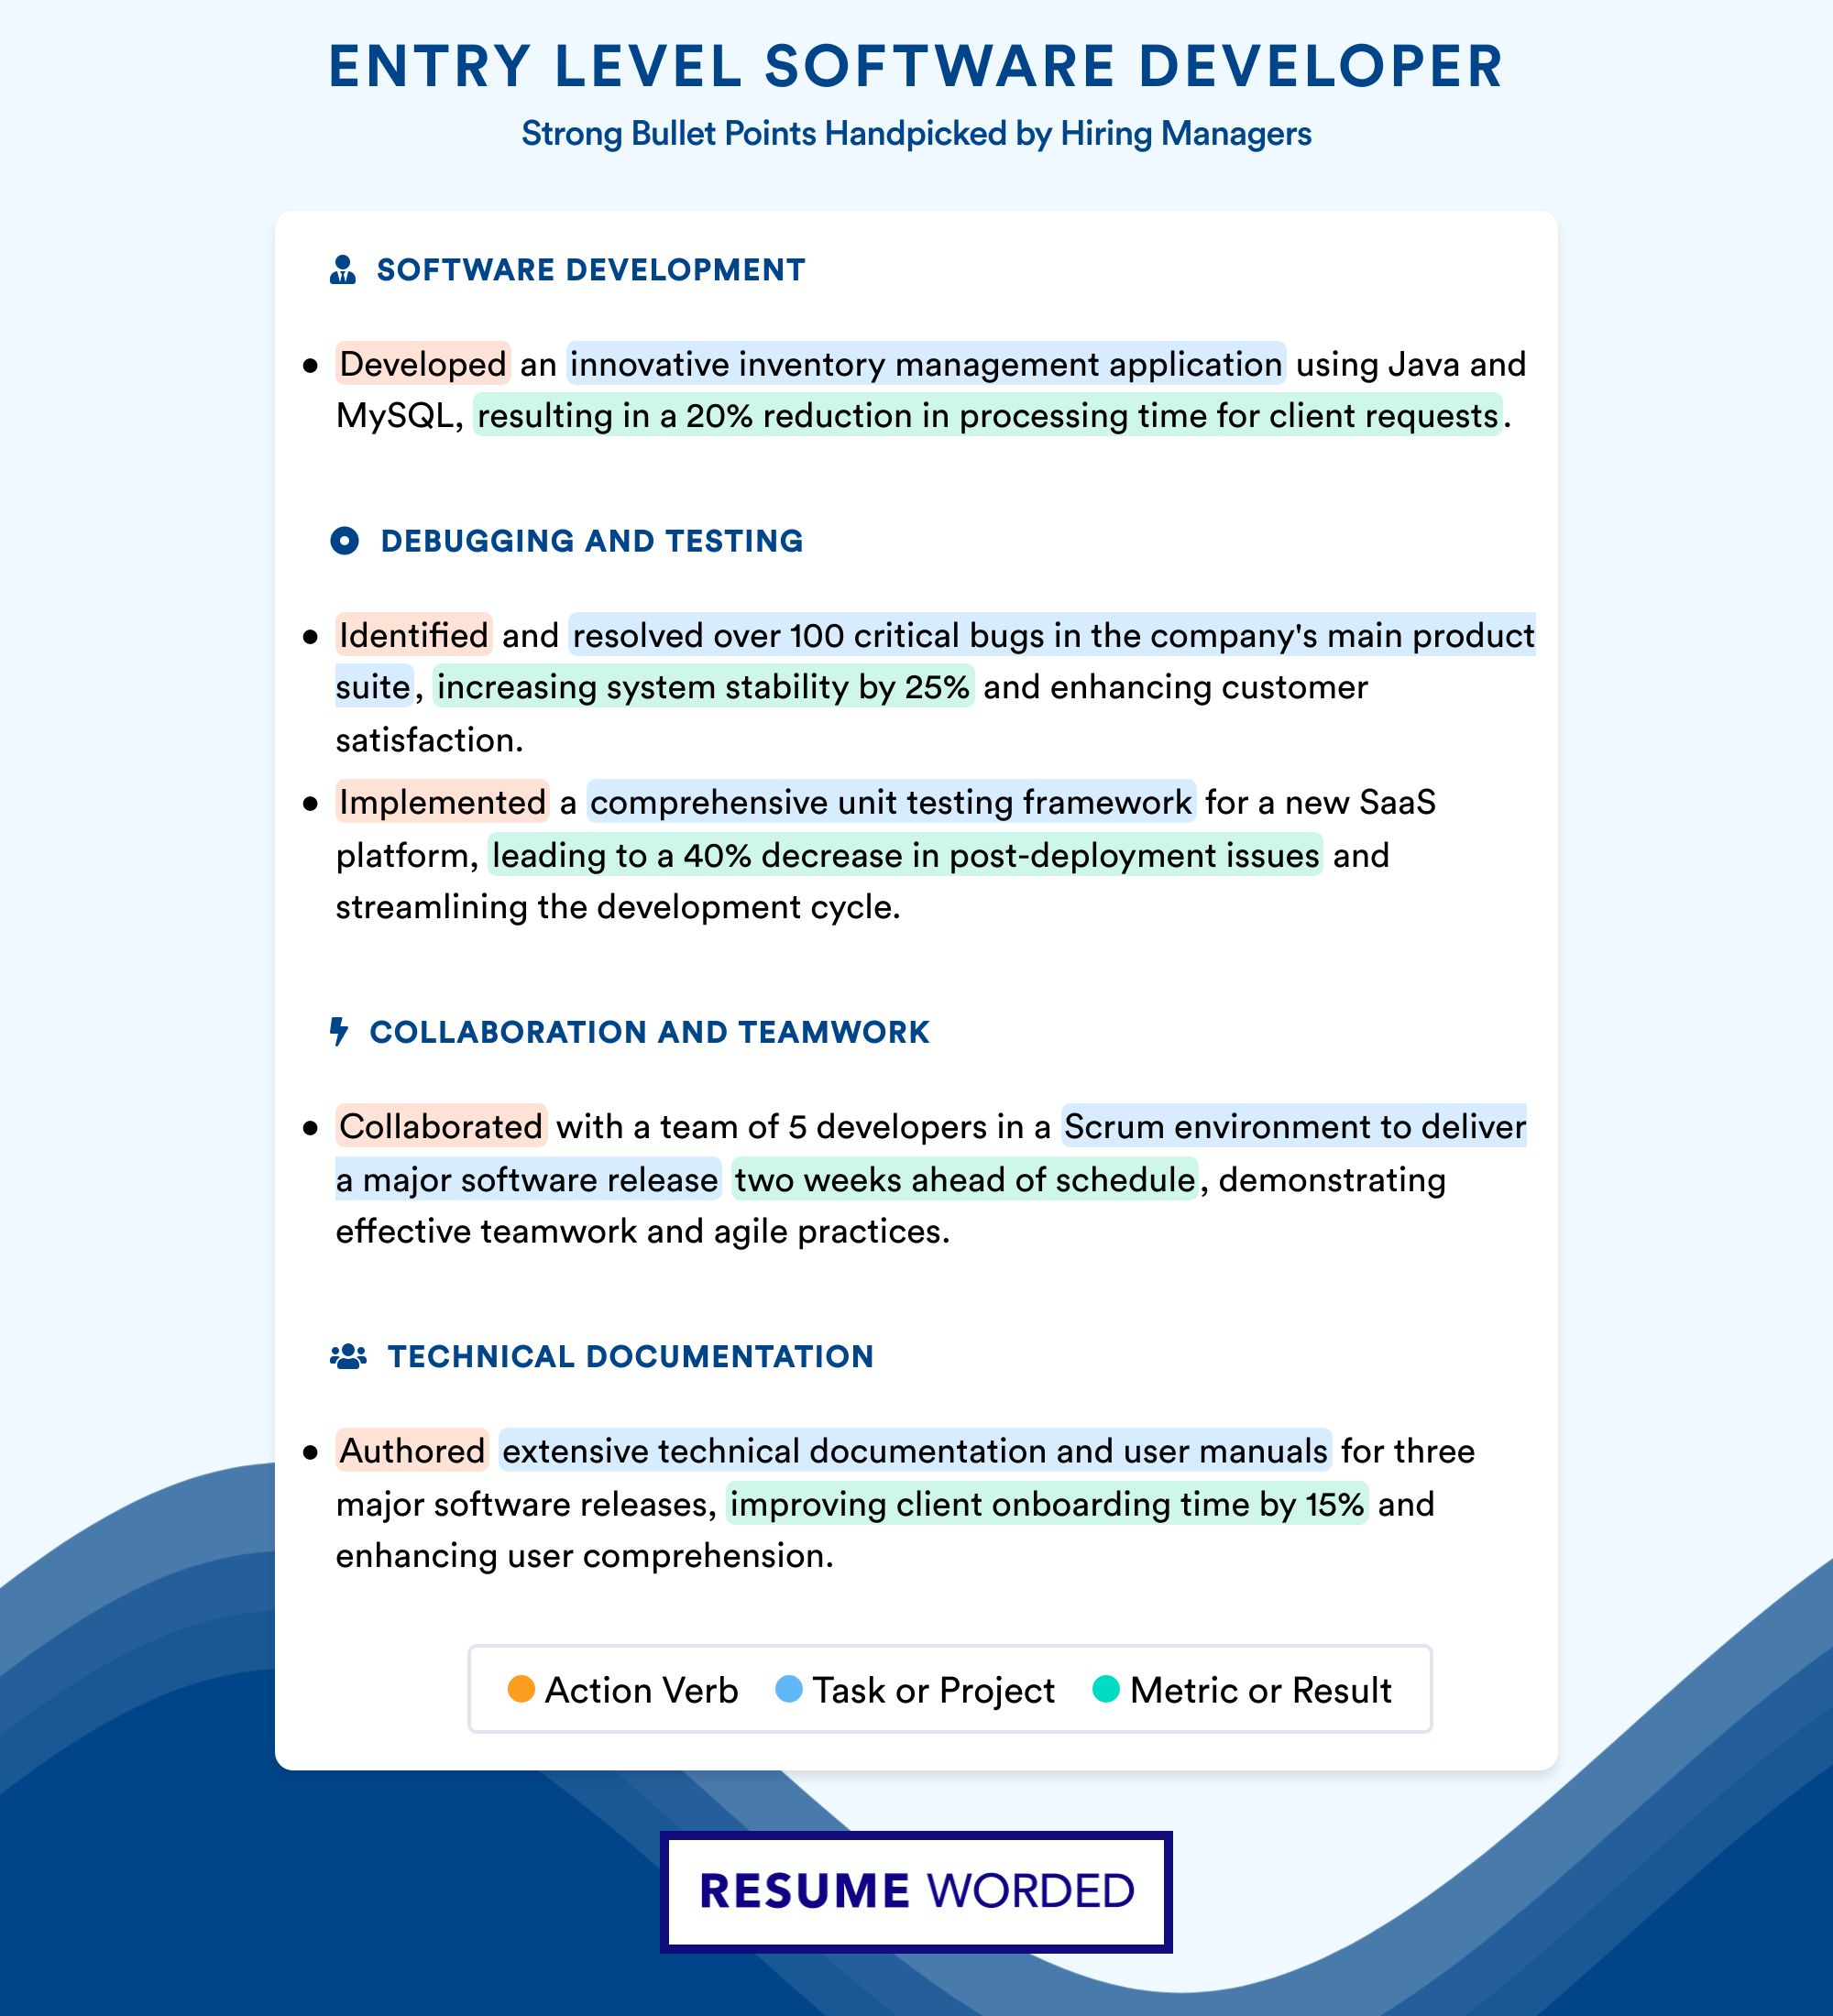
When developing the rest of your bullet points, consider the following information:
-
Action Verbs: Begin each bullet with an action verb, like developed, created, led, or managed. Avoid vague and passive verbs like "worked," or "was responsible for." You can visit this list of action verbs to see more examples, but it's also fine to leave this for next week.
-
Order: Your first bullet should provide the most basic and necessary information (For work experiences, what did you spend most of your time doing and for what purpose? For projects, what were you creating and what languages did you use?)
-
No personal pronouns: Avoid pronouns like I, she, he, they, me, etc.
-
Tense: Use present tense for current jobs and responsibilities and past tense for former jobs and things you have already accomplished.
-
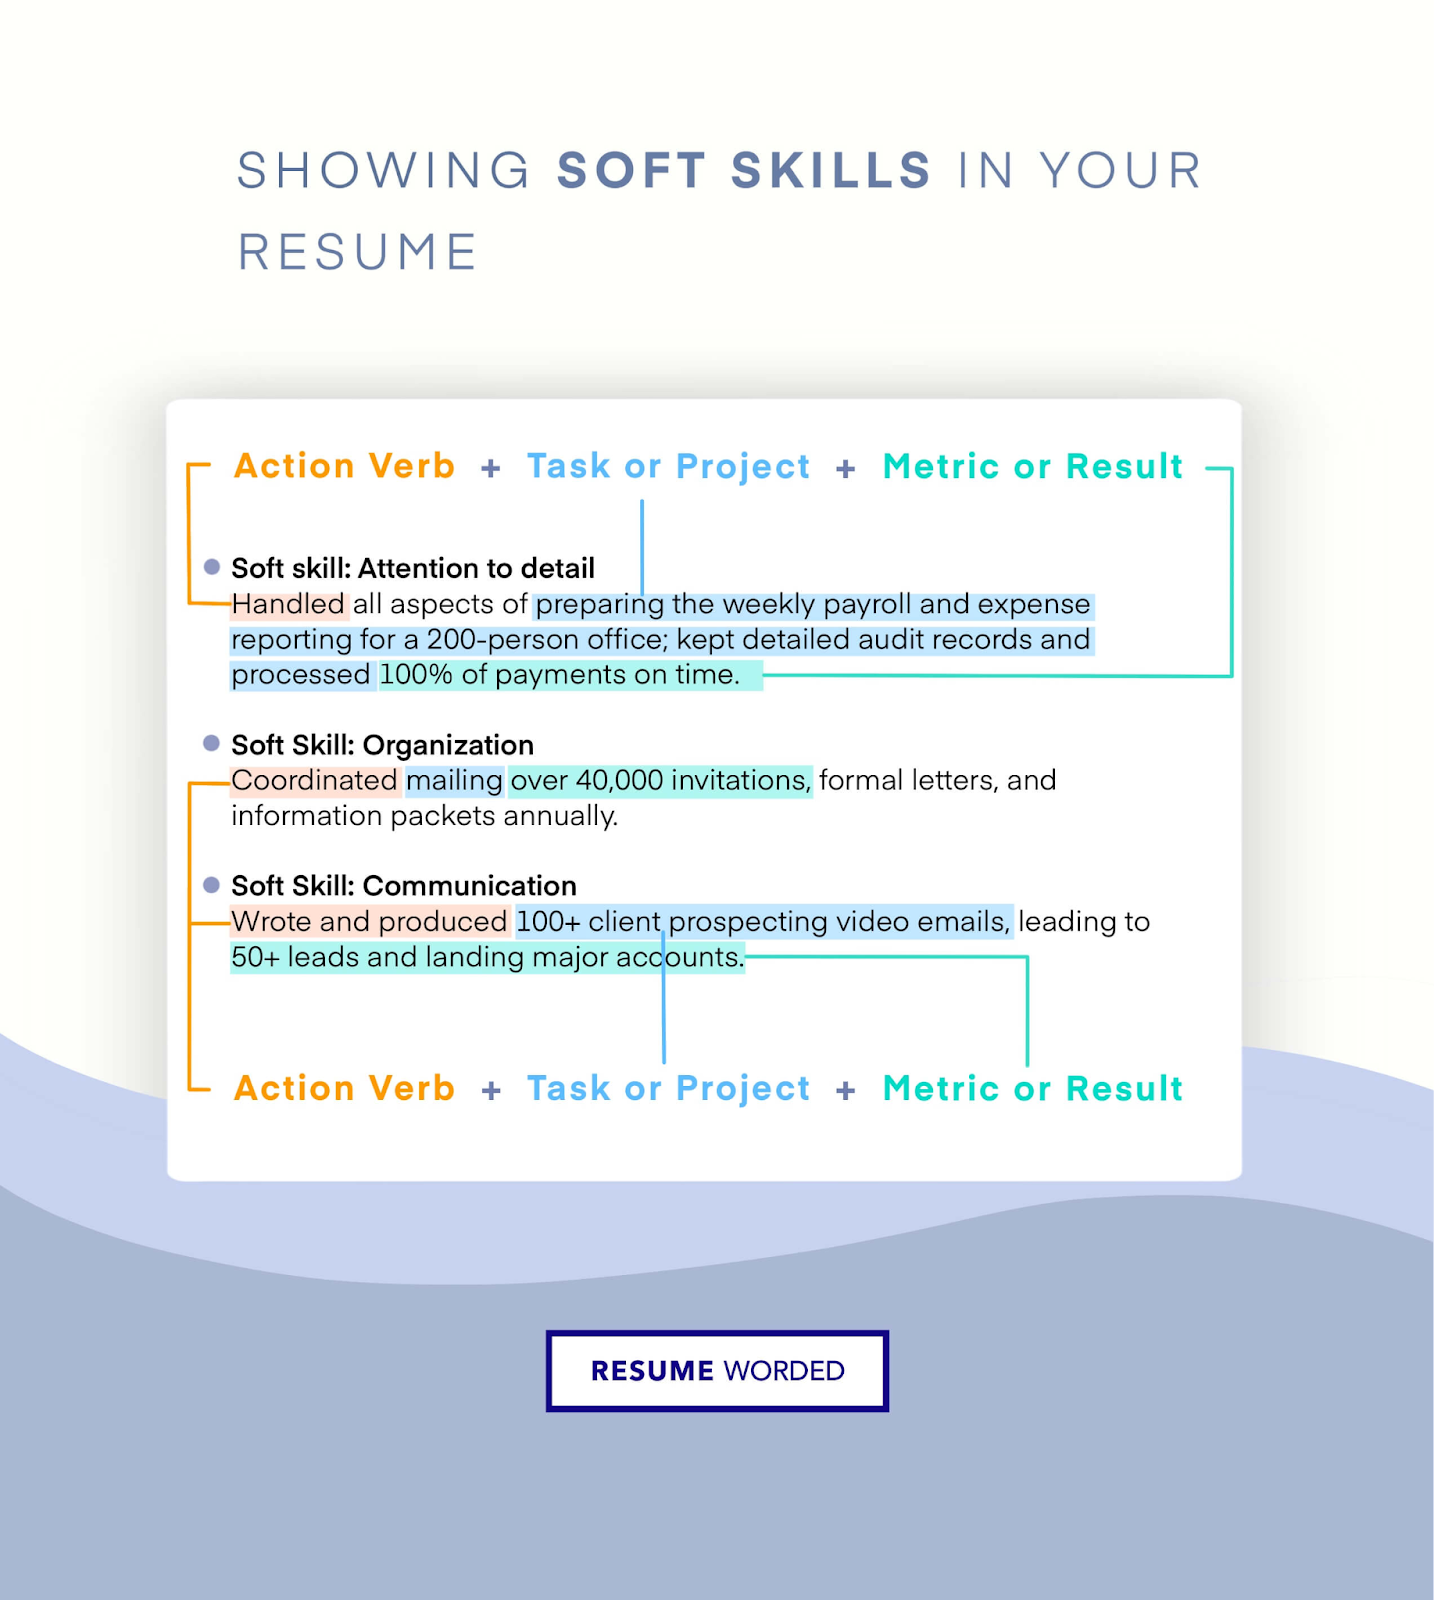
Achievement & Results: For your subsequent bullets, focus on what you achieved in your results, not what you were assigned. Examples are provided in the pictures below.
-
Quantify: Try to add numbers to your bullets when possible. Quantifying your work helps highlight the importance of certain outcomes or tasks. We will discuss this in more detail next week, so don't worry about it as much for now.
Examples are the easiest way to illustrate these ideas, so here are a few below:
Video: https://www.youtube.com/watch?v=cfaeND8Qmuo&t=17s
Projects
List the project(s) you have contributed to! This includes your practicum project, any previous coding projects from school or work, and even personal coding projects you've worked on in your free time (as long as they're professional and relevant of course).
Projects can be listed under experience or in a separate projects section depending on your actual previous job experience. However, no matter where the projects are listed it is important to include the below items when highlighting your relevant project work:
- The project's name - use a clear, descriptive title (e.g. To-Do List Tracker, Recipe Management App, etc.)
- A URL for the project GitHub if possible
- Start and end dates of the project (if currently working on it, put "[start date]-Present")
- The tech languages you used
- At least 2-5 bullets that describe what the project is, how you created it, and what the result was (see the above section for how to word bullets),
- Optional: Your role if relevant (e.g. Solo Developer, Team Lead, Frontend Developer, Java Developer, etc.)
Here's how that all might look:
To-Do List App | Practicum Group Project at Code the Dream | 07/2024 - 09/2024
- Developed a full-stack to-do list application with user-friendly navigation and task management features in a team of 4 peers.
- Built with React for the front-end and Node.js for the back-end, ensuring a fast and scalable user experience.
- Led the integration of the Airtable API to store, update, and retrieve tasks while ensuring data persistence.
- Implemented sorting functionality, allowing users to organize tasks by last modified date, title, and completion status.
- Deployed the app using Heroku and MongoDB Atlas, enabling public access and real-time database management.
Recipes Management App | Personal Solo Project | 09/2024 - Present
- Created a full-stack recipe management app with functionality to create, retrieve, update, and delete recipes, allowing users to curate personalized meal plans.
- Integrated secure authentication using JWT tokens, providing users with a protected and personalized experience.
- Designed API endpoints to manage recipes in MongoDB, including user-driven CRUD operations for efficient recipe management.
- Reduced API call response time by 20%, improving app performance and user experience.
- Styled the app using Tailwind CSS to deliver a responsive and visually appealing interface.
See here for more examples: https://resumeworded.com/blog/projects-on-resume
The STAR method is also a helpful way to list information, which is an abbreviation for Situation, Task, Action, and Result.
- Situation: A one-line description of the project
- Task: What you were charged with doing to complete the project
- Action: The steps you took to complete the task, including relevant technologies and methods
- Result: The outcome of your actions (preferably with a quantifiable impact)
Resume Summary
After your contact information, you should include a paragraph that briefly tells employers who you are and what skills you offer. Writing a summary is tricky, so we suggest leaving it for last! We'll also be going over how to customize your resume summary next week, so feel free to leave it blank for now.
To create your summary, you should do the following steps:
- Describe yourself using the title of the job that you're applying to.
- List your relevant experience, qualifications, and skills.
- Highlight some relevant achievement that is interesting or transferable about your background.
- Don't use personal pronouns (such as I, s/he/they, and my).
This focuses your resume and immediately communicates to employers that it's worthwhile for them to continue considering you. Here's are some examples below:


At this point, you should have a rough draft of your resume!
Strengthening Your Resume
Now that you have a rough draft of your resume, it's time to put on the finishing touches to polish it up and make sure your resume stands out.
Bullets
Work on rewording your bullets so that they follow this general formula:
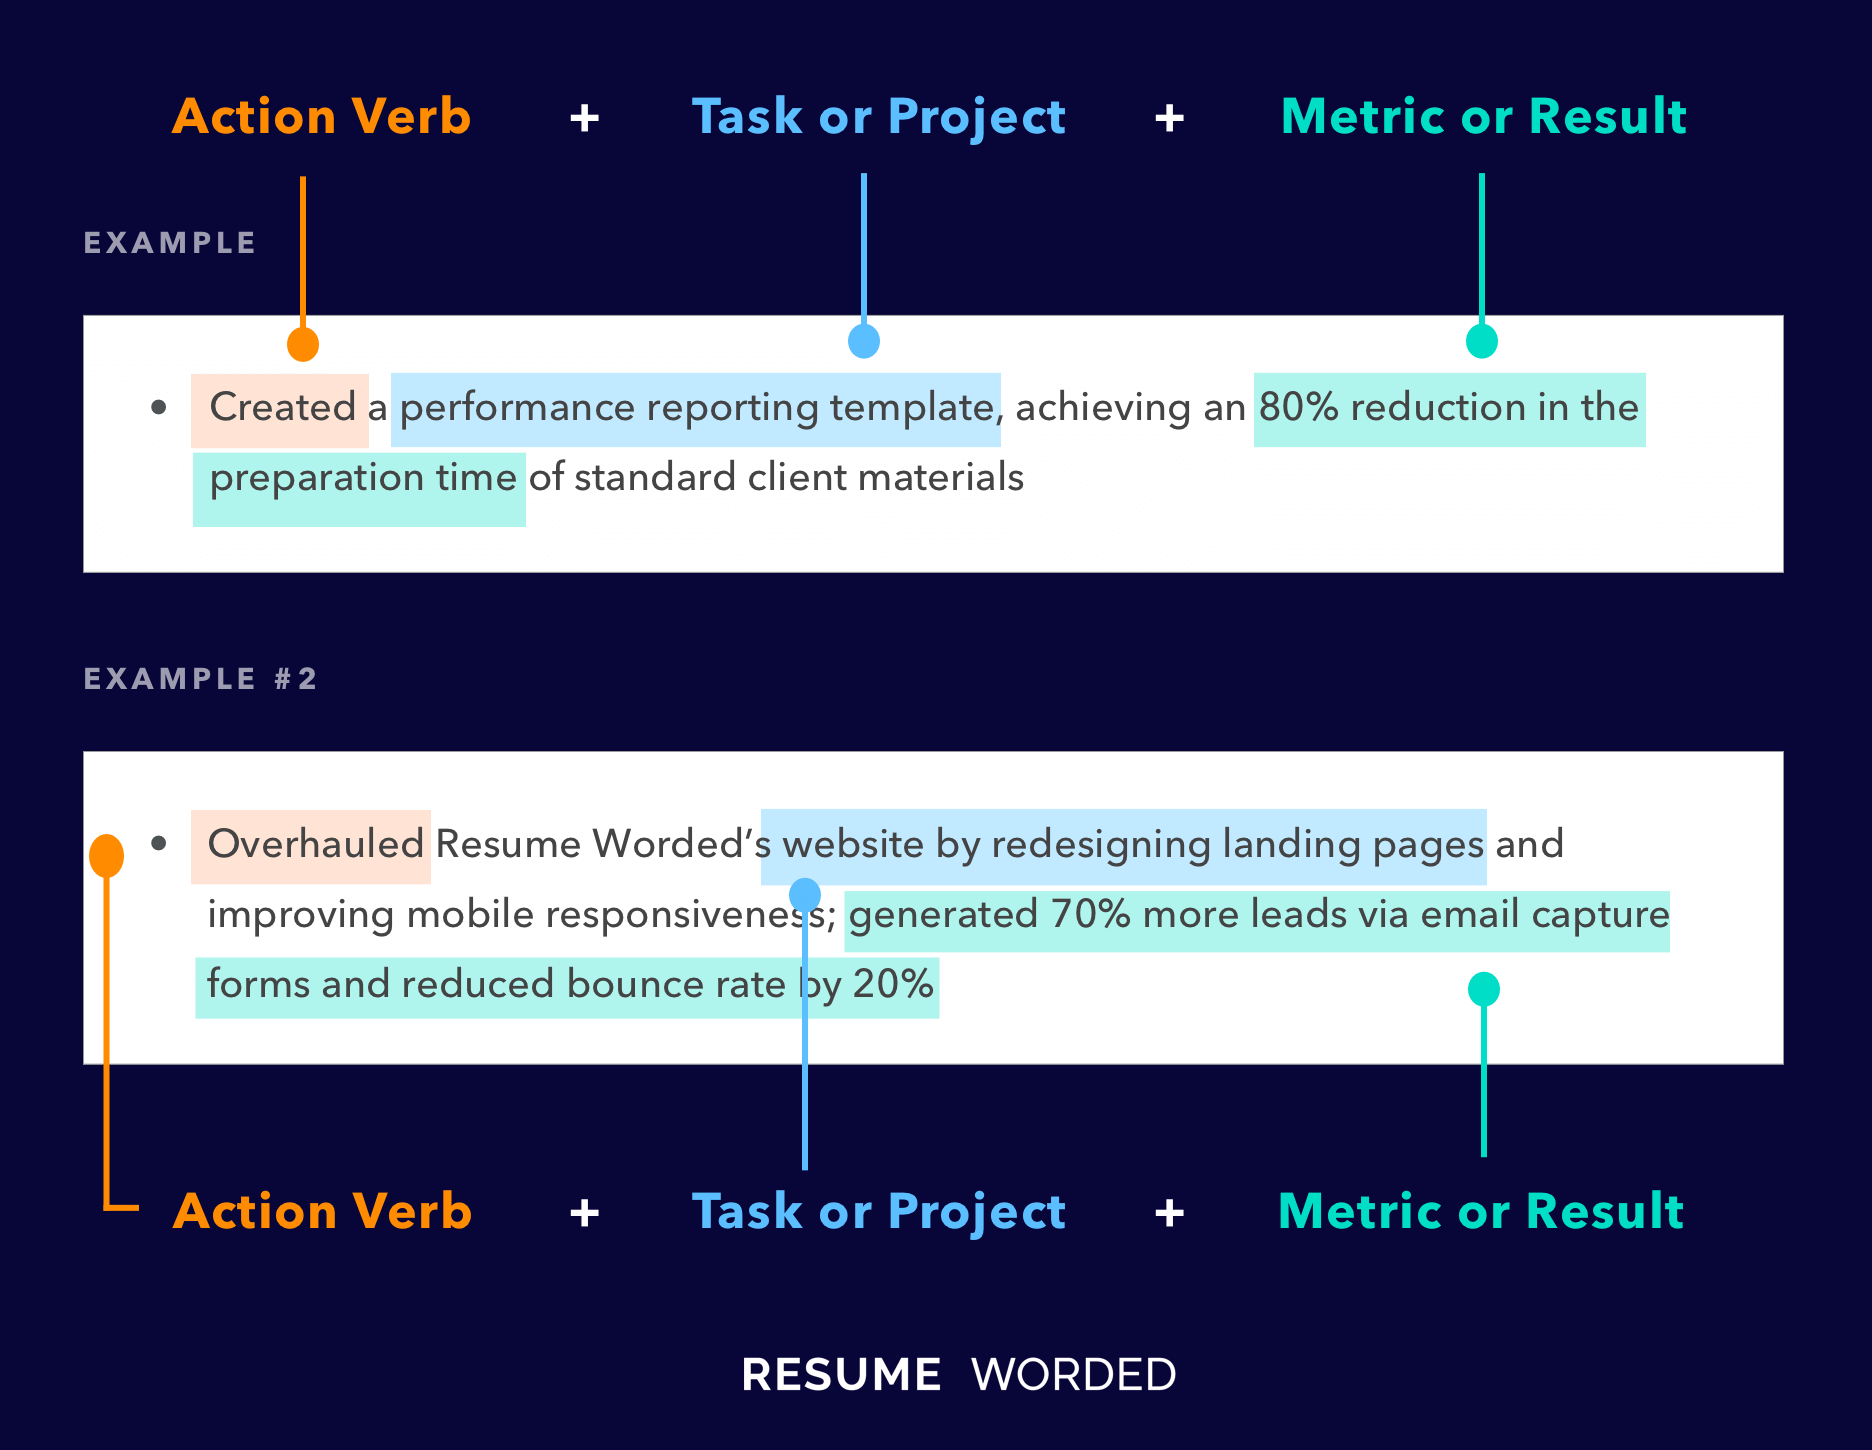
Note: Some resume writers say that starting with the Metric or Result can be even better when you're able to word it that way! For example, "Achieved an 80% reduction in preparation time of standard client materials by creating a performance reporting template" or "Generated 70% more leads via email capture forms by overhauling Resume Worded's website in a redesign of its landing pages..."
Let's break each section down in more detail:
Action Verbs: For each bullet, make sure that they are starting with a unique action verb, like developed, created, led, or managed.
- Try to avoid using the same verb more than once if possible.
- Visit this list of action verbs to see more examples.
Metric or Result: As you may have noticed, several of these strong bullets include numbers. What can you quantify in terms of the work you did? Ask yourself these questions below about each bullet to see what numbers you can add:
- Did you increase efficiency or productivity? Calculate the percentage! (e.g. Reduced webpage loading time by 25%...)
- How many people did you support or serve? (e.g. Supported 100+ clients by troubleshooting...)
- Did you work with or manage a certain number of team members or employees? (e.g. Collaborated with 3 other team members to...)
- Did you implement new ideas or processes for the company or project? What was the impact? (e.g. Streamlined documentation process by 30% by initiating a new system that...)
- Did you work with a budget or increase profitability? (e.g. Saved $X by...)
- Were you promoted or did you win an award? (e.g. Promoted within 6 months to Manager-level due to strong performance and organizational impact...)
Length: Remember the golden rule of how resumes should look - they must be easy to skim! Keep your bullets concise, and no longer than 2 lines at most.
Skills: Avoid just listing soft skills on your resume, and instead demonstrate and prove that you have that skill through your resume bullets. For example:
Customizing Your Application
Now that your bullets are polished, let's discuss how to customize your resume for a specific job. While this can take additional time, customizing can sometimes be worth it if it's a job you want very much!
But strike a balance that works for you - applying for a job with an imperfect resume is ALWAYS better than not applying at all because you took too long customizing your application and the job posting was taken down.
To start with customizing, read through the job description and pick out the keywords.
Keywords are words or phrases that describe what the employer is looking for in a candidate. This can include:
- Role titles like "fullstack" or "developer"
- Hard and soft skills like "Ruby on Rails" or "creativity"
- Areas of knowledge like "customer engagement" or "data analytics"
- Certain experience like "5+ years of experience" or "Bachelor's degree"
Yes, this will mean that you will have a lot of keywords to choose from - narrow down your list to just the keywords you know you have experience in or knowledge of.
Some people like to use tricks for this to make it easier or faster, such as:
- Job Scan is an online tool that helps you optimize your resume for any job by highlighting the key experience and skills recruiters need to see: Job Scan
- The Word Cloud Technique, which you can learn more about here: https://www.linkedin.com/pulse/cool-resume-hack-analyze-job-descriptions-word-cloud-emily
- ChatGPT: While you could use ChatGPT to write the entire resume, it's typically best if you use ChatGPT as a helpful tool rather than rely on it 100%. One of the best ways to use it without having it write your bullets for you in a robotic way is to copy and paste the job description into ChatGPT and ask it something along the lines of: "Based on this job description, please list the top 20 most relevant and important keywords that the perfect candidate would have for this job."
Skills
Now that you have a list of keywords from the job description, the easiest parts of your resume to add these in are:
- Your Skills section,
- Your Summary section, and
- Your Cover Letter.
For your Skills section, you can plug in the keywords that you may not have included before. If it makes sense and would look more organized, you may also sort your skills into categorized lists. Here are some examples below:
By Category:
- Languages: JavaScript, HTML, CSS, Python, Node.js, Express.js
- Project Management Tools: GitHub, Trello, Jira, Kanban
- Areas of Knowledge: Backend Development, Design, Algorithms, Agile (Scrum), Unit Testing, Debugging
By Proficiency Level
- Expert in: JavaScript, HTML, CSS, Git, GitHub
- Proficient in: Python, Node.js, Express.js
- Familiar with: Trello, Jira, Kanban
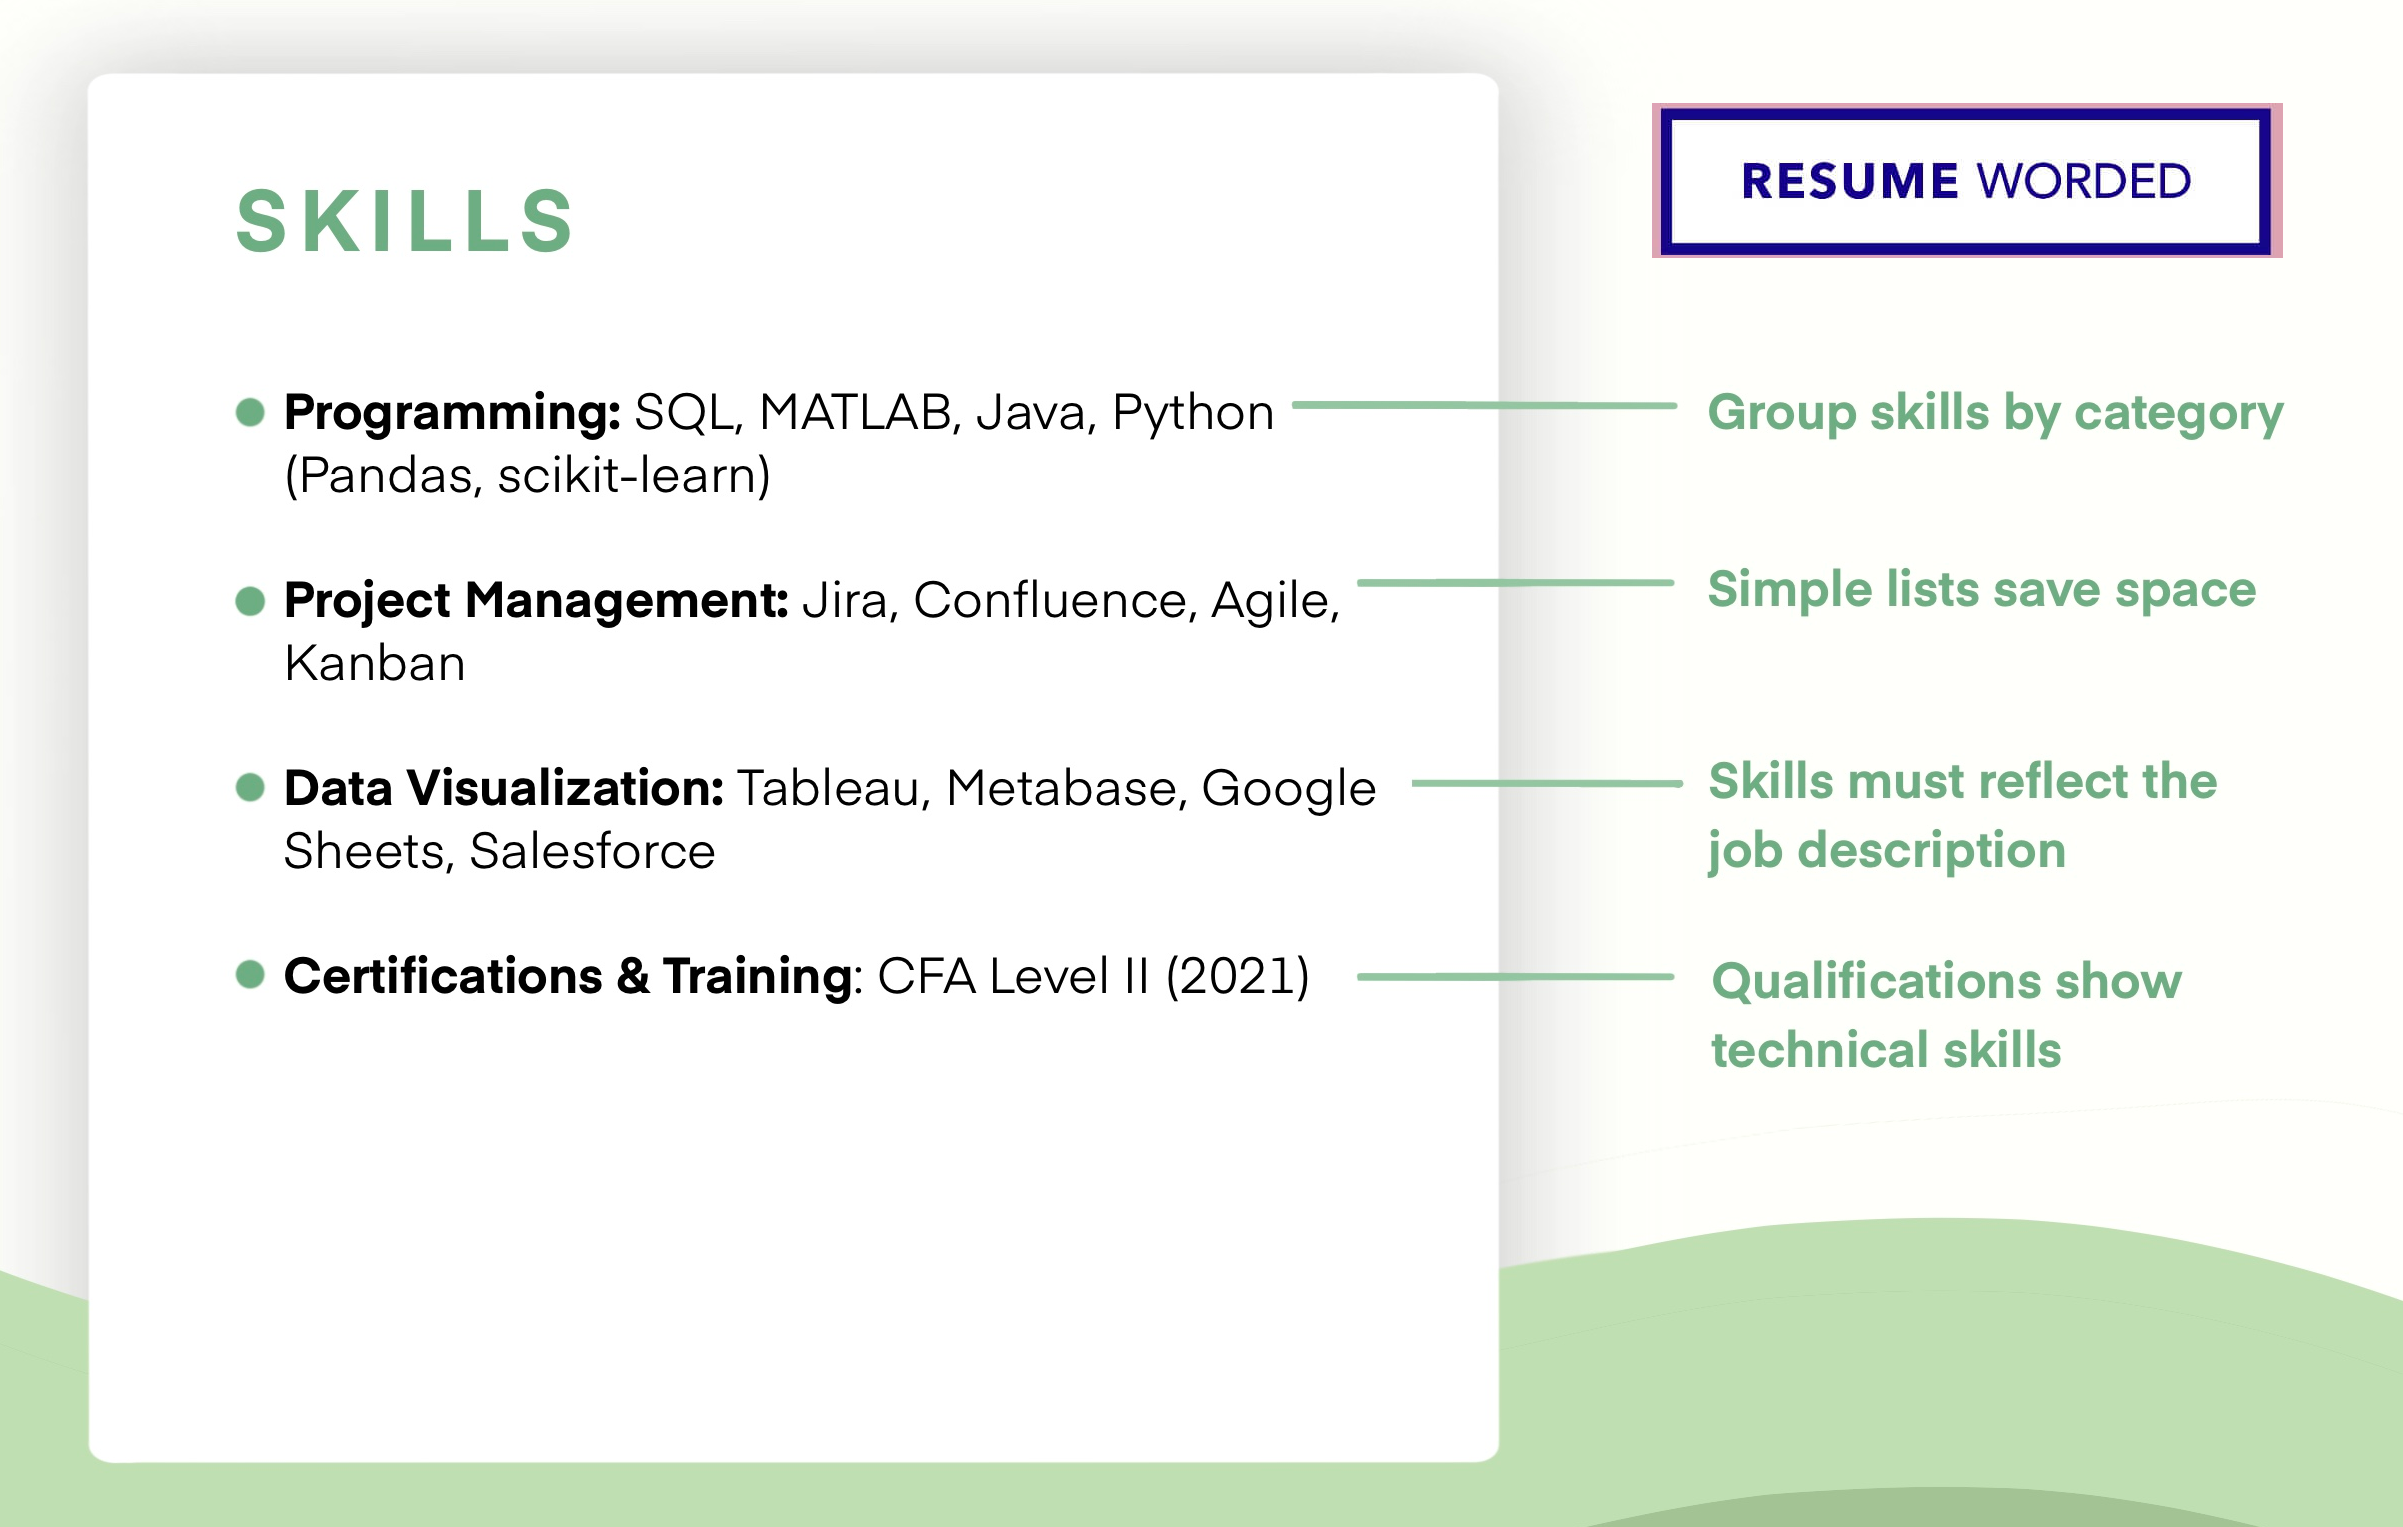
NOTE: Same rule as before with bullets - no list should be longer than 2 lines. If it's longer than 2 lines, you need to make more categories for your skills to make it more readable.
Summary
You can also plug keywords into your Summary as well.
Resume Summary Formula
Adjective(s) + Job Title + Your Experience. [Describe how you can help the employer/company]. [Provide at least one top relevant achievement or qualification].
Example:

Keep your summary around 3-6 lines long, and make it as relevant and specific to the job as you can. To read more on resume summaries, visit https://novoresume.com/career-blog/resume-summary
You Made It To the End!
Give yourself a big pat on the back for completing your resume! Your resume is the biggest piece of the job searching puzzle, so this is a huge achievement. But know that none of this is set in stone! Your resume should be a living document that grows and changes with you -- keep it updated every time you learn a new skill, gain a new certification, and definitely when you land a new job!
TIP: At every job, make sure you're keeping a list of your achievements somewhere -- this can be a notebook or a document somewhere, but make sure it lives on your personal device. On the off chance you're suddenly laid off or fired, you want to be able to reference this list of achievements, so you can add them to your resume or LinkedIn. It can also serve as a helpful resource for annual performance reviews if you're negotiating for a promotion or raise at your current or future job.