End to End Flow - ChrisMell/OEL-wiki GitHub Wiki
This guide will be a comprehensive look at the flow of performing all the necessary steps to automate a test case. This guide will focus mainly on a login flow. Other pages in this wiki will be linked to get more detailed information.
Before beginning, you should ensure that you have the tools you'll need to execute the framework. You'll need Java JDK 11, the Maven build tool, and Git. For download links and resources, check this section.
- Navigate to the repository on GitHub.
- Click the green code button and copy the url. This url will be used with the
git clonecommand. - With the url copied, run the
git clonecommand on either Git Bash (usually installed with Git) or from the Windows command line (cmd). Below is an example of the command:
C:\Users\<username>\git clone <url>
After running the above command in a location of your choice, you will see the framework code cloned on your local machine.
 |
|---|
| Getting the URL after clicking the 'Code' button in step 2. |
When opening IntelliJ for the first time, you may see a screen like the one below. This is where you will specify the location of the code you cloned from the previous step.
 |
|---|
| IntelliJ Start Menu |
- Click on the Open button
- Navigate to your cloned code. Click on the directory
- Click Ok
Your code should open up, and after some time, you will be able to see your project's files.
 |
|---|
| Project Menu After Opening the Project |
For your first test, we are going log in to one of the automation environments using specific credentials. Then we will validate that we have logged in successfully.
To streamline development, a great first step is to create the necessary files that we will need to execute test steps using Serenity BDD with Cucumber. This includes a test runner, a step definition file, a feature file, and an object repository file. We will also create packages to better organize the new code we are going to write.
- Create a demo package at the location src/test/java expanding the sub-directories, and right-clicking on the java package, click on the new option, and then click the package option.
- Create a DemoTestSuite java class by following the same actions in step 1, however you will select the 'Java Class' option this time. You will be prompted to name your java class at this point. For this demo, name your class 'DemoTestSuite'
- Create a DemoStepDefinitions java class in the newly created demo package created in step 1
- Create a demo.feature file in the location src/test/resources/features package. If you don't have a features package, create one at the location src/test/resources. Follow the same actions as in step 1 to create a new file, and name this file demo.feature. To keep features files organized, it is helpful to create sub-packages to hold files that pertain to a particular application or web portal. For an example of this, refer to the image below.
- Create a DemoObjects java class by following the same actions in step 1. Place this file in the demo package
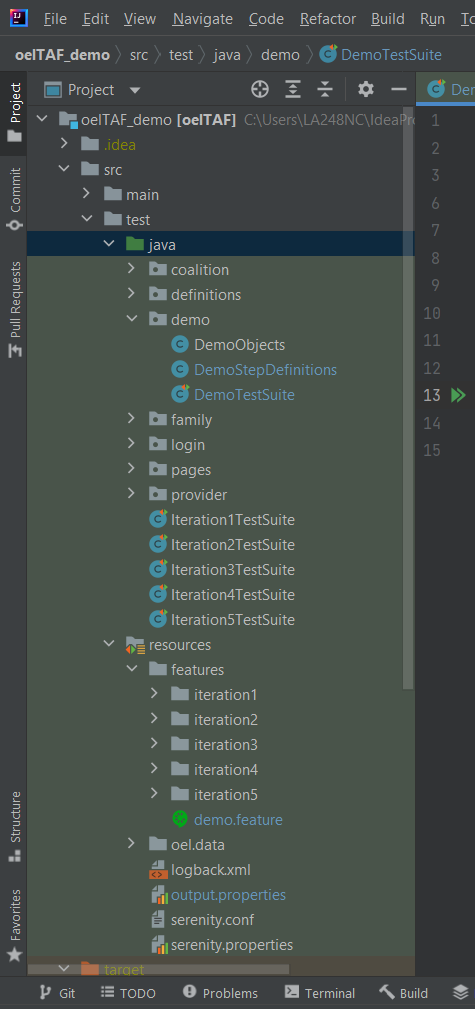
Now all files should be created, and your directory should look similar to the one seen in the above image. For more detailed overviews of these components, refer to the prerequisite knowledge section above.
Before writing steps, it will be helpful to define the web elements that we need to interact with. This is done using Serenity's target class. The steps below will show how to use the class to define an object, specifically a username text field, a password text field, and a log on button. These steps can then serve as a template to define objects going forward.
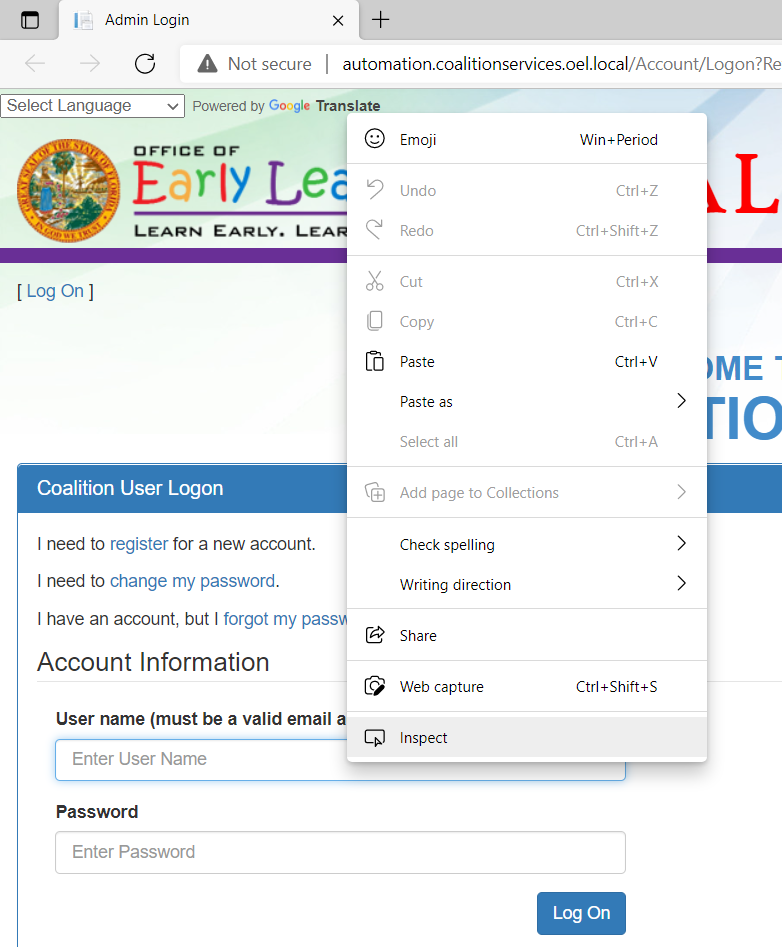
- Manually navigate to the web page you are trying to automate. In this case, we are visiting the coalition portal. Using the Chrome or Edge browser is recommended.
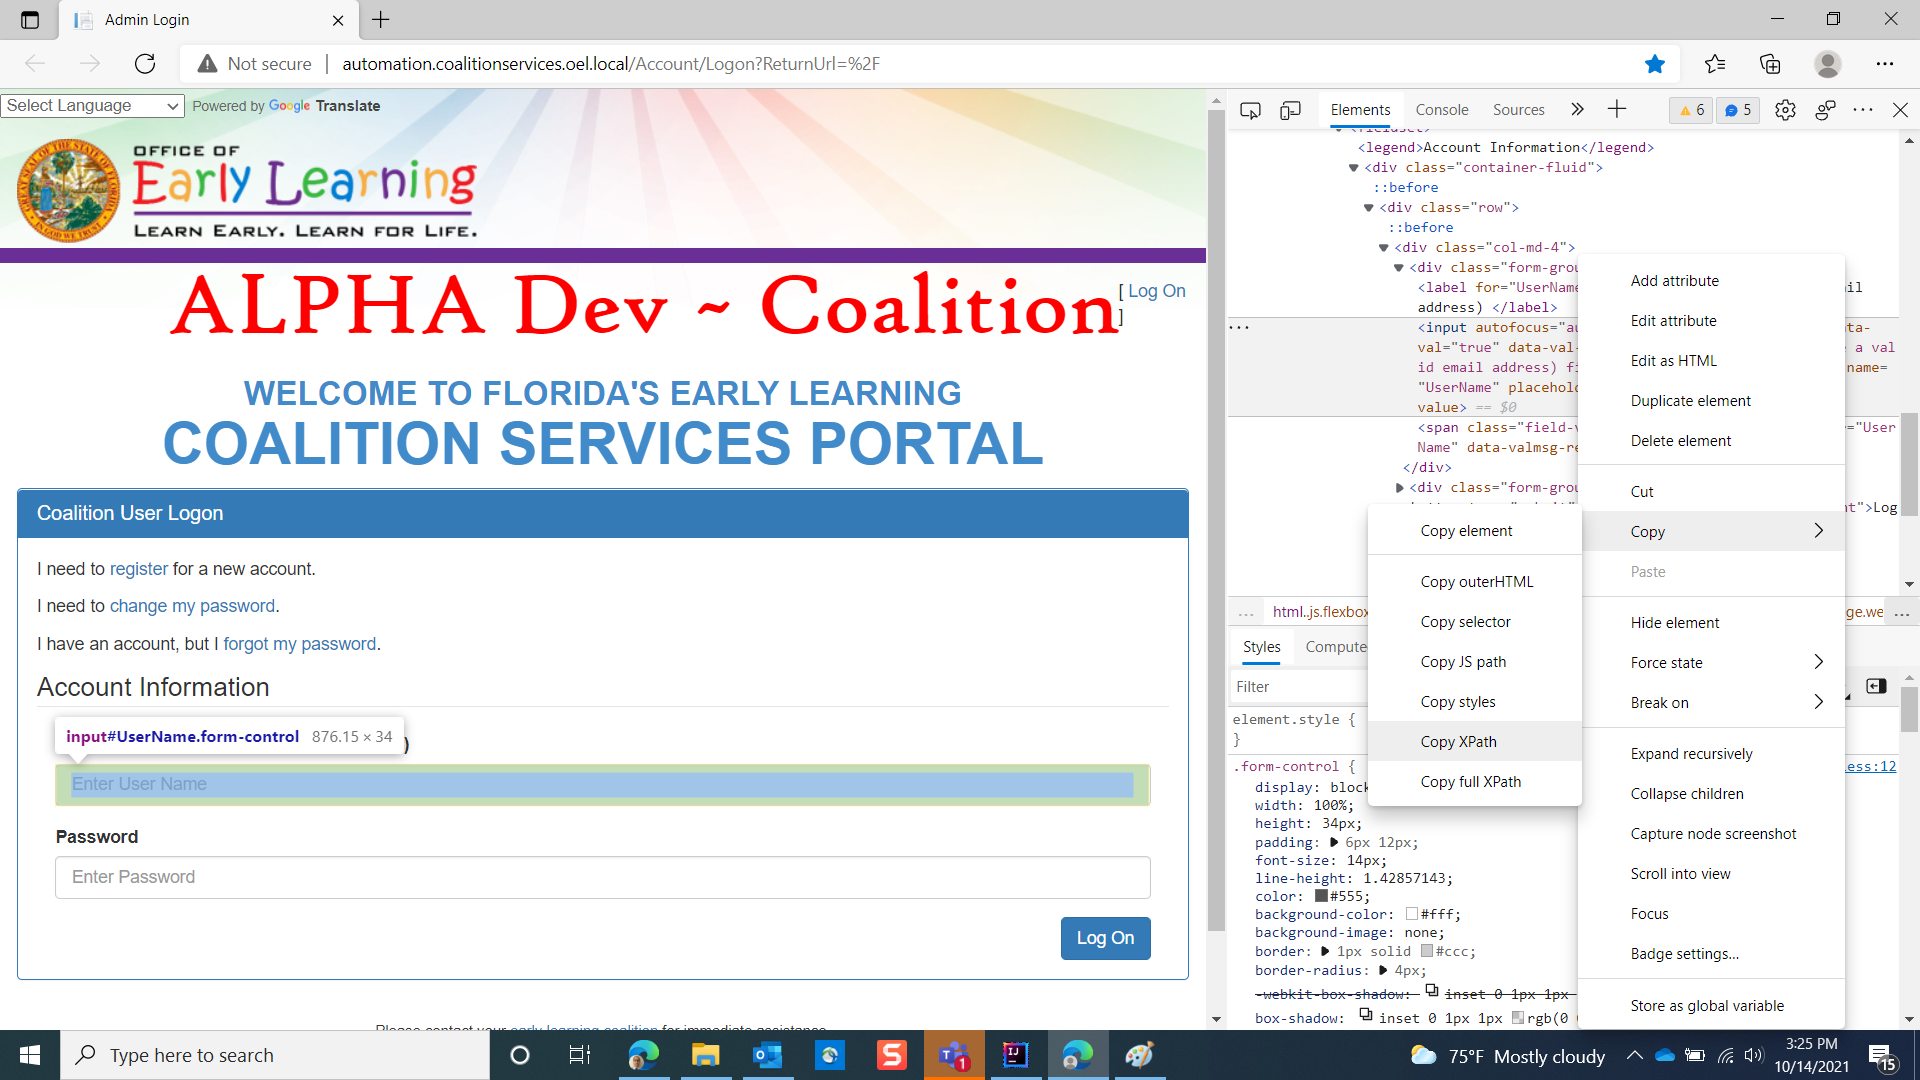
- On the log in page of the coalition portal, right-click on the username textbox
- In the context menu, click on 'Inspect'. The developer tools window will open and automatically highlight the web element that you right-clicked on.
- Right-click on the web element tag in the developer tools window
- Click on Copy -> Copy XPath. The XPath locator is now copied to your machine's clipboard, and you can paste it anywhere using ctrl-v.
- In IntelliJ, navigate to your DemoObjects java class and paste in the code below. The XPath you retrieved from the web browser in steps 2 - 5 will be used in the 'locatedBy("")' method demonstrated below.
public static Target USERNAME_FIELD = Target.the("username")
    .locatedBy("//*[@id=\"UserName\"]");

    public static Target PASSWORD_FIELD = Target.the("password")
    .locatedBy("//*[@id=\"Password\"]");

    public static Target LOG_ON_BTN = Target.the("log in button")
    .locatedBy("//*[@id=\"main\"]/div[2]/div[2]/form/fieldset/div/div/div/button");

    public static Target SEARCH_VPK_APPS = Target.the("vpk application search button").locatedBy("//a[contains(text(), 'Search VPK Applications')]");
The code above defines page objects
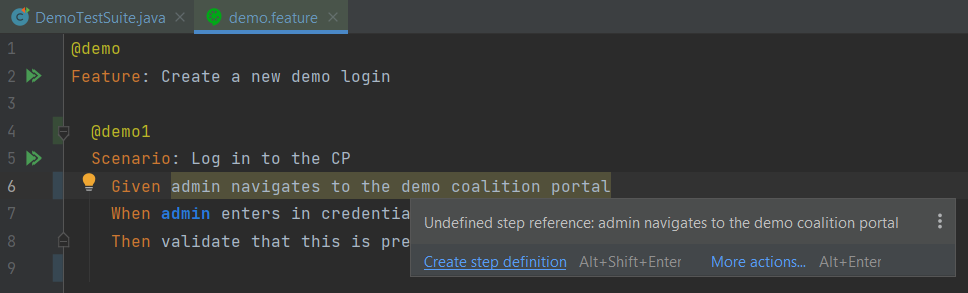
IntelliJ makes it simple to get a working step that is auto-generated from the feature file.
- Begin to write out your step in your feature file. You will notice that the IntelliJ editor recognizes that a step definition does not yet exist. Hovering your mouse cursor over the step will bring up an option that allows you to generate your java step definition
- Click on 'Create Step Definition'
- You should see another menu prompting you to choose a step definition file where you want to generate a new step definition. Choose DemoStepDefinitions
- If you do not see your step definition file, you may have to rebuild your project. On the top menu of the application, click on Build -> Rebuild Project
- After clicking on your step definition file, you will see a new step definition generated automatically. The step from the feature file and the step definition java code are now linked
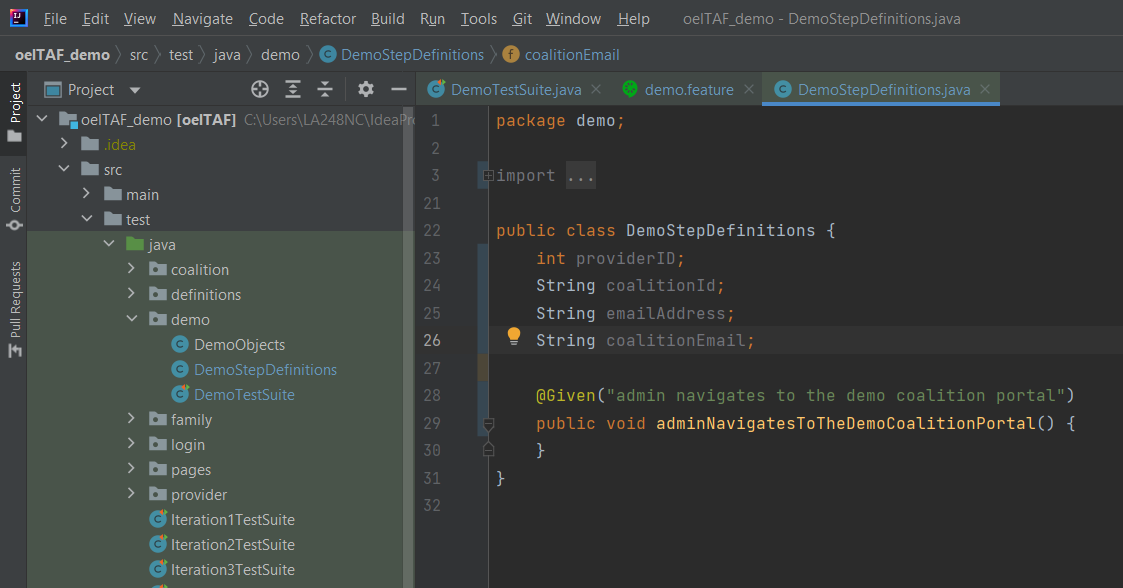 (Displayed above is the newly created step definition, within the specified 'DemoStepDefinition.java' file)
Now that we have written our first step, we need to write the java code that performs specific actions in the browser. This is where Serenity BDD comes in. Serenity BDD has many pre-defined action classes that make it simple to interact with the browser. The next steps will create the code necessary to access and log on to the coalition web portal.
- Write the below code in your DemoStepDefinitions file. This step definition uses the Serenity class 'Open' to open a web page, specified in the serenity.conf file. In this case, we are navigating to the url defined for 'demo.login'
@Given("{actor} navigates to the demo portal")
    public void navigateToTheDemoPortal(Actor actor) {
        actor.wasAbleTo(Open.browserOn().thePageNamed("demo.login"));
    }
- Write the below code into your demo feature file. Notice 'admin' becomes highlighted, indicating it is a parameter
@demo
Feature: Create a new demo login

  Scenario: Log in to the CP
    Given admin navigates to the demo portal
With the above step definition, you should be able to execute your test. You should see a web browser open up to the page specified by 'demo.login' in the serenity.conf file.
- Add the code below to your step definition file to enter in credentials and log on to the page
@When("{actor} enters credentials {word} and {word} and logs on to the portal")
    public void userEntersCredentialsWordAndWordAndLogsOnToThePortal(Actor actor, String username, String password) {
        actor.wasAbleTo(Enter.theValue(username).into(DemoObjectsUSERNAME_FIELD)
                .then(Enter.theValue(password).into(DemoObjects.PASSWORD_FIELD))
                .then(Click.on(DemoObjects.LOG_ON_BTN))
        );
    }
The step definition above will use our previously defined page objects to interact with the web page when the test is executed.
After our first step logs the user in, we will need to write a step that validates that we have performed the log in action successfully. To do this, we will need to define another page object in our DemoObjects java class. After that, we will use Serenity's 'Ensure' class to perform our validation.
- Enter the code below into your DemoStepDefinitions java class
    @Then("{actor} should see the search vpk application button")
    public void verifySearchApplicationButton(Actor actor) {
            actor.attemptsTo(Ensure.that(DemoObjects.SEARCH_VPK_APPS).isDisplayed());
        }
    }
- Enter the new steps into the demo.feature file
@demo
Feature: Create a new demo login

  Scenario: Log in to the CP
    Given admin navigates to the demo portal
    When admin enters credentials [email protected] and password and logs on to the portal
    Then admin should see the search vpk application button
At this point, our code will navigate to the coalition portal, log in with the specified credentials, and then validate that we are able to see an element that is on the home page. Let's execute our code to verify our solution.
- Run the below command in your command line to execute our test in the chrome browser, automation environment
mvn clean -Dit.test=DemoTestSuite -Denvironment=automation -Dwebdriver.driver=chrome verify
This concludes the basic components of your first test!
At this point, you have the skills necessary for writing your own steps to automate your test cases. If you would like to dive deeper, resources can be found on this page.