Acurite Atlas on WeeWX RTL SDR RTL_433 RPi (Page 2) - ChrisM510/AtlasWeeWX GitHub Wiki
First thing we want to do is get the sensor map set up. It is pretty straightforward, and will use the data you gathered in the last step. Here is my sensor map, which should help you out. The archives types section in the customization guide will help you understand the naming conventions, and what is actually put into the database.
outTemp = temperature.0380.AcuriteAtlasPacket
outHumidity =
humidity.0380.AcuriteAtlasPacket
windSpeed =
wind_speed.0380.AcuriteAtlasPacket
windDir =
wind_dir.0380.AcuriteAtlasPacket
UV = uv.0380.AcuriteAtlasPacket
rain_total = rain_total.0380.AcuriteAtlasPacket
radiation = lux.0380.AcuriteAtlasPacket
strikes_total =
strikes_total.00BC.AcuriteLightningPacket
strike_dist =
distance.00BC.AcuriteLightningPacket
extraTemp1 =
temperature.1DDA.AcuriteTowerPacket
#Birdhouse
extraHumid1 =
humidity.1DDA.AcuriteTowerPacket
#Birdhouse
extraTemp2 =
temperature.00BC.AcuriteLightningPacket
#Upstairs Outside - Lightning Sensor
extraHumid2 =
humidity.00BC.AcuriteLightningPacket
#Upstairs Outside - Lightning Sensor
lux = lux.0380.AcuriteAtlasPacket
To get my rain data and lightning data to show up
properly, I needed to edit the deltas section of the weewx.conf file:
rain = rain_total
Lightning_Strikes = strikes_total
strike_distance = strike_dist
Back to that environment sensor
Ok, remember when I said we would be coming back to that
little environment sensor? Now is about
the right time to tackle that.
You will need to obtain and install the driver for the BME280
module, as well as the “smbus2” package.
I found this item to be one of the more difficult items to get right. You might have to do some trial-and-error
exploration here like I did. Sorry, but
I wasn’t expecting to be writing out these instructions when I was doing all of
this for the first time.
Now, install the BME280 extension for WeeWX by following
these instructions.
Back to the weewx.conf file
Now that you have the BME280 installed and functioning,
here is what my configuration looks like in the weewx.conf file.
[Bme280wx]
temperature_must_have = ""
humidityKeys = inHumidity
pressureKeys = pressure
pressure_must_have = outTemp
i2c_port = 1
humidity_must_have = ""
i2c_address = 0x76
usUnits = US
temperatureKeys = inTemp
Here are some of the other areas of the weewx.conf file
that I had to edit for my uses.
Some values are calculated, rather than observed directly
from sensors. Change values to “software”
for some of these. More information can
be found in the WeeWX User’s Guide.
[StdWXCalculate]
# How to calculate derived
quantities. Possible values are:
#
hardware - use the value
provided by hardware
#
software - use the value
calculated by weewx
#
prefer_hardware - use value provide by hardware if available,
# otherwise use value
calculated by weewx
pressure = prefer_hardware
barometer = software
altimeter = prefer_hardware
windchill = software
heatindex = software
dewpoint = software
inDewpoint = prefer_hardware
rainRate = prefer_hardware
UV = prefer_hardware
windrun = software
For my lightning sensor, as well as to even out some of
my indoor temperature measurements, I needed to add the accumulator section to
the very end of the weewx.conf file. I
should point out that my lightning data still isn’t displaying quite right on
my WeeWX web page, but the data is going into the database…work in progress.
[Accumulator]
extractor = sum
extractor = min
merger = minmax
merger = avg
extractor = min
You may want to change and/or add to your labels section.
[[Generic]]
barometer = Barometer
dewpoint = Dew Point
ET = ET
heatindex = Heat Index
inHumidity = Inside Humidity
inTemp = Inside Temperature
outHumidity = Humidity
outTemp = Outside Temperature
radiation = Solar Radiation
rain = Rain
rainRate = Rain Rate
UV = UV Index
windDir = Wind Direction
windGust = Gust Speed
windGustDir = Gust Direction
windSpeed = Wind Speed
windchill = Wind Chill
windgustvec = Gust Vector
windvec = Wind Vector
extraTemp1 = Birdhouse Temp
extraTemp2 = Upstairs Outside
Temp
extraHumidity1 = Birdhouse
Humidity
extraHumidity2 = Upstairs
Outside Humidity
lux = Lux
cloudbase = Cloud Base
windrun = Wind Run
A word about solar radiation and lux… If you do some research, you will find that WeeWX
tracks solar radiation, however, the Acurite Atlas gathers Lux. The two values are not perfectly convertible. You can get reasonably close by modifying the
Corrections section.
# For each type, an arbitrary
calibration expression can be given.
# It should be in the units defined in
the StdConvert section.
#
Example:
foo = foo + 0.2
radiation = radiation * 0.01075
Extending the WeeWX database schema
Some of the values that the Acurite Atlas gathers, and
some of my customizations require extending the database schema. I tried and tried the instructions found on
the WeeWX Customization
page and others,
but to no avail. Ultimately, I decided
to bite the bullet and just modify the schema directly. Make sure you make a copy of the original
schema, as well as a copy of your database, and tuck them away somewhere safe,
just in case something goes sideways on you.
Locate your wview.py file (mine was at “/usr/share/weewx/schemas”)
and open it in a text editor (Geany is nice).
I added the following fields below directly to the file, and saved it.
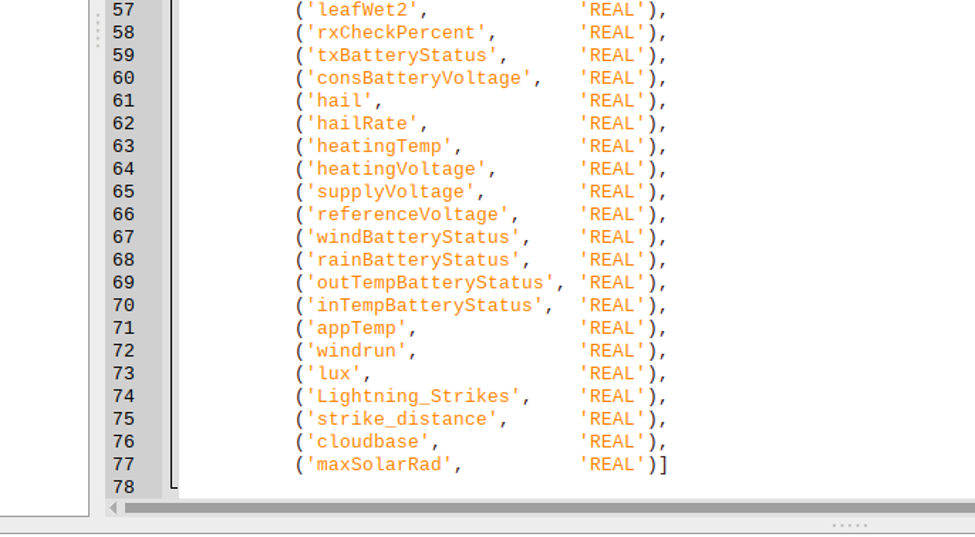
After saving the schema file, run “wee_database weewx.conf –reconfigure” to commit
the changes to the database and move the data to a new database. Change to the folder containing the database. Overwrite and move the old database with the
new database using “mv weewx.sdb_new weewx.sdb”. Perform a “sudo
wee_database --rebuild-daily” command to rebuild your archive tables. You can open your database using DB Browser
for SQLite to check if the schema change was successful.
Starting WeeWX
You don’t necessarily need to wait till now to start
WeeWX. I found it useful to sometimes
start it along the way (after it was installed) to check my work before moving
on. Start WeeWX by running “weewxd
/etc/weewx/weewx.conf” and wait for output.
You should see something like this:

If you do get output like this, wait 5 or more minutes
and open the website, located at http://localhost/weewx
(replace localhost with the IP address or hostname of your Raspberry Pi if browsing
from another computer).
You can run WeeWX as a service/daemon, if you wish (and
most will want to) by running “sudo
/etc/init.d/weewx start”.
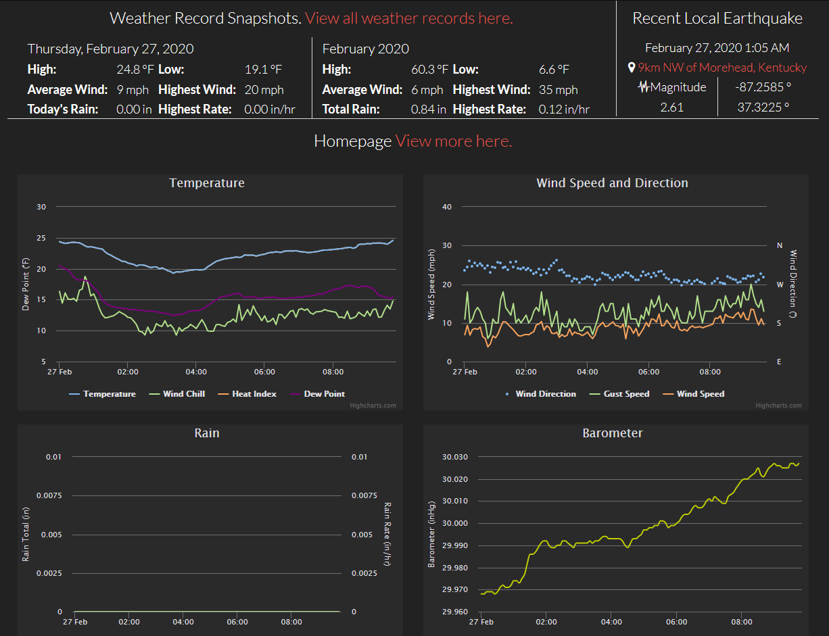
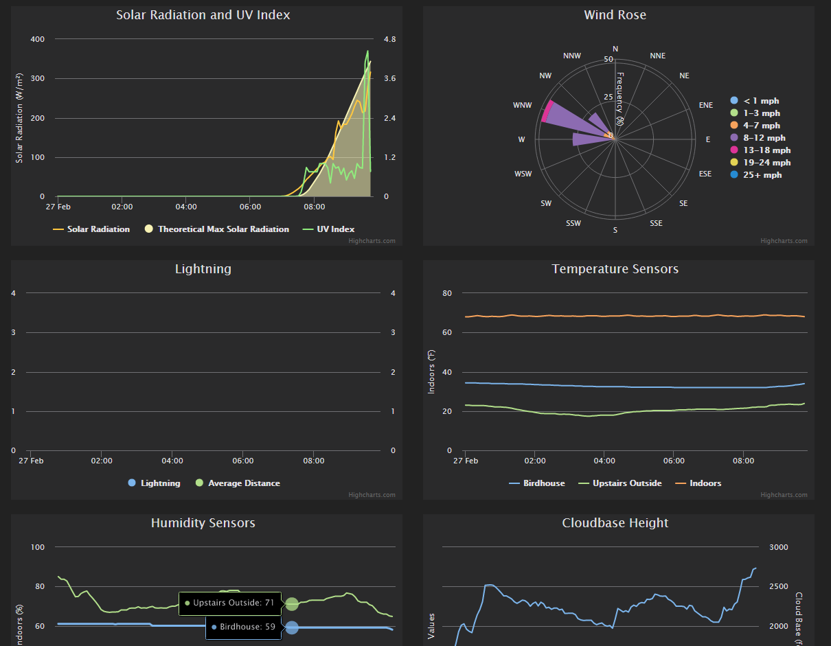
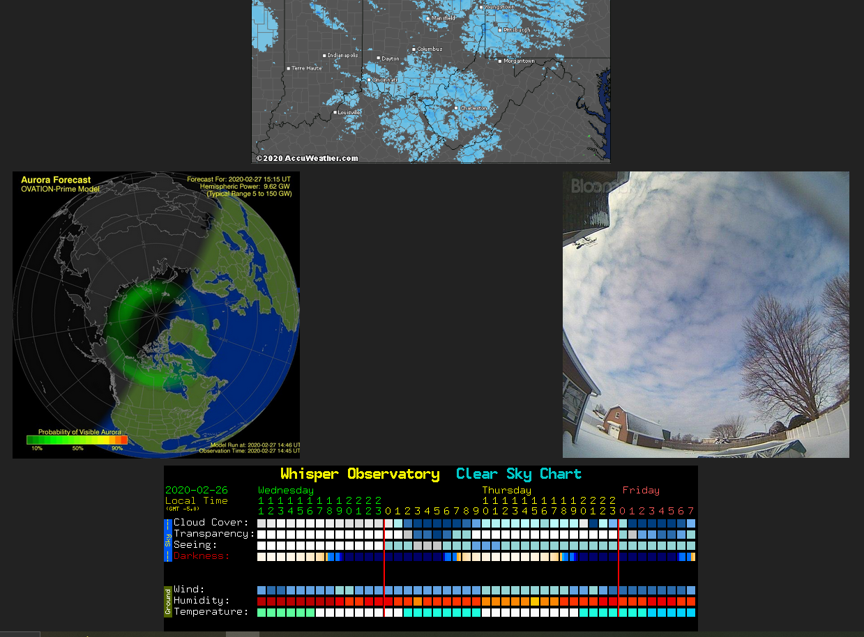
At this point, you are technically done… I, personally, did not like the website that
comes default with WeeWX. I looked at
all of the available skins available for WeeWX, and the one that appealed to me
the most is the Belchertown
skin by Pat O’Brien. You might like
it too. If you have made it this far,
setting up the Belchertown skin should be pretty straightforward, though it
might take some time to “tune it” to your tastes. Going into detail about the configuration of
the Belchertown skin is beyond the scope of this document, but here are a few
screenshots of mine.
I hope this guide is useful to you, but like I wrote, it
might be incomplete, and will likely need a few tweaks for you – I did the best
I could to recreate the steps I took to make this happen.