Acurite Atlas on WeeWX RTL SDR RTL_433 RPi (Page 1) - ChrisM510/AtlasWeeWX GitHub Wiki
Building a WeeWX server on a
Raspberry Pi 4 for use with Acurite Atlas weather equipment
By Chris Morris –
February 27, 2020
Preface
This guide is intended as a somewhat detailed set of
instructions for how I built a WeeWX server to receive, archive, and present data
from Acurite equipment. First, all real
credit should be given to the group of people on the Internet that I gathered
all of the information from that I used.
There is very little that I, myself, did on my own; rather I performed a
lot of research, pulling in and using the documented work of others. I will give appropriate credit and cite
resources that I used where appropriate and possible – if I have missed anyone,
it is unintentional, but please let me know so I can modify this document accordingly. I recommend that anyone following my guide
read each of these resources thoroughly in order to gain an understanding of
what is being done and why. I should
point out that this guide assumes a certain level of working familiarity with
Debian Linux, and command line configurations of computers in general. I am not a Linux expert, but if you are diligent,
have some IT prowess, and are willing to read, read, and read some more, then
you can do this too. I do hope to make your
experience a bit easier than mine, through this guide, but it will not be
exhaustive, and I must be honest….I will likely forget a couple things (but
will update it as I remember) – I did a lot of work on the fly, and was not
write it down as I went along. I will explain
as much as I can as I go along, perhaps too much so, but I do so in an attempt
to put you in the same frame of mind I was in so that you might understand why
I did the things I did, and it might help you…hopefully. I should also point out that I discovered
several different variations on what I did – many of my decisions were for
personal tastes. You should feel free to
explore some of the other options available, as they might work better for you.
I want to point out that it will likely take you a while
to follow through this guide. This is
not a process that will be done in just a couple of hours, particularly if you
are new to a Raspberry Pi and WeeWX. I
worked for several weeks, off and on, to get everything working. Even using this guide, you should expect to
take a few days to get through everything.
TAKE YOUR TIME! This should be an
enjoyable project that leads to an interesting little hobby – the learning
process is part of the fun, don’t rush it!
Introduction
I previously had an Acurite 5-in-1 weather station and
used the Valley Info Systems Reader software (VIS Reader) to pull data into a
SQL database. I really grew to like my
little weather hobby, and when Acurite came out with their Atlas system, I wanted
one immediately. I purchased it right
away, long before I was even prepared. I
had the unit unboxed before I realized that there *was* no easy way to achieve
the same level of personal data logging and processing as I was enjoying on VIS
Reader. Since Mike Walsh over at VIS
said he had no interest in supporting the Atlas hardware, I knew I was going
into uncharted territory on my own.
After doing a lot of Google searching, I quickly realized that there
were basically 2 paths of possible exploration – Acuparse and WeeWX. After briefly exploring Acuparse, I soon
realized that it was not going to meet my needs and expectations – I wanted
something that was more graphics-rich. I
am not knocking Acuparse…it just wasn’t what I was looking for.
Since I had settled on WeeWX as the committed path, I
started researching the options available for pulling in data from the Atlas
hardware. It turns out that there were
basically two options:
·
Use the Interceptor Driver to capture
data from an Acurite Access base station by grabbing data uploaded to Weather
Underground (WU).
·
Software Defined Radio (SDR) to capture
data directly from the sensor(s) themselves, thus taking the Acurite Access out
of the equation.
As it turned out, the Interceptor Driver was not going to
work well for me. This method required
capturing the WU data being uploaded because it was sent using unencrypted
traffic. Capturing the data sent to Acurite’s own web service was not an option
because it was encrypted using SSL. The problems,
for me, with using the WU data is that 1) it is not complete in terms of what
is collected by Atlas (such as lightning data), 2) Access only uploads every 5
minutes, and 3) the Access is notoriously unstable (something I had already
discovered personally). This left me
with going down the SDR path. In
addition to having none of the shortcomings of the Interceptor Driver method,
this allows me to gather data directly from multiple sources (desirable since I
do have a couple of additional sensors that I had acquired before getting the
Atlas) to pull into WeeWX.
Before I go much further, I want to give credit to Matthew Wall and Christian
W. Zuckschwerdt for the sdr rpi recipe instructions. My work here is largely based on that tutorial…I
just have adapted it for use with the Acurite Atlas and have thrown in some minor
customizations. Without their
work, this would not have been possible (I am certainly not smart enough on my
own to have ever figured this out). I
recommend thoroughly reading his page in order to understand what I am building
upon. Some of my instructions below are
taken directly from that website – all credit to them.
Edit: I would also like to thank Matthew personally for helping me with my efforts to get the Atlas packets working with his WeeWX SDR extension! Somehow, and most regrettably, I forgot all about the exchange he and I had back in December when I was working on this! Matthew blew my mind with how quickly he seemed to drop everything and turn out the update I needed! IIRC, this all happened within hours of my asking for help!
Edit: I would also like to thank Matthew personally for helping me with my efforts to get the Atlas packets working with his WeeWX SDR extension! Somehow, and most regrettably, I forgot all about the exchange he and I had back in December when I was working on this! Matthew blew my mind with how quickly he seemed to drop everything and turn out the update I needed! IIRC, this all happened within hours of my asking for help!
Equipment used
Ok, so now that I have decided on WeeWX using SDR, what
was I going to need. Here is my list:
·
Raspberry
Pi 4 – Since there was more documentation on using WeeWX on a Pi rather
than a full PC, I chose this route. I
would have loved to use a VM, but the SDR method required a hardware SDR USB
dongle, which ruled out other options for me.
·
Micro
SD Card – Needed for storage for the Pi.
·
Pi
Power Supply – The Pi4 needs a full 3A to power it…your average USB phone
charger will not do. Get this. I am probably going to experiment with using
a battery pack to make a UPS for my Pi.
I will update if I have success.
·
HDMI
Cable – Need to see what you’re doing…at least for now…more on that later.
·
USB Keyboard and mouse – needed, again at
least for initial setup. If you have
extras laying around like I do, use them, if not, buy something cheap.
·
Pi
Case – I used my 3D printer to print mine, but if you don’t have one, you
will need to buy one. The linked case works well because you will need access
to the Pi’s GPIO pins.
·
GPIO
extension – You will need this to have multiple inputs. More on why later.
·
Real-time
Clock (RTC) – Since the Pi doesn’t have its own real-time clock, you will
want this. It is important for accurate
time keeping should the Pi need to be rebooted or lose power.
·
Environmental
Sensor – The Atlas does not have its own pressure/barometer sensor, but
rather it relies on the sensor that is inside the Access base station. Since we won’t be using the Access, you need
this. This is also nice because it has a
humidity and temperature sensor for indoor measurements, so it can replace the
functionality provided by an Acurite HD Display.
·
SDR
Dongle – This is what will actually receive the signals from the
sensors. You can certainly use smaller,
cheaper equipment for a Raspberry Pi (using GPIO interface), but I wanted
something a bit more durable, plug & play, and I just happened to have this
laying around from a previous project.
This is one of those possible variation chances that might work better
for you. Experiment and have fun, and
definitely improve on what I did.
·
SDR
Antenna – After much trial-and-error (I will spare you all of that), I discovered
that the antenna used matters more than what I would think. This is the antenna I settled on. Use the shorter of the stubby antennas in
this pack.
·
Acurite
Lightning Sensor – Ok, I am getting ahead of myself, but later on I
discovered that the current iterations of the RTL_433 software does not yet
support decoding the lighting data directly from a lightning sensor equipped
Atlas, however, THIS sensor IS supported.
$20 seemed pretty cheap to solve this problem and move along. I figured I would use the Atlas lightning
sensor once it becomes supported.
·
Acurite
Sensor Repeater – I needed this because a couple of my sensors weren’t reaching
my Pi due to my aluminum siding. You
might need this too. Your mileage may
vary.
·
Acurite
Temperature and Humidity Sensor – If you want additional sensors for
additional locations, here is what I used.
These also make for a nice sanity check on the data you are getting from
your Atlas.
·
Acurite
Atlas – You probably already have this, if you are reading this guide, but
just in case, here is the link to the package I purchased.
Assembly and Setup of the Pi
Now its time to put it all together, physically. Unbox everything and assemble the Pi in
whatever case you picked out.
Once you have the Pi itself mounted, go ahead and hook it
up to your mouse, keyboard, and monitor.
For the installation, you will need to put the micro SD card in your
desktop/laptop computer, download the latest image of Raspbian, and load it
onto the SD card. The actual
installation of Raspbian is beyond the scope of this document, and it is
already well documented in numerous places on the Internet. I personally used
the NOOBS version of the installation. Raspbian
is based on Debian Linux, so I recommend starting here:
Once you have Raspbian installed, you might consider
installing the following optional components to Raspbian for ease of further
steps and future management.
·
Remote Desktop
Protocol (RDP) – This will allow you to connect to your RPi using RDP
later, eliminating the need for you to keep the monitor, keyboard, and mouse
all the time.
·
DB Browser
for SQL Lite – This will be needed later if you ever need to modify any of
your data, such as to correct a measurement manually.
·
Webmin – This software
gives you a very nice GUI for your Raspberry Pi. Again, follow instructions for Debian Linux.
Once you have RDP installed, I recommend performing
the rest of the instructions using RDP, because it will make copying &
pasting data and instruction commands from your desktop/laptop into the Pi. I also recommend assigning a static IP
address to your Raspberry Pi.
Now is a good time to go ahead and install a web
server. There are a few available. I chose to install Apache. It uses more memory than others like “nginx”,
but the Pi that I bought has 4GB of RAM, so I was not worried.
Install Real-time Clock
Since the Raspberry Pi doesn’t have its own RTC, you will
want to purchase and install one. Follow
these instructions here. You will also want to install your GPIO
extension now. Make sure you pay
attention to the “I2C” portion of the instructions, as this same subsystem will
come into play next for the installation of the environment sensor (this is
also why you need the GPIO extension, as both modules use several of the same
pins, therefore you need 2 of each).
After it is installed, you will want to remove the fake clock that is in
the OS using the command “sudo apt-get remove
--purge fake-hwclock”, and then ensure you have the correct timezone
using “sudo dpkg-reconfigure tzdata”.
Install Environment Sensor
With Acurite Atlas equipment, there is no pressure sensor
in the actual sensor platform, but rather it is part of the Access base
station, as well as the HD display.
While that is fine for the basic user, it isn’t enough for us – we want
to capture and record this data in the database, as well as using that data to
help in the calculation of other values used in WeeWX. Follow these instructions here. If you do some research, you will find that
there are two methods for configuring this module – use the I2C instructions. We will be coming back to this sensor in a
little while once we have WeeWX installed so that it can poll data from the sensor.
Once you have both modules installed, you will want to
run “i2cdetect -y 1” to ensure both are
working. You should see an output like
this:
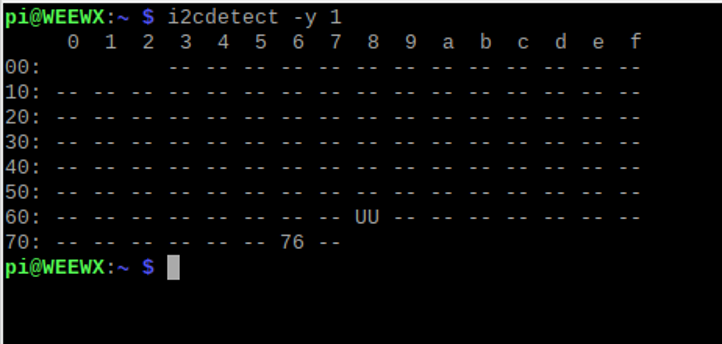
·
The register “UU” denotes that the RTC is
working
·
The register “76” denotes that the environment
sensor is working
Tip: Keep that i2cdetect command handy – it has occasionally
been useful in troubleshooting. Very
rarely, I have experienced the environment sensor causing the WeeWX process to
terminate. This command is what showed
me it was that sensor (it had become disconnected) that wasn’t working. For this reason, I also recommend that you
make sure your sensor is securely installed – those wires can wiggle loose, as
I found out. I shouldn’t have that
problem anymore, but hopefully I can spare you that minor issue.
Install the Software Defined Radio
Ok, at this point, you should have your Raspberry Pi all
buttoned up, and the basic OS is running fine.
Go ahead and plug in your SDR module into a USB port (Pro tip: Christian Zuckschwerdt recommends that SDR modules not be plugged directly into the RPi due to electronics interference, but rather buy a USB extension and locate the module a few inches/centimeters away from the RPi). The rtl-sdr software package is what will allow
the Pi to receive the radio signals, ala packets, from the Acurite
sensors. Since the module sticks out a
fair amount, and I was worried about putting stress on the combined unit and/or
the SRD module coming unplugged, I used Velcro to create a kind of strap to
hold it in place at first, and later bought a 2-inch USB extension so that I
could Velcro the module to the side of the Pi case.
Side note: at this point, if you are not already
familiar with using GIT, and understanding how it works and is used, you may
want to do some Googling to familiarize yourself with it. I certainly am no expert in it, but I did
find it very useful to take 20 minutes to read up on it a bit – it helped with my
understanding of later steps a lot.
To install the pre-requisites, use the command “sudo apt-get install cmake libusb-1.0-0-dev
build-essential autoconf libtool pkg-config”.
To install the “rtl-sdr” package, which allows the OS to
interface with the module, use these commands:
git clone git://git.osmocom.org/rtl-sdr.git
cd rtl-sdr
mkdir build
cd build
cmake -DINSTALL_UDEV_RULES=ON
..
make
sudo make install
sudo ldconfig
Install the RTL_433 software
This software package is what will actually parse and
decode the packets received by the SDR module.
This is what turns those raw radio signals into something that WeeWX can
actually work with. Now, here is where I
do diverge a bit from Christian’s instructions, albeit in a minor, though
significant way. His instructions use
the master branch of the RTL_433 software by Benjamin Larsson. For WeeWX to make use of the packets from the
Atlas, we need to switch to the “feat-atlas” branch.
***Now, don’t just start running the below commands until
you have read the entire section!
I have to be honest here…this is where I did a lot of trial-and-error,
in a short amount of time, without documenting my steps, and my memory is a bit
fuzzy. The instructions for installing
the RTL_433 package are:
git clone
https://github.com/merbanan/rtl_433
cd rtl_433
git checkout feat-atlas
mkdir build
cd build
cmake ..
make
sudo make install
You will need to switch branches before executing all
of those commands. If I remember
correctly, perform the command “git checkout
feat-atlas” immediately after the “cd
rtl_433” command.
Install WeeWX
Time to install WeeWX…finally… (but we are far from done)
Taking directly from Matthew & Christian’s instructions:
When you install WeeWX, select Simulator
when prompted for the station type. You will change it later to SDR when you
run the wee_config --reconfigure command.
# install weeWX
wget -qO -
http://weewx.com/keys.html | sudo apt-key add -
wget -qO - http://weewx.com/apt/weewx.list
| sudo tee /etc/apt/sources.list.d/weewx.list
sudo apt-get update
sudo apt-get install weewx
# shut down weeWX
sudo /etc/init.d/weewx stop
# install weewx-sdr extension and enable the driver
git clone
https://github.com/matthewwall/weewx-sdr.git
sudo wee_extension --install
weewx-sdr
sudo wee_config --reconfigure
Gathering data for WeeWX configuration
You will need to identify your sensors according to the
packets they transmit. Each sensor appears
to be unique, so as to not overlap with anyone nearby that may be operating the
same equipment. We need to identify
which ones are yours.
Running the command “sudo
rtl_433“ will get you an output like the below picture. This is useful for making sure that all of
your sensors are transmitting.

Next, run the command “sudo
PYTHONPATH=/usr/share/weewx python /usr/share/weewx/user/sdr.py
--cmd="rtl_433 -M utc -F json"
“ (make sure you actually grab the quotation mark after the “json”
at the end of the command). You should
get output similar to this:
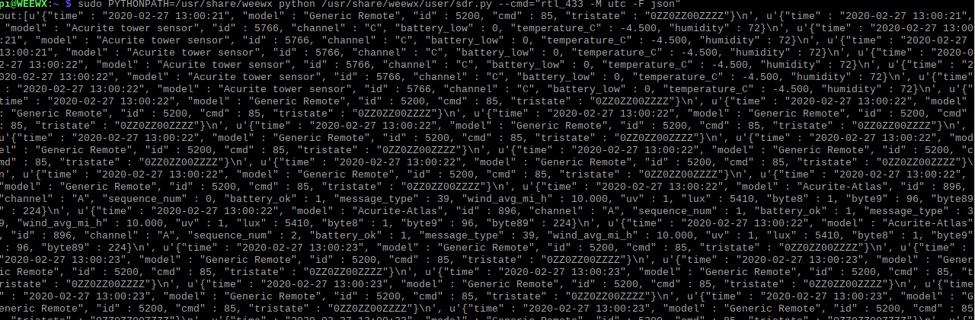
Yes, it all looks like gibberish… I recommend that you download and install Notepad++ on your desktop/laptop
computer and then highlighting the above input from your Pi and pasting it into
Notepad++, because it makes things a LOT more readable:

You might need to play with the above process a bit to
capture all of your data points that you wish to record. It will make more sense later, but you will
be defining in the WeeWX config file what sensor data points marry up to which
fields in WeeWX. Christian’s
instructions go into a bit more detail, and definitely help in understanding
what we are trying to achieve.
Configuring the WeeWX configuration file
If you are not already familiar with WeeWX, now is a
great time to take a break and go to the software’s website and read through
the User’s Guide and Customization Guide. Familiarizing yourself with the weewx.conf
file will be crucial to your success.
Again, take your time.
***I want to point out that you might drive yourself a
bit crazy when you are making modifications to the weewx.conf file – you often
will need to take a copy of it, paste it into a folder where you have full
permissions to edit, make your changes there, then copy & paste the file
into the proper working folder with superuser privileges (using the SUDO
command). Just be prepared for this…and
be patient.