Technical Design Document - ChillChiliStudio/Order227 GitHub Wiki
- Introduction
- Technical Goals
- Technical Risks
- Code Style Guidelines
- Third Party Tools and External Libraries
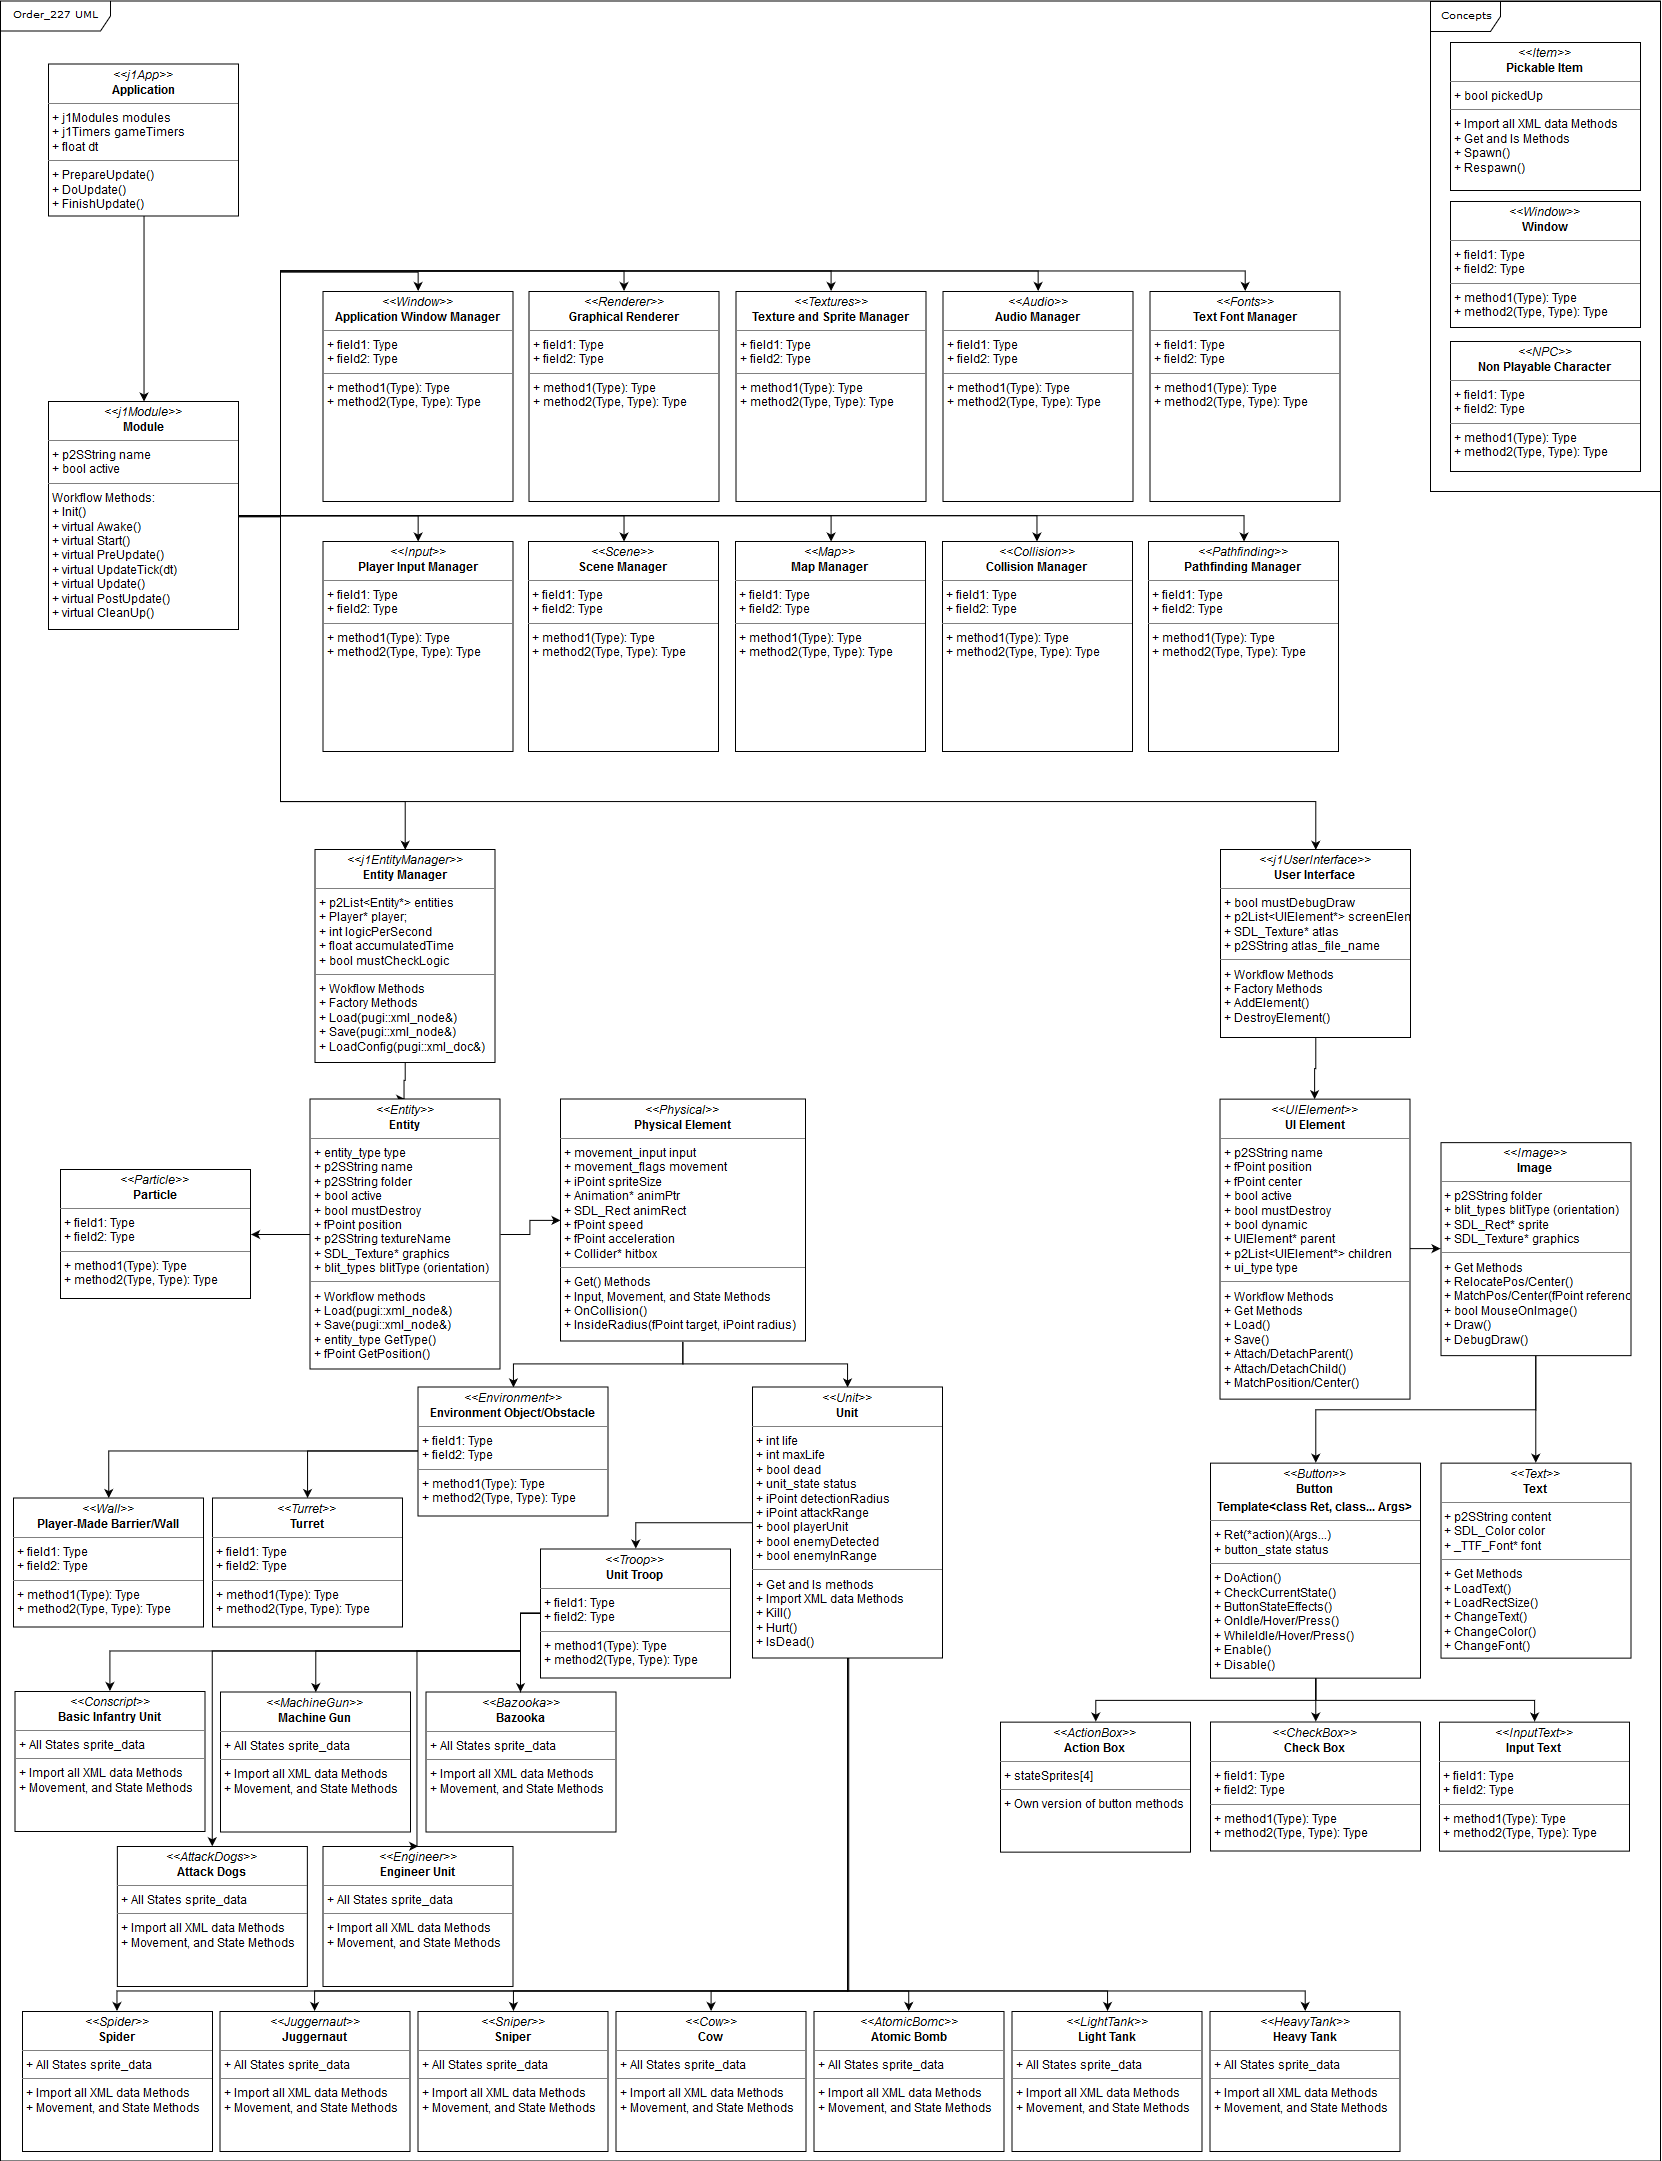
- Code Organization UML
- Branching Policy
- Performance Budget
- Build Delivery Method
- Version List
- Delivery Platforms
- Game Engine
- Art and Audio Tools
- Physics
- Artificial Intelligence
In this document we will specify the technical procedures and guidelines of the project.
- Code Editor: Visual Studio 2017/2018
- Programming Language: C/C++/XML
- Important Libraries Used: STL, SDL, pugixml
- Target Platform: PC
- Workflow Methodology: Agile (Scrum)
- Management Platform: HacknPlan
- Git Platform: Github
- Repository
Order 227 is an RTS, in which the player will have to defend his base from enemy hordes until they stop coming, capturing and controlling strategic points around it that will provide useful resources.
- Load isometric maps created from Tiled Map Editor
- Particles system that works with Quadtrees
- Friendly UI
- Management of large amount of units with multiple actions possible
- Simple AI
- 8 Directions for every unit animation
- Buildings with their respective animations
- Pathfinding calculation and amount of units could slow the game
- Creating buildings changes the walkable layout and forces path recalculation
- Hills, differents heights on 2D isometric maps are hard to make
- Flying units that can interact with ground elements and ignore obstacles
All code will be written in English, and we’ll use the C, C++, and XML programming languages and Visual Studio 2017/18 as code editor.
Names should be descriptive based on their functionality. Do not use abbreviations that are ambiguous or unfamiliar to readers outside your project.
Ex:
int numEnemies;
bool IsDead();
All uppercase, underscores between words.
Ex:
#define EXAMPLE_DEFINE_NAME(x, y) (x * y / (x + y))
Undercase, initial letter for each data type and entire word for last one.
Ex:
typedef unsigned short ushort;
Words in undercase separated by “_”, initial capital letter on each.
Ex:
class Class_Example {};
Words in undercase separated by “_”, initial capital letter on each.
Ex:
struct struct_example {};
Words in undercase separated by “_”, initial capital letter on each. Members must be in uppercase with underscores between words.
Ex:
struct struct_example {
FIRST_LIST_ELEMENT = -1;
};
Start with lowercase, change to uppercase only for the first letter of every new word.
Ex:
short coinsCollected;
Use uppercase for the first letter of every word, lowercase otherwise.
Ex:
void BubbleSort();
Symbol next to data type on declaration.
Ex:
char* stringExample;
int& iThoughtThisWasImposible;
Conditions that are considered too long for a single line have to be ordered vertically with a line for each part starting with the “&&” or “||”. If both symbols appear on the same long condition, the parts with “&&” have to go on the same line while “||” separates them vertically standing in front of each part.
Know which conditional to use for each situation (switch is very good for some conditions involving lists), but generally avoid the boolCheck ? optionTrue : optionFalse condition unless in need of writing in one line, like a #define.
Ex:
if (a > b
&& a == c
&& a < d
&& d == 100) {
code;
}
else (a > b && a > c
|| c == b && c > 0
|| a < 100) {
code;
}
Use “for” for loops which end conditions are controlled, and “while” for those that aren’t, meaning that there’s not fixed parameter that changes on each cycle. Analyze which conditionals work best for the loop’s readability: if and else if, or break and continue.
Ex:
for (int i = playerCurrentScore; i > 0; i--) // Starts and ends in a controlled way
playerTotalScore++;
while (wantCloseApp == false) // We cannot know when the end condition is triggered
executeApp();
Always use enum class. It can potentially prevent bugs by avoiding term overriding thanks to the necessity of namespaces, like for example having two enums with the term NONE at -1 and 0.
Use const for all variables and functions that will not be changed after their declaration. Doing so stops possible errors when trying to edit something that mustn't change.
Ex:
int const var = 1; // Constant integer variable that will always equal 1
int const get1() const { return var; } // Constant function that will always return var (1)
Always use brackets, it adds readability. Most of the time, the initial bracket must be on the same line as the declaration and the last a line under the last one of the declaration.
Ex:
if (a > b) {
code;
}
else if (b > a) {
code;
}
However, on large groupings like a class declaration or long patterns like class method definitions on a .cpp, the initial bracket should be put under the declaration line.
Ex:
class PhysicalElement: public Entity
{
public :
`// Constructor`

`PhysicalElement(entity_type type) : Entity(type) {};`
...
}
If a function has no content, an empty class destructor for example, put one bracket after the other.
Ex:
Class_Example::~Class_Example() {}
All classes will be declared on their own header .h file and defined on a .cpp file and use a #ifndef + #define + #endif instead of #pragma once. The define name must have a _H at the end to indicate its functionality.
Ex:
#ifndef ENEMY_H
#define ENEMY_H // @CarlesHoms
#include "Creature.h"
class Enemy: public Creature
{
public:
`…`
}
#endif
For classes, permissions order goes as follows: public, protected, private.
- Constructor and Destructor. Destructor must always be virtual for parent classes.
- Declarations of data types (structs or typedefs for example) inside the class.
- Core Methods present in multiple classes of the game’s system (like Init(), Update() or CleanUp()).
- All operators in permission order.
- All methods in permission order.
- All members in permission order.
Structs should follow the same pattern, but without the permission orders. Use override on child class abstract methods for better readability. Ex:
class Exaple_Class: public Parent_Class
{
public:
`Example_Class();    // Constructor + Destructor`

`virtual ~Example_Class();    // Inheritance = Virtual destructors and methods`

`struct class_struct {    // Data types`

`int x;`
int y;
`}`

`void ApplicationFunctions();        // App Methods`
public:
override void RedefinedMethod();    // All methods

                    `// Order: public, protected, and private`
private:
void AnotherMethod();
protected:
int someMember; // All members
`// Order: public, protected, and private`
private:
char* name;
`int value1 = 0;`

`int value2 = 5;`
};
When defined, methods need to have a single spacing between them and be on the same order as they were declared in the class.
Ex:
PhysicalElement::~PhysicalElement() // First method of the list, just like in the declaration
{
`if (hitbox != nullptr) {`

    `hitbox->to_delete = true;`

    `hitbox = nullptr;`

`}`
}
Make use of them to simplify code. It can be shorter and just as simple and understandable.
Ex:
var = -1;
if (++var == 0) { // Increase var by 1, then make the comparison
`arrayExample[var++];`

`arrayExample[var++];        // Use value to access array position, then increase by 1`

`arrayExample[var++];`
}
Always delete dynamic memory, we should have minimal to no memory leaks. Avoid creating or deleting memory leaks mid-game, it’s very resource expensive. Instead, create pools of dynamic elements and put them to use or return them to the pool whenever you need. Use dynamic memory wisely for memory economization but always maintain control over it.
While not essential, try to use the data types that you need to without taking an excessive amount of memory. You don’t need 32-bit int for a counter that goes from 0 to 10, a short or even an __int8 would do. Know the numerical boundaries of the variable you’re declaring and use the needed amount of memory. Exploit the versatility that the unsigned specification gives you by giving more reach to a data type used for a variable that will never have a negative value.
For string interpretation use element names when possible, all attributes on the same line as the element they are from and a space between high order elements to avoid saturation.
Ex:
<app mustCap="true" fpsCap="30">
`<name>Get Hooked v0.4</name>`

`<organization>UPC</organization>`

`<save>save_game.xml</save>`

`<load>save_game.xml</load>`
</app>
<renderer>
`<vsync value="false"/>`
</renderer>
- All files must be organized inside filters depending on their function inside the game’s code.
- Core files, like main and App must be together and easily localizable (little to no filters).
- There must be a separation between Game Files and Tools.
- Modules and other general functionality files must be inside a single filter.
- There must be a hierarchical order with object files:
- Factory and first object model/template must be together.
- Every parent must have its children classified in filters next to it.
Ex (from another project):

Do not skimp on lines while writing code. While it’s good to try economizing the space to not create files of infinite length, do not sacrifice readability or good code organization for the sake of having less lines.
Let the code breathe, do not agglomerate it and, when possible, separate it in sections with small comments indicating it, for example while declaring variables.
Use “//” for short comments, leave a tabulated space between it and the comment. Try to align comments close to each other for easier readability. Comments referring to a specific line of code must be on the same line if there’s enough space, otherwise it is decided by the author but, as a rule of thumb, put it on top of the code you’re referring to, like marking the start of a variable list or a small explanation for a really long function that leaves no space for the comment on the same line.
Ex:
// List of laser particles
Particle blueLaser; // Blue laser particle declaration
Particle redLaser; // Red laser particle declaration
Particle missile; // Seeking missiles particle declaration
// There’s no way I can fit my comment in there, I’ll do it here
void ThisFunctionNameIsSoLong (int and, char* has, int so, int many, int parameters);
If the comment is long enough to take several lines, like a full explanation, use “/**/”. It’s up to the author to decide the length of each comment line, but don’t overdo it. The comment positioning depends on the author, but put it on top of the code you’re referring to.
Ex:
/* The music flag starts as false by default and turns true when it begins to play,
it will turn false using a condition when the music stops. */
bool musicPlaying = false;
We will use two keywords for specific comments:
-
TODO: To mark things left to do or half-way done when necessary.
- Ex: // TODO: Find and eliminate memleaks
-
IMPROVE: To mark things that could be improved or developed further.
- Ex: // IMPROVE: Allow save list instead of a single file
The most important rule for commenting: make sure your comment is understandable for everyone and positioned in a way that can be quickly related to the piece of code it’s referring to. All written code must be accompanied with a minimal amount of comments that explain its functionality and why it exists. Everyone that reads your code should have a minimal idea of how it works by reading the included comments.
Note: When commenting code to disable it temporarily saving it for later use or testing reasons, do not leave a space between the “//” and the now commented code.
Ex:
//if (a > b)
`//a = b;`
An autograph is marked by a “@” followed by the author’s name and surname without spaces or accents. Just like comments, it’s positioning is up to the author, but indicate which part of the code you’re referring to. For entire files you can set it at the beginning, and for specific parts of the code like a function or class, next to the function declaration and definition.
Ex, Carles is the original module creator while Joan made his own function inside it:
#ifndefine MODULE_EXAMPLE_H
#define MODULE_EXAMPLE_H // @CarlesHoms
void ExampleFunction(); // @JoanMarin
All written code must be accompanied with it’s author signature somewhere where it can be easily spotted.
The ultimate guideline: READABLE CODE IS GOOD CODE
- Code Editor: Visual Studio 2017/2018
- Git Platform: Github
-
External Libraries:
- Standard Template Library: C++ assist tool.
- Simple DirectMedia Layer: Graphic interface output.
- pugixml: XML file management with C++.
- Tiled Map Editor: Map creation, editing, and exportation to XML.
Organization of GUI elements and entities.
The git workflow we are going to use is pretty simple. There is a master branch in which there will be all the versions of the game in which we will add the functionalities from the other branches once those work correctly. Each person involved in the code will have his own branch, which will have the name of the functionality he’s adding. Once the functionality is done, the master will be merged into that branch, then, it will be tested, and once it’s sure that are no errors/bugs in it, the branch will be merged into the main, and then it will be deleted.

The entirety of all the files to function should **not weight more than 200 MB and memory usage must not surpass 64 MB at any point. The game must run at a solid 60 frames per second and loading times should not take longer than 3-4 seconds. All these goals should be reached for the specificated Minimum System Requirements.
Automated builds will be made constantly with the use of AppVeyor. A final test build will be made 1 week before delivery (Internal Milestone) and a QA process will follow throughout it.
2 days before delivery (Internal Milestone), a final build will be made and prepared for release but QA will keep ongoing. If new changes are made, the build will be updated, otherwise if they are unneeded or unachievable in a safe testing time threshold the original build will be delivered.
On the delivery day (External Milestone), a new build will be made and prepared for release unless no changes have been made since the last build. Afterwards, the next automated build version will be updated in AppVeyor’s .yml settings.
Code and QA leads will supervise the whole process and manage build updating and delivery.
We will follow a version list that will mark the stage of development depending on the established features and the ones still in development or to be released. Any build between versions, must be numbered with a number between the correspondant version's number.
-
0.1: Vertical Slice (April 21th)
- Basic Map with working Base and Terrain without Fog of War
- Basic Infantry Divisions (Allied & Enemies) & Basic Control - Basic Infantry, Bazooka, Machine Gun, Sniper, Cows and Dogs - Attack, Move and Hold
- Basic Hordes System (5 easy waves)
- Win & Lose Condition with current waves quantity
- Basic AI Behaviour - Objective Fixing, Pathfinding and attack
- Economic System (money gathering and expenditure)
- Primarily Strategic Point Control System (basic rewards)
- Basic UI (Main Menu, Game, Pause and Win/Lose Basic Screens)
- Console with main debug settings
- Basic key controls (orders giving, camera move, hordes' in-between time jump and pause)
-
0.5: Alpha (May 19th)
- Definitive Map
- Fog of War
- Defense Building System
- Definitive Strategic Point Control System
- Definitive UI with all screens
- Basic Storytelling - Explanation through text, images and animations
- All units & troops orders implemented, except Special ones, implemented
- Definitive Horde System (Between 10 and 20 Waves)
- Full key controls
- Communist Bar
- Full Console
-
1.0: Gold (June 2nd)
- Well and definitive balanced gameplay
- Special Units
- Advanced storytelling - Explanation through cinematics
- Waves Polishing & Balancing
- Game polish & final details
- Website, Trailer & Gameplay video
PC exclusive. Milestones will be delivered in the Releases section of our repository in GitHub.
- Operating System: Windows 7, 8, 10
- Processor: Intel Pentium III or AMD Athlon MP
- Video Card: NVIDIA® GeForce; 6200 LE, ATI™ Radeon™ 7000 (64 MB) or better.
- Memory: 64MB
- Storage: 200MB Hard Drive space
- Sound: Direct Sound Compliant Sound Card
- Resolution: 1280x720 (16 bit color)
We will use the Simple DirectMedia Layer library for rendering and graphical output. The functionality of the Game Engine can be seen in the UML of the Code Organization UML section of this document.
Tiled Map Editor will be used to design, create, and edit maps from imported tilesets to then be exported into readable XML files by using the pugixml library. For sprite extraction we used the XCC Mixer, Texture Packer, and Photoshop software applications. SDL will handle the audio.
Physics will follow basic mathematical formulas and collision detection will be handled by a collider layer, where every physical element of the game will be represented to detect impacts.
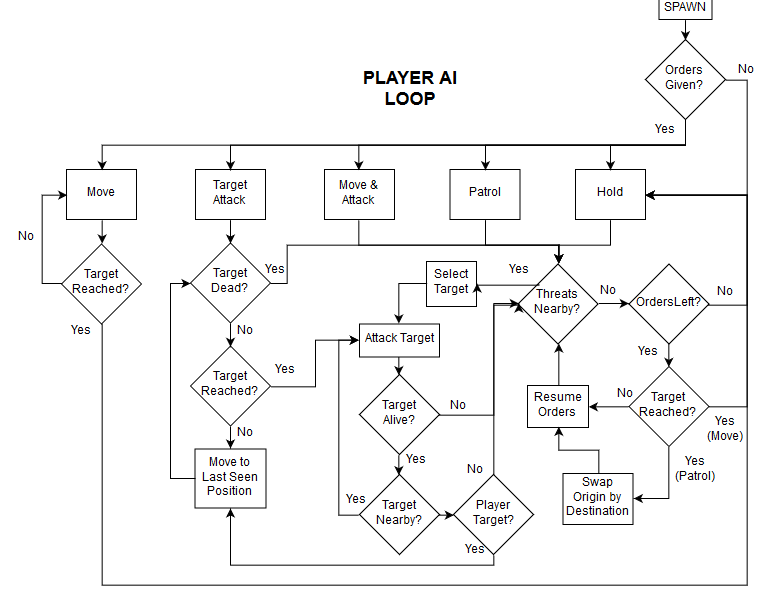
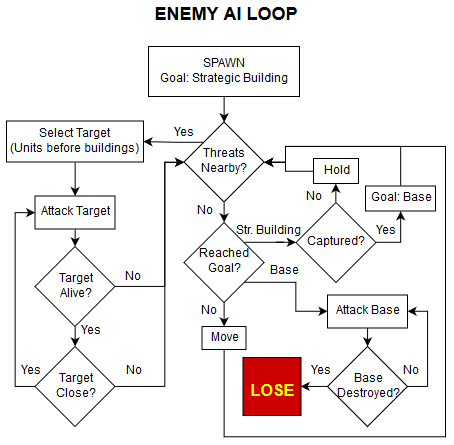
Most game elements follow very simple logic and conditions that can be handled with ease. Two of them however, enemy and friendly units, have a specific order workflow they follow: