Game Design Document - ChillChiliStudio/Order227 GitHub Wiki
Main Index
Introduction
This is a project started by Chill Chili Studio, a team formed by 7 students of the Degree in Video Games Design and Development at CITM-UPC. In this document, we will be gathering all the specific information involving the videogame Order 227: Not a Step Back and its design, trying to leave no questions unanswered.
Summary
Order 227: Not a Step Back is a Real Time Strategy game for PC with isometric perspective in which the player has the mission to defend its main base from the enemy hordes that want to destroy it. In order to do that, it can create and control troops and build defense constructions by using money provided by the main base. In addition, there are some strategic places that can be conquered in order to get bonuses in money gathering or other boosts/rewards.
Technical Sheet
- Name: Order 227: Not A Step Back
- Genre: Real Time Strategy
- Direct Game Objective: To survive 20 enemy hordes defending the main base.
- Background Game Objective: To make the player face different kind of threats one after the other, force him to manage his resources quickly, change strategies if the situation demands it, and think about present and future threats alike when planning or managing.
- Game Objective towards Player: While feeling slightly overwhelmed and burnout, to cleverly think on a strategy to endure it. Feel satisfaction if the strategy succeeds or challenged if it doesn’t.
- Developer: Chill Chili Studio
- Language: English
- Estimated Prototype Release Date: 21st April
- Estimated Alpha Release Date: 19th May
- Estimated Gold Release Date: 2nd June
- Estimated Production Starting Date: 10th March
- Platform: PC
- Similar Games or Sagas: Command & Conquer (specifically Red Alert 2), Age of Empires, Starcraft, Warcraft, Company of Heroes, Total War.
General Gameplay
The player controls an army and has the mission of keeping the main base undestroyed during 20 rounds of enemy hordes in which enemy troops will appear from 12 spawning points with the objective of destroying that base or whatever they found in the way.
The player’s army works by both platoons of 5 units and individual, but stronger units to which they give orders such as moving around the terrain, attack, hold… There are three types of military units, both allied and enemy ones: Infantry, Armored and Special. They can be created in the main base by using the money that the base constantly provides. With this money, the player can also build walls and turrets over the whole map using engineers.
There are also Strategic Buildings that can be conquered by moving troops there and waiting a determined time. They give money and a special reward. If the building has no player troops and an enemy troop moves there, after the same time of conquest the place will no longer be considered as conquered by player.
Our main objective is to make a dynamic game in which the player has to think the strategy to survive as long as it can, arriving at the end if possible. The hordes difficulty is progressive and the whole match should last between 15 and 30 minutes.
Game Pillars
- 1. Each base must focus on a single type of advantage Each Strategic Building give a unique reward so each one is important.
- 2. Enemies must be predictable, numerous and feel like wave/horde
Enemies will come as waves or hordes, leaving some rest time between them. Their actions must predictable by
the player, such as following a path repeated times, going to the closest controlled building, attacking a
player’s unit if it’s close... - 3. The player must be able to build anywhere he likes Since the player is able to build some defense constructions, he must be able to build anywhere he likes (inside a walkability parameter, it’s not possible to build on a cliff or outside the map, for instance).
- 4. High risk, high reward The player will have the freedom to take risks or follow a safer strategy, but facing big risks must be incentivized by equally big rewards.
- 5. The player must always dispose of different options to face the same problem There must not be a unique way to solve a problem or to get over an obstacle, the player must feel as if he has many options to do that.
- 6. Communism must be a satirical, exaggerated and important mechanic of the game Since the project is based on a game that arises anti-communist propaganda and it also gives a basis to do that (militarism, cold war times…) but it has a big communist presence, our game, in part as a counter-wight tribute, in part as for the satiric, will make have communism a satirical and important mechanic presence and, in a certain level, will arise it.
Game Universe
The in-game universe is placed during a different future in the planet Earth in mid 80s where the cold war became an active conflict, with more technologically advanced equipment and extremist ideologies.
Story & Narrative Structure
Context
The Supreme Soviet has recently approved a motion to defend and stand along the people of a territory which emancipated themselves from the oppression of a tyrant dictatorship governed by The King and supported by the United States of America and its allies, in an action of popular empowerment and civil disobedience to stand along and defend the human and civil rights of the people. This action was seen, by the dictatorship, as an unacceptable action that interferes in his state’s sovereignty and territorial control, for that reason it has ordered the total suppression of the emancipated people turning them into rebels and seditious and setting up fake trials to imprison and oppress people in mass.
As the Supreme Soviet, in its defense of the people and its rights, couldn’t accept the reaction of the dictator The King, it decided to move the Red Army of Workers and Peasants towards that territory to support the people there. The United States of America saw this as a violation and as an interference in a internal conflict of an external country so, in behalf of their interests, with the excuse of ensuring a supposed non-existent neutrality and to support its ally The King, they decided to support an attack to the main Soviet Operations Headquarters in the area to reject them and take them away from that territory to let The King “solve” his conflict.
Another indirect conflict of the Cold War has begun, in which the capitalist carnivorous interests of the United States of America and its allies will face the popular will. The Soviets must stand and hold their base at all cost! Defend the popular empowerment! Defend the people! Defend the rights!
Conclusion
If during the game the main base is destroyed, the United States of America, the capitalism and The King will have won and the people’s emancipation is oppressed as well as the people itself (massive assassinations, public executions and humiliations…).
Otherwise, if the player gets to kill all enemies in the horde number 20, the people of that territory will have achieved its goals to defend the human and civil rights and the attainment of their emancipation. The fight will be over successfully.
Analysis
In a analytic view of the narrative of the game, it is clear that the player’s objective and story’s finality, is to make the communism victorious and to make its more pure ideas prevail, being a kind of elliptical antagonist the cruelties of the neoliberal system and its oppressions. The elliptical protagonist in this case are the pure ideas that make the people’s will and its rights prevail. In this world, the capitalism and the occidental countries that adopted this system are seen as the representation of the story’s antagonist, and the communists countries which adopted a status more closer to people and its power, in a more pure and idealistic way (in the significance sense of the words), in the root of the idea and also in a utopic sense, are presented as the representation of the story’s “protagonist” and so, the entity with which the player should build a certain emotional bond (or feel linked with it and its representations). Also, in the very background, to make the player see in the end that what the occidental and neoliberalist system in the last decades sold us as “good” was not in fact that good and what was sold us as “bad” was not in fact that bad, simply both systems were counterpositions and balances that worked well in some aspects and bad in other aspects, but criminalized or idealized thanks to publicity, and that now that one of them has “won”, we are closer to a system crysis.
In this case, our objective towards game’s narrative is to turn around the typical works that criminalized communism and idealized capitalism as the “civilization” and show them in the contrary way. Of course, the satirical and exaggeration components of the game will cool and sweeten all this puristic concepts and will make the game feel better as a game with a high ludic component, which is actually another of the objectives since we don’t want the player to get bored or intellectually challenged in a political way. Also, it’s done in order to avoid some possible ideological criticism and to highly keep the ludic sense of the game.
Structure & Presentation to the Player
The narrative of this game is divided into three parts: the presentation of the conflict (context section), the overcoming (or not) of the conflict (in-game), and the conclusion and results of the conflict (conclusion section).
The second part totally depends on the player’s acts, so is self-explanatory, meaning that it explains as the player plays and from its own actions, since the it’s the own player who has to build it (so no need of direct presentation since it depends of the player). The first and third parts must be presented to the player. In a first approach and early version of the game, these will be presented through a text (maybe an animation or a drawing too) before and after each match respectively. In a later version of the game and in a more evolved approach of it, these parts will be presented through a cinematic in the same moments and the text will be deleted. What to show at each “story screen” is stated above in the context and conclusion sections. In these representation we can include some satirical element or wink (like a sentence or an animation) that shows that actually communism was not that good as we were presenting it (something related to gulags or siberia walks like).
Scenery & Terrain
The scenery will be mainly plain to avoid walkable areas in altitude. The only acceptable altitude areas will be full unwalkable to mark non-walkable parts of the map, so the altitude in the game will be faked or simulated and only for visual purposes (a unit cannot “go up over a ramp”). The map size will be considered following the Tiled program parameters. We will have a 350x350 tiles terrain with tiles of 60x30 pixels.
The map will be always the same and its disposition too. The next is a visual representation of the map layout, where the blue dots are Strategic Buildings, the green one is the main base, the black lines are the map limits and the red marks the 12 enemy spawning points.
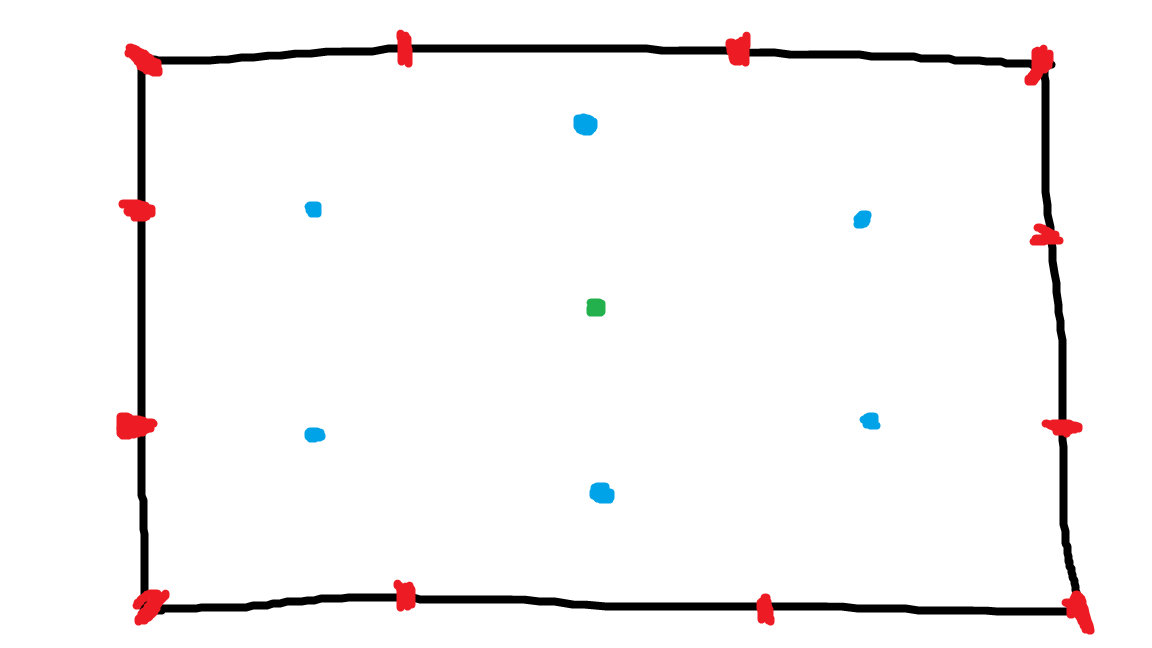
The map is seen in a isometric perspective (2.5D).
Fog of War
An important key of the game is the fog of war that will be all over the whole map. It will be semi-transparent, meaning that the terrain and buildings will be seen but not the enemy troops incoming. The next image is a visual example, the clear part of the image is an area where the player, if moves the camera over there, will be able to see everything that is placed in that area, and the darkest part is the part in which the player can only see the terrain and buildings but not the enemy units.
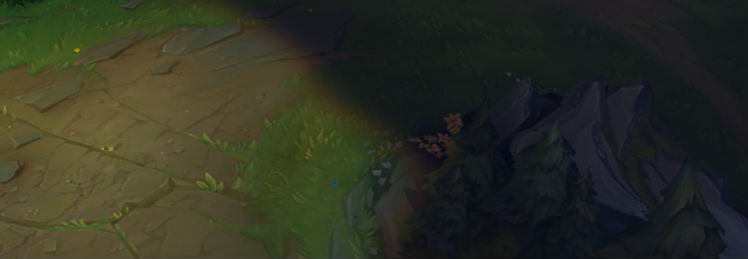
Anyway, the active spawning points (see Hordes Mechanic) will be marked in the minimap.
If the player controls a Strategic Building, this one has an area of vision that will clear the fog of war, as well as defense buildings or its troops. The area that clear each entity will be variable according to the characteristics of each one (detailed in its correspondent GDD sections). In case that there’s no elements with the capacity of clearing the fog of war in a given area, that area will be covered with fog of war (so if there’s a unit in a point P with nothing near that clears the fog of war and this unit moves far enough so the P is outside the unit’s range of vision, the point P will be covered by the fog of war again).
Minimap
The minimap will be a representation of the game map in a little area of the UI. It must show the main base, the Strategic Buildings (and if they are controlled or not), defensive buildings, the fog of war status and the current active enemies spawning points (should be shown when the previous round it’s finished, before starting the next one and until it’s cleared).
Also should shown the enemy troops inside the areas with no fog of war and the allied troops.
Buildings
During the match, in the game map, there will be two types of buildings:
- Static: Buildings that are already placed on the map. Except the base, they can be conquered by player and enemy can “unconquer” them in that case (never control them). They are not attackable neither destructible (so they have no life).
- Dynamic: Buildings that the player can place all over the map with the Engineers troop. They have defense purposes and are destructible so they have a certain amount of life.
There might be decorative buildings. If it’s the case, they must not be attackable neither destructible (so they have no life) and they are neither functional, they will just be visual buildings (just affecting the walkability area, as the trees, for instance). They don’t need any further specification, the sprites used will be defined in the Art Bible.
Static Buildings
The most important static building will be the main base. It will be a troop creator, meaning that all troops to be created will appear from here. It recovers its life at 200 life/minute or 3/second. Buildings that produce money income give the money in timespaces of 2 seconds. There will be 6 other static buildings which give different bonuses, they are:
- Tank Factory - Unlocks the creation of Armored Units & Bazooka infantry. It gives 5$ each 2 seconds.
- Radar - Eliminates all the Fog of War and gives 5$ each 2 seconds.
- Goldyard - Gives 15$ each 2 seconds.
- High Performance Training Center (HPTC) - Gives more velocity and resistance to all player’s units. It gives 5$ each 2 seconds.
- People’s Heart - Communist statues surrounded by barricades. It has the inscription “Sing to our Motherland, Communism’s triumph lead us on!” - It Unlocks the communist bar, which will be filled by killing enemy units (not animal ones!). If filled, the atomic bomb will be unlocked and thrown from here. It gives 6$ each 2 seconds.
- Expropriated Production Center (EPC) - Gives the Defense Buildings and base extra life and reduces 4s the build time (6s in total now), the Strategic Points are harder for the enemies to conquest and easier for the player (increased/decreased time in 4s, so 6s and 14s to conquer/unconquer them). Gives 6$ each 2 seconds.
At each non-controlled building there will be 4 enemy troops from beginning: a basic infantry and a machine gun divisions, a sniper unit and a Melee Attack Dogs Division. If a building is captured by enemy, the 4 same units will appear there to stay (for information on these units, see the section of Player's and Enemies' Troops).
All buildings that shoot have an attack range of 20 tiles of radius. All buildings have a range of vision of 30 tiles of radius and the base on of 40.
Dynamic Buildings
There will be two types of dynamic buildings. Those can be placed anywhere on the map with an engineer troop. The only condition to build in a place is that the place where the building will be placed is walkable (not cliffs nor on top of other buildings or units, for example). The place will automatically become unwalkable until the building is destroyed. The two defensive buildings are:
- Turrets: Towers that shoot towards the enemy if it’s inside its shooting range of 10 tiles and provide a range of vision of 20 tiles (of radius, both). Inflicts a damage of 2 and shoots 2 bullets per second. Build cost is 300$ and last 10 seconds to build them. They have a life of 8.
- Walls: Rectangular-cubic buildings used to avoid units to pass. Walls will be automatically attacked if nothing else is on the range of the enemy units. They don’t attack, its building cost is 200$ and last 10 seconds to build them. They have a life of 12 and provide a range of vision of 10 tiles of radius.
Buildings Overview & Values
| NAME | Damage - Shoots/s | Life | Cost - Income/min | Information |
|---|---|---|---|---|
| Base | 3 - 3 | 1000 | 0$ - 600$ | Troops Creator |
| Tank Factory | 1 - 1 | - | 0$ - 150$ | Unlocks Tanks & Bazookas |
| Radar | - | - | 0$ - 150$ | Clears ALL Fog of War |
| Goldyard | - | - | 0$ - 450$ | Triple Income Building |
| HTPC | - | - | 0$ - 150$ | x1.5 vel & +2 life to all player units |
| People's Heart | 1 - 1 | - | 0$ - 180$ | Unlocks Communist Bar (Filling it allows to throw Atomic Bomb) |
| EPC | - | - | 0$ - 180$ | +5 Life for walls & turrets (decreases build in -4s) & +400 life for base. Increases/Decreases Conquer/Unconquer time in +4s |
| Turret | 2 - 2 | 8 | 300$ - 0$ | - |
| Wall | - | 12 | 200$ - 0$ | - |
Troops
Player Troops
The player will count with the next troops able to be created in the main base. Some of them must be unlocked by controlling a certain Strategic Building or as a reward, so here the initial status of the troop will be shown:
-
Basic Infantry Division - Unlocked
-
Engineer Division - Unlocked
-
Machine Gun Infantry Division - Unlocked
-
Sniper Unit (unique infantry division with one unit) - Unlocked
-
Bazooka Infantry Division - Locked
-
Light Tank Armored Unit - Locked
-
Heavy Tank Armored Unit - Locked
-
Juggernaut Desolator Unit (Special troop) - Locked
-
Atomic Bomb - Locked
As seen, there are three types of military units, both allied and enemy ones: Infantry, Armored and Special. Special ones appear in a determined moment under determined circumstances. Also, is important to state that each division is formed by five indivisible units, meaning that the Machine Gun Infantry Division is formed by 5 soldiers with Machine Guns, the Bazooka Infantry Division by 5 soldiers with bazookas… And they will be moved together as one whole unit. Instead, the Units are formed by only 1 unit of its respective class. Each time a Division losses a fifth of its life, a unit forming the division dies and so, the damage that the division inflicts is a fifth lower (only happens with Divisions, not with Units).
Each troop has also a vision range in which, in its inside, clears the fog of war (if any). Also, an attack range in which, in its inside, will reach an enemy troop with its attack. If a troop has a damage range, it means that its attack inflicts its damage in the determined range. The next is a list (units are the radius, in tiles, of the range) of the different ranges of the different troops:
- Range of vision for infantry troops: 12 tiles
- For Snipers: 24 tiles
- Range of attack for infantry troops: 6 tiles
- For Snipers: 12 tiles
- Bazooka Range of Damage: 1 tiles
- Range of vision for armored troops: 18 tiles
- Range of attack for armored troops: 9 tiles
- Range of damage for armored troops: 2 tiles
- Range of vision for Juggernaut: 18 tiles
- Range of attack: 9 tiles
- Atomic Bomb range of attack: Whole map
- Range of damage: 30 tiles
Enemy Troops
In addition to the player’s troops (except bazookas), the enemy troops have 3 more units that can appear. These are the next:
- Melee Attack Dogs Division
- Melee Attack Spider Division
- Suicidal Cow Unit
All these animal units have the same range of vision than an infantry troop and an attack range of 1 tile of radius (except cows, which have an attack range of 2 tiles and a damage range of 1 tile of radius).
Troops Overview & Values
| NAME | Damage - Shoots/s | Life | Speed (tiles/s)* | Cost for player | Production Time (Soviets) | Information | Faction | Thread Value |
|---|---|---|---|---|---|---|---|---|
| Basic Infantry | 1 - 2 | 5 | 1 | 150$ | 5s | - | Both | 1 |
| Engineer | - | 5 | 1 | 150$ | 5s | Repairs & Builds | Soviet | - |
| Machine Gun | 1 - 4 | 5 | 1 | 300$ | 7s | Extra Cadence | Both | 2 |
| Sniper | 5 - 0.5 | 5 | 1 | 500$ | 8s | Damage to Tanks: 1 | Both | 5 |
| Bazooka | 2 - 0.5 | 6 | 1 | 500$ | 8s | Damage to Tanks: 5 | Both | 5 |
| Light Tank | 3 - 2 | 8 | 4 | 1000$ | 10s | Damage from infantry: 1 | Both | 6 |
| Heavy Tank | 8 - 1 | 12 | 3 | 2000$ | 13s | Damage from infantry: 1 Building Damage: 5 | Both | 8 |
| Juggernaut | 4 - 4 | 20 | 0.5 | 0$ | 20s (apparition) | Heavy guy with machine gun | Soviet | - |
| Atomic Bomb | - | 0 | 10s of launch time | 0$ - Full Communist Bar | 10s of throwing time | 20 damage in an area of 30 tiles | Soviet | - |
| Attack Dogs | 1 - 1 | 2 | 2 | - | - | Immovilizes unit 2s | Allied | 1 |
| Spider | 2 - 2 | 5 | 2 | - | - | Immovilizes unit 5s | Allied | 2 |
| Suicidal Cows | 10 | 2 | 1 | - | - | If attacked or attacks, explodes inflicting damage to whatever it’s in its exploding range | Allied | 5 |
Note: Each troop has a thread value (only for the enemy) necessary for spawning. See Hordes Mechanic section for further information.
Gameplay & Mechanics
Game Flow
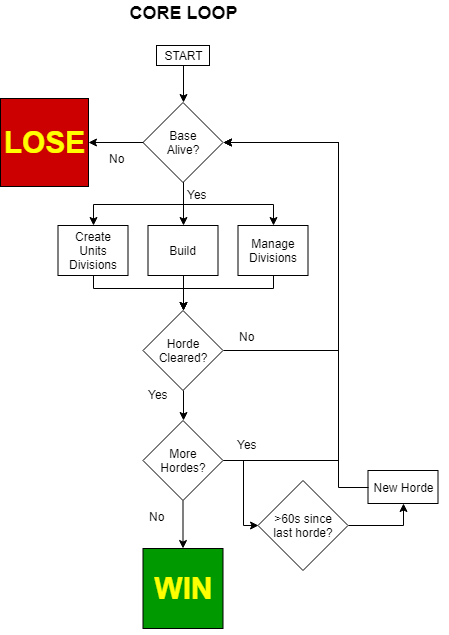
The next is an image that shows the representation of the core game loop or game flow.
The player’s main goal is to protect the central base from the oncoming, if it’s destroyed the player loses. Capturing the Strategic Buildings around it will allow to unlock bonuses, new troops, create an advanced defense point, and overall give an advantage to the player. To accomplish these goals, the player can build fortifications, create units, and manage them.
Each horde will increase in difficulty the longer the player progresses, up to the 20th horde. After killing the last enemy of a horde, the player has a minute to prepare for the next round, which will have indicators to give information about the characteristics of the new horde.
Please note that the values such as time between hordes or Strategic Building conquer time can change or be modified by certain given factors.
Player Control
The player will be able to move around the camera by moving the mouse cursor to the screen limits (respecting the directions, if the cursor is in the upper limit, the camera will move up, if it’s in the left limit, the camera will move left and so on) or by using the WASD keyboard keys.
Also, it will be able to select a troop by clicking over the area that is occupying or selecting several with the left button of the mouse and dragging. This action will form a virtual square of selection, in which all troops within that square (being the whole troop’s area inside it or just partially) will be selected. In this section, the User Interface plays a very important role since the player must know at all time which elements has selected or what it can do with them. When selecting a group of troops, in the UI bar in the bottom, the number and types of troops will at the right of the minimap (deeply explained in the In-Game Interface of UI Document), aside with the orders available to give. This enters in conflict in case of selecting any unit along with an engineers troop (since all troops have the same orders except engineers). In this case, the orders available will be the ones of non-engineers troops and when any order is given, the engineers will switch its current order into a Hold one. If more than a troop of engineers is selected, the orders available will be the ones of the engineers, but only the first troop of engineers that was selected will accomplish the given order and the other part of the group will switch its current order into the Hold one (except Move and Hold orders, which are accomplished by the whole group in both cases since they are orders for all units).
Is important to state that, when a troop (or various) is selected, the life of it will be shown as a bar at the bottom of the troop’s icon (which is over the troop itself, for further information, see the UI Document).
Finally, the player will be able to build defense buildings by selecting an engineers troop, moment in which, in the UI bar, at the left of the minimap, the icons will change to the buildings available to construct. By clicking on one, the player must click somewhere in the map, then the building will be enqueued and will start the production when the engineer reaches the point selected to build. If more than a building is selected, they are enqueued. In the case that no engineer is selected, the squares at the left of the minimap will always show the troops that the player can build in the base (must be differentiable the ones unlocked and the ones locked, of course).
When building or creating troops, the money is subtracted each time that some element is enqueued, but if for some case, that element is dequeued (for instance, an engineer division dies while building or when it has elements in its queue), the money of the dequeued elements is returned to the player.
Tutorial
We will include a very basic tutorial. This will be a screen for the player learn fastly how to play and how the game works. In this screen, it must be explained how the money works, what the UI Panel in the bottom does and what it communicates, how to give orders and how the Strategic Buildings Mechanic work.
Troops Creation & Control
All troops can be created, if they are unlocked and player has enough money, in the main base. Once the base is clicked, the player will see in the bottom UI bar which divisions can be created and clicking on one unlocked will start the production (if enough money), which finishes in a determined amount of time. If the more than one is selected, a queue will be builded in the order of selection. If an enqueued element’s icon is right clicked with the button, one of these element is dequeued and money returned.
In case that a unit which is unlocked is selected for production and, in the middle of it, the unit is suddenly locked (for example, because the Tank Factory is no longer under player’s control), the production will be finished and the unit created (and all the troops that the player has of that class will be keeped until they are destroyed). If there was any enqueued, all the units in the queue that are now locked, are dequeued and never produced. Once created, the troop will come out from the main base.
If a unit is on the map, the player will be allowed to select the division by clicking on it and give orders. The orders available are:
- Move - The unit, if selected, will move if the right button of the mouse is clicked. The destination will be the position of the mouse in the moment of giving the order. If, while moving, the order is given again, the destination is updated. Also, if the unit is moving and is attacked or an enemy comes up in the attack range, the unit will keep moving unless the Attack or the Move & Attack order is given.
- Attack - If the order of move is given over an enemy, the selected unit will move until having the enemy in range and then, will attack until the enemy troop is dead or outside its vision range.
- Hold - (Seen in the UI panel) Cancel any previous orders and keep a defense position (which will make the unit not to move under any circumstance and attack if an enemy enters in the attack range and until the enemy gets out of it). This order can only be given through the UI panel by selecting it.
- Move & Attack - (Seen in the UI panel) The move order but attacks if it finds an enemy troop in its way that enters in its range of vision and until the enemy troop is dead or outside its vision range. This order can be also given with mouse as the move order but while pressing the F key.
- Patrol - (Seen in the UI panel) Move & Attack order moving between the troop's current position to the selected one constantly until order is changed. This order can be also given with mouse as the Move order but while pressing G.
The engineers will be the only troop with different orders, they won’t have the orders involving attacks (Attack, Move & Attack and Patrol), will only keep the Move and Hold orders (without attack) and two extra ones:
- Build - (Seen in the UI panel) Build a selected Defense Building (in UI pannel of engineer) in a spot selected with right click (they will Move towards it before startig the construction). The unit won’t disappear when finishing the building process.
- Repair - (Seen in the UI panel) Selecting this order in the Engineer's UI Pannel will allow to select a unit or building with right click. Engineers wWill move towards the selected unit or building and repair it at a speed of 0.5 of life/second (only for Armored units, Defense Buildings and main base, which will recover faster its life, increasing the speed to 250 of life/minute or 4/second).
If an engineer is given an order, this one will be performed with no distractions until finished, changed or diying. If a unit which is not an engineer is selected along an engineer and an order not available for engineers is given to the selected troops, the engineer order will switch to Hold. In the same case, the orders for engineers can’t be seen in the UI panel.
Note: If in the list, for an order there is no the "(Seen in the UI panel)" specification, means that the order doesn't shows up in the UI and therefore, the order is given with the mouse.
See here a player troop AI Loop Scheme:

Atomic Bomb & Communist Bar
The communist bar is a mechanic unlocked by a Strategic Building (People’s Heart). Is a 100 units bar that it’s filled in 1 for each enemy killed (animal enemies does not sum anything!). When the bar is filled, an atomic bomb, from the People’s Heart building can be thrown towards any point of the map by selecting the building and a point (with right click) to throw the bomb. It will last 10 seconds to throw it and another 10 seconds to reach the objective marked.
It inflicts 20 points of damage in an area of 30 tiles from the exploding point to each unit (both allied and enemy) or building. If it hits a decorative entity (such as a tree or a building), this one will disappear and the walkability map will be modifyied.
Enemy Behaviour
The behaviour of all enemies will be the same: when appearing, they will move towards the closest Strategic Building controlled by player while attacking any player troop or defensive building in the way. Once arrived to its objective, if there’s not player troops it will wait until the conquer time finishes. Then, it will go directly to the main base.
If in the quarter of the map they are, there are no Strategic Buildings controlled by the player, the troop will directly go towards the base.
Enemy troop AI Loop Scheme:

Hordes Mechanic
There’s a total of 12 spawn points from which enemies might appear. Each round has an arbitrary number of spawns, picked at random, where enemies will come from (let’s call them “Active Spawn Points”), the others will be inactive, meaning that no enemies are coming from there at that round.
Each spawn point will have a “threat threshold” that has to be filled by randomly selected enemies, each with its own threat level that adds onto the spawn thread pool until the threshold is reached, that way we can manage the game flow and difficulty spikes.
Round Parameters:
- Round 1: - 1 Active Spawn Point with threat threshold 10
- Rounds 2 - 3: 2 Active Spawn Points, 20 threat threshold for each
- Rounds 4 - 6: 3 Active Spawn Points, 40 threat threshold for each
- Rounds 7 - 9: 4 Active Spawn Points, 60 threat threshold for each
- Rounds 10 - 11: 6 Active Spawn Points, 90 threat threshold for each
- Rounds 12 - 15: 8 Active Spawn Points, 120 threat threshold for each
- Rounds 16 - 19: 10 Active Spawn Points, 160 threat threshold for each
- Round 20: 12 Active Spawn Points, 200 threat threshold for each
Between hordes, there will be 1 minute for the player to rest that can be skipped with R key. The game will be saved after each round, the player will be able to load whenever he wants in the pause screen, but he won't save whenever he wants.
Special Hordes
Once round 6 is active, 2 numbers between 7 and 19 (both included) will be picked. Those numbers will be special hordes, which means that they will have a time limit imposed. If the player clears the horde inside that time limit, it will be rewarded with a Juggernaut Special Unit, active until it gets killed (or until the end of the match).
The time limit is calculated by picking the horde’s thread number and summing, to that number, its half. The resulting number will be the seconds of the time limit, so, for example, if round 12 is picked as a special round, its thread level will be picked (120), will get summed its half (60), so the time that the player has to clear that horde in order to get the Juggernaut unit is 120+60 = 180 seconds. If the time limit is not accomplished, nothing happens, the game keeps flowing.
Building Mechanic
In the same way than the troops, the constructable buildings will be seen when clicking on an engineer troop and the player will have to select the construction site all over the map. by clicking in the place he wants to build (inside walkability parameters). The selected engineer will move there (into a tile before to remain in a walkable area after construction) and build it in a determined time. Once done, the space that occupies the building will not longer be walkable until the building is destroyed. As well as troops, buildings have a construction time and engineers can only build one building at a time (but the queue for this engineer’s order is also permitted as well with the units created in a base).
Win & Lose Conditions
The player wins if the last enemy of the horde 20 dies. Otherwise, loses if its main base is destroyed (which happens if the main base life gets to 0).
Controls Overview
| KEY | FUNCTION |
|---|---|
| W | Move Camera Up |
| A | Move Camera Left |
| S | Move Camera Down |
| D | Move Camera Right |
| Left Mouse Button (LMB) | Select (Buildings, units, UI Button...) or enqueue troops/building at the creation queue (if the correspondent icon in the base is clicked with LMB) |
| LMB + Drag | Select units in area |
| Right Mouse Button (RMB) | Give Move order (with a troop selected) or dequeue troops/building from the creation queue (if the correspondent icon in the base is clicked with RMB). If an order was selected, the objective of it is given with RMB |
| RMB + F | Give Move & Attack order (with a troop selected) |
| RMB + G | Give Patrol order (with a troop selected) |
| ESC | Pause |
| R | Skip hordes’ in-between time |
| T | Center camera in main base |
| CTRL + 1 | Save Group of units to key 1 |
| CTRL + 2 | Save Group of units to key 2 |
| CTRL + 3 | Save Group of units to key 3 |
| CTRL + 4 | Save Group of units to key 4 |
| CTRL + F1 | Save camera location to key F1 |
| CTRL + F2 | Save camera location to key F2 |
| CTRL + F3 | Save camera location to key F3 |
| CTRL + F4 | Save camera location to key F4 |
| 1 | Select group of units 1 |
| 2 | Select group of units 2 |
| 3 | Select group of units 3 |
| 4 | Select group of units 4 |
| F1 | Move to camera location 1 |
| F2 | Move to camera location 2 |
| F3 | Move to camera location 3 |
| F4 | Move to camera location 4 |
Ideas for Future Versions
Here we will place a list of ideas to implement in future versions. These ideas has been given at some point of the development process but considered, for some reason, non appropriate or timely for Gold version (v1.0), but ideas worth to implement according to game pillars and style.
- Terrain with walkable areas in altitude.
- Bosses
- Upgrades buying
- Divisions coupling if they both sum the whole life of a division
- Choose where to place main base
- More Buildings
- Special Characters
- Secondary Optional Objectives/Missions
- Aerial Troops
- Controls Changeable
- Advanced Tutorial