How to add Bluetooth - CatGenius/catgenius GitHub Wiki
Introduction
My cats love chewing on USB cables, serial cables, power cables... basically any kind of cable. If your cats are anything like mine, you'll want a wireless serial connection to your CatGenius. This page tells you how to do so for under USD $50.
Here is the end goal:
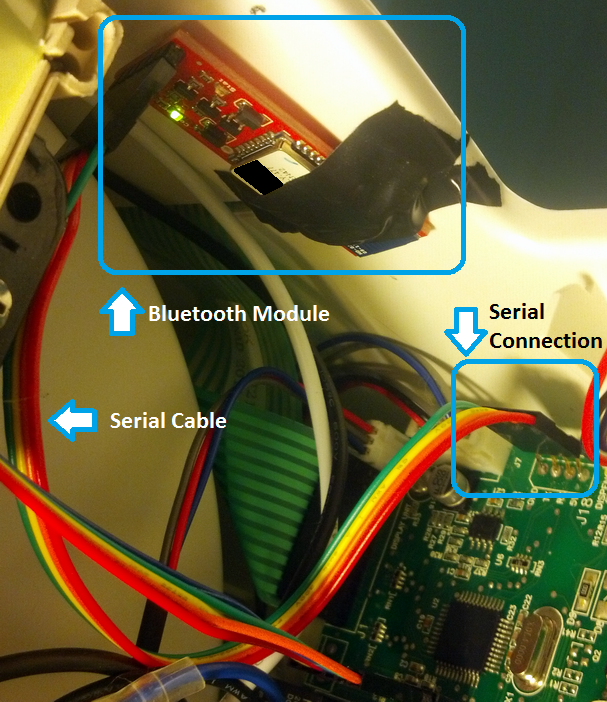
Why Bluetooth?
No wires, as stated above. Also, the goal here is to provide something that's inexpensive and easy to set up. "Plug-and-play", if you will.
An obvious alternative is WiFi, but at the time this page was written an affordable module that wouldn't require significant modifications and involved PCB/soldering work could not be found.
Another alternative is WiFi-based Serial and/or USB devices, but these are more expensive than the Bluetooth module usually and typically require special connectors, level shifters, etc.
Plus, you can connect to Bluetooth with almost anything. A laptop is convenient, but a smart phone is even more convenient. Android has a number of Bluetooth serial apps that work well. iOS does as well.
Preparation
Materials
- Bluetooth module
- At least one break-away male header
- Connector cable
- Soldering iron
- Solder
- Desoldering wick (Optional)
Procedure
- Review the page about adding a Serial Port. Do not follow the instructions, just take note of the information documented there
- Install a header on the Bluetooth module
- Install a serial header on CatGenie board
- Create the cable to connect them
- Connect the Bluetooth module to the CG board using the cable
- Mount the Bluetooth module to the inside of the CG shell using tape or some other mounting mechanism
Bluetooth module
We'll be using the Roving Networks Bluetooth Mate Silver for several reasons:
- It is affordable (USD $40)
- No other parts required other than a connector cable and headers
- No need for external power: It will run off the +5V CG serial connection just fine thanks to a built-in power regulator and a good range of voltage tolerance
- It supports a wide range of TTL signalling levels, avoiding the need for a level-shifter
- It can be re-used with almost any device if you'd like to reappropriate it later (Arduino, etc.)
- The module comes without a header. Solder one on like so:
https://raw.githubusercontent.com/CatGenius/catgenius/master/documentation/wiki/rn_bt_front.png
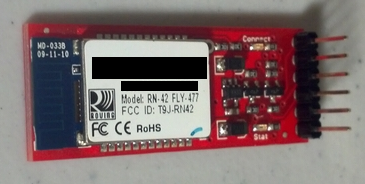
CatGenie Board Serial Header
The CG board comes without a serial header, so unless you've already done so, you'll need to solder one in now. It's a pretty tight fit in there.
The trick is to solder the needed header in place without having to remove the main board and without accidentally touching anything with the soldering iron. One way to do this is to pull 4 pins out of a header and solder one at a time while holding with a pair of pliers like in the image below. The board already has solder in place where the pins go, so if your careful you won't need to apply any extra:
Connector Cable
We'll need a connector/jumper cable to connect the Bluetooth module to the serial header on the CG board.
You can make your own cable using left-over PC ribbon cable or equivalent, or mod a pre-made one. For those of us sloppy with a soldering iron, the pre-made route is suggested. Purchase one 6-pin (Bluetooth module) and one 4-pin (CG board) cable in order to accommodate both ends - less than USD $1 each:
For convenience, use the 4-pin cable as-is on one side, and remove the pins from the other side. Remove the header from the 6-pin cable completely, and insert the removed pins from the 4-pin cable into it in the order shown below. There is more information about how to remove pins on the firmware programming page.
Here is the finished cable after modding. The 6-pin side is lined up the way it should be connected to the Bluetooth module:
This is how it should be connected to the CatGenie serial header. Note that the red wire connects to the 5V pin and green goes to GND:
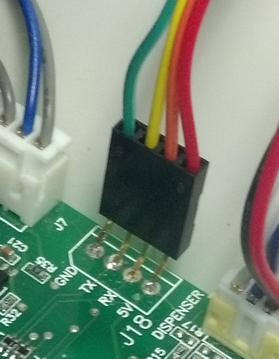
To save a whole USD $1 (you really are cheap!), you could just use a single 6-pin cable. If you choose to do so, the finished cable should look like below. Note that in this verison of the cable, the black wire should connect to the GND pin on both the Bluetooth module and the CG board and the green wire should connect to VCC/5V:
Connecting to Your CatGenius over Bluetooth
Preparing
Smart phones and tablets: There are many Bluetooth apps out there for just about every device. Search the app store to download something appropriate. Android: "Bluetooth SPP" is a free app without ads that appears to work well Desktops/laptops: if your computer does not include native Bluetooth support, buy one of the many USB dongles available and install it. Windows: There is some basic information here.
Connecting
Scan for Bluetooth devices. The Bluetooth Mate shows up as RN42-XXXX where XXXX is a unique identifier. Connect to it in SPP/Serial mode, then use any terminal app that supports serial connections to connect to it. The communication parameters are: 115200bps N-8-1 with no handshaking.
More details will be added later.
Configuring
Once you have a terminal program open and connected on the Bluetooth serial port, it needs to be configured. The Bluetooth module is only in command mode for 60 seconds after power-up, so do this quickly.
Setup your terminal for 115200bps N81, No handshaking. Perform the following session (What you type is in blue):
$$$ CMD S-,CatGenie AOK R,1 Reboot!
Wait about 5 seconds for reboot, then:
$$$ CMD SU,19.2,N AOK U,19.2,N AOK
Once you do that the baudrate is changed, so you will have to change your terminal settings to 19200bps. Also enable XON/XOFF flow control. But now your CatGenie should be online. Press Enter and you should get the CatGenius prompt:
#