Animations - Cairath/Oxygen-Not-Included-Modding GitHub Wiki
This chapter covers how to work with Oxygen Not Included's custom animation format.
- Tools You Will Need
- Klei Animation Files
- Kanim Format
- Converting Kanim to Spriter SCML
- Kanim Concepts in Spriter
- Converting Spriter SCML to Kanim
- Adding Animations to a Mod
-
Any of these softwares will be useful:
Do not use Microsoft Paint.
-
Used for creating the animations. The Free version of the software provides all of the features you will need.
Make sure to download the original Spriter, not Spriter 2. -
Used for converting between Spriter and Kanim file formats.
-
Kanim Explorer (Advanced)
Used for inspecting and editing the contents of the animation files.
Klei uses a proprietary file format to store data about their sprites and animations. Normally this data is contained in a set of three files that make up a kanim. These files all share a common prefix, such as "hqbase" which is the name of the kanim for the Printing Pod.
An example of a complete set of animation files:
-
hqbase_0.png
This is a sprite sheet containing all of the sprites used to make the Printing Pod. -
hqbase_build.bytes
This is the file that contains all of the sprite data for the Printing Pod. -
hqbase_anim.bytes
This is the file that contains all of the animations for the Printing Pod. (i.e. Keyframes)
The name for an animation does not always match the name you see in the game, so it will be very useful to extract all of the game's textures at once to allow visual searching through the graphics.
You can find the texture files for all of the animations in the <Extracted Assets>/Texture2D folder.
The build.bytes and anim.bytes files that go with the texture will be located in the <Extracted Assets>/TextAsset folder.
This section breaks down each of the files that make up a kanim using the Conveyor Loader as an example.
The file prefix for the Conveyor Loader is conveyorin.
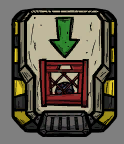
Here is the conveyorin_0.png texture from the game assets.
All of the graphics needed for the Conveyor Loader are stored in this texture.
To make sense of this texture, the game also needs to load a build.bytes file that matches the texture.
The build.bytes file contains an array of Symbols that organize all of the sprites into named groups.
Here are some of the symbols in the conveyorin_build.bytes file:
- body
- meter_frame
- opening
- place
- ui
Every Symbol has at least one sprite under it. Which is why all of the sprites will have a number suffix like _0.
These fully named sprites with a numeric index are called Frames (like a picture frame).
Here are the sprites that you get by cutting up the texture into the Frames defined in the conveyorin_build.bytes file:
| body_0 | opening_0 | place_0 | ui_0 |
|---|---|---|---|
 |
 |
 |
 |
Some of the Symbols in a build file will have multiple Frames like this:
| opening_0 | opening_1 | opening_2 |
|---|---|---|
Symbol: opening
|
Symbol: opening
|
Symbol: opening
|
| Index: 0 | Index: 1 | Index: 2 |
|
 |
 |
Generally a Symbol that has multiple Frames is used to group all of the sprites that will be swapped during an animation. So in the case of the Conveyor Loader, you can see the yellow light has an On (Index 1) and Off (Index 2) sprite under the symbol named opening. This will be important to remember for later when we look at how the animation data makes the sprite blink.
Each Symbol also has 4 flags that can be toggled to change how they behave in the game:
-
Bloom
Toggles whether the bloom shader is used to render the sprite. This makes it glow. -
OnLight
Toggles whether the symbol is used as a "on light" which is only shown when a building is on. -
SnapTo
Toggles whether the symbol is marked as a snapping point for other animations to snap to. -
Foreground
Toggles whether the symbol appears in a foreground layer so that it overlaps most other objects.
The final piece of the kanim puzzle is the file that tells the game where (and when) all of the sprites go.
The anim.bytes file contains an array of named animations called Banks.
Here are all of the Banks in the anim.bytes file:
- on
- off
- working_pre
- working_loop
- working_pst
- meter
- place
- ui
Every Bank has its own list of all of the Key Frames that make up an animation.
Each frame is shown for 33ms and the game does not tween the postions of sprites between these frames.
A Key Frame contains yet another array made up of Elements that describe which sprites are present in the frame and how they are positioned.
-
A duplicate build.bytes or anim.bytes file does not conflict with the existing game kanims.
You can take advantage of this fact to easily recolour sprites from the game.
Just copy the kanim files to your own mod folder and edit the texture file directly. - When you are editing original textures you must not draw past the imaginary "picture frame" around a sprite.
- Do not resize or move the contents of a texture when directly editing it.
-
Lots of kanims in the game assets do not have anim.bytes files.
This is because the texture and build.bytes file are the only assets Klei needed to draw the graphics.
(For something that is not animated) -
The game expects a complete set of files when loading kanims from mods.
Even if you do not need any animations, you still need an anim.bytes file in your mod's kanim folder. This is especially important when you are making edits to those animations from the game that do not have anim.bytes files.
It is not currently possible to open the kanim files in any animation software, so they must be converted to a file format that can.
Spriter is a 2D animation software that can be used to make animations like the ones seen in Oxygen Not Included. Currently this is the only animation software that has had a converter created for the kanim files. This section takes you though the steps necessary to convert the animation assets from the game into a Spriter .scml project file.
-
Open a command shell (cmd.exe or PowerShell on Windows) at the path where kanimal-cli.exe is located.
-
Run the following command:
kanimal-cli.exe scml --output <output_folder> <texture_file> <build_file> <anim_file>
<output_folder>: The folder where you want the Spriter files to be saved.
<texture_file>: The full path to the texture file. (You can drag and drop the file to paste the path)
<build_file>: The full path to the *_build.bytes file.
<anim_file>: The full path to the *_anim.bytes file.
For example, the full command to convert the Conveyor Loader files might look like this:
kanimal-cli.exe scml --output "C:\ONI-Mods\SpriterProjects\conveyorin" "C:\ONI-Assets\Texture2D\conveyorin_0.png" "C:\ONI-Assets\TextAsset\conveyorin_build.bytes" "C:\ONI-Assets\TextAsset\conveyorin_anim.bytes"
If all goes well the Spriter files should exist in the <output_folder> and be ready to open with Spriter.
This section is not a tutorial on how to use Spriter.
If you do not already understand the Spriter UI and concepts then take the chance now to play with the software or watch some tutorials on YouTube.
This section will explain all of the parallels between a spriter project and a kanim.
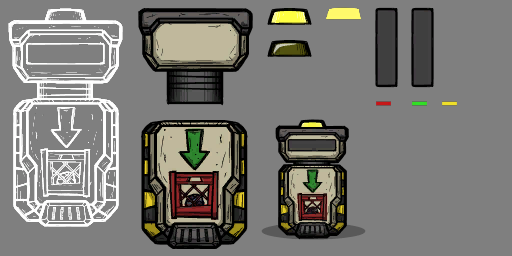
Continuing with the Conveyor Loader example above, this screenshot shows what the conveyorin kanim should look like once you have converted and loaded it in Spriter.
![]()
Spriter supports many features that are discarded when converting scml to kanim.
Bones will be thrown out, and positions of sprites will not look correct.
Kanim only uses keyframes, and the position of every sprite is defined each frame. If you leave gaps on the timeline, kanimal-se will be able to linearly interpolate between those keyframes. It will not preserve any sort of custom "curves" in the Spriter tweening options.
If you still need to use custom tweens, you will have to essentially destroy the tween once you are happy with the way it looks in Spriter. This can be done by inserting keyframes in all of the time steps between the two original keyframes. The tween will be "chopped up" into keyframes and can no longer be modified.
In Spriter, the parallel to the kanim Symbols is the window in the top right.
The list of files here will become the symbol names that are added to the build.bytes file.
Keep in mind that the _0 in image filenames is necessary. It is used to create a Frame for that specific image. So body_0.png means that a symbol called body will be added to the build file and the specific image called body_0.png will be stored as index 0 under body. If a body_1.png existed it would be added under body as index 1.
You can also edit the Pivot point for each of the sprites, which will be stored in the build file with the corresponding Frame.
The animation banks in the anim.bytes file are determined by the list of animations in the Animations window on the bottom right.
The project must be set up to have one Entity with all of the animations as children of that entity. The name of the entity does not need to match anything. (TBC)
The name of each animation directly matches the strings that Oxygen Not Included will use to play an animation.
ex: anim.Play("working_loop")
Every animation should be configured to the following timeline settings:
![]()
- Frames are 33ms long.
-
Enable Snapped is checked.
Non-snapped frames are meaningless, they'll be snapped to the beginning of the timestamp by kanimal-se. - Ruler Units set to Snapping Frames
This just makes it easier to work with the timeline.
From here the rest of the work to make the actual animation is Spriter as usual.
The positions of the sprites and data you put in the Object Properties window will become the Elements in the anim.bytes file.
Reminder: Do not use bones or non-linear tweens!
When you are ready to "export" your animations from Spriter back into the game you will have to use kanimal-cli again.
-
Open a command shell (cmd.exe or PowerShell on Windows) at the path where kanimal-cli.exe is located.
-
Run the following command:
kanimal-cli.exe kanim <scml_file> --output <output_folder> --interpolate
<scml_file>: The full path to the .scml file.
<output_folder>: The folder where you want the kanim files to be saved.
--interpolate: Tells kanimal-cli to fill in frames between sparsely placed keyframes in the Spriter timeline.
For example, the full command to convert the Conveyor Loader scml files from before might look like this:
kanimal-cli.exe kanim "C:\ONI-Mods\SpriterProjects\conveyorin\conveyorIn.scml" --output "C:\ONI-Mods\CustomAnims\conveyorin" --interpolate
If all goes well the kanim files should exist in the <output_folder> and be ready to include with your mod.
The mod loading system in Oxygen Not Included will automatically detect the asset files and add them to the game assets.
They just need to be put in the correct place in your mod folder.
Each of the animations you want to include with a mod must be put in their own folder like this:
<mod_folder>/anim/assets/myanim1/myanim1_0.png
<mod_folder>/anim/assets/myanim1/myanim1_build.bytes
<mod_folder>/anim/assets/myanim1/myanim1_anim.bytes

<mod_folder>/anim/assets/myanim2/myanim2_0.png
<mod_folder>/anim/assets/myanim2/myanim2_build.bytes
<mod_folder>/anim/assets/myanim2/myanim2_anim.bytes
/myanim1/: This folder name is imported by the game and creates a kanim asset named myanim1_kanim.
If there are any issues with the structure of the kanim the game will usually display the error in the logs. It may also crash when some code tries to use the kanim after it failed to load.