The Avatars of Colonial Discourse 2026 ‐ Workshop - C2DH/template_repo_JDH GitHub Wiki
| Activity | |
|---|---|
| 14:00 - 14:30 | Word of editorial manager |
| 14:30 - 15:45 |
Part 1: JDH template repository Part 2: One Notebook many homes - your setup |
| 15:45 - 16:00 | Coffee break ☕️ |
| 16:00 - 16:30 | Writing time Part 3: Writing Environments for JDH - Advantages and Limitations |
| 16:30 - 17:00 | Part 4: Notebook presentations and wrap up 🚀 |
- Introduction of each participant
- Presentation of the repository's structure - overview of the template article
and the technical pipeline
- Overview about how GitHub is used during all the process

A Jupyter Notebook is a file format where you can mix text written in Markdown and Python code by using cells.

To execute one selected cell you can use the shortcut cmd+shift or ctrl+shift or by clicking on the
Warning
For the code cell, you need sometimes to have executed previous cells before to be able to reach some variables.
You can execute all the cells, with the icon ⏩.
🔗 Link to the slides about Git/GitHub
To have Git on your machine, you can :
- install directly Git if you are familiar with command line interface (CLI) through a terminal
- install Github Desktop if your prefer to have a user interface (UI)
Some basics Git operations : Git workflow
| Step | Description | Git Command Line |
|---|---|---|
| 1 | Start the project |
git init or git clone <HTTPS url or SSH url>
|
| 2 | Work on your side | git checkout -b <branch name> |
| 3 | Write your chapter | write in your Jupyter notebook |
| 4 | Add your chapter to the envelope | git add <name of the file> |
| 5 | Give a name to the envelope | git commit -m "my commit message" |
| 6 | Send envelope to the editor | git push |
| 7 | Integrate it into your book | git merge <branch name> |
| 8 | Get update from the editor |
git fetch or/and git pull if you want to download the update |
What you need to do:
- First, you need to click ont he button
Use this templateand selectCreate a new repository.

- It will bring you to a page where you can configure your new repository. Choose the name, add a description and switch the visibility to private.

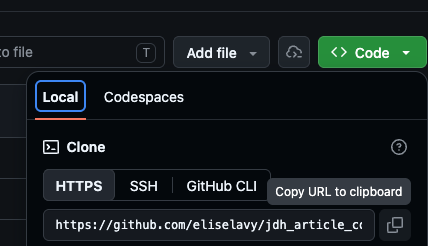
- Once you have your repository created based on our JDH template, you can clone it to your computer by using Git. Click on the
<> Codegreen button. If you do not have any SSH configure for GitHub, you can copy/paste the HTTPS link and add it togit clone <https link>in your terminal. Or you can use GitHub Desktop.

Do not hesitate, to familiarize yourself with the README file (written in Markdown). - You can even create your own markdown file in your new Github repository - A good resource to be familiar with the Markdown syntax
💡 Hint: Markdown is a simple formatting language. Use
#for headings,**text**for bold,*text*for italic, and-for bullet points. We can also create Tables in Markdown or add links (actually this whole tutorial is written in Markdown) 😉
You can launch a Binder environment using the button in the README.

💡 Hint: The Binder button lets you run code in the cloud without installing anything locally!
What you need to do: Choose your setup approach.
| Approach | Best For | Core value |
|---|---|---|
| Local installation | Hands-on/DIY | Control, but you own the setup and dependencies |
| Jupyter Stack with Docker | Reproducible/Containerized | Isolation, portability, a methodology that lasts |
| Google Colab | TurnKey | Convenience, support, Gemini, GPU, cloud |
| Positron | Analyst-first/Polyglot IDE | A native data-science IDE for Python and R users: variable and data explorer, plots, console and notebooks in one place, with environment management built in |
| JupyterHub | Teams/institutions with a shared, managed server | One managed server for many users: centralized setup, authentication and resources, so each person gets a ready-made environment without installing anything |
| Notebook.link | Authors, teachers and readers who want to run or share a notebook with nothing to install | Notebooks run entirely in the browser through JupyterLite and WebAssembly, with cloud-stored projects, permalinks to shareable notebooks, and no server or setup. |
💡 If at some point you are lost during the workshop, do not forget to ask for help 😃
⚠️ If you choose local installation then you have to install Python.
You can use different tools to install Python on your machine. Choose one of them:
- Python - the official website
- uv - a very fast installer (see the dedicated page on using it with Jupyter)
- Conda can help manage Python environments if you prefer a graphical user interface (UI).
Once you have installed Git on your computer (see above for links), you can directly git clone the repository into the directory of your choice.
You will have to write your article in article.ipynb.
There are several ways to write inside a .ipynb file:
- you can use an integrated development environment (IDE) like VS Code, PyCharm, etc.
- or you can use the Jupyter Notebook interface by launching it from the terminal:
- if you choose a Python installation, according to the official Jupyter documentation, just run
pip install notebookand thenjupyter notebookto launch it. - if you choose uv, run
uv run --with jupyter jupyter lab. - if you choose Conda, you also need to install JupyterLab with
conda install conda-forge::jupyterlab, or use the Anaconda Navigator app.
- if you choose a Python installation, according to the official Jupyter documentation, just run
- Install Docker Desktop
⚠️ If you choose the Docker installation, then Python is already integrated inside the container 😉
💡 Hint: You can also check our guidelines and follow the video tutorial :
-
You need then to clone the Jupyter stack. You can find the repository here. Follow the instruction described above to know how to clone it.
-
Then with the terminal goes to the directory where you cloned with
cd ~/path/to/your/directory. -
And then do a
docker compose upin the terminal, once you are in the right directory. It will launch the container. -
Launch the Docker Desktop app. You should have a list of containers running (or not). Normally the container
journal-of-digital-history-jupyter-stackshould be listed there.

- Launch the jupyterlab by clicking on the localhost port in the Docker Desktop app.

- In your browser, you should have a window opened which ask you for a token.

- To find the token, go back to Docker Desktop app, click on the 3 vertical dots
Show container actionsand then selectView details

- Then copy/paste the token to previous browser window (see on following screenshot where you can find the token.)

- And normally, then you should see the jupyter notebook in the Jupyter Lab interface :)

-
Create your own repository based on the JDH's template (see above in the Git section).
-
Go on Google Colab.
-
Link your account with your GitHub account.
-
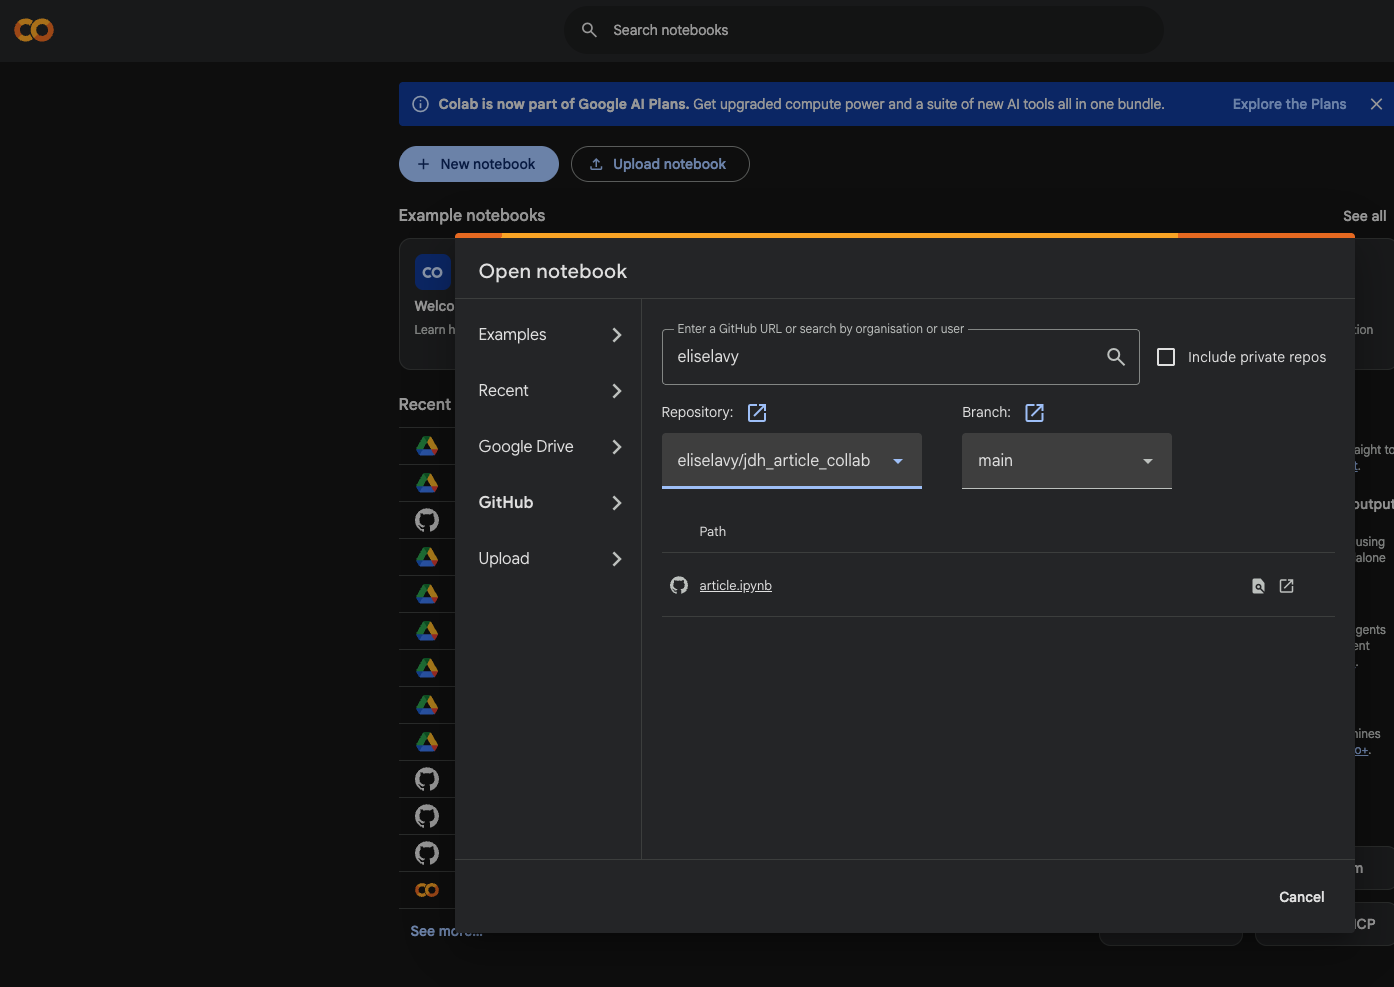
Click on Upload notebook, select GitHub and select your repository.
-
Select the
article.ipynbto open it. -
Edit it.
Warning
Colab opens only the .ipynb file from a GitHub repository, not the full repository. Therefore the media folder is not available in the runtime and assets must be loaded through their absolute raw.githubusercontent.com URL. Please have a look on this example from the JDH guidelines.
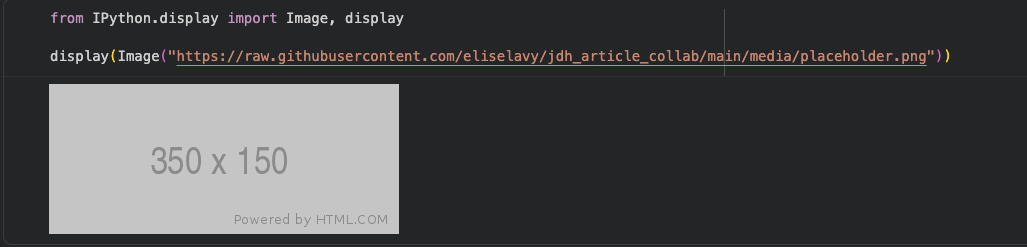 On Drive, mounting it (
drive.mount('/content/drive')) would work, but it asks each reader to authorize access to their own Google Drive, and the assets would have to be copied there first, which breaks the idea of a self-contained article.
-
Resynchronize with GitHub.

- Download and install Positron
- From file, New folder from Git
- Click on start Session
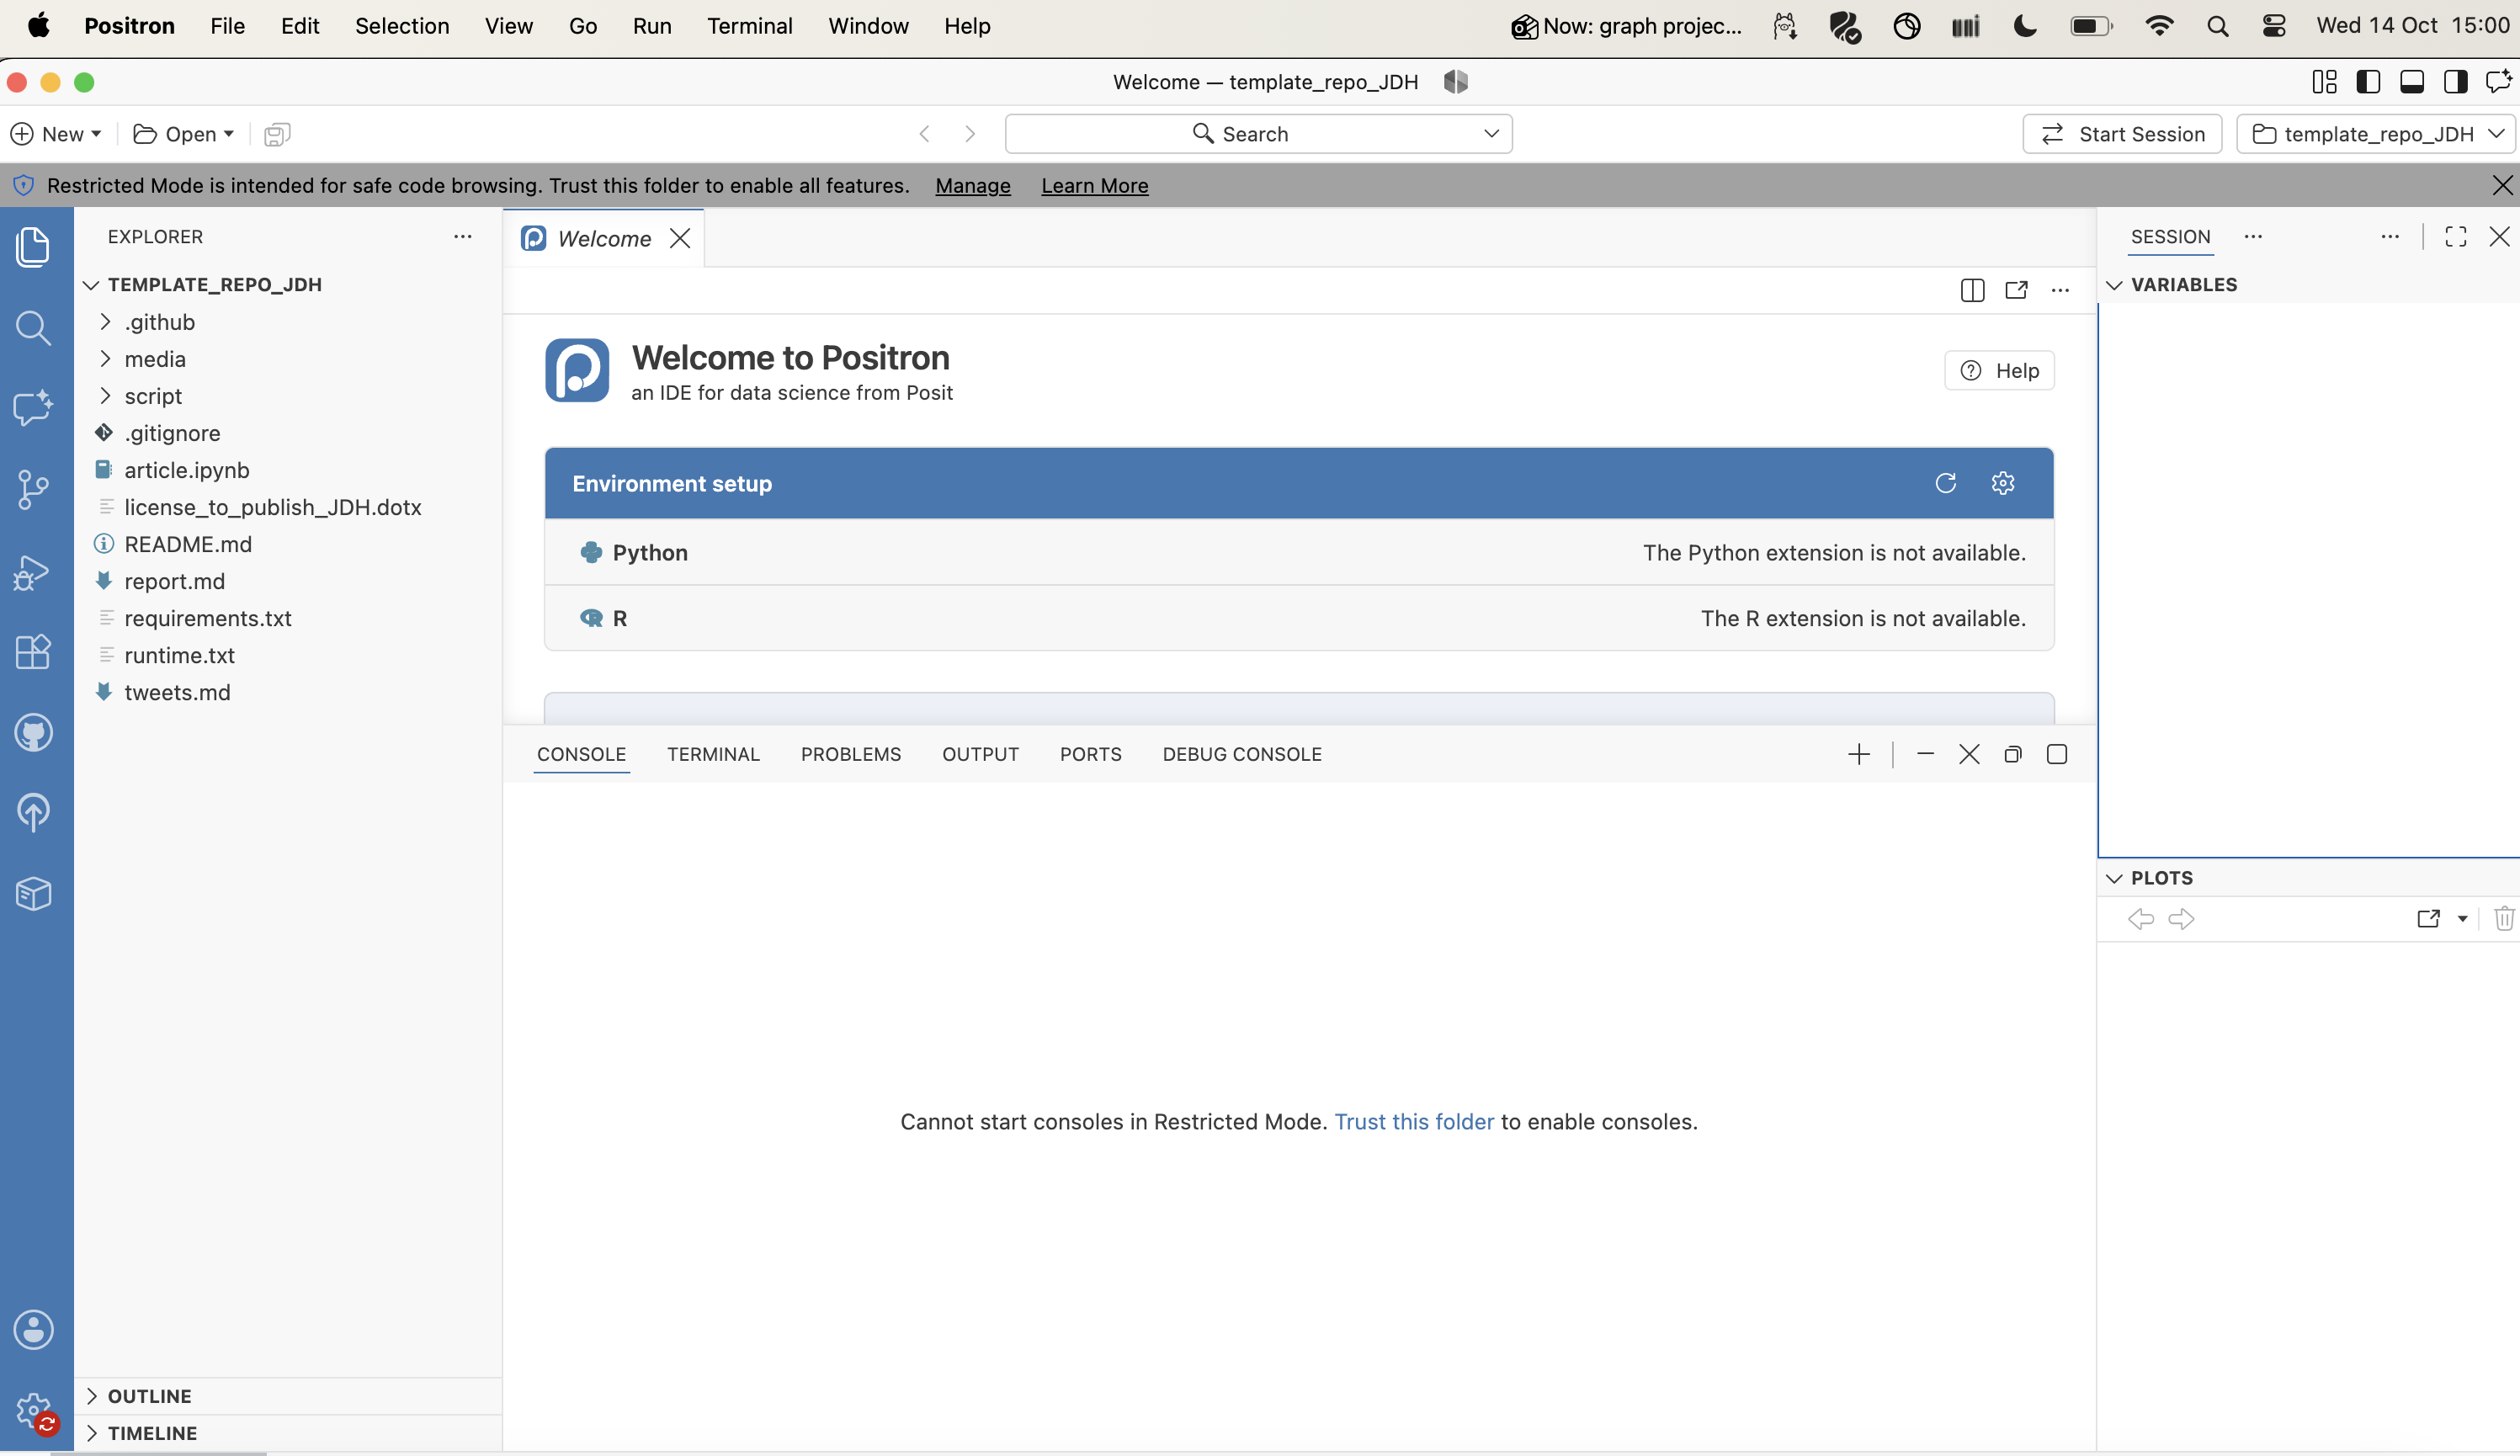
- Trust the repository
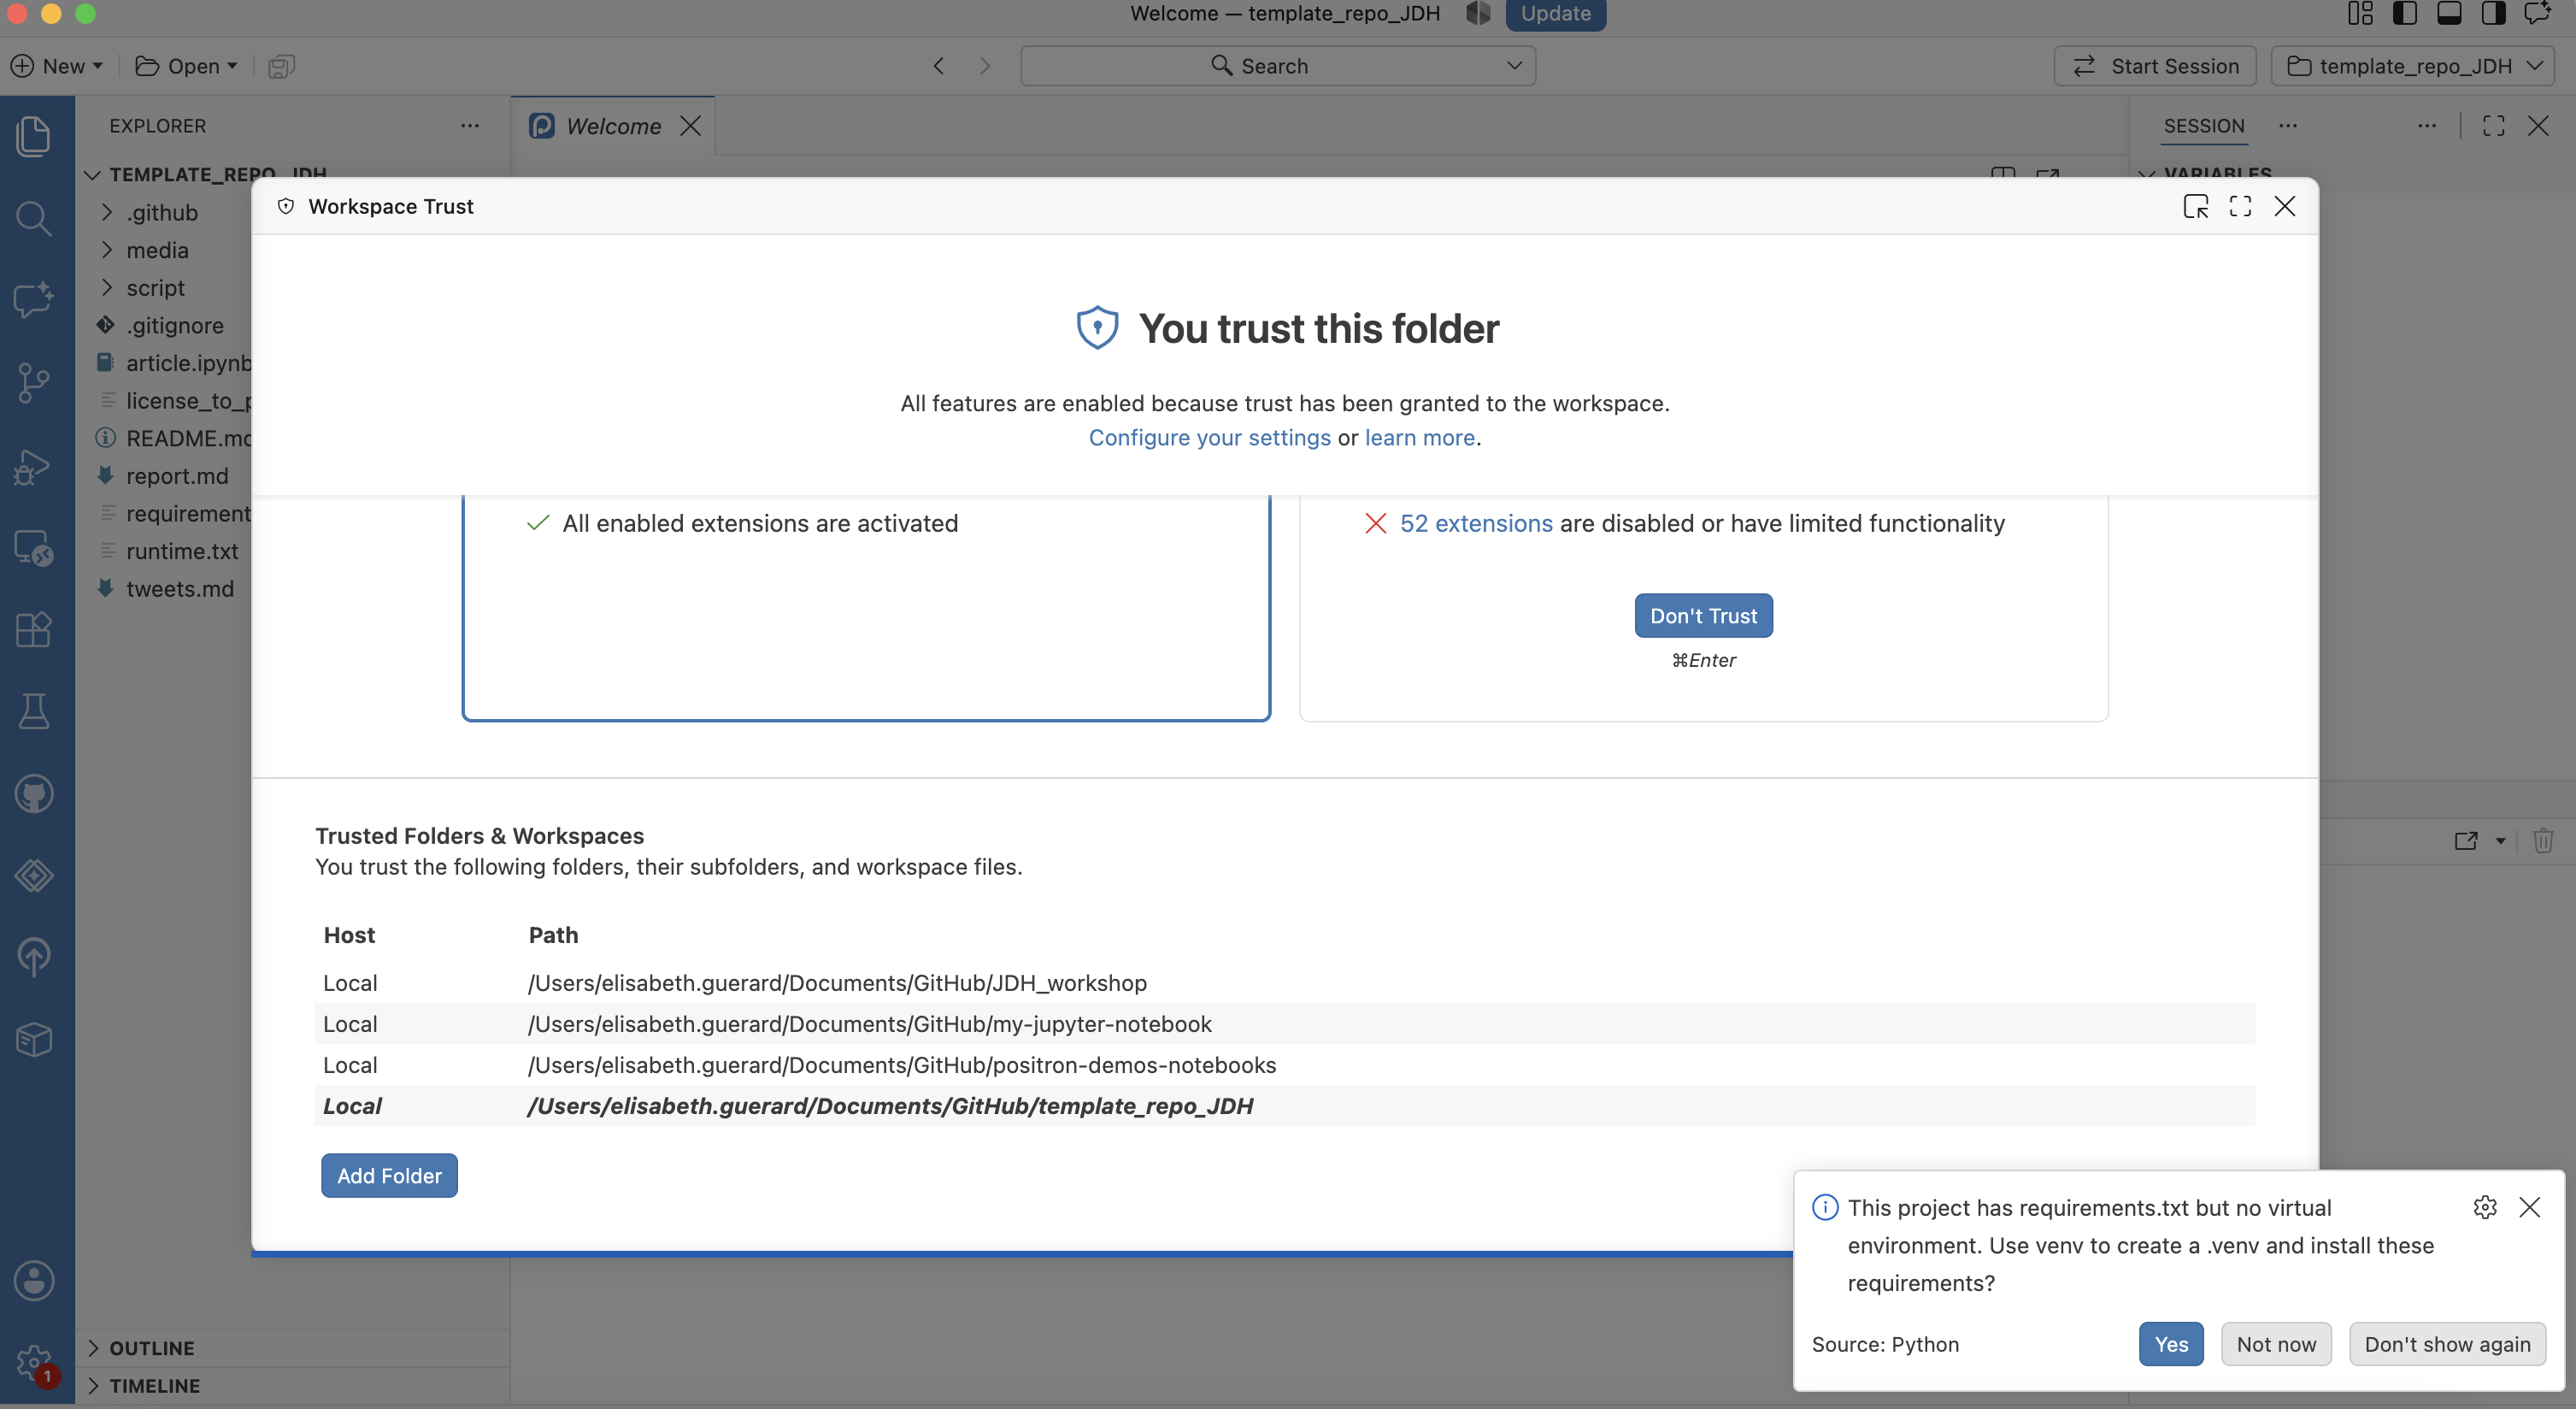
- Virtual environnement created
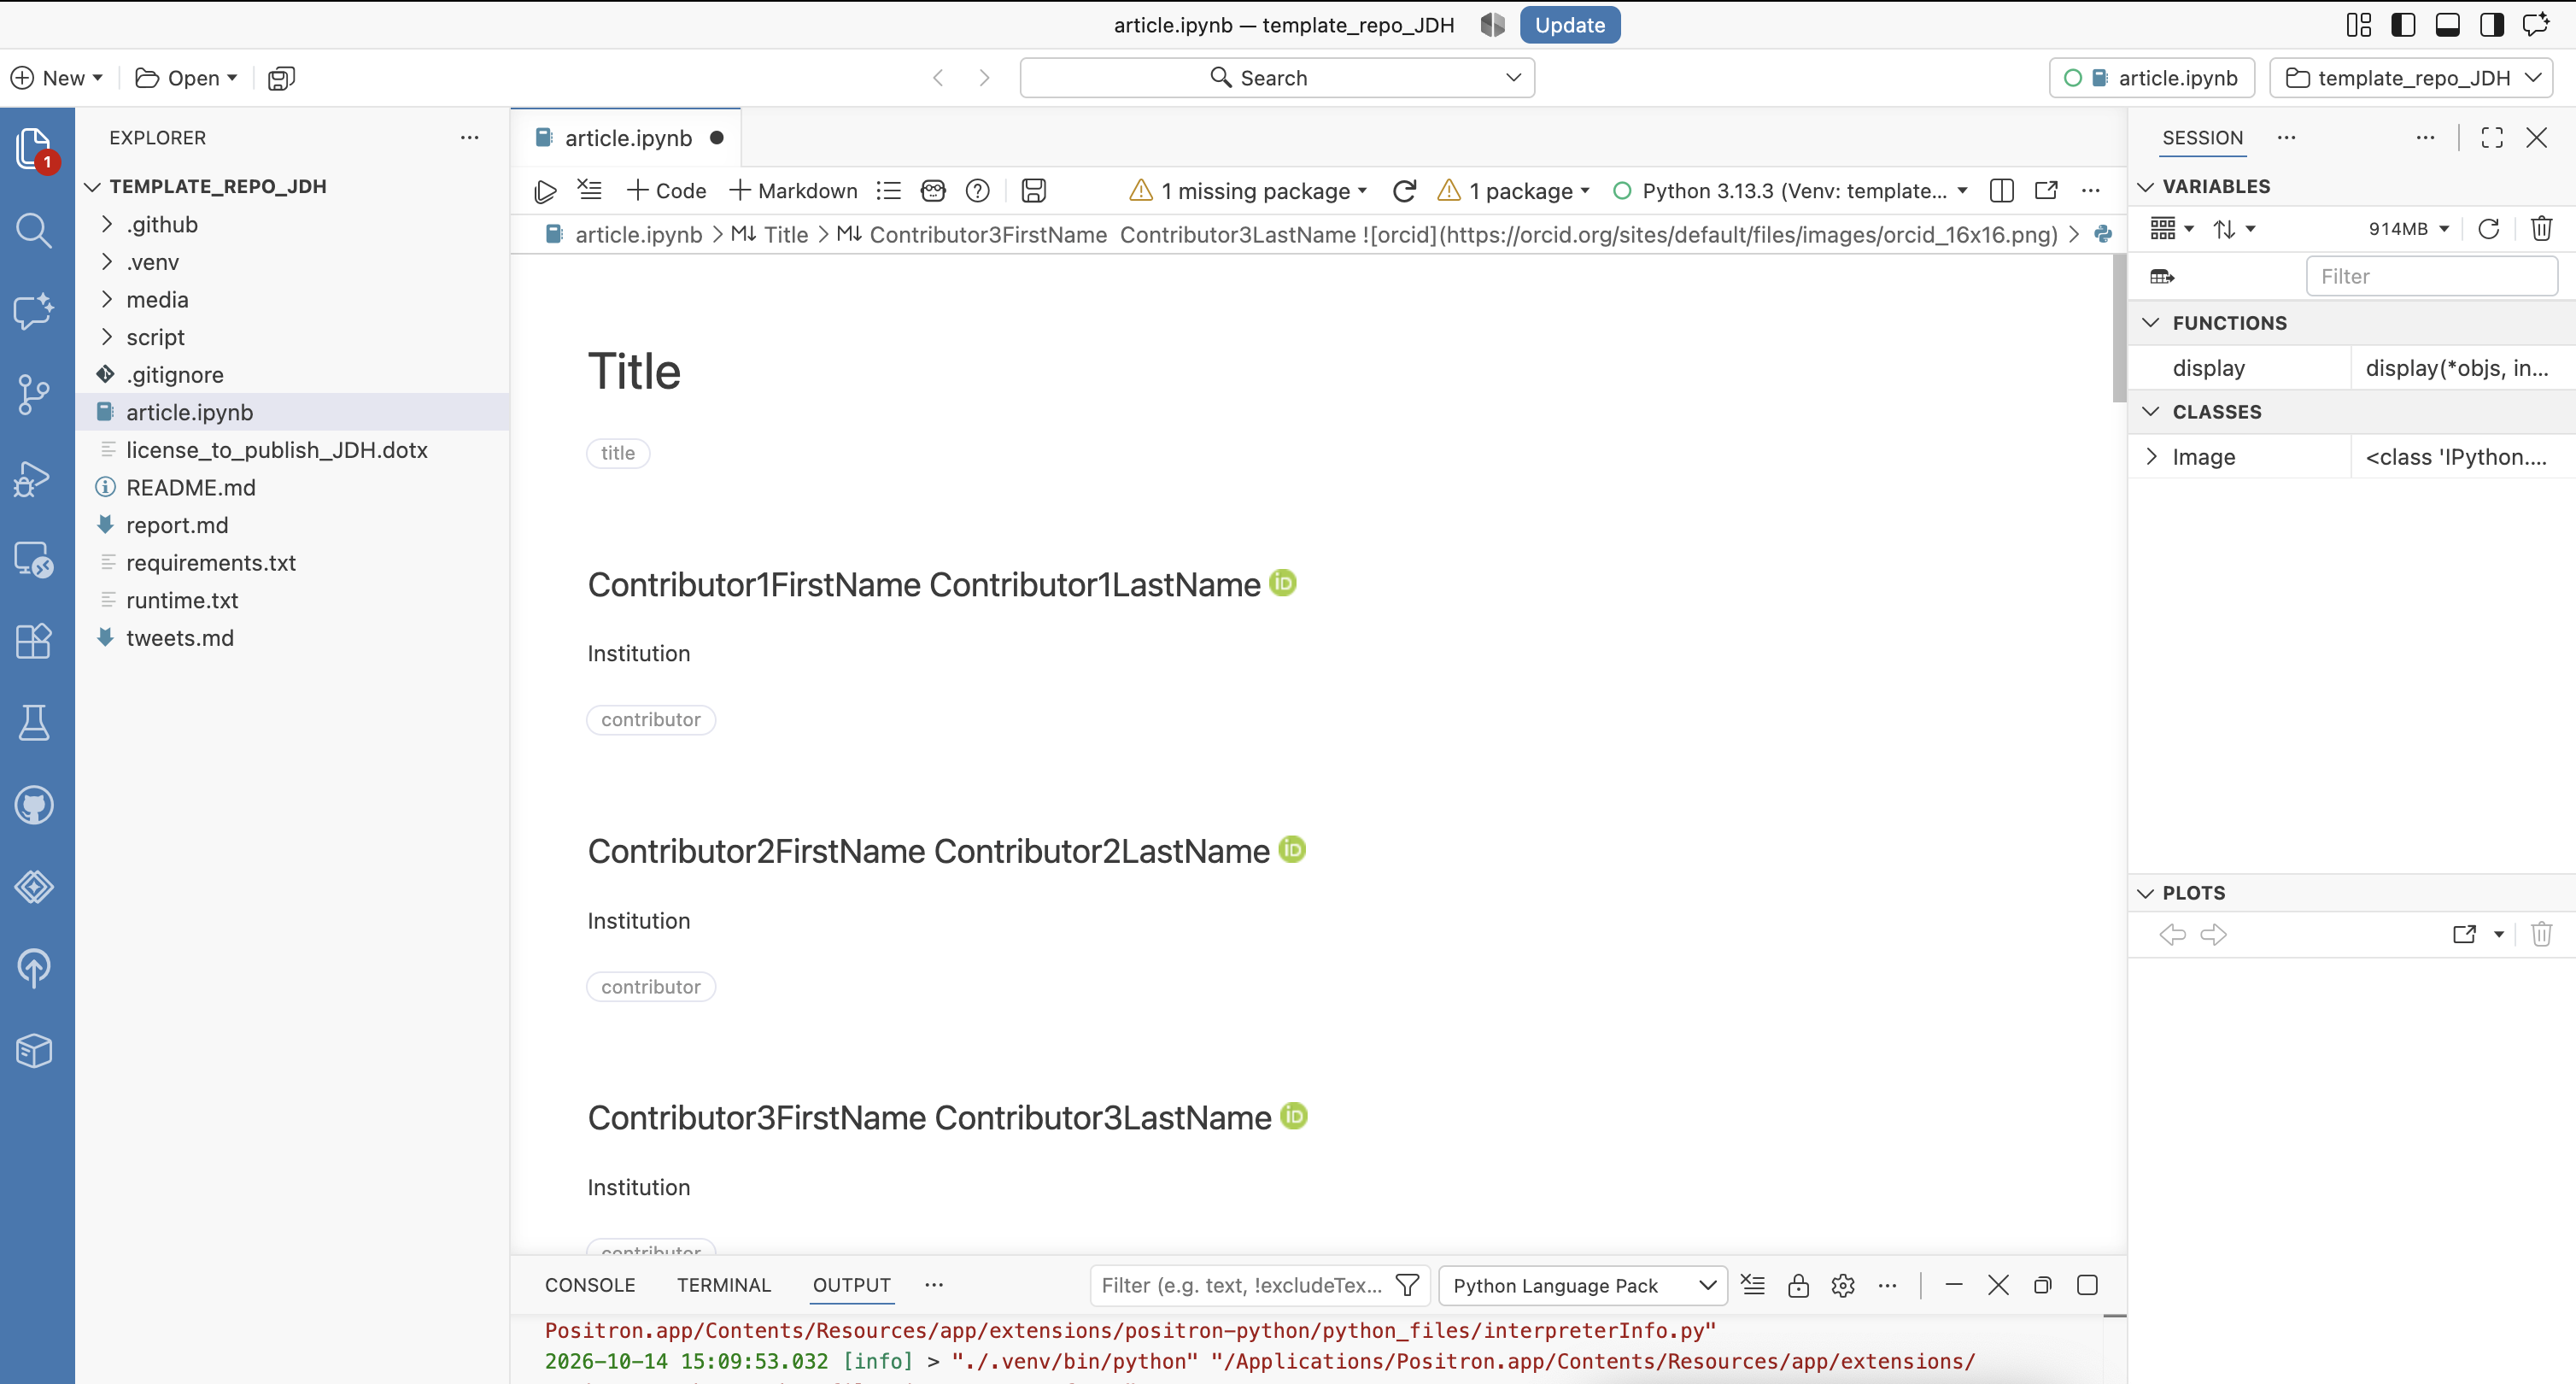
Documentation here
-
Create your own repository based on the JDH's template(see above in the Git section).
-
Log in to your institution's or organization's JupyterHub instance (for the workshop, we have two users account available, do not hesitate to ask to us)
-
Open a terminal from the Jupyter interface!

- Clone your repository with
git clone <repo-url>(see above for more details)
-
Install dependencies with
pip install -r requirements.txt -
Install the citation-manager plugin by using the command line with
pip install jupyterlab-citation-manager. -
Open
article.ipynbfrom the file explorer and run it. -
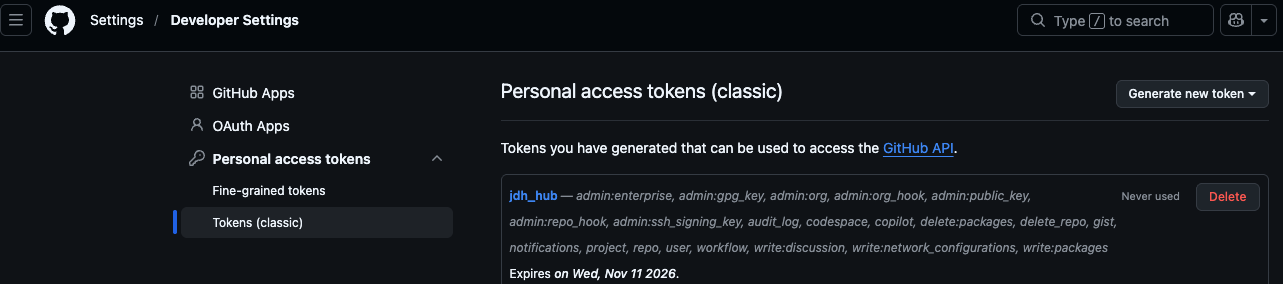
Resynchronize with GitHub repository - you need to create a personal access tokens (classic).
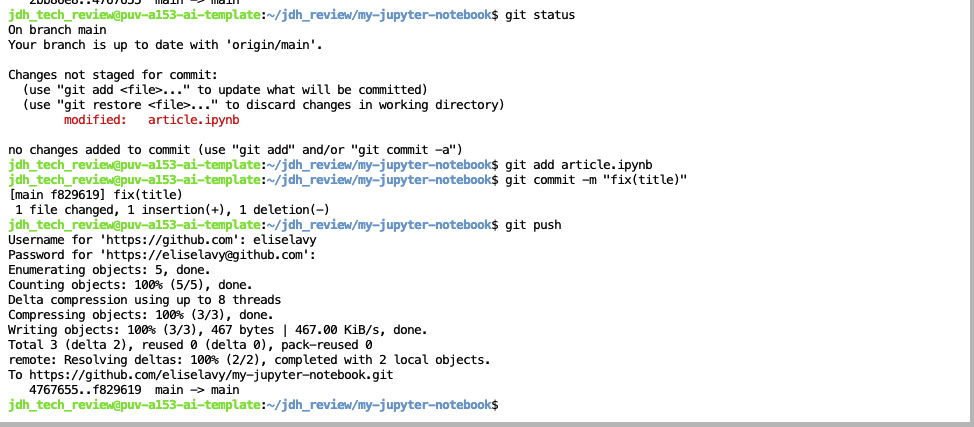
- Do
git add,git commitandgit pushfrom the terminal.
You can have an overlook of the template by clicking on the badge
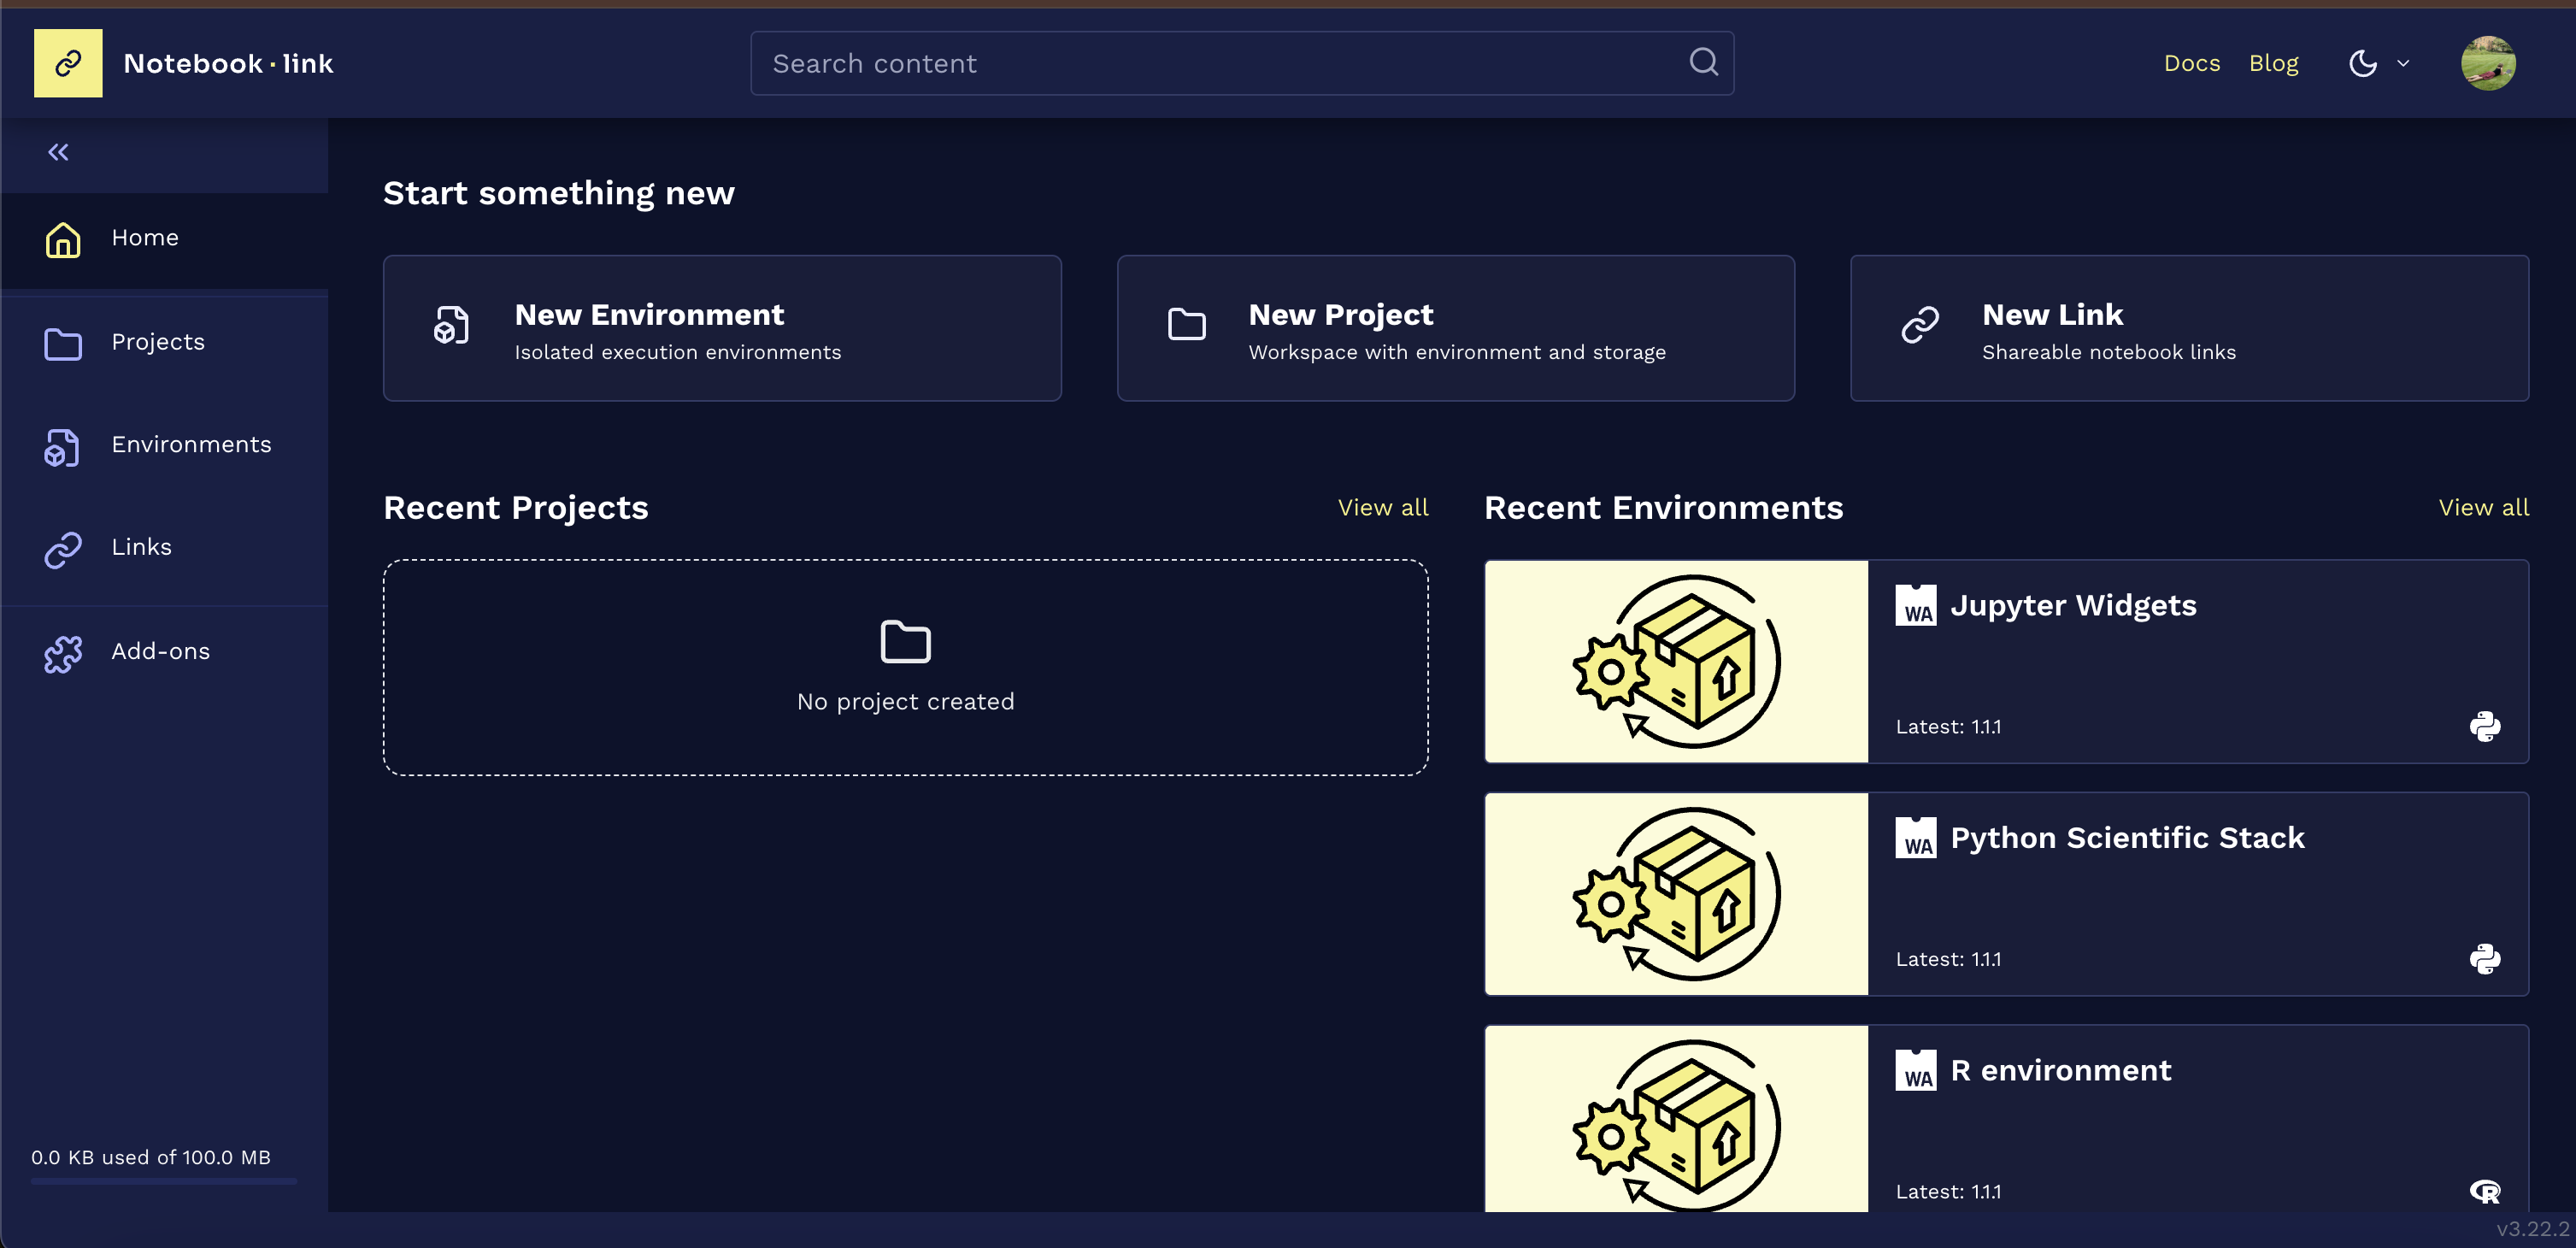
- Open your browser to the page Notebook.link
- Connect with your GitHub account
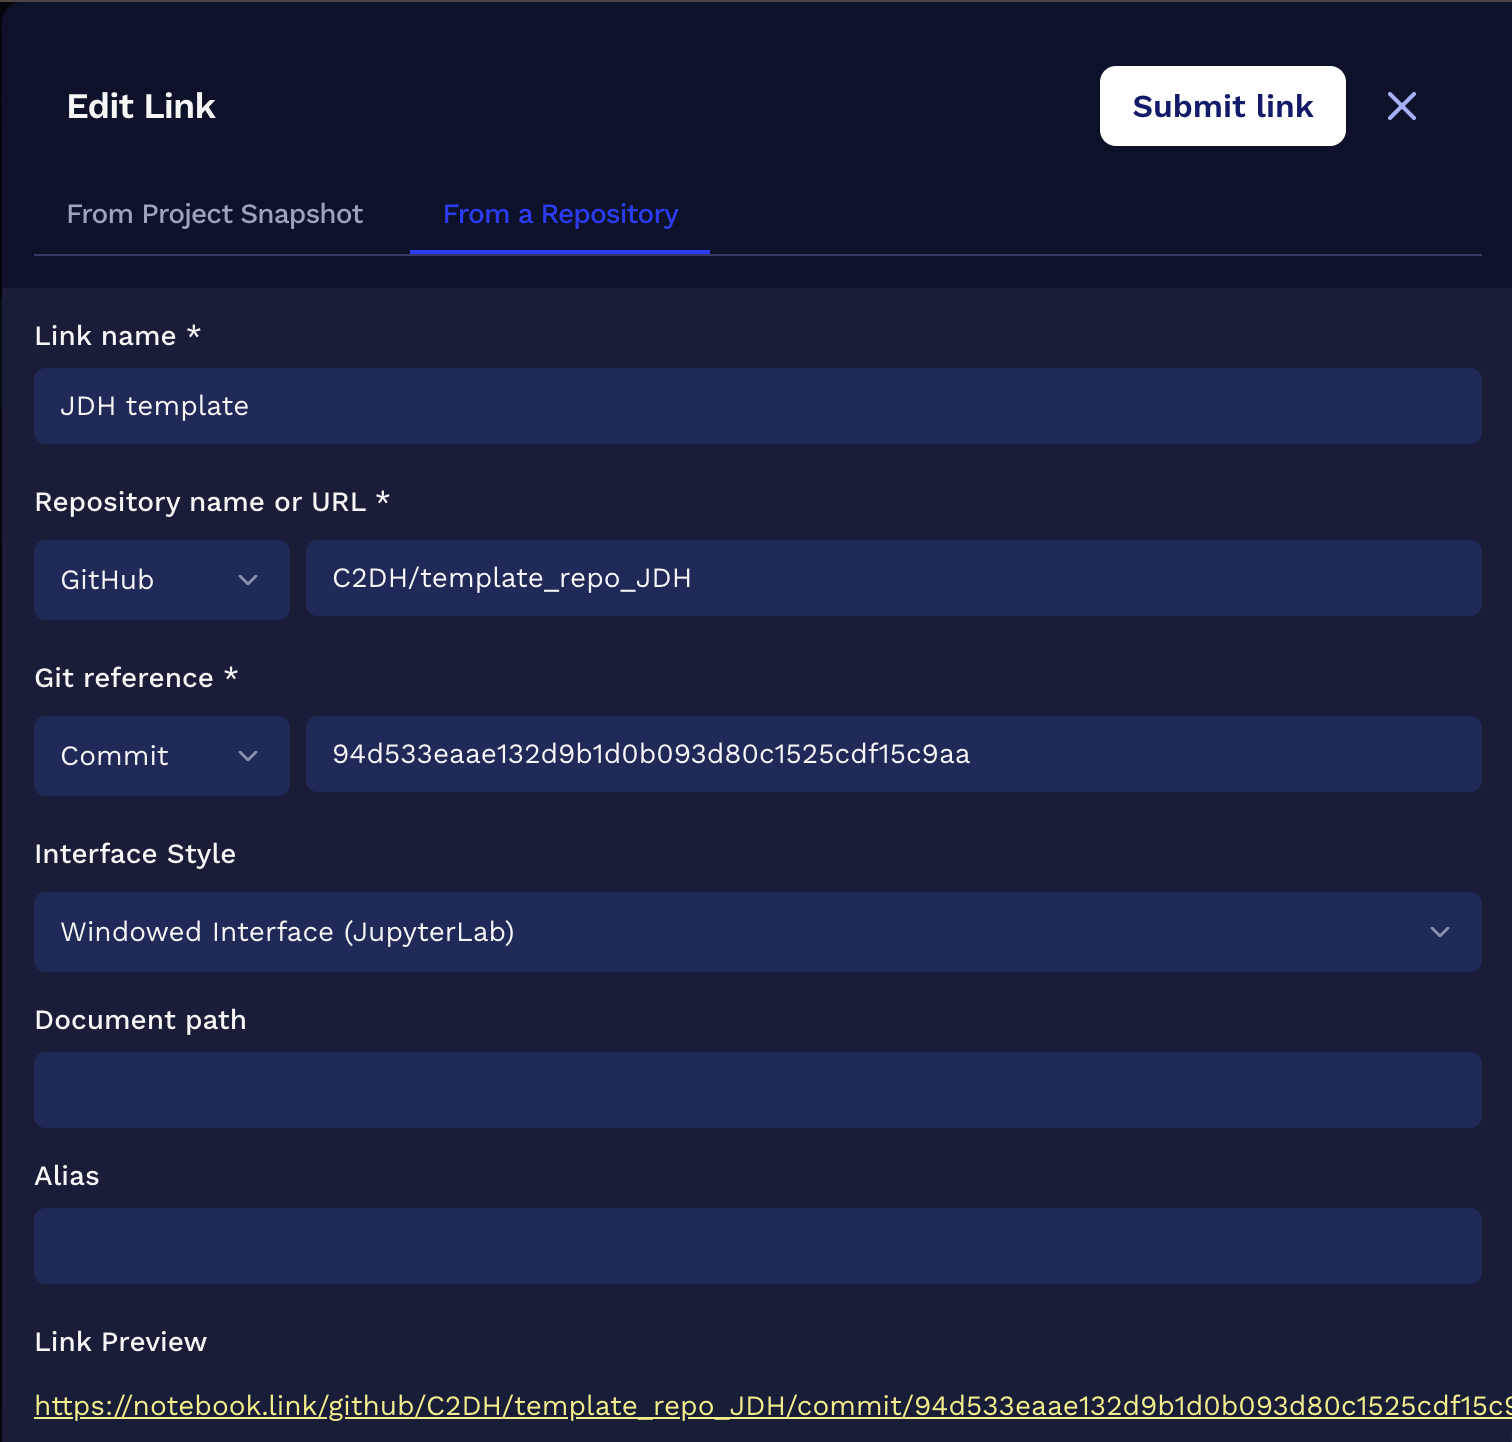
- In the home page, clik on New Link button
- Fill the form with the information related to your repository created with the JDH's template
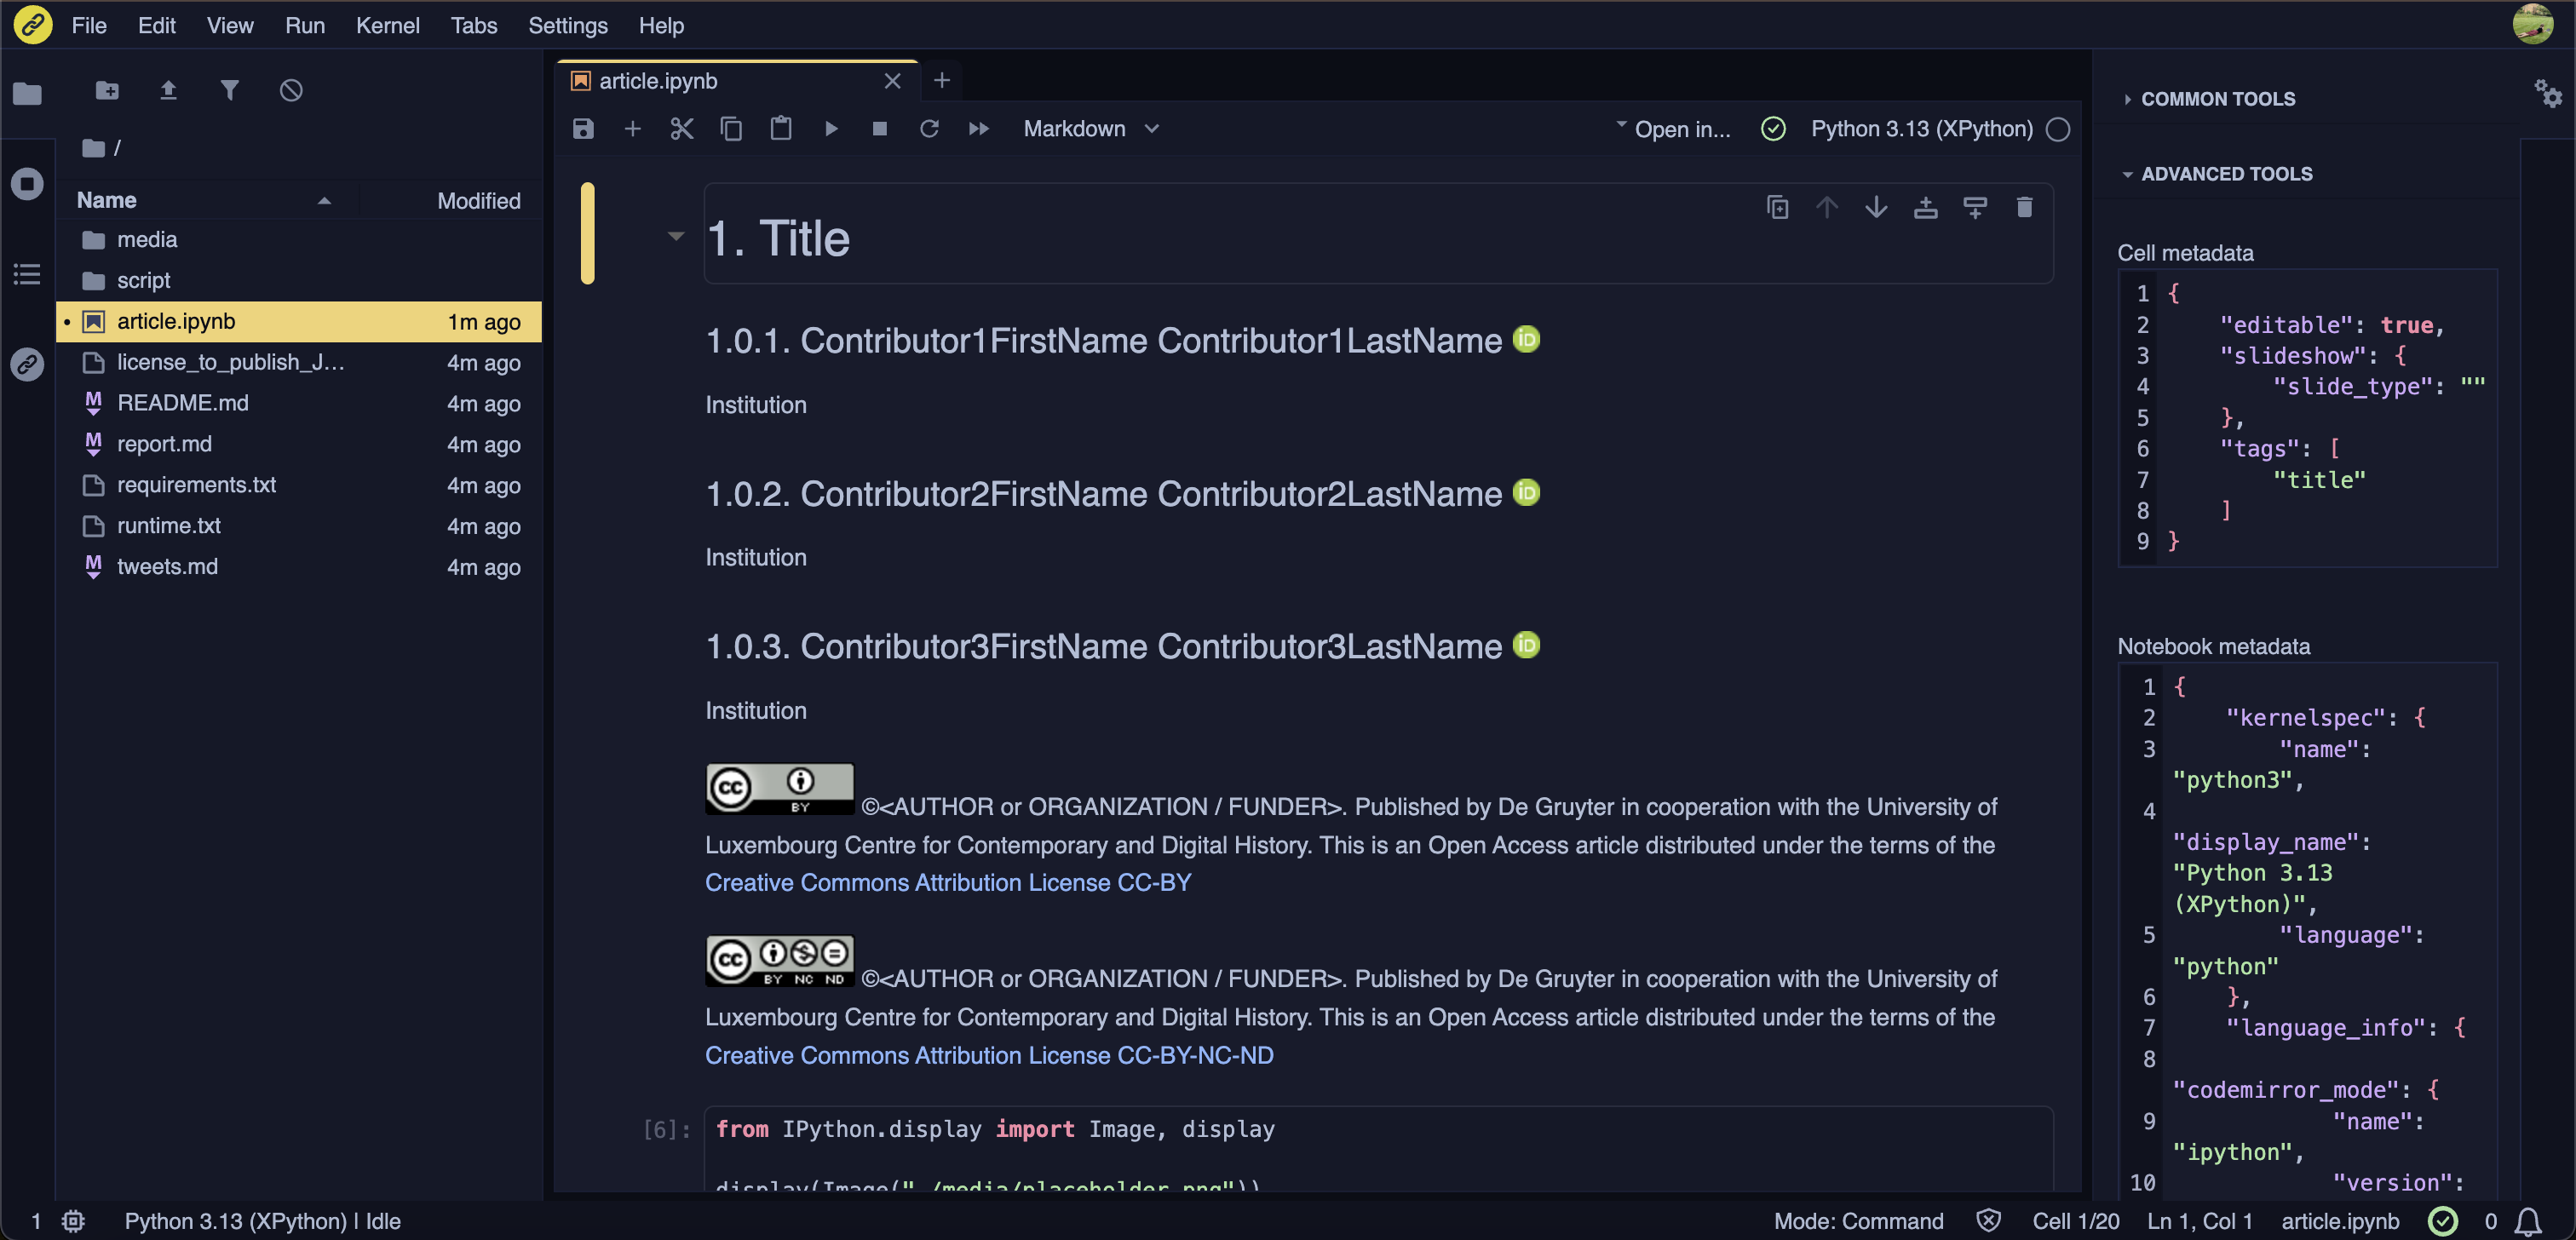
- Click after to open it
| JupyterHub | Local installation | JupyterLab in Docker | Google Colab | Positron | Notebook.link | |
|---|---|---|---|---|---|---|
| Supported languages | Python , R | Python , R | Python , R | Python | Python, R | Python,R |
| Asset insertion | relative/absolute | relative/absolute | relative/absolute | absolute url | relative/absolute | relative/absolute |
| Cell tags (figures, tables, hermeneutic layer) | ✅ | ✅ | ✅ | ❌ no native UI - edit JSON | ✅ | ✅ |
| Metadata used for labelling | ✅ | ✅ | ✅ | ❌ no native UI - edit JSON | ❌ no native UI - edit JSON | ✅ |
| AI assistant | plugin to install - Jupyter AI | plugin to install - Jupyter AI | plugin to install- Jupyter AI | Gemini ✅ | Positron assistant ✅ | JupyterLite-AI, using your own API key from most LLM providers |
| Insertion citation | zotero plugin to install | zotero plugin to install | zotero plugin just to insert API key | BibTeX key in a md cell | BibTeX key in a md cell | BibTeX key in a md cell |
| GPU | Depends on server | Depends on your machine | Depends on your machine | ✅ Free tier | Depends on your machine | ❌ Runs in the browser |
| Who manages the environment | Institution | You | You (container) | You | Platform (WebAssembly packages) - Git not available - Cloud storage - Repository limited to 50 MB |
If you want to see how your Jupyter Notebook is rendering on Journal Of Digital History website, then you can use our Preview Notebook page.

Now, it is time for you to present what you have done to the rest of the participants 🚀.
- Explore the Tag Palette in Jupyter Lab (click on the 2 wheels icon in right-top corner)

Zotero is a tool that can be used to collect and manage your citations whereas Citation-manager is a plugin for the JupyterLab interface which helps to insert the citation into your Jupyter notebook.
What you need to do for Zotero:
- Install the Zotero app on your computer : https://www.zotero.org/
- Generate your API key by visiting https://www.zotero.org/settings/security
💡 Hint: The API key is like a password for your Zotero library— it allows your code to access your references programmatically.
What you need to do for citation-manager:
pip install jupyterlab-citation-manager- or install it from JupyterLab store by clicking on the puzzle piece icon and select
Yes. Then you can look in the search for jupyterlab-citation-manager.

Warning
The installation of the JupyterLab store does not work if you are using JupyterHub. Then you need, to use the command line with pip.
| Stage | What we do | Output |
|---|---|---|
| 1. Repository check ✍️ | Confirm the GitHub repository is accessible, follows the JDH template and stays within size limits. | Repository validated |
| 2. Environment reconstruction ⚙️ ✍️ | Collect all package versions, including undeclared imports found by scanning the notebook. Fix the Python version and check package compatibility. | Pinned requirements.txt - automatic check GitHub action Nbconvert |
| 3. Clean execution ⚙️ | Run the notebook top to bottom in a fresh environment (Binder or Docker), never in my own environment. Keep partial outputs and error traces. | Execution log |
| 4. Output comparison ✍️ | Compare the re-executed outputs with the author's saved outputs, cell by cell with ReviewNB. | List of identical and different cells - Manual |
| 5. Resource check ⚙️ ✍️ | Verify that all URLs, GitHub links and datasets exist and load. Flag hardcoded local paths and personal credentials, and encourage generic, project-level accounts instead of personal ones. | Link and data report |
| 6. Reference check ✍️ | Verify that every cited reference have mandatory Zotero fields | Verified bibliography |
| 7. JDH compliance ⚙️ ✍️ | Check tags, metadata and asset paths against the guidelines. | Compliance checklist |
| 8. Feedback to the author by email or on the Github issue ✍️ | Iterate until the notebook runs cleanly. | Reviewed, reproducible article |