1.3.2.3 Driver Controls - Brickwolves/CodeCampWiki GitHub Wiki
Physical Connection
First things first, let’s plug in the four DcMotors. If you look at the back of a DcMotor, you’ll see two cords plugged in:
- Power Cord (the black and red cord)
- Encoder Cord (the thinner red, white, and blue cord)
Please plug in the DcMotor to Port Number 0 of your Control Hub or your Expansion Hub.

Driver Station Configuration
Now that the motors are physically connected, we need to set up a Configuration on the Driver Station to associate the port numbers with a unique id such as 'right-left-motor' or 'shooter-motor'. This is necessary because in Java code we can only reference plugged-in hardware via their unique ids.
- Open the Driver Station app
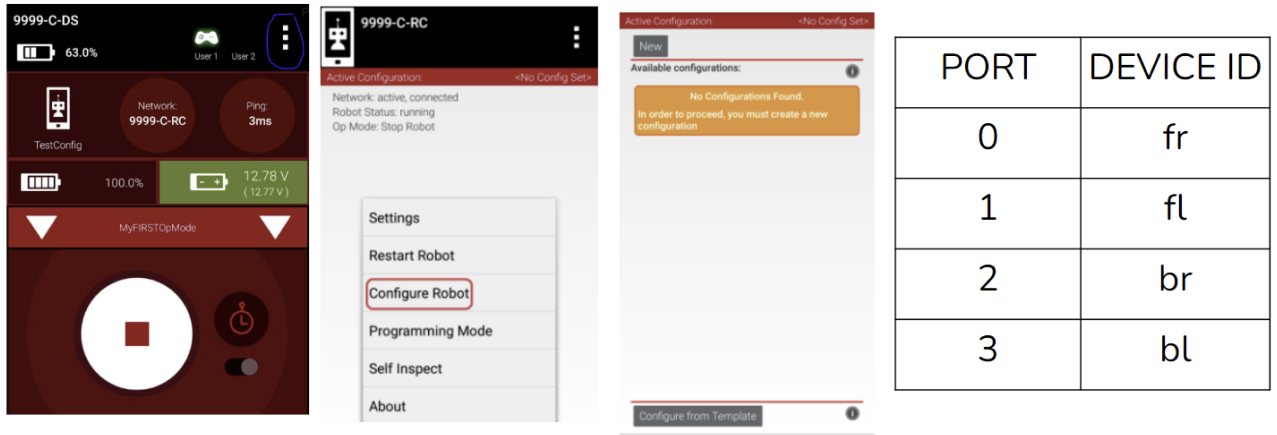
- Click the three vertical dots in the top right corner
- Click Configure Robot to go to the configuration page
- Add a new configuration and name it "driver"
- If you're on a Control Hub you can click on the Control Hub item and it'll take you to a set of different types of hardware such as Servos, DcMotors, Sensors etc. If you're using an Expansion Hub click that item instead till you see different types of hardware. Please click on the Motor item.
- Add your four motors with ports and ids corresponding to the following table below. "fr", "fl", "br", "bl" correspond with front-right, front-left, back-right, and back-left.
- Exit out till it prompts you to save your configuration. Save it and then activate the configuration before returning to the Driver Station home app screen.
Coding the DcMotors
So just like we did with the DcMotor in 1.3.2, we need to declare, instantiate, and set the mode of all four DcMotors.
- Declare four private DcMotors called fr, fl, br, bl above the Robot constructor
- In the
initRobot()method, instantiate the four motors using theOpModeUtils.hardwareMapand use the proper ids that you set in the Driver Station configuration - Below the instantiations, set the four motors' mode to RUN_WITHOUT_ENCODERS
Speed Control
So now you can pick a direction and drive in it at a set speed. Obviously that's not quite enough for a finished robot. So the next step is to control the speed of the robot and the easiest way to do that is using the triggers on the controller. Whereas most buttons on the robot return a Boolean the triggers return a Float. This means they return a value from 0-1 depending on how much you hold them down. To get this value we can do pretty much the same thing we do with gamepad.button except instead of using gamepad.button as a boolean in an if statement we can use gamepad.left_trigger as a number. Try and fill in the logic here to get it to drive:
if(???){
    ???.???(???);
}
Now using that same logic, try and make something that goes backwards too.