Adding New Trainer Classes - BluRosie/hg-engine GitHub Wiki
HeartGold and SoulSilver divorce from the previous entries in the series and couple the trainer class directly with a sprite for said class.
In this sense, adding new characters to battle was an inconvenience. You would have to add a brand new class or decide which one you would not want in your hack to add a new one.
hg-engine now has exposed everything needed to add brand new trainer classes so that you do not need to compromise with the vanilla engine and you can put in an additional 120 or so trainer classes, allowing for as many individual trainer sprites.
There is a very handy commit that handles all of this as a sort of tutorial to follow. While not part of the main repository for obvious reasons, it can be accessed here.
Trainer sprites can be animated with a few frames, but that will not be covered here for the time being.
In alphabetical order, the relevant files are...
-
armips/data/trainers/trainers.s- link to file - just trainer data, nothing needs to be done except you can add your trainer class constant here -
armips/include/constants.s- link to file - addTRAINERCLASS_*constant define here -
bytereplacement- link to file - adjust bytes written to allow for more table entries in the music tables -
data/graphics/trainer_gfx- link to file -
data/text/730.txt- link to file - trainer class names -
data/text/731.txt- link to file - trainer class names with their articles -
include/constants/sndseq.h- link to file -ANIM_MUSIC_COMBO_*constant defines -
include/constants/trainerclass.h- link to file -TRAINERCLASS_*constant define here -
src/music_tables.c- link to file - special animations/music for either certain wild Pokémon or trainer classes that the player faces -
src/pokemon.c- link to file - the gender assigned to each trainer class is covered in this file -
src/trainermoney.c- link to file - trainer base prize money table
Special coverage is given to...
Now we cover the files that aren't self-explanatory beyond their blurbs above.
In this folder, each trainer class has its own set of images and JSON files. There is...
- ###.png
- ###_anim.json
- ###_cell.json
- ###_enc.png
- ###_enc.png.key
First, we start with ###_enc.png.
###_enc.png is the first 2 frames of your sprite (with an empty second half if your sprite is not animated). It should be a 4bpp 160x80 image (may be 8bpp, i.e. the direct output of Aseprite's indexed sprite when you save it). It pairs with a .key file that can be copied from any other sprite.
For an example:

###.png is a garbled version of all of the frames of your sprite, here dumped as 80 pixels in width and 80*frames pixels in height, 80 pixels per frame. It is garbled such that the NCER can pull directly from consecutive tiles, or 8x8 squares, for each of its individual OAM's.
For an example:

A somewhat better way to visualize this would be to dump the image with width 64, although this adds 4 rows to the bottom of the image because 100 is not divisible by 8:
It is recommended for the time being to stick with the 80x80 image.
The garbled image can be generated with Tinke relatively easy. Follow the NCER (cell) editing tutorial from the DS Pokémon Hacking Wiki.
When you have imported your image over the existing one and managed to get it to not be transparent or whatever issues end up arising, export the individual NCGR and NCLR files (RGCN and RLCN in Tinke due to little endian), saving them as their names.
For this tutorial, we export the Dawn sprite from Platinum from the ROM. So we export 8_640.RGCN and 8_641.RLCN, saving them as 8_640.NCGR and 8_641.NCLR. In your terminal, you can then extract the image using nitrogfx from the hg-engine repository. Navigating to the hg-engine folder...
./tools/nitrogfx 8_640.NCGR 129.png -palette 8_641.NCLR -width 10This will output an image to 129.png and will work if you exported your NCGR and NCLR files to the hg-engine folder directly. You can replace the filenames with whatever.
The output image in question:

###_anim.json and ###_cell.json can be easily copied from another sprite that you want to emulate the animation/tile mapping from. These correspond to NANR and NCER files directly, which can once again be edited in Tinke and visualized accordingly. Converting the NANR to JSON can also be done using nitrogfx:
./tools/nitrogfx 8_642.NCER 129_cell.json
./tools/nitrogfx 8_643.NANR 129_anim.json
Note that the NCER JSON must end with _cell.json after the number, while the NANR JSON must end with _anim.json after the number. This will allow the build system to detect everything properly and output the files in order.
This file has a few tables that control music for both trainer classes and specific wild Pokémon species.
This introduces the concept of the Animation-Music Combination (AMC), which controls the animation that plays leading into a battle and the music that plays during the battle itself.
We are looking to play the music from the Spiky-eared Pichu event during our battle without an introductory animation. Not sure how to edit the animations as of yet, so we will keep it at no animation.
When the trainer sees us and walks up to us, we would like the Weather Trio battle music to play.
Here are the steps to recreate this behavior:
AMC's are indexed by constants at the end of include/constants/sndseq.h. Adding a new one there will let us keep track of things easily, here ANIM_MUSIC_COMBO_TEST.
We then add our new entry to the MainMusicComboTable:
u16 MainMusicComboTable[][2] =
{
...
    [ANIM_MUSIC_COMBO_KIMONO_GIRL] = {0x2D, SEQ_GS_VS_TRAINER},
    [ANIM_MUSIC_COMBO_RED] = {0x2E, SEQ_GS_VS_CHAMP},
    // (***END OF VANILLA ENTRIES***)
    [ANIM_MUSIC_COMBO_TEST] = {0xFFFF, SEQ_GS_E_G_PICHU},
};
Then we increase the amount of elements that the game expects for MainMusicComboTable in bytereplacement from 2D to 2E:
# MainMusicComboTable combo range
arm9 080517AA 2E
arm9 080517D4 2E
In order to get the trainer class to play a specific music during battles, we need to add an entry to TrainerClassToMusicCombo:
u8 TrainerClassToMusicCombo[][2] =
{
...
    {TRAINERCLASS_KIMONO_GIRL, ANIM_MUSIC_COMBO_KIMONO_GIRL*4},
    {TRAINERCLASS_PKMN_TRAINER_RED, ANIM_MUSIC_COMBO_RED*4},
    // (***END OF VANILLA ENTRIES***)
    {TRAINERCLASS_NEW_CLASS_TEST, ANIM_MUSIC_COMBO_TEST*4},
};
Then we increase the amount of elements that the game expects for TrainerClassToMusicCombo in bytereplacement from 20 to 21:
# TrainerClassToMusicCombo table range
arm9 08051886 21
Now the battle music with be the Spiky-eared Pichu event music.
In order to play the Weather Trio vs. music when the trainer sees the player, we then need to add an entry to sTrainerEncounterMusicParam:
struct TrainerMusic sTrainerEncounterMusicParam[] = // cues which music sequence occurs upon eyes meeting
{
...
    {.class = TRAINERCLASS_EXECUTIVE_ARCHER, .music1 = SEQ_GS_EYE_ROCKET, .music2 = SEQ_GS_EYE_ROCKET},
    {.class = TRAINERCLASS_EXECUTIVE_PROTON, .music1 = SEQ_GS_EYE_ROCKET, .music2 = SEQ_GS_EYE_ROCKET},
    {.class = TRAINERCLASS_EXECUTIVE_PETREL, .music1 = SEQ_GS_EYE_ROCKET, .music2 = SEQ_GS_EYE_ROCKET},
    {.class = TRAINERCLASS_NEW_CLASS_TEST, .music1 = SEQ_GS_VS_KODAI, .music2 = SEQ_GS_VS_KODAI}, // new entry
};
Then we increase the amount of elements that the game expects for sTrainerEncounterMusicParam in bytereplacement from 2C to 2D:
# sTrainerEncounterMusicParam table range
arm9 080550D4 2D
This should then allow the Vs. Weather Trio music to play when the trainer sees the player.
This file contains a table called sTrainerGenders that maps each trainer class to the gender that it represents. You only have to add the entry for the new class in order for this to repoint properly because the function is also replaced:
const u8 sTrainerGenders[] = {
...
    [TRAINERCLASS_ROCKET_BOSS] = TRAINER_MALE,
    [TRAINERCLASS_PKMN_TRAINER_LUCAS_DP] = TRAINER_MALE,
    [TRAINERCLASS_PKMN_TRAINER_DAWN_DP] = TRAINER_FEMALE,
    [TRAINERCLASS_PKMN_TRAINER_LUCAS_PT] = TRAINER_MALE,
    [TRAINERCLASS_NEW_CLASS_TEST] = TRAINER_MALE, // new entry
};This file contains a table called PrizeMoney that maps each trainer class to a multiplier for the money that the player gains when beating the trainer. You can add your entry to the table:
struct TrainerMoney PrizeMoney[] = // 0x34C04 in Overlay 12; 2 bytes for trainer class ID, 2 bytes for modifier; 516 bytes in total in vanilla
{
...
    { .class = TRAINERCLASS_PKMN_TRAINER_DAWN_PT, .multiplier = 0 },
    { .class = TRAINERCLASS_BIRD_KEEPER, .multiplier = 8 },
    { .class = TRAINERCLASS_NEW_CLASS_TEST, .multiplier = 50 }, // new entry
};
Then we increase the amount of elements that the game expects for PrizeMoney in bytereplacement from 81 to 82:
# PrizeMoney table range
0012 0223FBD0 82
0012 0223FBD4 82
0012 0223FBDC 82
As previously alluded to, bytereplacement has a series of bytes that are written at addresses in overlays. For an overview of what this does, check out the Code Injection Guide on the DS Pokémon Hacking Wiki.
For adding a trainer class, you just need to add 1 (in hexadecimal) for the tables that you want to expand, between MainMusicComboTable, TrainerClassToMusicCombo, PokemonBattleMusic, and sTrainerEncounterMusicParam. You only need to expand the ones that you were looking to expand earlier.
Animated sprites are handled entirely by the NCER and NANR pulling from the sprite and toggling OAM's on and off.
Arcade Star Dahlia, the Frontier Brain of the Battle Arcade, has quite the battle sprite animation.

The 101_enc.png sprite is easy, just the first 2 frames on a 160x80 canvas:

The base 101.png sprite is a little harder. The raw image for this looks like this (first the raw image, then one dumped to width 64 for easier visualization):
Click to drop down!


Dahlia is trainer class 101. With 5 raw files per trainer class, we look to files 505 through 509 in Tinke.
Viewing 506, then 505, and then 507 will give us the NCER view in Tinke. We are able to then edit the individual frames that can be pulled from for the NANR animation file. All of the placement and such is defined in the NCER--so those frames that just shift are entirely duplicated OAM entries that differ in their x- and y-coordinates.
Here are the frames that only differ in shifting, viewed through the OAM editor in Tinke:
Click to drop down!


The NANR then sequences the frames, adding them in order and specifying the delays between each frames. This may actually be best edited using the JSON, as Tinke's editor is more of a viewer that doesn't have an implementation for editing.
The NANR is represented in the repository by the 101_anim.json. It is posted here for reference while we also cover what exactly it means:
Click to view full anim JSON.
{
	"labelEnabled":	true,
	"sequenceCount":	2,
	"frameCount":	14,
	"sequences":	[{
			"frameCount":	1,
			"loopStartFrame":	0,
			"animationElement":	0,
			"animationType":	1,
			"playbackMode":	2,
			"frameData":	[{
					"frameDelay":	4,
					"resultId":	0
				}]
		}, {
			"frameCount":	13,
			"loopStartFrame":	0,
			"animationElement":	0,
			"animationType":	1,
			"playbackMode":	1,
			"frameData":	[{
					"frameDelay":	20,
					"resultId":	0
				}, {
					"frameDelay":	6,
					"resultId":	1
				}, {
					"frameDelay":	4,
					"resultId":	2
				}, {
					"frameDelay":	20,
					"resultId":	3
				}, {
					"frameDelay":	6,
					"resultId":	4
				}, {
					"frameDelay":	4,
					"resultId":	5
				}, {
					"frameDelay":	28,
					"resultId":	6
				}, {
					"frameDelay":	4,
					"resultId":	5
				}, {
					"frameDelay":	6,
					"resultId":	0
				}, {
					"frameDelay":	18,
					"resultId":	7
				}, {
					"frameDelay":	4,
					"resultId":	8
				}, {
					"frameDelay":	4,
					"resultId":	9
				}, {
					"frameDelay":	80,
					"resultId":	10
				}]
		}],
	"animationResults":	[{
			"resultType":	0,
			"index":	0
		}, {
			"resultType":	0,
			"index":	4
		}, {
			"resultType":	0,
			"index":	5
		}, {
			"resultType":	0,
			"index":	6
		}, {
			"resultType":	0,
			"index":	1
		}, {
			"resultType":	0,
			"index":	2
		}, {
			"resultType":	0,
			"index":	3
		}, {
			"resultType":	0,
			"index":	9
		}, {
			"resultType":	0,
			"index":	7
		}, {
			"resultType":	0,
			"index":	8
		}, {
			"resultType":	0,
			"index":	10
		}],
	"resultCount":	11,
	"labels":	["\u0001", "ï¾X"],
	"labelCount":	2
}-
labelEnabledshould betrue -
sequenceCountis the amount ofsequencesthat will be read from the NANR -
frameCountat this point is the total amount of frames between each defined sequence -
sequencesis an array of individualsequenceobjects, each containing the following fields:-
frameCountis the amount of entries in theframeDataof thissequence -
loopStartFrameshould always be0 -
animationElementshould always be0 -
animationTypeshould always be1 -
playbackModeshould be2for the first animation with just 1frameDataentry,1for the one featuring the actual animation -
frameDatais an array of individualframeDataobjects, each containing the following fields:-
frameDelayis how many frames for which this part of the animation should be present -
resultIdcorresponds with the entry inanimationResultsthat corresponds with the frame displayed
-
-
-
animationResultsis an array of individualanimationResultobjects, each containing the following fields:-
resultTypeshould always be0 -
indexcorresponds with the frame as defined in the NCER
-
-
resultCountis the amount ofanimationResultobjects are in the arrayanimationResults -
labelsis text strings that correspond with eachsequenceobject that is defined, although it's often gibberish -
labelCountis the amount of strings inlabels
So as an example, we will insert the male protagonist sprite from B2W2.

We first split it into frames. Dahlia has 11 total frames, so we will limit our frames to 11. This sprite has 28 total frames.
We split it down into these images:


We can then multi-export in Tinke the Dahlia frames and superimpose our own frames over top of Dahlia's. From there, we can reimport the image (once to get the palette, a second time with the Swap To Original Palette enabled with the Threshold set to 244 if necessary):


From there, we clean up the NCER cells in Tinke by shifting each to the same 80x80 frame as the original frame. We offset each frame by (-40, -40) and cleanly align all of the other OAM's to border properly. We then export the file and get this NCER, which translates to this JSON file.
Doing all of this also gives us this NCGR image:

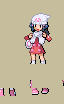
Finally putting the first two frames together to match this:

Putting this all in the ROM (and copying the 101_anim.json file from Dahlia) gives us the following animation:

Very close, but not quite there yet.
We first clean up the animation JSON file.
We put each animationResult in order by index:
Click to drop down!
	"animationResults":	[{
			"resultType":	0,
			"index":	0
		}, {
			"resultType":	0,
			"index":	1
		}, {
			"resultType":	0,
			"index":	2
		}, {
			"resultType":	0,
			"index":	3
		}, {
			"resultType":	0,
			"index":	4
		}, {
			"resultType":	0,
			"index":	5
		}, {
			"resultType":	0,
			"index":	6
		}, {
			"resultType":	0,
			"index":	7
		}, {
			"resultType":	0,
			"index":	8
		}, {
			"resultType":	0,
			"index":	9
		}, {
			"resultType":	0,
			"index":	10
		}],
	"resultCount":	11,
And then we put each frameData in order of its resultId and adjust the frameDelay. We then delete instances with duplicate resultId fields.
This then requires us to change the frameCount fields (both the upper-level one and the individual frameData's frameCount), adjusting it down to account for the new amount of frames.
Click to drop down!
	"frameCount":	12,
	"sequences":	[{
			"frameCount":	1,
			"loopStartFrame":	0,
			"animationElement":	0,
			"animationType":	1,
			"playbackMode":	2,
			"frameData":	[{
					"frameDelay":	4,
					"resultId":	0
				}]
		}, {
			"frameCount":	11,
			"loopStartFrame":	0,
			"animationElement":	0,
			"animationType":	1,
			"playbackMode":	1,
			"frameData":	[{
					"frameDelay":	10,
					"resultId":	0
				}, {
					"frameDelay":	5,
					"resultId":	1
				}, {
					"frameDelay":	5,
					"resultId":	2
				}, {
					"frameDelay":	10,
					"resultId":	3
				}, {
					"frameDelay":	5,
					"resultId":	4
				}, {
					"frameDelay":	5,
					"resultId":	5
				}, {
					"frameDelay":	5,
					"resultId":	6
				}, {
					"frameDelay":	5,
					"resultId":	7
				}, {
					"frameDelay":	5,
					"resultId":	8
				}, {
					"frameDelay":	10,
					"resultId":	9
				}, {
					"frameDelay":	80,
					"resultId":	10
				}]
		}],
After doing that, there are still frames where the sprite is jumbled
This is caused, interestingly enough, by Dahlia's sprite using reflected tiles and thus OAM layouts:


So we now aim to clean up frames 4 through 6 to resemble the OAM's on the left.
We redo an export on the frames so that they are easily imported once again. Then we change the x-values on each of the OAM's on frames 4-6 to realign with where they are now, which will let us reimport the frames over the original ones and allow for a NCGR for insertion again.
This gives us a new NCER that corresponds with a new JSON and a new NCGR. Reconverting the NCGR to PNG gives us:
Click to drop down!

Combining all of this together gives us the final animation:

As always, feel free to reach out to me on Discord with help for this, either in the KoDSH server or the DSMC server, where we'll help you as soon as we can. The NCER/JSON files are provided for easy reproduction steps and viewing the reproduction steps in Tinke for yourself as you follow along. It may even be possible to insert far more frames at a time by copying the patterns that you see in each file and extending further, reproducing patterns that you see and such. This is just the process that made sense to me for developing animated trainer sprites so far.
If you'd like this Nate sprite inserted in your hg-engine repository, the exact files are these ones: