Installing SPI - BitKnitting/should_I_water GitHub Wiki
Go To The Source
The code I'm talking about is located in this GitHub repository
Intro
I was not familiar with SPI on the Raspberry Pi. I found TonyD's video: Raspberry Pi & Python SPI Deep Dive with TonyD! to be a good starting point.
Initially, SPI is not enabled on a Raspberry Pi.
Enable SPI
i.e.: $ sudo raspi-config...then get into interfacing options. Choose SPI and choose Yes to turn on the interface.
Check
Check to see that the SPI drivers are running on the Raspberry Pi:
$ lsmod | grep spi
spidev                  7373  0
spi_bcm2835             7596  0

$ ls /dev/spi*
/dev/spidev0.0  /dev/spidev0.1
Loopback Test
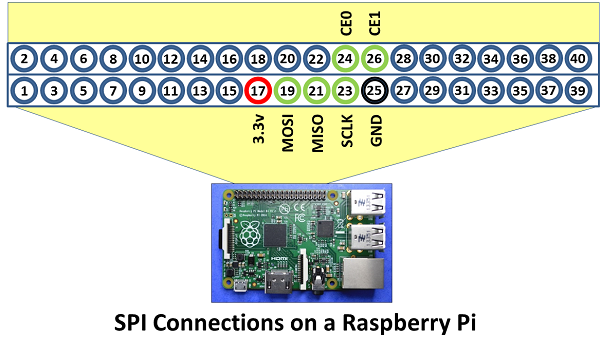
Run the loopback test To verify SPI is working through MISO/MOSI. First, I put a wire between the MOSI and MISO pins:
$ wget https://raw.githubusercontent.com/raspberrypi/linux/rpi-3.10.y/Documentation/spi/spidev_test.c
gcc -o spidev_test spidev_test.c
./spidev_test -D /dev/spidev0.0
spi mode: 0
bits per word: 8
max speed: 500000 Hz (500 KHz)

FF FF FF FF FF FF
40 00 00 00 00 95
FF FF FF FF FF FF
FF FF FF FF FF FF
FF FF FF FF FF FF
DE AD BE EF BA AD
F0 0D
Slap on the Python Layer
I like to check what versions of Python are installed:
 $ ls -la /usr/bin/python*
lrwxrwxrwx 1 root root       9 Jan 24  2017 /usr/bin/python -> python2.7
lrwxrwxrwx 1 root root       9 Jan 24  2017 /usr/bin/python2 -> python2.7
-rwxr-xr-x 1 root root 3162224 Nov 24 17:33 /usr/bin/python2.7
lrwxrwxrwx 1 root root       9 Jan 20  2017 /usr/bin/python3 -> python3.5
-rwxr-xr-x 2 root root 3976264 Jan 19  2017 /usr/bin/python3.5
-rwxr-xr-x 2 root root 3976264 Jan 19  2017 /usr/bin/python3.5m
lrwxrwxrwx 1 root root      10 Jan 20  2017 /usr/bin/python3m -> python3.5m
Which tells me I have both version 2.x and 3.x installed. All is good for now.
Install spidev
To access SPI from Python, install spidev: $ pip3 install spidev
Install wrapper
To install the Python Extensions Wrapper, I first need to install the python dev tools so that python.h is available:
$ sudo apt-get install python-dev python3-dev. As noted in this Stack Overflow exchange:
python-dev contains everything needed to compile python extension modules ().
Setup SPI
- Import the module:
import spidev - initialize the interface:
        self._device = spidev.SpiDev()
        self._device.open(0, 0)
        self._device.max_speed_hz = baudrate
        self._device.mode = 0b00
baudrate is the value passed into the RFM69 class. Mode:
Description: Property that gets / sets the SPI mode as two bit pattern of Clock Polarity and
Phase [CPOL|CPHA]
Range: 0b00 = 0 .. 0b11 = 3
Send/Receive
After reviewing tightdev's SpiDev doc,I use XFER to send/receive over SPI.
See the _read and _write functions.
Polarity and Phase
Because I continually learn then forget what Polarity and Phase mean, I take a swig at explaining...
(NOTE: We found Elliot Williams' Hackaday article on SPI to be useful).
The SPI diagram from the atm90e26 datasheet section 4.1.1:
 SCLK idles HIGH. This means the ATM90E26 has POLARITY = 1.
As noted by Elliot, phase describes whether the data is going to be read on the first clock transition (phase = 0) or the second (phase = 1).
Phase=1 is used by ATM90E26 SPI transmission.
POLARITY = 1, PHASE = 1 -> ATM90E26 SPI transmission used SPI mode 3.

SPI Issues
SPI issues I have come across while porting the Adafruit Circuit Python RFM69 library:
- In order to see packets on my logic analyzer, the baud rate needs to be set lower than the default of 10MHz. The Logic analyzer is able to capture at a max of ~ 5MHz. So I'm thinking <= 2.5MHz.
- The guidance in the RFM69 tricks for young players video advised the baud rate must be at least 62.5KHz.