Pi OS 12 6M - BYO-NTP/recipes GitHub Wiki
| date | server | os | gnss | daemon | 🎯 | 🗣️ |
|---|---|---|---|---|---|---|
| 2025-06 | Raspberry Pi 4 Raspberry Pi 5 |
Pi OS 12 |
u-blox NEO-6M | chrony NTPsec ntp |
discuss |
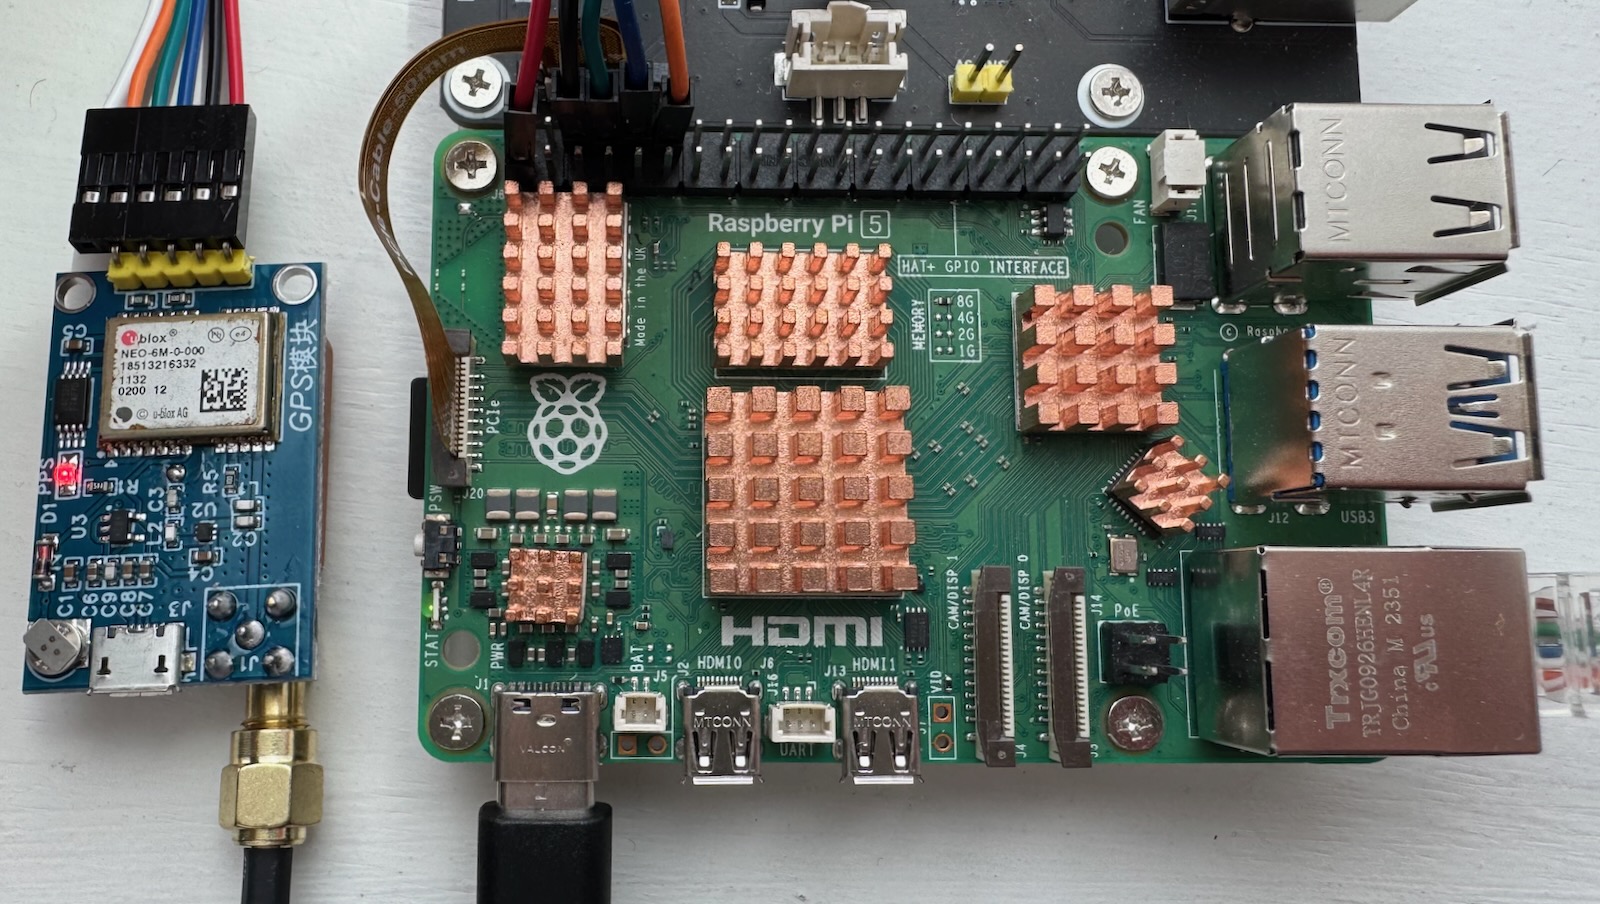
Connect the NEO-6M to a USB to Serial TTL adapter and plug the USB port into a Windows computer with u-blox u-center installed. Configure per the recommendations on the gnss page.
After the GNSS is configured, wire it to the Pi as shown in the assembly section below.
Liberate the serial port from the console:
raspi-config nonint do_serial_cons 0
raspi-config nonint do_serial_hw 1
systemctl disable --now [email protected]
systemctl mask [email protected]
Create a symlink to /dev/gps0, and enable low_latency on the serial port:
apt install -y setserial
cat > /etc/udev/rules.d/10-gps.rules <<EOL
# symlink /dev/ttyAMA0 to /dev/gps0
KERNEL=="ttyAMA0", SYMLINK+="gps0", GROUP="dialout", MODE="0660"

# configure the serial port for low latency.
KERNEL=="ttyAMA0", RUN+="/bin/setserial /dev/ttyAMA0 low_latency"
EOL
udevadm control --reload-rulesapt install -y pps-tools
grep -q pps-gpio /boot/firmware/config.txt || cat >> /boot/firmware/config.txt <<EOWD
# u-Blox NEO-6M
dtoverlay=pps-gpio,gpiopin=18
enable_uart=1
EOWD
rebootVerify that the PPS module loaded:
lsmod | grep ppspps_gpio 12288 0Test that PPS pulses are present (Control-C to cancel):
ppstest /dev/pps0trying PPS source "/dev/pps0"
found PPS source "/dev/pps0"
ok, found 1 source(s), now start fetching data...
source 0 - assert 1747026175.000003161, sequence: 4756 - clear 1747023968.100025259, sequence: 2549
source 0 - assert 1747026176.000000660, sequence: 4757 - clear 1747023968.100025259, sequence: 2549
^CNote that if your GPS hasn't got a fix yet, you may need to wait up to 20 minutes before you get PPS output. Also, check the board and see that the PPS LED is blinking. If not, wait until it is. If necessary, move it outdoors where it has a clear view of the entire sky.
Each section heading is a link with many more details about installing, configuring, and verifying that particular NTP daemon.
export NTP_REFCLOCKS=$(cat <<EO_CHRONY
refclock SHM 0         refid NMEA precision 0.03 poll 2 offset 0.120
refclock PPS /dev/pps0 refid PPS  precision 4e-7 poll 2 lock NMEA trust
EO_CHRONY
)
curl -sS https://byo-ntp.github.io/tools/chrony/install.sh | shexport NTP_REFCLOCKS=$(cat <<EO_NTPSEC
refclock nmea refid NMEA minpoll 3 maxpoll 5 time2 0.125 prefer mode 8 baud 115200
refclock pps refid PPS minpoll 3 maxpoll 4
EO_NTPSEC
)
curl -sS https://byo-ntp.github.io/tools/ntpsec/install.sh | shexport NTP_REFCLOCKS=$(cat <<EO_NTP
server 127.127.20.0 minpoll 3 maxpoll 6 mode 88
fudge 127.127.20.0 refid NMEA time2 0.115 minjitter 0.003
server 127.127.22.0 minpoll 3 maxpoll 4 prefer
fudge 127.127.22.0 refid PPS
EO_NTP
)
curl -sS https://byo-ntp.github.io/tools/ntp/install.sh | sh- watch the status in near real time:
- printf '\e[8;9;80t'; ssh -t pi5 watch -n2 chronyc sources
- printf '\e[8;9;80t'; ssh -t pi5 watch -n2 ntpq -c peer
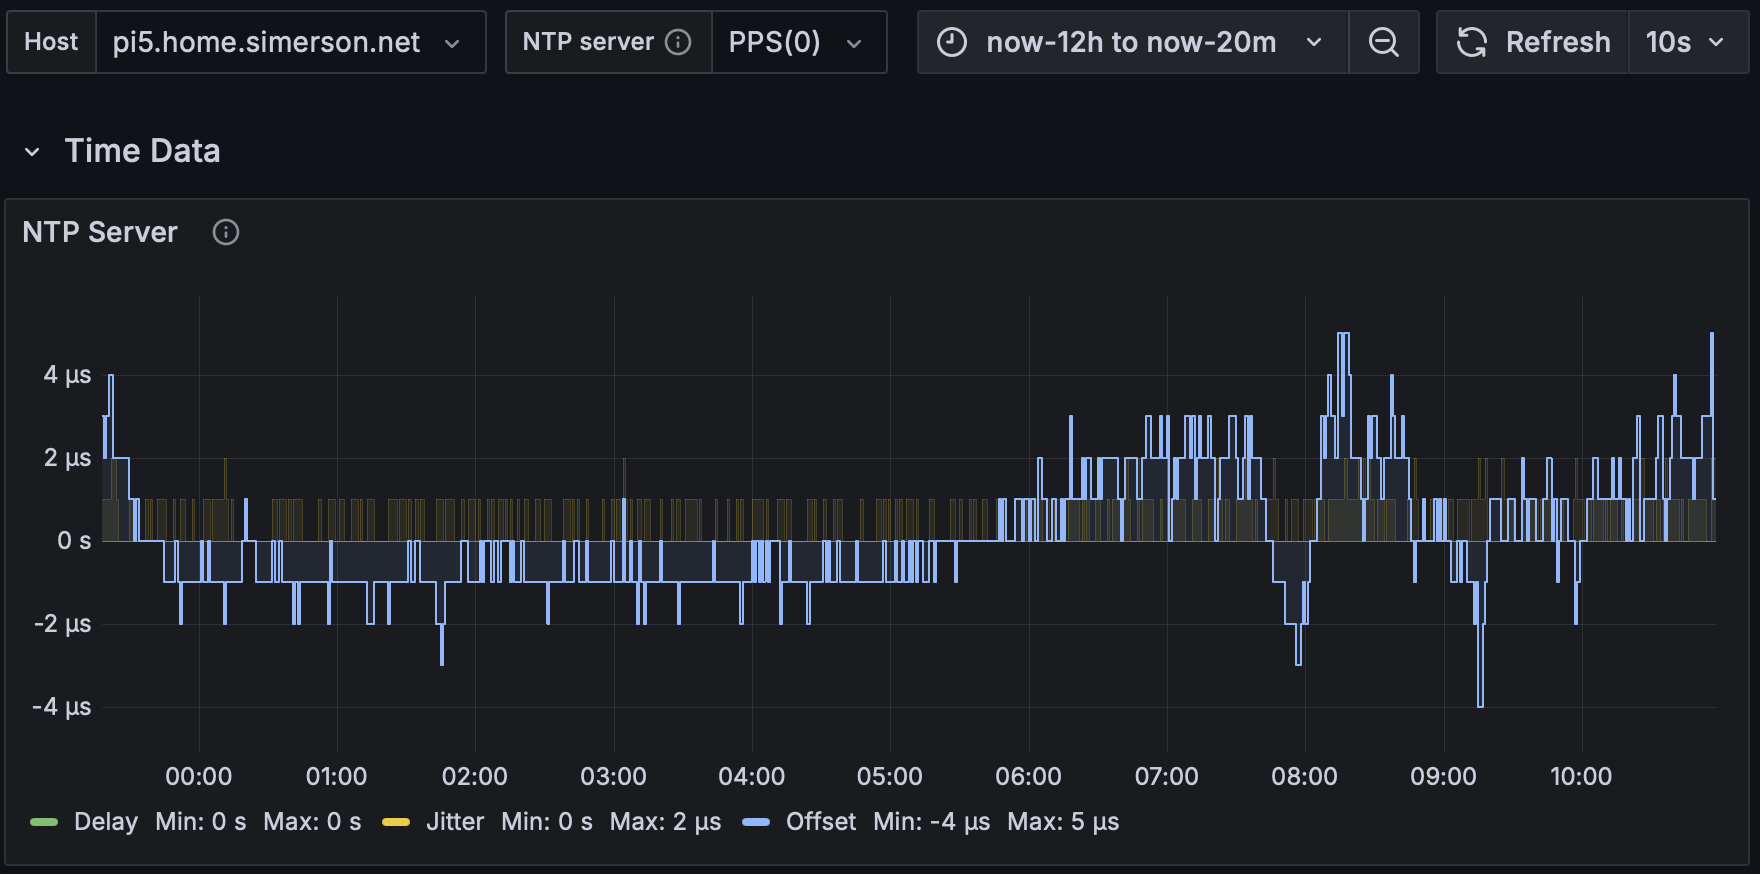
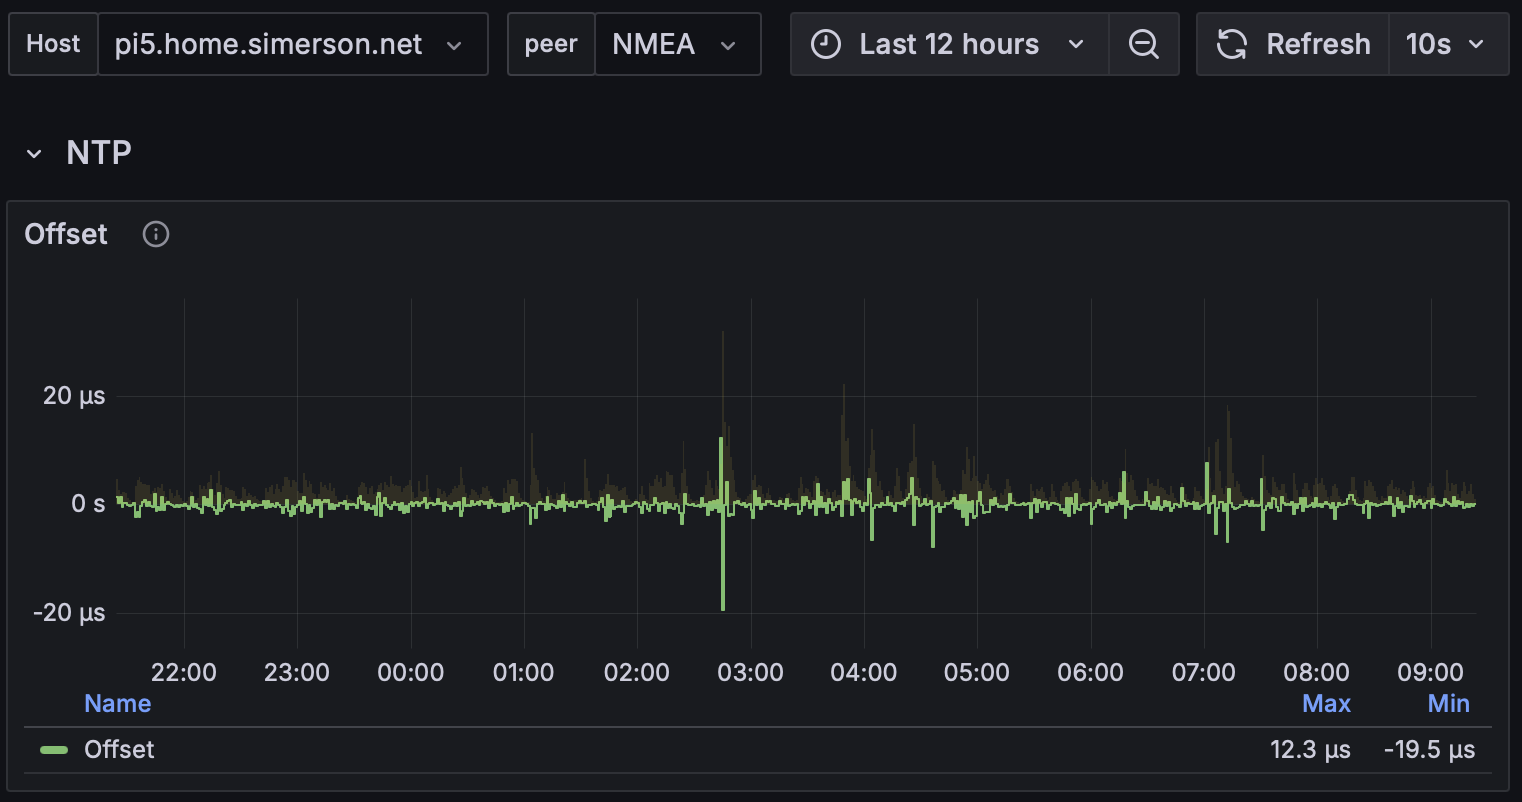
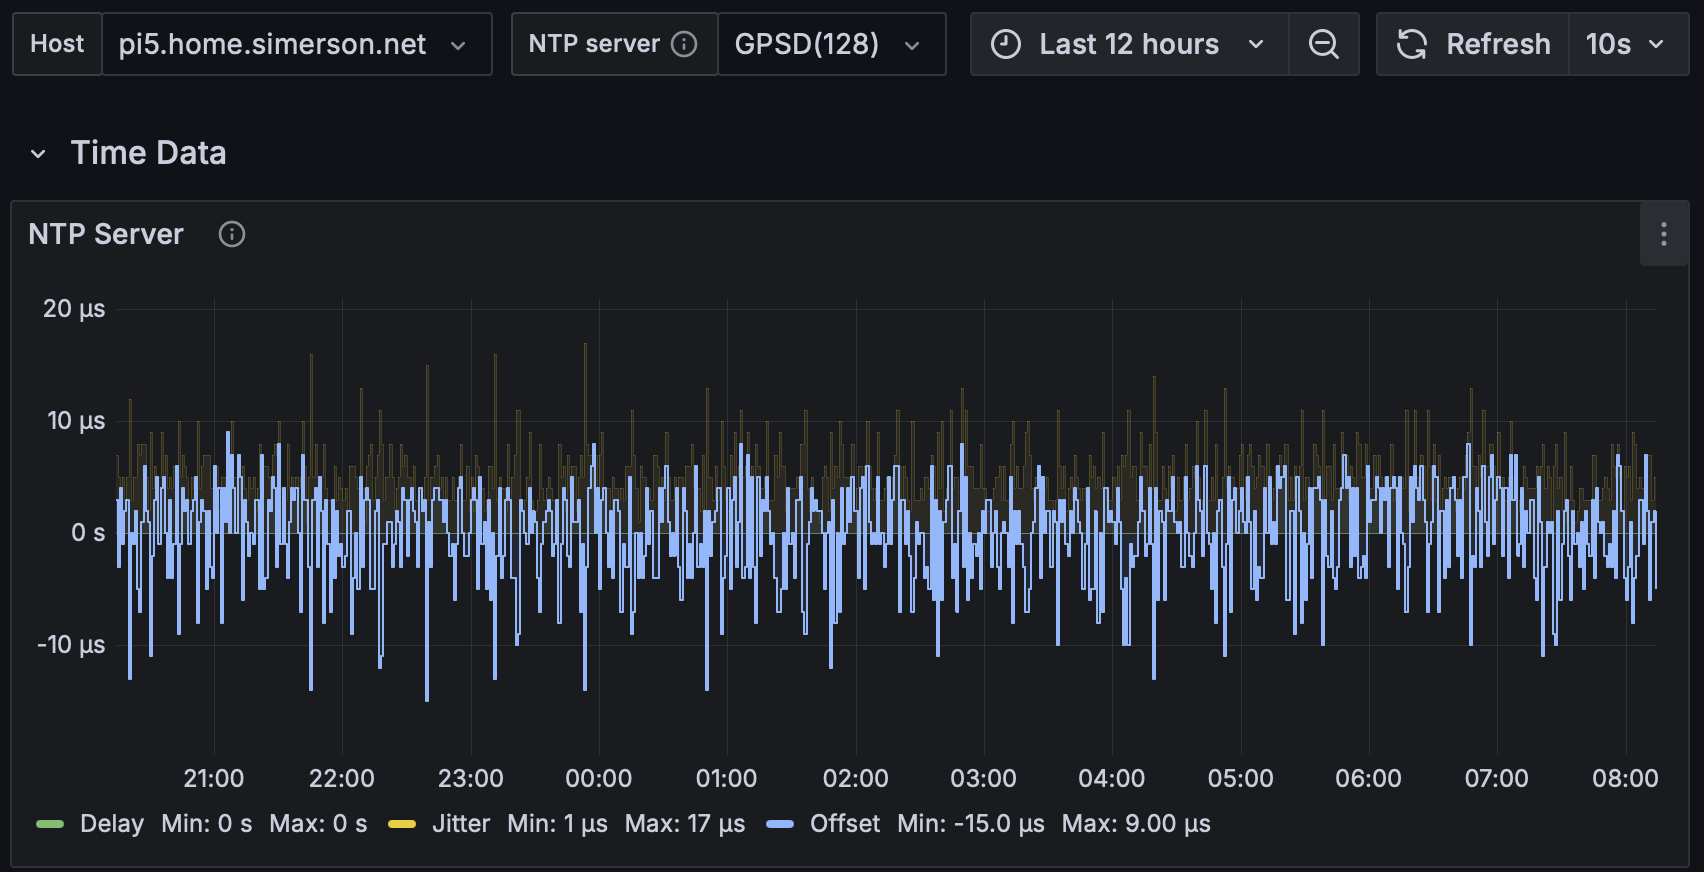
- Measure the offset
- Gather statistics with telegraf + influxdb + grafana or similar.
Chrony
NTPsec
ntp