Tutorial: Getting Started Making Mods - BLCM/BLCMods GitHub Wiki
So you want to learn how make mods? Great, you've come to the right place. This tutorial will teach you the concepts behind modding, and how to use the tools we've made to help you, but note that it will not teach you how to make your specific idea a reality, that's simply too broad. It's always good to experiment yourself, but if you ever get too stuck don't be afraid of joining the discord and asking for help in the bl-modding channel.
BL2/TPS Modding is very unique compared to modding in other games. It is based entirely around the set command, which lets us change object's fields. This leads to one of the fundamental rules that modding is based around:
We can't add or remove anything, only change stuff that already exists.
Now it helps if you already understand Object Oriented Programming, but I'm going to try give a quick overview. Loosely quoting Wikipedia:
Object-oriented programming is based on the concept of "objects", which can contain data, in the form of fields, and code, in the form of procedures. A feature of objects is that an object's procedures can access and often modify the data fields of the object with which they are associated. In OOP, computer programs are designed by making them out of objects that interact with one another.
Classes are the definitions for the data format and available procedures for a given type of object. Every object has a class.
The set command lets us modify the fields on any one of the game's objects. When the game then tries to interact with the object it will read the values we gave it instead. What exactly this does can vary greatly.
While we can't edit them, classes are also still an important concept to understand as they define how the object behaves. Two objects may interpret the same field differently if they're different classes.
Now there are two types of objects the game uses - singletons and dynamically generated objects. Simplifying a bit, singletons are baked into the game files while dynamic ones are created as needed. The stats of Torgue Launcher Barrels are stored in a singleton, while your specific Norfleet is stored in a dynamically generated object. Theoretically you can modify both types, but only singletons are practical, and will let you execute your mod a single time as you start the game.
So to recap:
- The game uses objects to store data about and perform actions on pretty much everything.
- These objects are divided into classes, which define how the objects behave
- Through
setcommands we can modify the fields on these objects, making the game behave differently. - We can't practically modify dynamically generated objects.
- We can't add or remove anything, only change stuff that already exists.
OpenBLCMM is an incredibly helpful tool when it comes to making mods, so it's important you set it up right. First you'll want to go to tools -> settings and turn on developer mode.

Next you'll want to download the object dumps for Object Explorer. Head to the OpenBLCMM Datapack Download Site and download whatever game you're interested in. Save the .jar file in the same directory which contains OpenBLCMM.jar or OpenBLCMM.exe. When you next start up OpenBLCMM, the data should be found and available for use. You can check the datapack status in the Help -> About menu.
So once you've got OpenBLCMM restarted with the object dumps installed you're probably wondering how to use them. Go to the tools dropdown and open Object Explorer. This is the main tool you will be using to help develop your mods. When it opens you will be greeted with the following window.
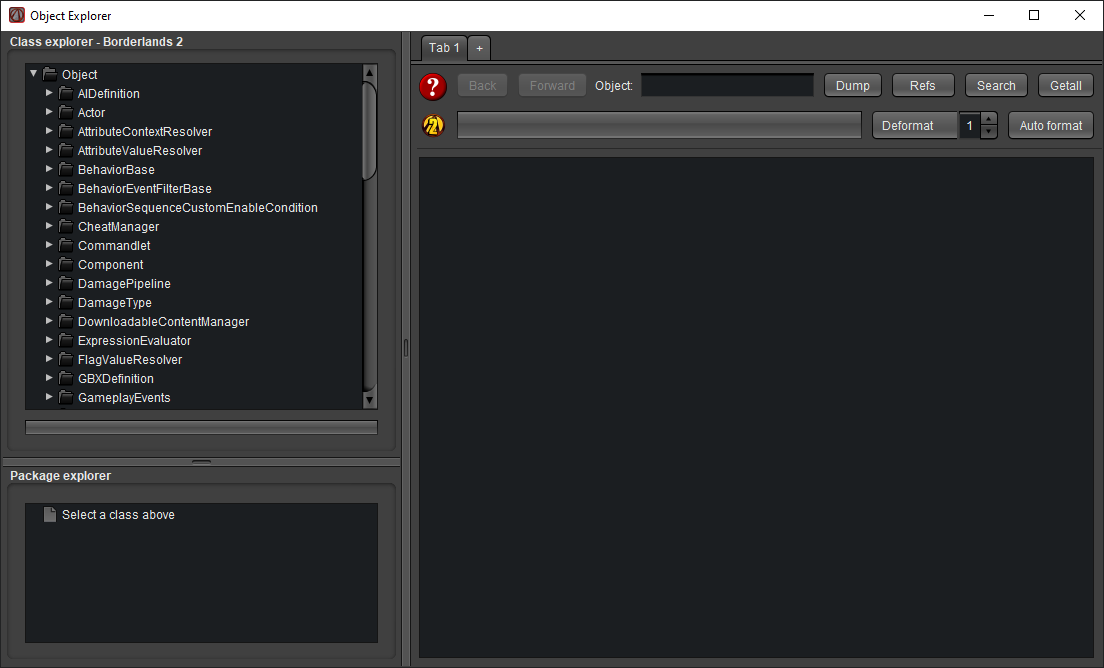
You can ignore the two panels on the left for now, they help you identify what packages objects come from, which is not needed for text mods.
The toolbar in the top/right has a number of useful fields to help you find objects. Firstly you can put something into the search bar then hit one of the buttons next to it to get the following results:
Dump: Try to show you the dump of the object you put into the search bar.
Refs: Show you a list of objects that reference the object you put into the search bar.
Search: Show you a list of objects that contain the term you put into the search bar.
Getall: Show you all objects of the class you put into the search bar.
If you just press enter in the search bar it will attempt to dump, followed by searching if that fails.
The searchbar does have autocomplete bound to Ctrl+Space. If you want to you can use this to try find objects, but getting used to the different search types will help you find them much quicker.
Under the searchbar on the left you can see the logo for the game it's currently searching through. This is based on the game of your currently open file in the main OpenBLCMM window, you can adjust it from the dropdown in the bottom-left.
Now as a demo let's actually try search for something. Let's search for everyone's favourite weapon, the grog nozzle. The previously empty panel should fill up with something like the following.
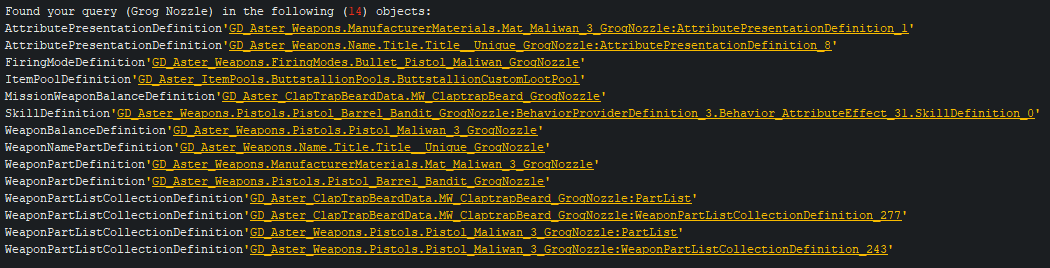
Whenever you see an underlined orange bit of text like this you can double click it to open up that object's dump. You can also double middle click, or Ctrl+Double Click to open it in a new tab.
Let's open up the last one:
WeaponPartListCollectionDefinition'GD_Aster_Weapons.Pistols.Pistol_Maliwan_3_GrogNozzle:WeaponPartListCollectionDefinition_243'
When you open up this object you will see it has a lot of long lines that are hard to read. This is what the Deformat and Auto Format buttons are for. Try press them, and mess around with the deformatting level until you get something you can easily read.
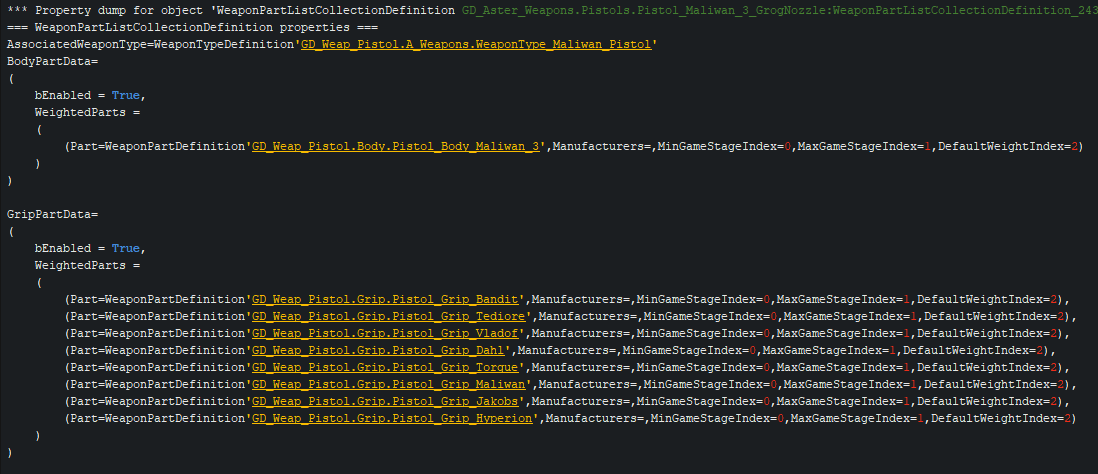
Now as you can see this object contains a lot of references to individual weapon parts. This isn't really that surprising from the class name - it's a WeaponPartListCollectionDefinition, sure sounds like it should hold a collection of weapon part lists.
Now let's get used to the OE controls a bit more, let's follow the very first reference:
WeaponTypeDefinition'GD_Weap_Pistol.A_Weapons.WeaponType_Maliwan_Pistol'
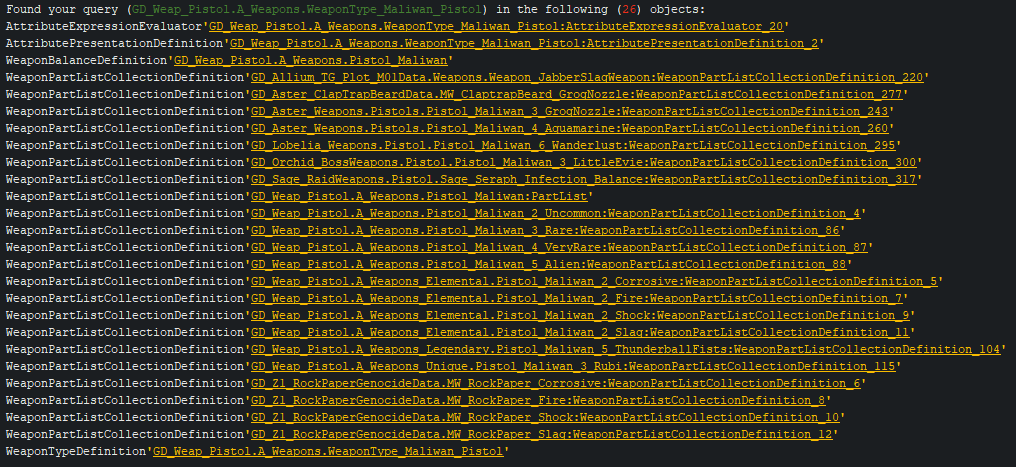
Here you can now see a completely new object that defines the Maliwan Pistol weapon type. Now let's see what else uses this object, hit the 'Refs' button. You should see a list mostly comprised of other WeaponPartListCollectionDefinitions referencing other Maliwan pistols.
At this point you should know enough to find most objects you'll need, and with practice you'll get better/quicker at finding them. There are some more advanced things you can do in object explorer (hover over the question mark), but it's time to move on.
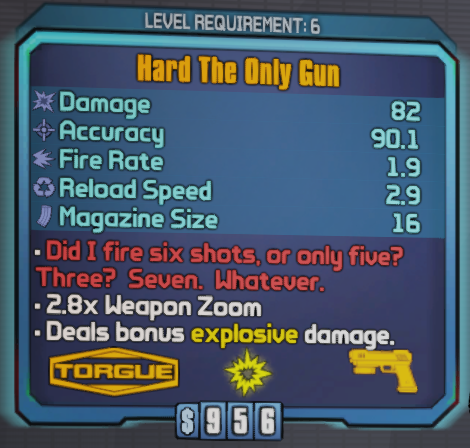
So now that you've gotten used to navigating through object explorer, let's finally get started making a mod. We're going to keep it simple for now, just a small text edit, we're going to change the name of the Unkempt Harold. So first let's just try find the object that controls it's name.

Well that was easy. This search reveals another unfortunate reality of modding:
Object names don't always correspond to what they control.
This is especially evident in TPS, which reuses a lot of BL2 objects for different purposes.
In this case, the game refers to the Unkempt Harold as "Calla", and a search for this quickly reveals more objects.
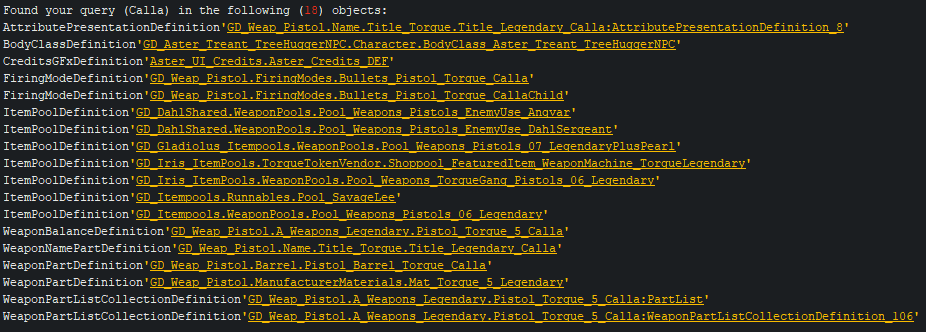
We found the object we wanted in the first search so this doesn't really matter, but it's always something to keep in mind. Right near the top of that object we can find what we're looking for.
So now we know where the game stores what we want to modify, but how do we actually change it? Go back to the main OpenBLCMM window and create a new file (you don't want to have existing mods conflict while testing). Right click the header and click insert (or just press insert) and a new window will open up. This is where you will type your commands.
Technically OpenBLCMM does support a few different commands, but all you're ever going to need is the set command. For simplicity's sake you can assume that anything you type that doesn't start with set will end up as a comment. So what exactly is the set command? It's just a regular Unreal Engine console command. A mod file is just a list of console commands that the game runs one by one. Now what does this command do? Let's check the UE3 documentation:
SET - this one is the most powerful of them all. It takes as the first parameter string a class name, the second string a variable name, and the third string, a value. All objects of the given class (including subclasses) will have the given variable set to the given value. For example "set Pawn CollisionRadius 200" will make all pawns have a collision radius of 200. (See PawnTricksAndTips? for more details). In v3323 the set command has limited functionality when using online, this is to limit cheating.
The docs are actually kind of wrong here, the command also accepts the names of specific objects, and it will only affect that object.
So the first argument is our object, the second is the field (or variable as they call it), and the third is the new value. Let's try it.
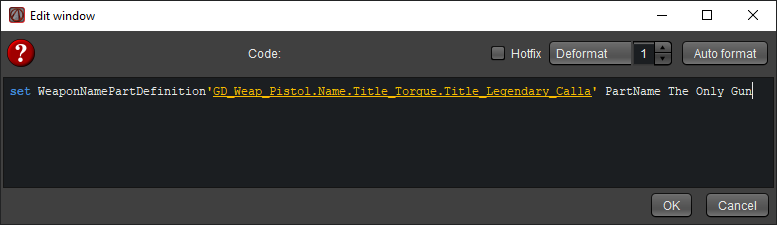
Now hit OK, enable the new command you added, save the file, go in game and execute it, and let's go check if it worked.
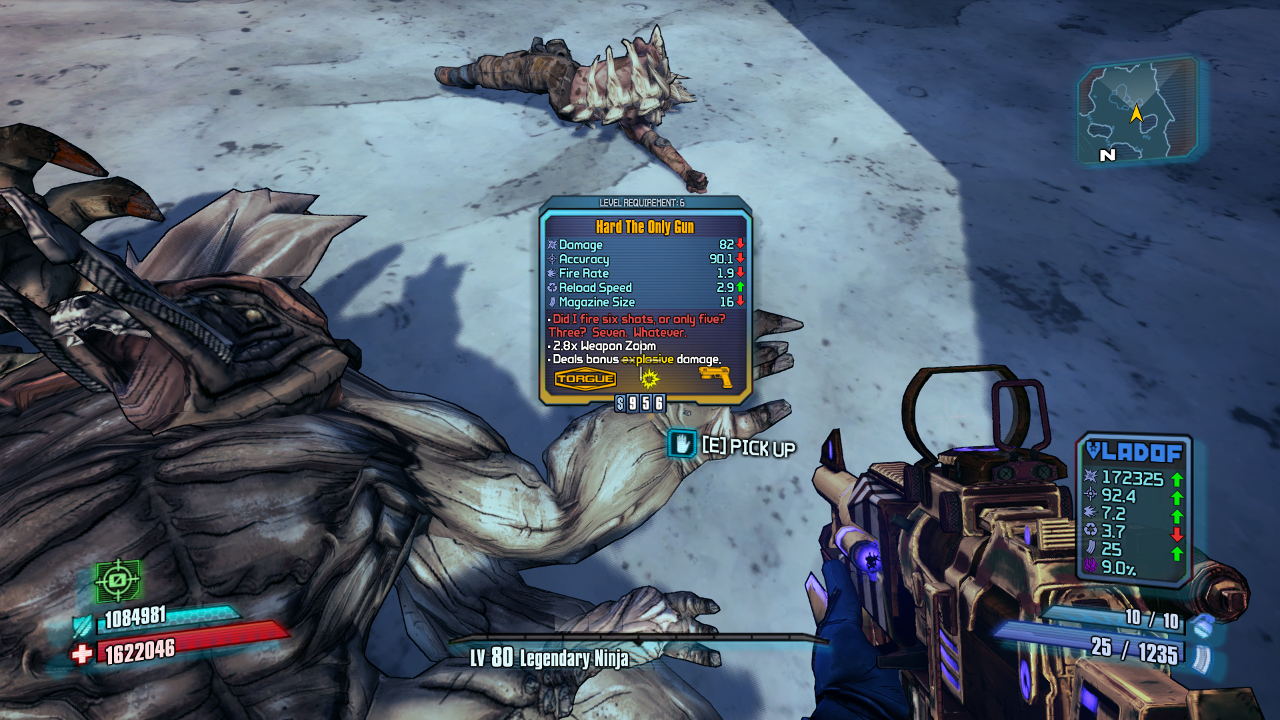
So your mod isn't quite working and you want to make sure you haven't gotten your command wrong. How can you do that? OpenBLCMM will warn you for some more obvious errors, but it won't do everything. The answer is to check the object in game, using another console command.
OBJ DUMP - Dump all variable values for the specified object, supports specifying categories to hide or show (hide=movement,collision)
- [class] - plain name or CLASS= or NAME=
- HIDE= - Comma separated list of categories to exclude.
- SHOW= - Comma separated list of categories to include.
Again the docs just mention classes, but this works on specific objects too. So using our previous mod, let's try run:
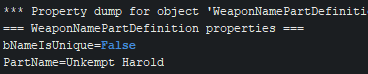
obj dump WeaponNamePartDefinition'GD_Weap_Pistol.Name.Title_Torgue.Title_Legendary_Calla'
The console will get spammed with a lot of data that you might recognise. Use PageUp/Down or your scrollwheel to scroll up until you find what you were editing.

It worked (as we already saw). If you don't see what you expected then your command is wrong somewhere. The game will try to guess what to fill it in with, so if half of the value looks fine then check about where it breaks in the command, the error is likely around there.
If you're dealing with a much more complicated command that spills over multiple lines you might find it hard to read. If this is the case, run the command flushlog, then open up Documents\My Games\Borderlands 2\WillowGame\Logs\Launch.log. From this file you can copy paste the output back into a OpenBLCMM window, then use the deformatter to make it more readable.
So at this point you know how to create a basic mod. The exact same concept extends out for all mods, but there are a few common formatting issues you might run into.
All examples here are going to be on the UH barrel:
WeaponPartDefinition'GD_Weap_Pistol.Barrel.Pistol_Barrel_Torgue_Calla'
Sometimes you may come across values that looks a little like the following.

This is a struct. Structs are surrounded by brackets, and contain more field = value pairs.
Now let's say you wanted to modify this to use the purple rarity object instead, how would you go about that? Well you can start it just like normal, but when it comes to the value you're going to have to copy the entire line (remember it was one line before OpenBLCMM deformatted it). If you don't copy everything the game will try to guess the other values, which may have unintended results.

OpenBLCMM will deal with all the formatting so you can safely leave it on multiple lines like that.
Now that you have a command ready you can modify it's fields - autocomplete (Ctrl + Space) works in the set window too. Let's change it to use ItemRarity4_VeryRare, then exec the file and check out our work.
Oh dear. Let's check the object dump though.

It did change here. This means that our command was fine, there's just another factor controlling the rarity that we'd have to change if we wanted to continue.
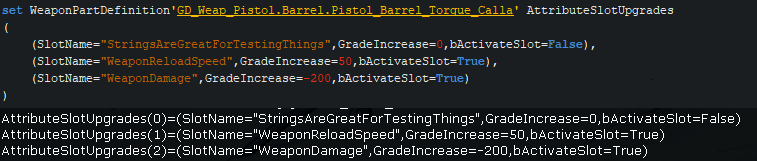
Another bit of odd formatting you may come across looks a little like this:

This is an array. Arrays have numbered fields in round brackets, followed by a value. This is just a special way of printing however, setting array fields is rather different. If the dump shows the following:
Field(0)=FirstValue
Field(1)=SecondValue
Field(2)=ThirdValue
Then your command has to be set out like the following:
set <obj> Field (FirstValue, SecondValue, ThirdValue)
Essentially, replace Field(0)= with an opening bracket, every other Field(n)= with a comma, add a closing bracket to the end, then reformat the whitespace.
Note that if these values are structs, like in our example, then the entire struct, including brackets, needs to be between the commas. Our example should look like this in set command format:

Arrays somewhat break the fundamental rule of modding mentioned at the very top of this guide - that you can't add or remove anything. When you set an array you are allowed to add as many entries as you like. The object dump will show one line per entry. As you may have worked out, unfortunately this also means that if an array is empty it won't show up in the dump. The only way to find out about empty array fields is to find another object where they're used.
For now let's test the following:
The last formatting oddity is rather similar to arrays.

There are two small differences here - fixed arrays use square brackets rather than round ones, and they will print multiple None values.
Trying to use a normal array command on these does not work well.

Instead, it turns out you can use a completely normal set command as if this was a regular field - but only for the first value. To modify the other values you have to use hotfix syntax, something we'll cover soon.

For the programmers, the normal arrays are more akin to List<T>()s, while these are T[n]s.
So as you go about experimenting with various mods you'll eventually come across some commands that just don't work. Take this one for example.

When you try to execute this command you will may get an error. In fact if you just try to dump the object you will also get an error.

So what is going on here? In an effort to save memory on consoles, the game only loads certain objects when they are needed. If no one is playing Zero, it doesn't need to load info about his skills. You might actually have noticed that those commands ran fine if you were playing him. Some objects are also level specific, there's point in loading something the Warrior while you're still in Southern Shelf.
But now how can you make a mod that modifies these objects? You don't want users to have to re-execute it every time they load. The answer is hotfixes.
Hotfixes are a system Gearbox implemented to let them make small adjustments to the game without releasing a whole new patch. They publish some changes on the SHiFT servers, your game downloads them, then as needed it makes the adjustments. If you were around near the game's release you may remember some of the things they used these for. And because Gearbox wanted to modify some of these objects that aren't always loaded, they gave the system the ability to change them.
So when the game downloads hotfixes where are they stored? As it turns out, they store it in an array on an object we can access. This means we can add our own hotfixes, and use their system to modify these objects that aren't always modified. OpenBLCMM abstracts out a lot of the hotfix formatting, so you can keep writing normal set commands, you just need to fill out some extra info. Let's start by ticking the hotfix box.
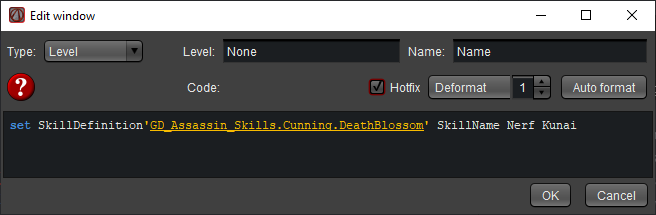
This adds three new fields you'll want to fill out. The Name field is functionally useless, as OpenBLCMM with deal with the formatting anyway. The Type field affects when exactly the hotfix modifies the object. There are three types:
Level: These hotfixes are run every time you load a level. You can give it a specific level, in which case they will only be run when you load that specific level. Unsurprisingly, these are used for things specific to levels. Most of the time you need a hotfix these will do.
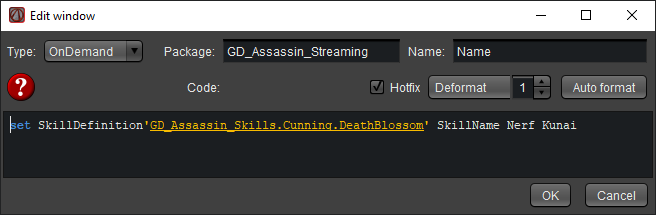
OnDemand: These hotfixes are run every time the specified package is loaded. You will have to specify a package, you can't just leave it as "None". These are used for character specific stuff as well as vehicles.
Patch: These hotfixes are run when you hit continue/new game. At this point no new objects are loaded, so they act the exact same as a normal set command and are generally useless.
Level and OnDemand hotfixes have the last field, Level/Package. You should use autocomplete (Ctrl + Space) to fill these in. If you don't see what you want then you probably don't actually need a hotfix.
So taking what we've learnt, you want to change our command to be an OnDemand hotfix on Zero's package.
Note that hotfixes won't cause errors if you get something wrong, so it can be a good idea to test your command as a regular command before making it into a hotfix, just make sure the object is loaded before you start testing.
Because hotfixes run through a different system to normal set commands, they add a bit of new syntax.
When you use a normal set command you have to overwrite the whole field. If you have an array with hundreds of entries, or a large amount of nested structs, then this gets a bit overwhelming, especially if you only want to make a small change. Let's look at one of our previous commands.
Let's say we only wanted to adjust the second GradeIncrease field, let's make it -50. With a normal set command you'd have to overwrite everything. With a targeted set command you can do the following:
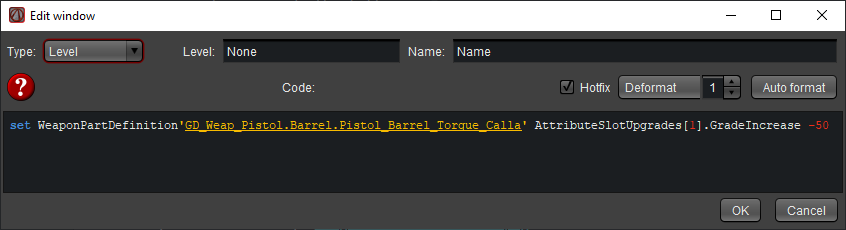
There are two techniques in use here:
-
If you have an array (or fixed array) you can add an index in square brackets to refine the command down to just that particular entry. Note that these are 0-indexed, meaning the first entry is index 0, the second is 1, and so on.
-
If you have a struct you can add a dot separator followed by a child field to refine the command down to just that child field.
You can combine these two techniques in any way you like in order to get down to a single value.
Remember the original purpose of hotfixes? Gearbox wanted to be able to make changes without pushing a new patch. But what happens when a new patch comes out? If they changed one of the hotfixed values then the hotfixes would still overwrite it. Now this isn't a problem if it's the same value, and if they didn't change the value then they probably still want the hotfix to work. But what if they changed the value, but to something other than what was in the hotfix? They implemented comparison edits for this reason.
Essentially, you can tell a hotfix to only apply if it's field is current at a certain value. If it's a different value then it won't be changed. Gearbox's hotfixes use this extensively, though it is less common in modding.
So how do you use comparison edits? OpenBLCMM created a special syntax for these, the set_cmp command.
set_cmp <obj> <field> <expected value> <new value>
This is not a real command and won't work in the console or outside of hotfixes.
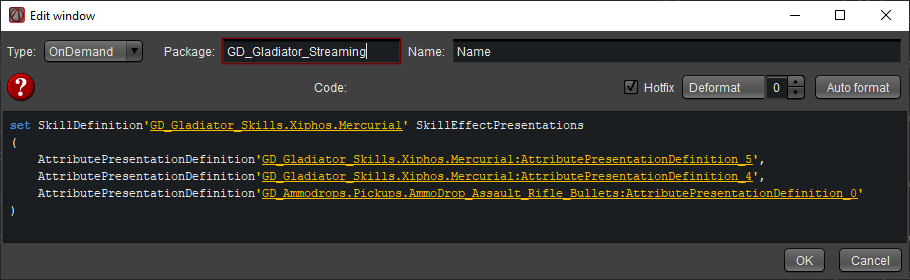
In TPS there added one extra bit of special syntax that lets you append to arrays. Create a new mod file, set it to TPS, then let's look at the presentation array for Mercurial, on the object:
SkillDefinition'GD_Gladiator_Skills.Xiphos.Mercurial'

Let's quickly grab another random AttributePresentationDefinition to append, making sure it's not one that'll only be loaded on another character:
AttributePresentationDefinition'GD_Ammodrops.Pickups.AmmoDrop_Assault_Rifle_Bullets:AttributePresentationDefinition_0'
This is how you'd normally adjust the array. Note that this is an OnDemand hotfix because it's one of the objects only loaded when playing Athena.
To append an entry to an array, you simply make the value be the new entry prefixed with a plus.
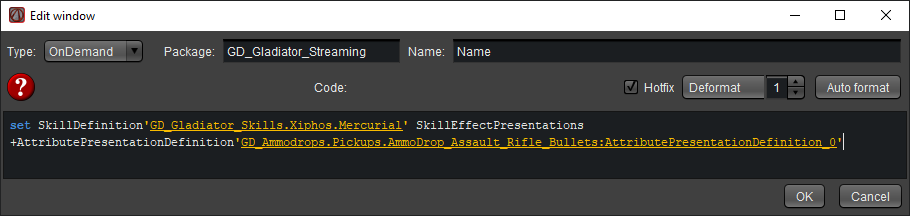
Now let's save and execute the mod, and load an Athena to check.

You do need to be careful of when exactly your hotfix runs however. If we used a level hotfix and switched maps a few times we'd get this.

If the object hasn't been unloaded and reloaded when the hotfix runs again then it will just keep adding the same thing.
Not even Gearbox is immune to this problem. To try give the Boomacorn, the Jack O' Cannon, the Machine, and the Ol' Painful loot sources they added hotfixes adding them into the rare lootpool for their relevant weapon types. But they messed up this appending, so every time you save quit another 6 copies of the same gun get added into the lootpool, eventually making them almost guaranteed.