Getting Started With the Due - Autonomous-Motorsports-Purdue/Electrical_Documentation GitHub Wiki
Getting Started
The Arduino Due is a microcontroller board based on the Atmel SAM3X8E ARM Cortex-M3 CPU. It is the first Arduino board based on a 32-bit ARM core microcontroller.
The Arduino Due is programmed using the Arduino Software (IDE), our Integrated Development Environment common to all our boards and running both online and offline. For more information on how to get started with the Arduino Software visit the Getting Started page.
Use your Arduino Due on the Arduino Desktop IDE
If you want to program your Arduino Due while offline you need to install the Arduino Desktop IDE and add the Atmel SAMD Core to it. This simple procedure is done selecting Tools menu, then Boards and last Boards Manager, as documented in the Arduino Boards Manager page.
Attach the USB micro side of the USB cable to the Due's Programming port (this is the port closer to the DC power connector). To upload a sketch, choose Arduino Due (Programming port) from the Tools > Board menu in the Arduino IDE, and select the correct serial port from the Tools > Serial Port menu.
Installing the Arduino Sam Boards core
If you are using the Arduino IDE version 1.6.2 or newer you need to install the core that supports the Arduino Due. Please follow this guide to install the new core.
Installing Drivers for the Due
OSX
- No driver installation is necessary on OSX. Depending on the version of the OS you're running, you may get a dialog box asking you if you wish to open the "Network Preferences". Click the "Network Preferences..." button, then click "Apply". The Due will show up as "Not Configured", but it is still working. You can quit the System Preferences.
Windows
(tested on xp and 7)
-
Download the Windows version of the Arduino software. When the download finishes, unzip the downloaded file. Make sure to preserve the folder structure.
-
Connect the Due to your computer with a USB cable via the Programming port.
-
Windows should initiate its driver installation process once the board is plugged in, but it won't be able to find the driver on its own. You'll have to tell it where the driver is.
-
Click on the Start Menu and open the Control Panel
-
Navigate to "System and Security". Click on System, and open the Device Manager.
-
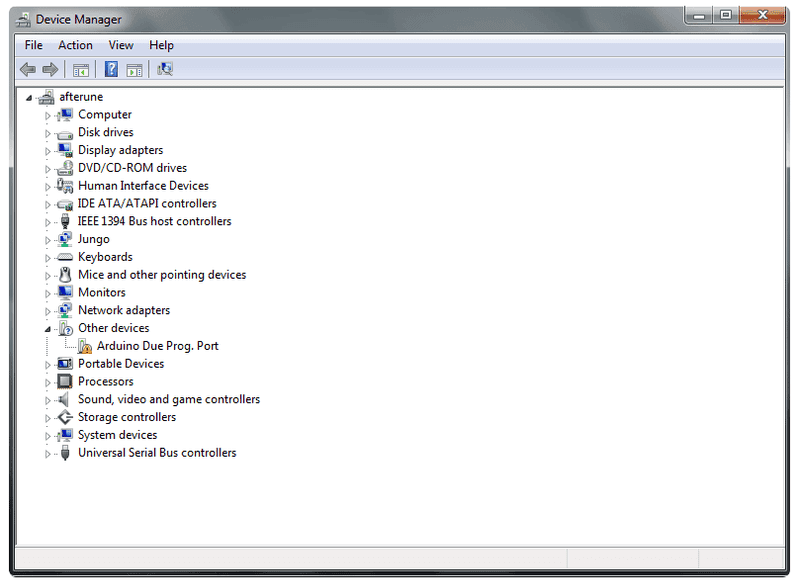
Look for the listing named "Ports (COM & LPT)". You should see an open port named "Arduino Due Prog. Port".
- Right click on the "Arduino Due Prog. Port" and choose "Update Driver Software".
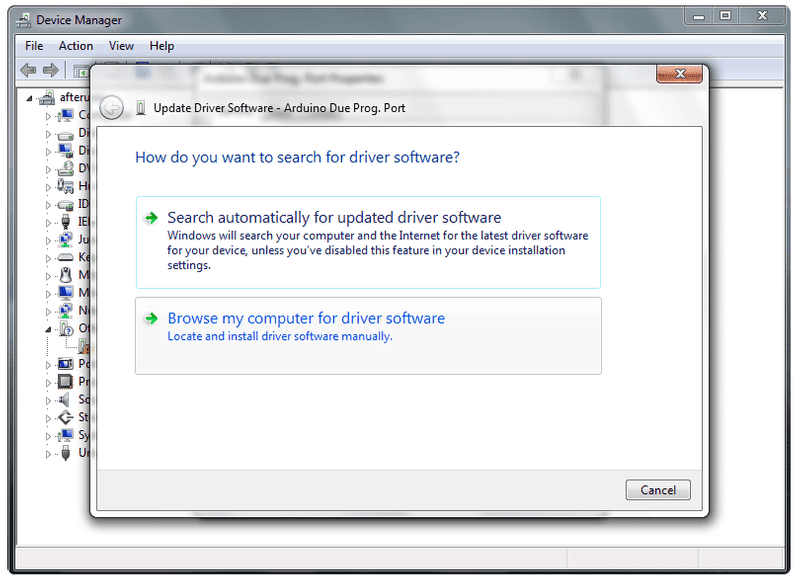
- Select the "Browse my computer for Driver software" option.
-
Navigate to the folder with the Arduino IDE you downloaded and unzipped earlier. Locate and select the "Drivers" folder in the main Arduino folder (not the "FTDI USB Drivers" sub-directory). Press "OK" and "Next" to proceed.
-
If you are prompted with a warning dialog about not passing Windows Logo testing, click "Continue Anyway".
-
Windows now will take over the driver installation.
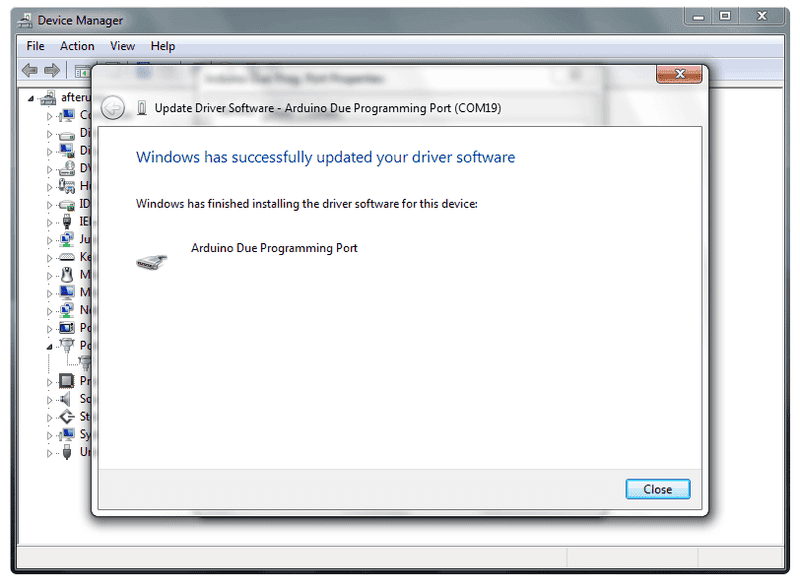
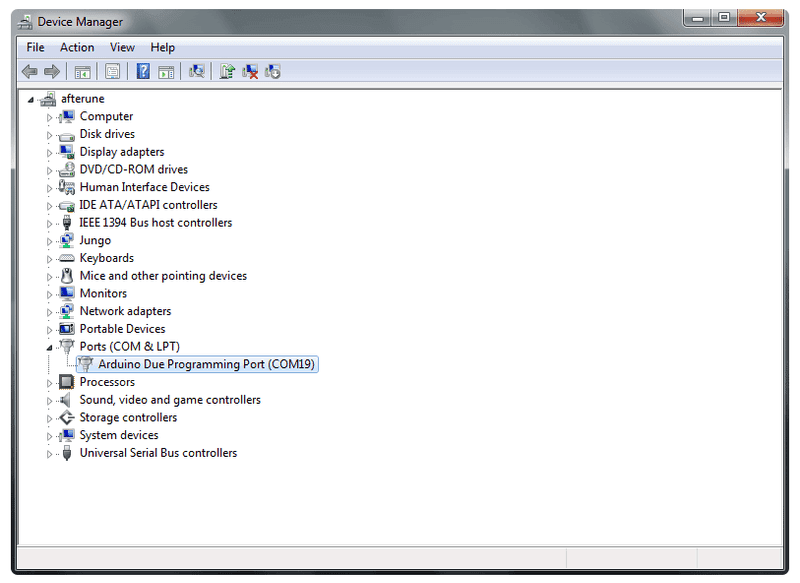
- You have installed the driver on your computer. In the Device Manager, you should now see a port listing similar to "Arduino Due Programming Port (COM4)".
Linux
- No driver installation is necessary for Linux.
Select your board and port
The uploading process on the Arduino Due works the same as other boards from a user's standpoint. It is recommended to use the Programming port for uploading sketches, though you can upload sketches on either of the USB ports.
For uploading with the Programming port follow this steps:
-
Connect your board to the computer by attaching the USB cable to the Due's Programming port (this is the port closer to the DC power connector).
-
In the "Tools" menu choose "Serial Port" and select the serial port of the Due
-
Under the "Tools > Boards" menu select "Arduino Due (Programming port)"
Open your first sketch
Everything is now ready to upload your first sketch. Go to File on the Arduino Software (IDE) and open the Examples tree; select 01. Basic and then Blink
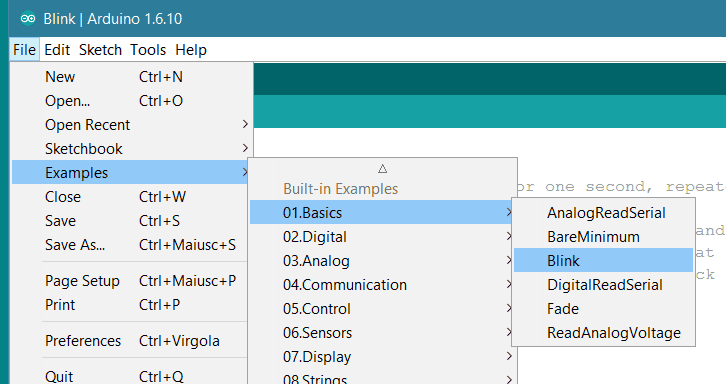
This sketch just flashes the built in LED connected to Digital pin 13 at one second pace for on and off, but it is very useful to practice the loading of a sketch into the Arduino Software (IDE) and the Upload to the connected board.
Upload the program
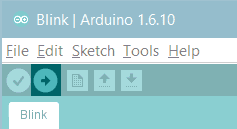
Press the second round icon from left on the top bar of the Arduino Software (IDE) or press Ctrl+U or select the menu Sketch and then Upload.
Learn more on the Desktop IDE
See this tutorial for a generic guide on the Arduino IDE with a few more infos on the Preferences, the Board Manager, and the Library Manager.
You have successfully set up your 101 board and uploaded your first sketch. You are ready to move on with our tutorials and projects: choose your next destination below.
More
This page is mostly a shortened version of Arduino's official getting started with DUE. More info and the official site can be found here.