Configuring the Software - Anashost/ESPSomfy-RTS GitHub Wiki
From here on out we just need to get the shades talking to the ESPSomfy RTS device. You will first connect the device to your local WiFi network then add the shades, pair them, and link the remotes.
Initial WiFi Connection
When the software is first connected it will start its own ESPSomfy RTS wifi network. You will need to connect to this network so you provide the WiFi credentials for your network. So open your WiFi networks and connect to the unsecured network named ESPSomfy RTS. Once connected navigate to http://192.168.4.1 and it will bring up the blank shades screen. Click on the gear icon at the upper right to open the configuration screen and select the WiFi tab. Initially, the transceiver will not be initialized until you enable it in a later step. This is to ensure you have the pin mappings set correctly.
Press the scan button and when the list returns, select your WiFi network, enter the passphrase and hit save. If you have one of the hardwired ethernet ESP32 devices you may select the Use Ethernet checkbox. See the section below on configuring ESPSomfy RTS to use a hardwired ethernet connection.

While you are here, click on the General tab and provide a unique host name for the device. This will allow you to connect to it using the name of the device rather than the IP address. If you skip this step for now you will need to find the IP address of the device assigned by your router. You can also find it in the Network section of Windows Explorer as it will show up by default. Double clicking on it will bring up the Home Page.
You will need to disconnect from the wifi network after you have provided your credentials to see the device on your local network. This will disconnect the ESP32 from its own network and connect it to your WiFi network.
From here on out you can access it by navigating to http://ESPSomfyRTS.local on your local WiFi network. That is until you change the host name and it will then start to use http://<your hostname>.local. This allows you to have several ESPSomfy RTS modules on your network at the same time each with thier own name.
You probably only need this if you have more than 32 shades to control, or the radio is encased in Kryptonite diminishing the signal, or it is located on another planet, or has a magic spell of protection on it. It should also show up in your Windows networking list as the module has SSDP and mDNS built in. Lots of unlikely or's just had to be listed.
Using Hardwired Ehernet
ESPSomfy RTS supports hardwired Ethernet boards. If your board is not listed you will need to review the spec sheet for your board and apply the settings from this information. ESPSomfy RTS will also perform a fallback to a wireless connection should the Ethernet cable become disconnected that is if you have provided valid WiFi credentials in the WiFi section. ESPSomfy RTS will only enable one interface at a time since initial testing with both enabled, really slowed down performance.
To use a board that has hardwired Ethernet click the Use Ethernet checkbox to enable the options for configuring your board. Then select your Board Type from the board type dropdown. If your board is not listed use a custom board type and ensure the documentation for the board matches the configuration. It is very important that the information related to the board is consistent with the manufacturer's settings. Incorrect settings for an Ethernet jack can destroy the board since the pins are not protected.

General Settings
Once the ESPSomfy RTS device has rebooted access the General tab. There are a few options here for the server. This includes the host name of your Somfy server as well as the time zone and whether the server should announce iself over Universal Plug & Play. If you have isolated the device on your network you can choose a timeserver that is local to your network. This will ensure time logs and backups are in sync.

Set up the Transceiver
Initially, ESPSomfyRTS will start with the transceiver disabled. You will need to ensure the pin mappings match the wiring that you used when initially building your device. To set up and configure your transceiver navigate to the transceiver configuration screen. From the gears menu click the Somfy tab then click the Configure Transceiver button. A screen will appear with the transceiver options.
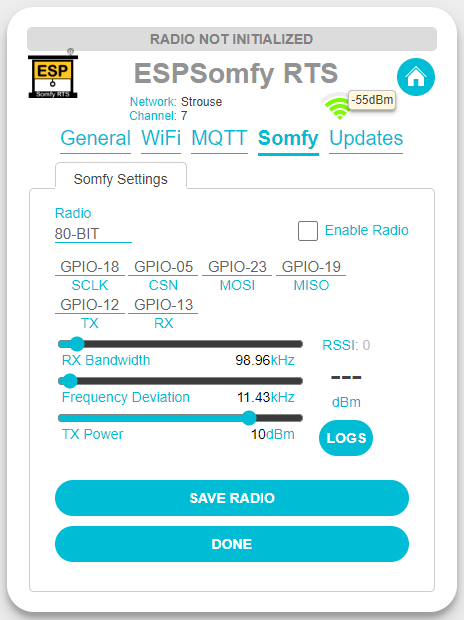
First you need to select the radio type. If you do not know what type of motor radio you have it is likely a 56-BIT motor. Leave it here for now. Next review each of the pin selectors and set them to the proper pin assignment for your wiring. The screen will default to the default wiring from the hardware build but please double check to ensure these values match the way you wired the transceiver. If you used a wired Ethernet board these will most definitely not be correct.
After you have verified the pins, click the Enable Radio checkbox and then press the Save Radio button. ESPSomfy RTS will now enable the transceiver into receive mode so you can tune your radio. Once the radio has been enabled, the Radio not Initialized header will disappear from the screen. If the message does not disappear, then you likely have an issue with your pin selections.
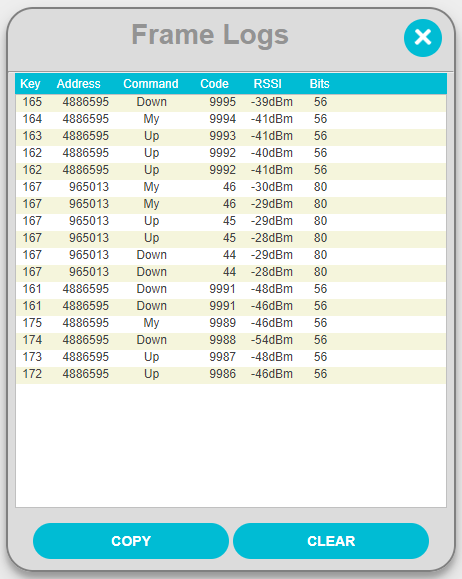
You can view all incoming frames from your remotes with the Logs button. This will display the frames with the most recently received frame at the topmost position. Pressing the Copy button will copy the current command list into your clipboard. If you are submitting an issue that ESPSomfy RTS doesn't recognize a particular command this will help with debugging and allow me to provide further assistance.
Tune your Transceiver
The default tuning parameters are most likely not the best settings for your transceiver. To start, first select the RX Bandwidth to 96.96kHz and the Frequency Deviation to 11.43kHz. You can use the arrows on your keyboard to fine tune the value. Then press the Save Radio button. Next, using a remote from about 3 feet away press one of the buttons. ESPSomfy RTS should pick up the signal and provide an RSSI (Received Signal Strength Indicator) value. This number is a measurement of how strong the signal is. The closer this value gets to 0 indicates a stronger received signal.
Each time you press a button it should increment the number next to the RSSI: label. Below is from a DSUN radio and this is the best I could get it to do at 3 feet. Bear in mind this has to do with many factors but if you are getting -60dBm consistently then it is still better than the reception on the motor. The range for Somfy remotes is not great. They use a PCB antenna and from my novice inspection, I could not find an amplifier circuit.

This same configuration it an E07-M1101D transceiver was registering -32dBm on average.

Tuning the RSSI value requires moving the sliders to the left (more narrow) or the right (wider) to get the best reception. ESPSomfy RTS tunes the radio center point to 433.42mHz. The RX Bandwidth controls how much of the frequency is listened to so a narrower bandwidth filters out more noise but a wider bandwidth hears more. 97.96kHz gives me good range in my environment but your mileage can vary depending on what other interference is nearby.
If you place the receiver on the top of a microwave (don't put that or small animals in there) then you will likely need to narrow the bandwidth as much as possible. As a suggestion don't do that and find a place for the radio away from interference and small animals.
The Frequency Deviation setting determines how much signal difference from low to high or high to low is required to trigger a data bit. The wider the deviation is, the stronger the signal must be. Conversely, when you set this more narrow, there is a greater likelihood of picking up distant noise. Setting this value to 11.92kHz initially seemed to have a good trade-off for me for noise and range.
I would be remiss if I didn't mention folks with a frequency analyzer for which I am not one. Hence the basic settings on the configuration page. If you are a radio head, and not just some dude who has listened to their music, open an issue or discussion so we can benefit from your findings.
The TX Power determines how loud the transceiver shouts at the motors. You can leave this at 10dBm unless your transceiver is one of the ones that support up to 12dBm. Either way this range is much further than the typical Somfy remote and at 10dBm you should be able to control the shades from a great distance. If only the Somfy remotes had better range -- sigh.
Shade Setup
The ESPSomfy RTS device supports a maximum of 32 shades, blinds, or draperies. So if you live in a glass house don't throw rocks make another device. You can also modify the code to increase the SOMFY_MAX_SHADES value but you will eventually run out of memory on the ESP32. So stop being so cheap and build another $12 device.
ESPSomfy RTS needs a bit of information about each motor it is controlling as well as any other means of controlling said motors. This will ensure that the shade positions are always in sync. Up is up and down is down and any position in between is a percentage of down. So if you are used to the percentage of up translation from others, then get used to a percentage of down.
No matter if I am standing on my head or in any other position, I cannot square a percentage of open in my mind. It doesn't work, 100% is not open and 0% is not closed. I just can't convince myself of that backwards logic any better than I can convince myself that I look great in a turtleneck. So before you submit an issue that it is backwards just don't. Then ask yourself if you remove the shade completely... is that 100%. If it is you need help.
At this point it is probably beneficial to provide a little bit of a glossary.
- Blind - A window covering made up of slats with a single up/down motor and an optional tilt motor.
- Shade - A window covering that is made up of fabric with a single motor that drives the shade covering up or down. This term is also used as a generic term referring to a defined Shade, Blind, or Drapery in the ESPSomfy RTS software.
- Remote - A physical device such as a Telis or Situo channel that is used to control the said motor(s). Keep in mind a Telis 4 is actually 5 remotes but who's counting.
- Linked Remote - A remote that is used to control a particular motor that the ESPSomfy RTS module should know about. ESPSomfy RTS needs to know about these so that if a button is pressed on an external remote it knows what the current position is of the shade should be.
- Pairing - The process of linking the defined shade in this software so it can control the shade.
Adding a Shade
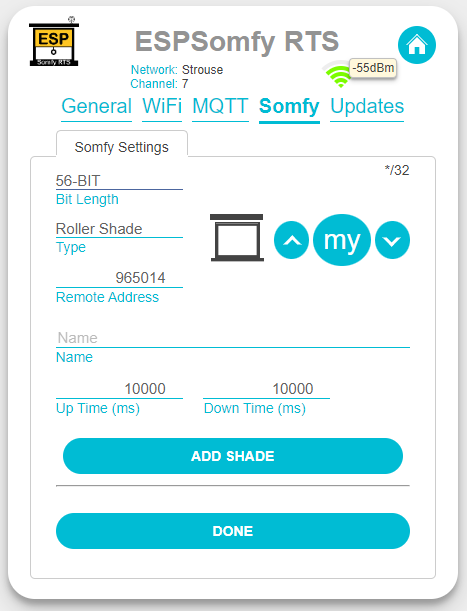
To add a shade navigate to the Somfy tab and press the Add Shade button. This will open up the shade properties and allow you to enter the information about your shade. You can come back later and edit any of these values later but I caution editing the address after it has been paired. Once you pair the shade with the motor, the motor will store this address. If you change it later it will not know who it is.
First choose the protocol that the motor understands. Most Somfy motors, use a 56-bit protocol. However, some use 80-bits to communicate and will require you to select the 80-bit setting for the Bit Length. The easiest way to tell if you have this scenario is to open the frame log described above then press a button on the remote that is currently being used to control the motor. When ESPSomfy RTS hears the commands from the remote it will indicate whether it was 56-bits or 80-bits.
Next select the type of Shade you are adding. This can be a Roller Shade, Blind, or Drapery. Roller shades and draperies do not support the optional tilt function. If your window covering has a tilt motor then you will need to use the blind type in order to support it. If you select Blind from the dropdown then a Has Tilt option will become available and the icon will change. If you check the Has Tilt option you can supply the tilt timing for that motor.
You must provide up to 20 characters for the name of the shade. This can include any printable character.
The Remote Address is expected to be unique for all known addresses and the default is generated from the MAC address of your ESP32. This can be any value so long as it is unique. Change it at will but did I mention that it must be unique and the algortithm to calculate a new address only makes sure the address is unique among all the addresses that the ESPSomfy RTS module already knows about.
Remote addresses are 24-bits long and are assigned at the factory for Telis remotes. So unless you have very old remotes you can probably safely assign these to some lower number if you want but only before pairing. Did I mention that these need to be unique for all controller channels and remotes within earshot of the ESPSomfy RTS module.
The Up Time, Down Time, and optional Tilt Time fields are the number of milliseconds it takes for the shade to travel from the down position to the up position and vice versa. This value is provided in milliseconds so if you are counting the number of seconds and it takes 10 seconds to fully travel then this equals 10000 milliseconds. The maximum number of milliseconds is around 54 days so if you have a reaaaaaaaly slow motor you too are supported.
In another example, if it takes 9.5 seconds to go from full down to full up then that would be 9500 milliseconds. Keep in mind the up time and the down time can be different depending on the weight of the fabric and you can make adjustments these values at any time in the future. You will find this to be remarkably precise and always in sync if you set this up correctly. Burn a minute to time your shades and they will always be in sync.
Once you are satisfied with your settings press the Add Shade button. This will change the screen to include more button functions. You can either perform these processes now or come back later to perform these functions once you have added all your shades.
- Save Shade - Saves the current settings for the shade
- Pair Shade - Allows you to pair the shade with the somfy motor
- Link Remote - Links the channel on your Somfy remote to the shade. This ensures the position of the shade can be known at all times. You can link up to 5 channels to each shade. Beyond that you probably need to simplify your life because you have remotes strewn everywhere. Honestly you should get checked.
Editing a Shade
You can edit any shade that you have previously added by navigating to the Somfy tab under the config gears in the upper right. From the list of added shades simply click on the pencil to bring up the shade editing screen.

Pairing a Shade
In order to control the shade motor you must first pair it with the motor. This is not unlike how a Telis remote is paired with the motor and in fact it follows this procedure exactly.
On left side of the shade in the list there will be an edit pencil. You guessed it you should click on it to bring up the shade editor window. If you just added the shade and pressed the Add Shade button you should already be here.
Click the Pair Shade button to bring up the pairing screen. This will contain instructions on how to put the motor into pairing mode so you can proceed. After the motor jogs press the Prog button on the pairing screen and the motor should once again jog to tell you it was successful. There is no communication from the motor to the remotes so I am relying on you to verify that the motor jogged after pressing the Prog button. If it didn't then don't say it did. You will have to go through the unpairing process if you aren't honest about it and try again.
The pairing and unpairing process is essentially the same but in either instance Somfy does not provide any digital response that the pairing unpairing was successful. The only response is a visual one from the shade when it jogs. If the shade does not jog after pressing the prog button, simply perform the unpair process without putting the shade into paring mode with the external remote and try again. If you followed the procedure correctly this will just work. The range for the Somfy Controller is really, really far... over the hill and through the dell. Did I mention that I am impressed with the range?

Linking Remotes
Once you have paired the shades it is time to link the other remotes you use to open and close the shades. This linking process makes sure we capture every movement of the shade so that its position is always accurately reported. Now that you have been through the pairing process and saw how painless that was, click the Link Remote button to bring up the linking window.
When this screen is open the controller is listening for any remote out there that is sending a command to the shade. Simply press any button on the remote you want to link. If you are having trouble deciding which button to press, press the up button. Once the remote is detected it will automatically close the link remote window as soon as it hears the remote.

To unlink an external remote from the shade simply click on the trash can icon from the linked remotes list.
Setting a Rolling Code
You may set the rolling code for a shade registered in ESPSomfy RTS. However, I caution you on using this feature and I hesitated to add it. If these get out of sync you will need to reset the memory on the motor. This is because each command sent to the motor increments the rolling code value stored on the motor by 1. If it does not match the expected value by a small window then the motor will not respond to the command and is part of the security features of the motor. Still if you are interested in what that number is you can click on the Set Rolling Code button just to see it but heed the warnings on the page. Really, I've got your back here.

Backup and Restore
You may back up your shade settings at any time using the backup function. To back up your shade settings, from the gears menu, select the Updates tab. From this tab simply click on the backup button and a text file containing the current shade configuration will be downloaded to your browser. You may use this file should you need to replace your ESP32 or simply want to use another device.
To restore the settings you can simply upload a valid backup file to the device using the Restore button. But beware, this will overwrite all the shade settings on the device. During the upload process, ESPSomfy RTS will maintain the current rolling code if it is greater than the rolling code stored in the file.
