PE1000N - ASUS-IPC/ASUS-IPC GitHub Wiki
1. Flash Image by Ubuntu
1.1 Recovery Mode
-
System Requirement
• Linux Host Computer (x86 Ubuntu 18.04 and above)
• Micro USB cable
-
Enter Force Recovery Mode
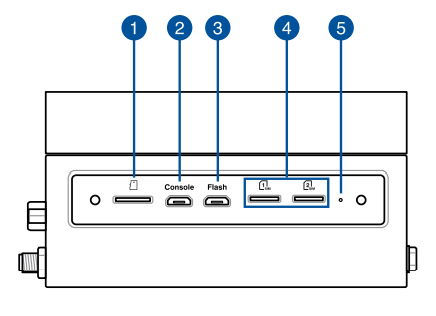
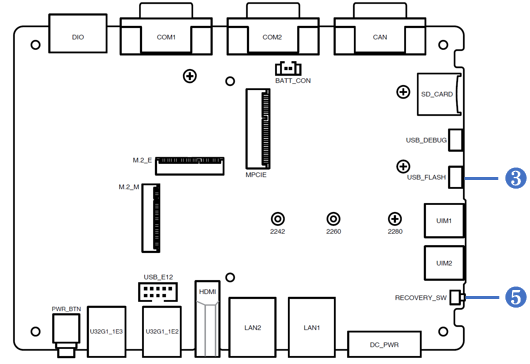
For PE1000N Box, the Flash Port is number ❸, and the Force Recovery Button is number ❺.
Please perform the following steps to force the PE1000N to enter force recovery mode:
[PE1000N]
- Power off the PE1000N and remove the power cable.
- Connect Host Computer and PE1000N Flash Port (number ❸) with Micro USB cable.
- Press and hold the Force Recovery Button (number ❺).
- Connect the power cable and Power ON the PE1000N.
- After 3s release the Force Recovery Button.
[Host Computer]
Make sure PE1000N is entered to force recovery mode, type command ‘lsusb’, you can see: “NVidia Corp”, it means PE1000N is in force recovery mode.

1.2 Flash Image
[Host Computer]
-
Extract BSP file on Host Computer.
BSP file example :
| System | File Name |
|---|---|
| PE1000N Nano | PE1000N Nano JetPack x.x.x Image Vx.x.x |
| PE1000N TX2 NX | PE1000N TX2 NX JetPack x.x.x Image Vx.x.x |
| PE1000N Xavier NX | PE1000N Xavier NX JetPack x.x.x Image Vx.x.x |
1.sudo tar emmc-nx-PE1000N-1.0.0-official-202206270615.tbz2
2.cd emmc-nx-PE1000N-1.0.0-official-202206270615
3.sudo ./nvmflash.sh –showlogs
- Flashing the image takes around 10 minutes.
For kernel 5.10, please use these commands to flash:
- To flash the eMMC:
 sudo tar -xvf xxxxx.tar.gz
    cd mfi_PE1000N-nx
    sudo /etc/init.d/ds_agent stop
    sudo ./tools/kernel_flash/l4t_initrd_flash.sh --erase-all --flash-only --massflash 2 --showlogs PE1000N-nx mmcblk0p1
[PE1000N]
After 10 minutes, PE1000N will auto reboot.
NOTE :
- Do not use a USB Hub between Host Computer and PE1000N.
- You can know the process of flashing image from “emmc-nx-PE1000N-0.0.5-official-202201031710\mfilogs\log”.
2. Flash Image by Windows
2.1 Preparing your Environment
- Update Windows version to build 19041 or higher
- Open Windows PowerShell as administrator mode
- Type the command below in PowerShell to enable WSL and Virtual Machine
dism.exe /online /enable-feature /featurename:Microsoft-Windows-Subsystem-Linux /all /norestart
dism.exe /online /enable-feature /featurename:VirtualMachinePlatform /all /norestart
- Restart your computer
- Run Windows PowerShell as administrator mode
- Type the command below in PowerShell to update WSL and ensure WSL kernal version is higher than 5.10.60.1
wsl -v
wsl --update
- Type the command below in PowerShell to set WSL default version
wsl --set-default-version 2
- Type the command below in PowerShell to install Ubuntu 20.04 and please enter new username and password after the installation
wsl --install -d Ubuntu-20.04 (after enter username and password, please type "exit" to quit Ubuntu)
Note: username has to be all lower case and no special characters, else it may fail.
- Type the command below in PowerShell and make sure the version of Ubuntu 20.04 is 2 and has the mark of *
wsl -l -v
- If your Ubuntu 20.04 WSL version is 1, Please Type the command below in PowerShell (you can skip this step if your Ubuntu 20.04 WSL version is 2)
wsl --set-version Ubuntu-20.04 2
- If your Ubuntu 20.04 WSL doesn't show the mark of *, Please Type the command below in PowerShell (you can skip this step if your Ubuntu 20.04 shows the mark of *)
wsl --set-default Ubuntu-20.04
-
Download USBIPD 5.2.0 (usbipd-win_5.2.0_x64.msi) and install
-
Run Windows PowerShell as administrator mode, and type the command below in PowerShell to run Linux and install USBIP
winget install --interactive --exact dorssel.usbipd-win
wsl
sudo apt update
sudo apt upgrade
sudo apt install bzip2
sudo apt install linux-tools-virtual hwdata
sudo update-alternatives --install /usr/local/bin/usbip usbip `ls /usr/lib/linux-tools/*/usbip | tail -n1` 20
2.2 Flash Image
[PE1000N]
- In power-off state, use a Micro USB cable to connect the PE1000N interface (Diagram ❸) to the PC's USB port
- Press the Recovery Button (Diagram ❺), then simultaneously plug in the power. Wait for 3 seconds and remove the recovery button
Note: Make sure you can feel that you have poked on something, else you are not touching the recovery button.
[Host Computer]
- Open PowerShell in administrator mode and type in below command to list all USB devices connected to Windows
usbipd list
If APX device is not detected:
• Ensure you do touch the reset button and do hold for more than 3 seconds after connect power source before releasing.
• Try replacing the micro-B cable. Cheap, multi-purpose and extended length cables may cause communication issue with this step.
-
Open Ubuntu 20.04.6 LTS APP using the “wsl” command under PowerShell in administrator mode.
-
At PowerShell Enter the following command based on the BUSID corresponding to the Device APX to connect the device, do not close PowerShell after attach wsl
usbipd attach -a -b BUSID --wsl (In this example, the command should be usbipd attach -a -b 1-4 --wsl)
- Double check PE1000N is in recovery mode by open Ubuntu 20.04 APP and type the command 'lsusb', and you will see 'NVidia Corp'. This indicates that PE1000N is in forced recovery mode.
- The OS image file is in compressed. Extract the image file on Windows until that you can see all files instead of only single mfi_PE1000N-nx-emmc.
- After extracting the image file, switch to the Ubuntu 20.04 APP screen.
- At Ubuntu 20.04 the Windows hard drive is directly mounted at /mnt/. Locate the image folder under /mnt to access it.
Example: if your username is 'myname', you would change the directory by typing cd /mnt/c/Users/myname/Desktop
- Enter the following command to start flashing the image (takes around 10 minutes)
sudo ./nvmflash.sh --showlogs
- PE1000N will autoreboot after finishing flashing the image, and you will see 'flash complete' in Ubuntu. Flash again if the script report failures.
3. Startup from external storage
(This method only supports for OS V1.x.x, it is not compatible with the new version of OS V2.x.x)
3.1 Mount rootfs to external storage
NOTE : Please flash Image first. (Refer to 1. Flash Image)
-
Open Disk Manager to make sure the external storage is completely empty and clean. Consider using Dispart with the “clean” command to return it back to clean state if this external storage device is not brand new.
Ex: SD
Ex: NVMe
-
Copy initrd to the /boot path in PE1000N
sudo cp /media/xxx/xxx/initrd_230707 /boot/initrd -
Reboot PE1000N
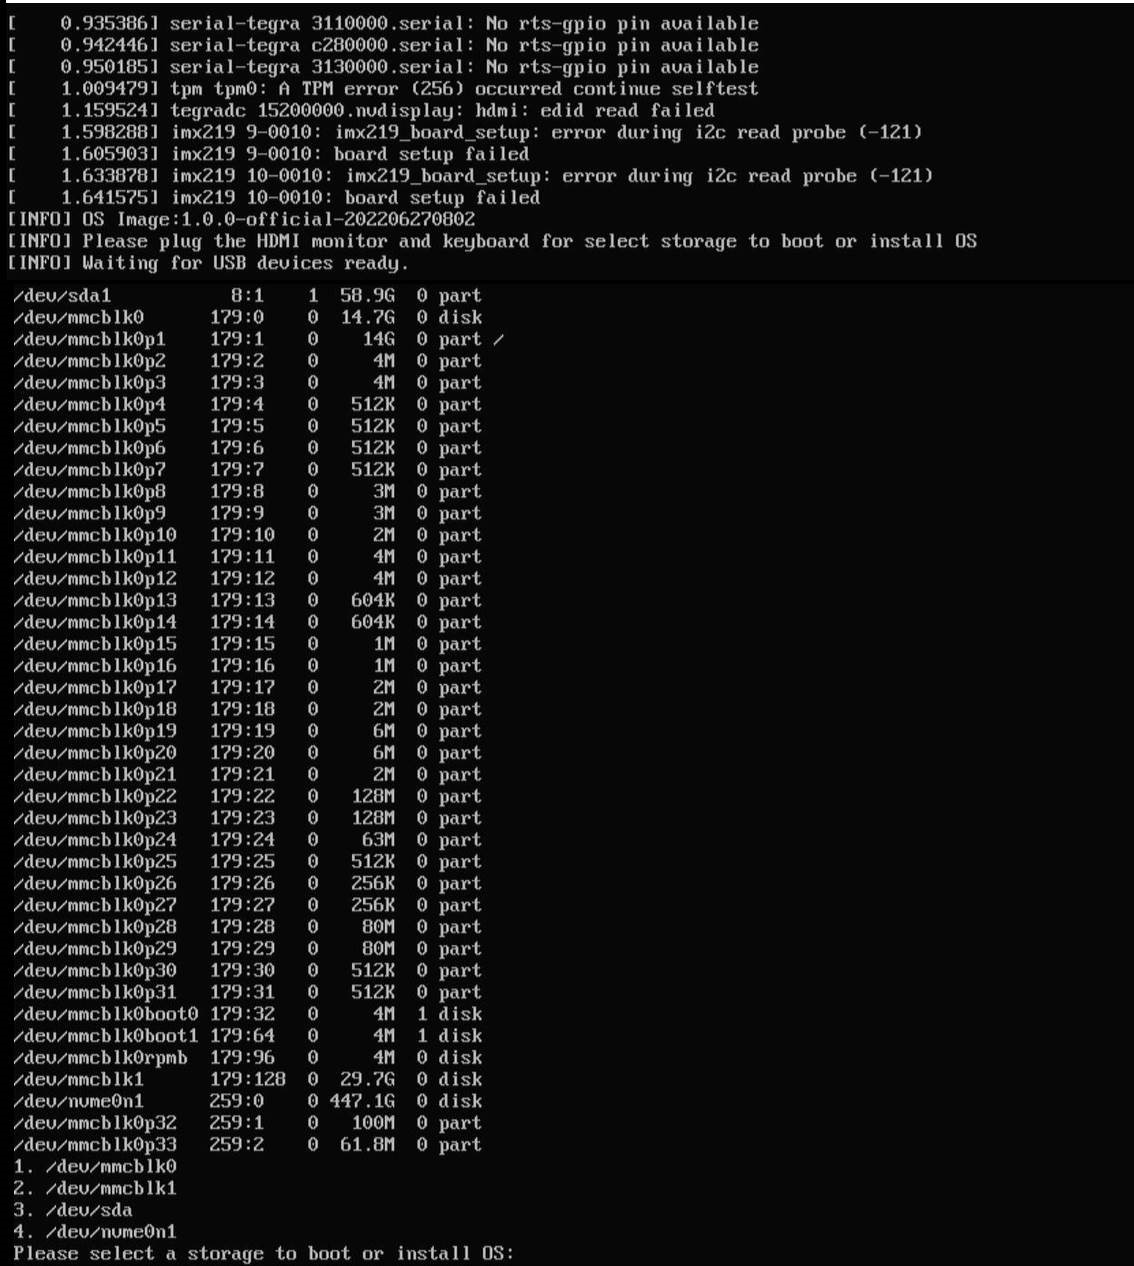
After booting, the HDMI screen will display as below, please connect the keyboard to select the device you want to install, In this example, 1: EMMC, 2: SD, 3: USB, 4: SSD
We select “2” in this example to demonstrate porting OS over to SD card.
-
System will start to copy OS over to external storage device.
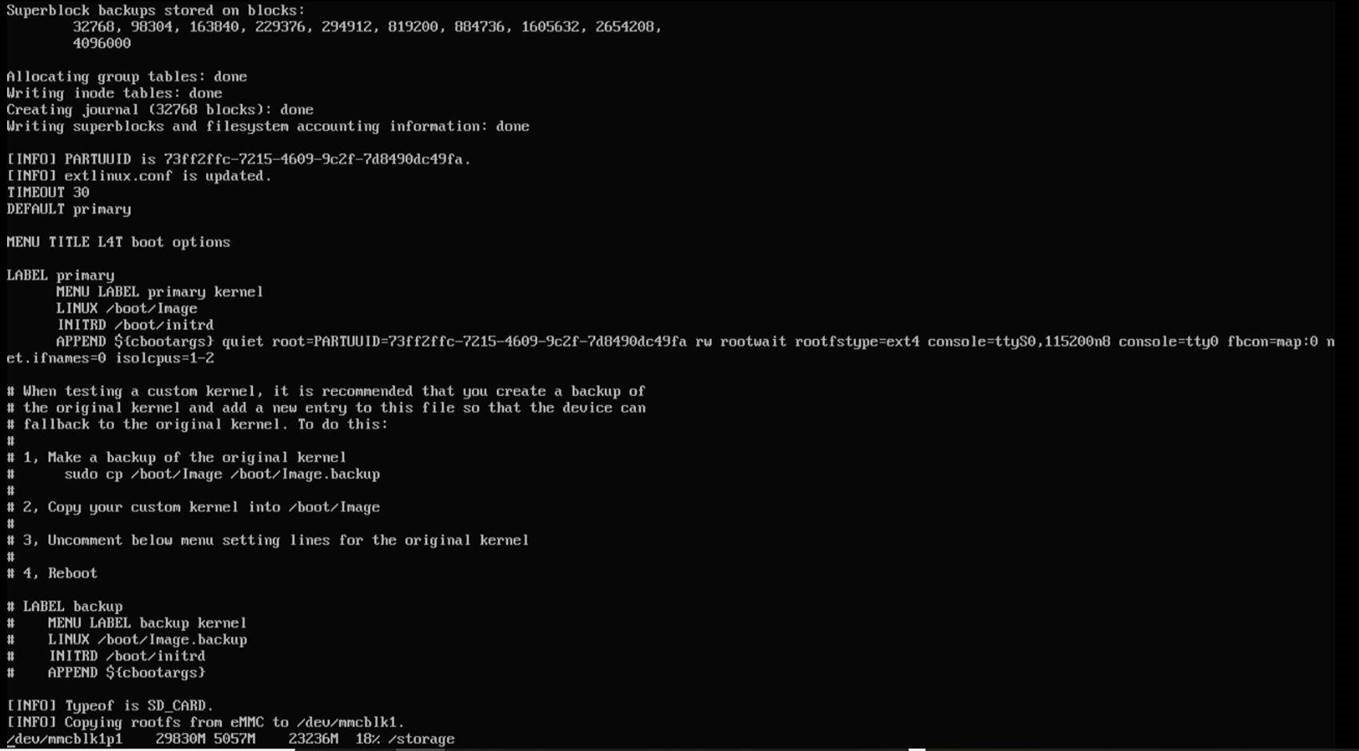
Take the external storage device out, wipe it clean and restart from step 1 in section 3.1 if you encounter any error.
-
After booting, type command ‘
df’, you can see filesystem info is as: OS is install on SD card, indicating OS is corrected ported to external storage.Moving forward if you ever wish to change the boot device again, simply remove and clean the external storage device before installing back to the unit again to roll back to step 1.
3.2 Deploy to multiple devices
If you want to deploy to multiple devices, you can follow the steps below. (Take SD card as an example)
-
Take the SD card that mounts rootfs.
-
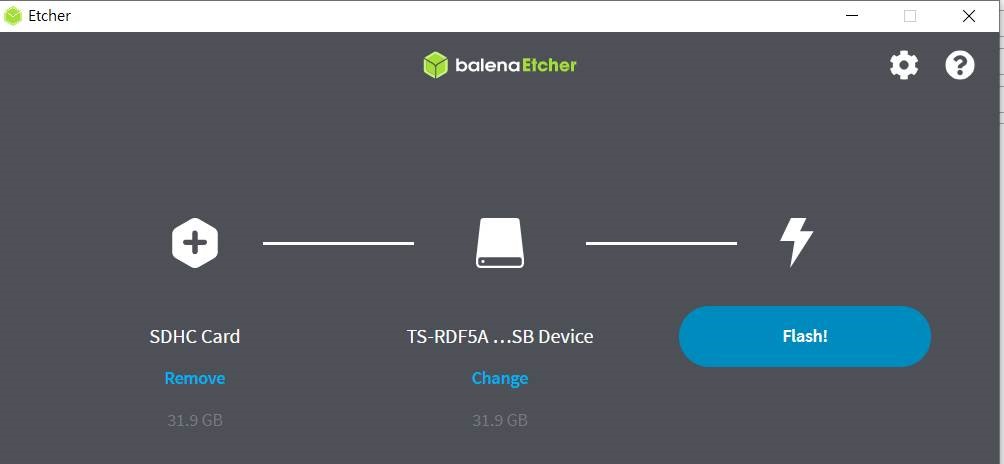
Select the Clone drive through balenaEtcher to clone the content of original SD card to another SD card.
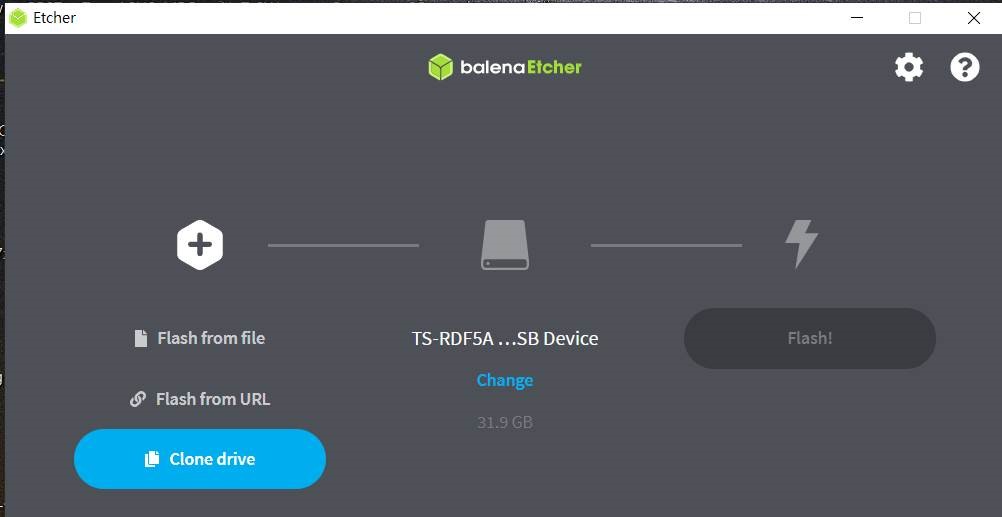
-
Start Flash!
-
Use the following command to change the root mount point of the PE1000N that has already flash the official image.
sudo vi /boot/exlinux/extlinux.conf
Change the original dev/mmcblk0p1 to /dev/mmcblk1p1, and save the file.

-
Insert the SD card you just cloned from step 3 into the PE1000N, and reboot PE1000N .
-
After booting, you can see OS is installed on SD card now.
4. LTE Setting
4.1 How to set up a SIM card
NOTE : Please insert the SIM card and power on the device.
-
Click to open the settings bar at the top right side of the desktop.

-
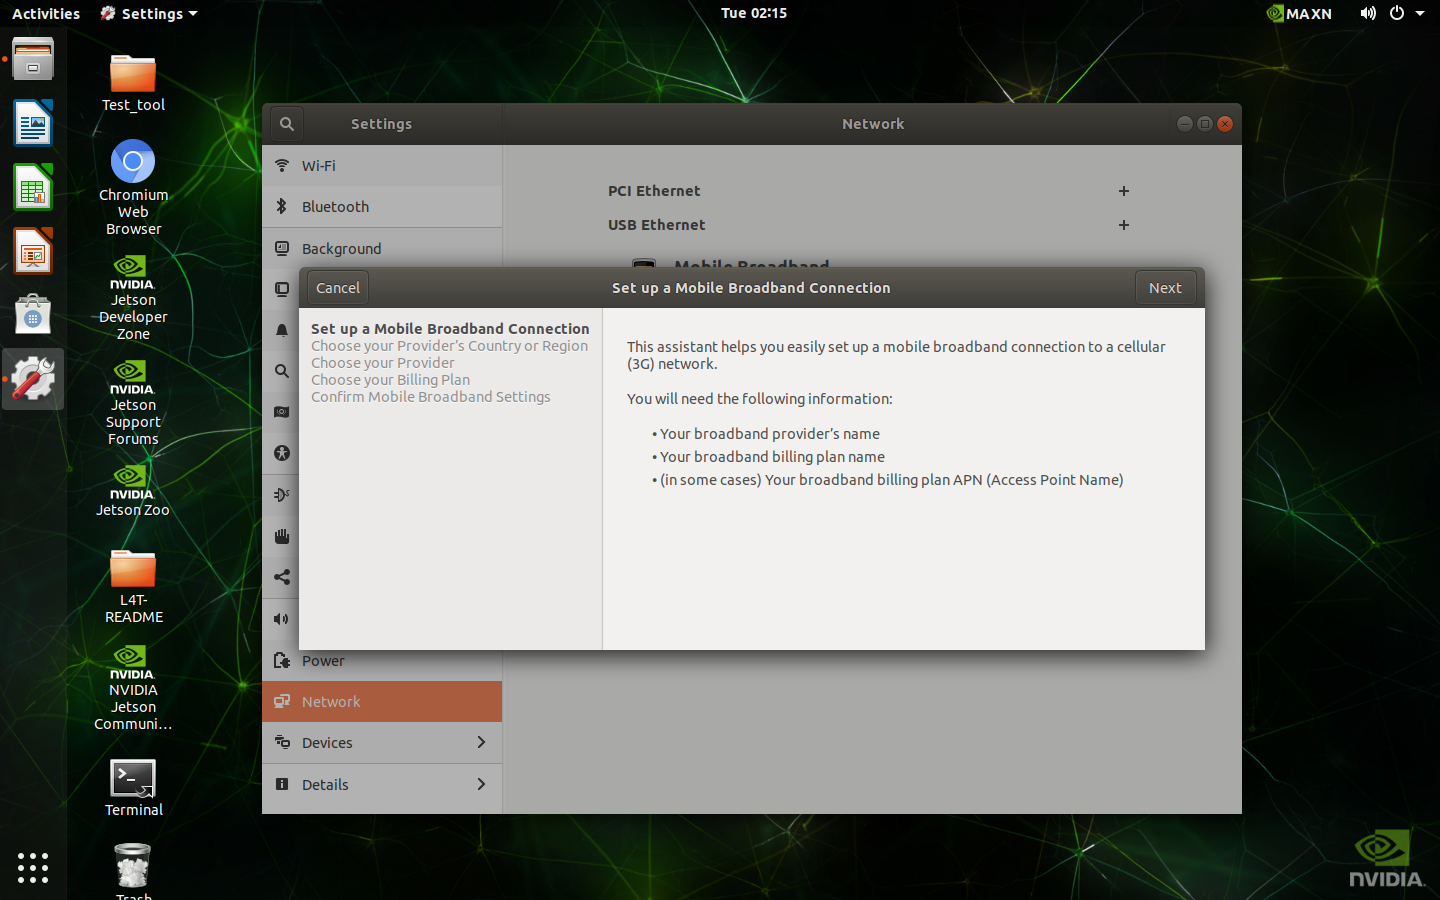
Click Mobile Broadband Settings

-
Switch on the Mobile Broadband to enable LTE function

-
Open the Network bar below the IMEI

-
Select Add new connection

-
Click Next on the top right of the window
-
Select your country

-
Select your provider

-
Select your plan

-
Click Apply on the top right of the window

-
It will use this configure to connect to the internet automatically

-
The current signal strength also appear on the settings bar

4.2 How to switch SIM card slot
-
Open Terminal on the desktop

-
Type command ‘
sudo PE1000N-config’, if it asks for a password, enter the password set by yourself. Press Enter.
-
Select Ok

-
Select 5. SIM Select SIM slot and press Enter

-
Select 1 SIM1 or 2 SIM2 and press Enter

-
Select Finish and press Enter

-
Select Yes and press Enter to reboot

4.3 How to check SIM card status
-
Open Terminal on the desktop

-
Type command ‘
sudo PE1000N-config’, if it asks for a password, enter the password set by yourself. Press Enter.
-
Select Ok

-
Select 7. Configuration and press Enter

-
Check SIM slot and SIM state on the screen

5. Minimizing Storage Usage
If you have installed the full set of JetPack components (libraries and SDKs) either with the ‘sudo apt-get install nvidia-jetpack’ command or by using SDK Manager to install all, you may have packages that you do not need for your application. You can take the following actions to regain disk space.
5.1 Remove samples package
  sudo rm -rf usr/local/cuda/samples
  sudo rm -rf usr/src/cudnn_samples_*
  sudo rm -rf usr/src/tensorrt/data
  sudo rm -rf usr/src/tensorrt/samples
  sudo rm -rf usr/share/visionworks* ~/VisionWorks-SFM*Samples
  sudo rm -rf opt/nvidia/deepstream/deepstream*/samples
5.2 Remove static libraries
  sudo rm -rf usr/local/cuda/targets/aarch64-linux/lib/*.a
  sudo rm -rf usr/lib/aarch64-linux-gnu/libcudnn*.a
  sudo rm -rf usr/lib/aarch64-linux-gnu/libnvcaffe_parser*.a
  sudo rm -rf usr/lib/aarch64-linux-gnu/libnvinfer*.a
  sudo rm -rf usr/lib/aarch64-linux-gnu/libnvonnxparser*.a
  sudo rm -rf usr/lib/aarch64-linux-gnu/libnvparsers*.a
6. Config Tool
Open Terminal on the desktop. Type command sudo PE1000N-config, if it asks for a password, enter the password set by yourself. Press Enter.
Select Ok using the keyboard.
- Hostname: Set Hostname.
- Console: Enable/Disable more kernel massages at boot time.
- COM1 port: Set COM1 port mode to RS232, RS422 or RS485.
- COM2 port: Set COM2 port mode to RS232, RS422 or RS485.
- SIM: Select SIM slot (SIM1/SIM2).
-
M.2 slot: switch M.2 slot (work only on Nano SOM)
-
Configuration: The setting status of the COM/SIM/M.2 slot.
- About: Information of this tool.
7. Switch DIO Instructions
- Open Terminal on the desktop
- Type below command to switch DIO
Set one DO Value: sudo dio_out #DO_Num # Value
Get one DI Value: sudo dio_in #DO_Num
Get all DO Value: sudo dio_out
Get all DI Value: sudo dio_in
8. LED Functions
8.1 Turn on/off LED
- Open Terminal on the desktop
- Below command are examples to turn on LED (Type Echo 1 or 0 for turning on/off LED)
ETH0 : sudo echo 1 > /sys/class/leds/eth0-led/brightness
ETH1: sudo echo 1 > /sys/class/leds/eth1-led/brightness
UART0: sudo echo 1 > /sys/class/leds/uart0-led/brightness
UART1: sudo echo 1 > /sys/class/leds/uart1-led/brightness
CAN: sudo echo 1 > /sys/class/leds/can-led/brightness
WIFI: sudo echo 1 > "/sys/class/leds/wifi-led/brightness
LTE: sudo echo 1 > /sys/class/leds/lte-led/brightness
8.2 Disable kernel LED function
- Open Terminal on the desktop
- Type below commands to disable kernel LED function
ETH0: sudo echo none > /sys/class/leds/eth0-led/trigger
ETH1: sudo echo none > /sys/class/leds/eth1-led/trigger
UART0: sudo echo none > /sys/class/leds/uart0-led/trigger
UART1: sudo echo none > /sys/class/leds/uart1-led/trigger
CAN: sudo echo none > /sys/class/leds/can-led/trigger
WIFI: sudo echo none > /sys/class/leds/wifi-led/trigger
LTE: sudo echo none > /sys/class/leds/lte-led/trigger
8.3 Recover Kernel LED function
- Open Terminal on the desktop
- Type below commands to recover kernel LED function
ETH0: sudo echo eth0 > /sys/class/leds/eth0-led/trigger
ETH1: sudo echo eth1 > /sys/class/leds/eth1-led/trigger
UART0: sudo echo uart0 > /sys/class/leds/uart0-led/trigger
UART1: : sudo echo uart1 > /sys/class/leds/uart1-led/trigger
CAN: sudo echo can > /sys/class/leds/can-led/trigger
WIFI: sudo echo wifi > /sys/class/leds/wifi-led/trigger
LTE: sudo echo lte > /sys/class/leds/lte-led/trigger