Accessing WECG Remote Nodes - AG7GN/wecg GitHub Wiki
Version 20230318
This document describes how to access and operate WECG owned and managed remote nodes (stations). These stations all have a VNC server. You'll be using a browser on your local PC or tablet to access and control the VNC server on the remote node. Access to these remote nodes is controlled by using a client certificate issued by the WECG administrator. The administrator can revoke a certificate if needed, which will disallow a user from accessing the remote nodes.
Installation
Prerequisites
- A computer (Windows/Mac/Linux) or iPad. This is the client device. Other tablets may also work but have not been tested.
- The client device must have at least one of the following browsers installed: Firefox, Chrome, Edge, Safari.
Client Certificate
-
Send an email message to w7ecg.wecg [at] gmail [dot] com and request a client certificate for VNC access. Include your call sign in the request.
-
Within a few days, you'll receive an email with a certificate bundle (
p12) file. You can install this certificate bundle on any or all of your personal devices that you would use to access the remote nodes.
Installing the Certificate on a Windows PC
-
Access your email on your PC and double-click the
p12file attached to the message you received from the WECG administrator. Alternatively, you can save the attachment and then double click it in Windows Finder. -
You'll be prompted to install the certificate:
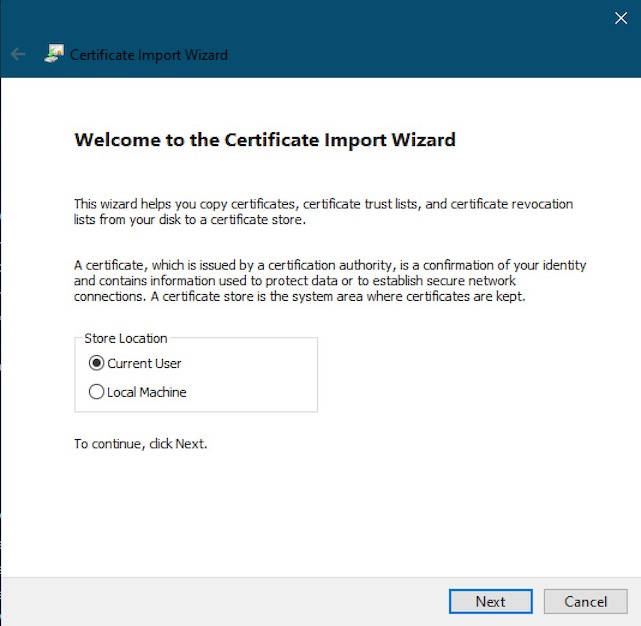
Click Next.
-
The File Name field should already be populated:
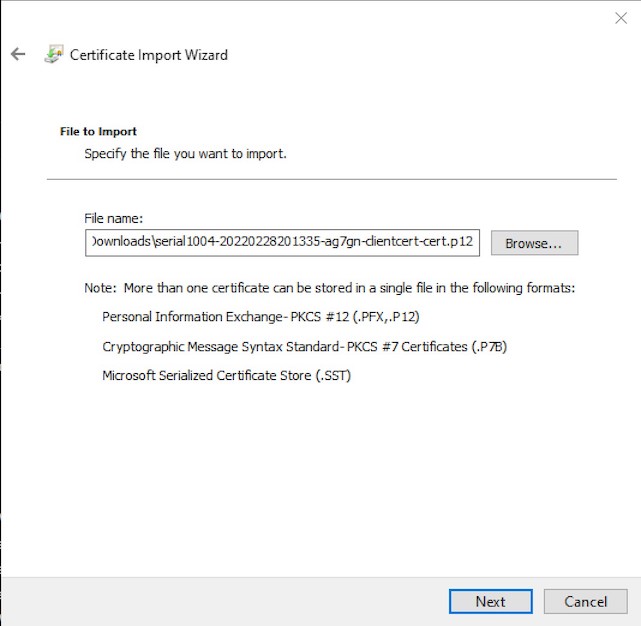
Click Next.
-
Enter the certificate bundle password, which will be in the email message from the WECG administrator:
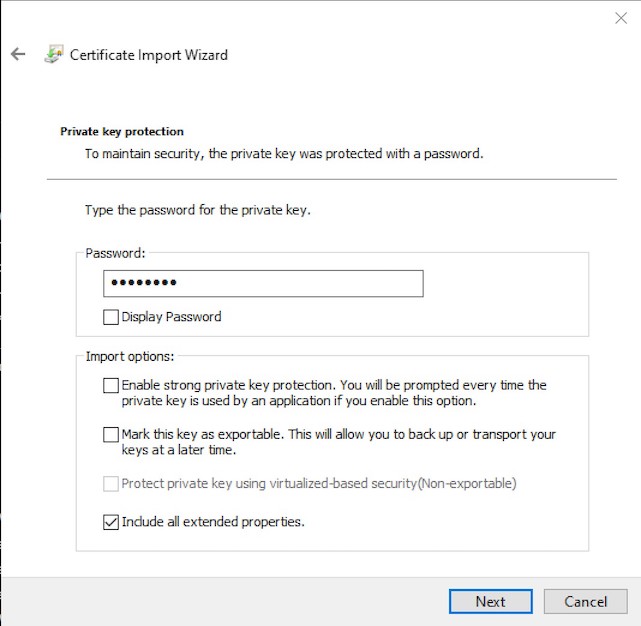
Click Next.
-
Select Certificate store (Automatic):
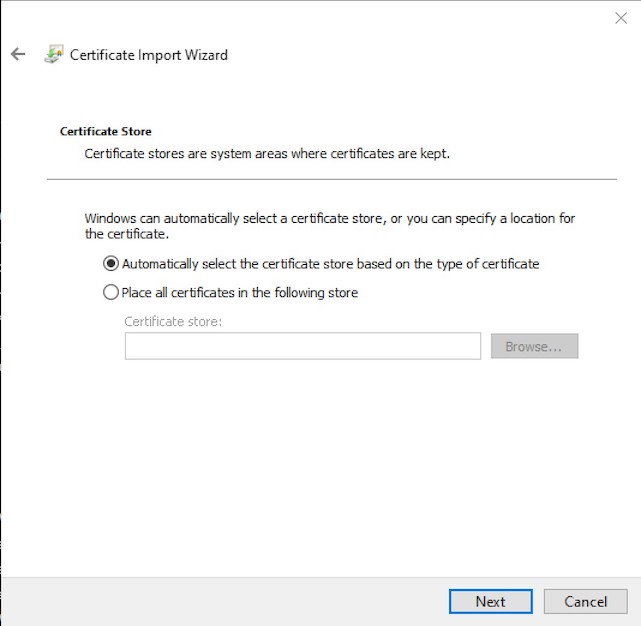
Click Next.
-
Finish the import:
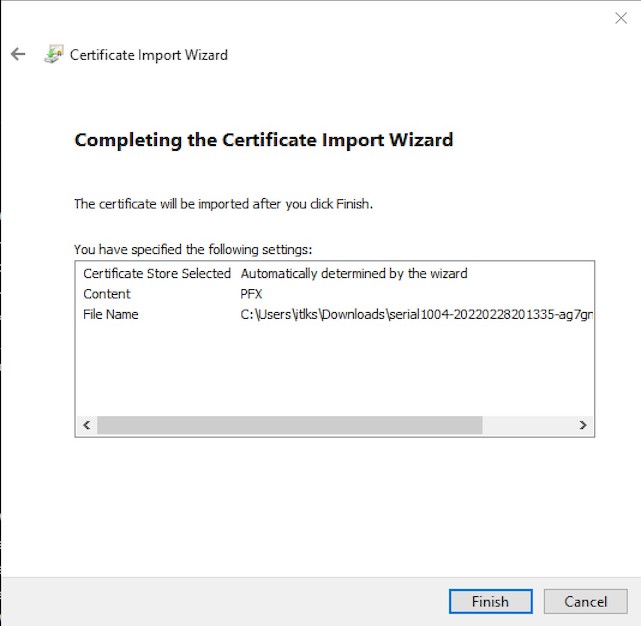
Click Finish.
-
Accept the Security Warning:
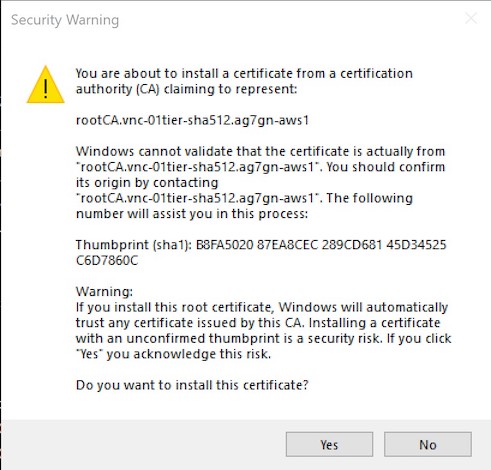
Click Yes.
-
You should see this message:

Click OK.
Testing the Certificate on a Windows PC
-
Open an Edge, Firefox or Chrome browser and enter https://vnc.wecg.org in the URL field. Press ENTER. You'll be prompted to select a certificate:

Select the certificate and click OK.
-
You should see the remote node menu in your browser:
Click on the desired Remote Node
-
You'll be prompted for the VNC password, which will be in the email message from the WECG administrator:

Enter the password and click Send Credentials.
You should now see the remote desktop. Go to the Operation section for next steps.
Installing the Certificate on a Mac
-
Access your email on your Mac and double-click the
p12file attached to the message you received from the WECG administrator. Alternatively, you can save the attachment and then double click it in Mac Finder.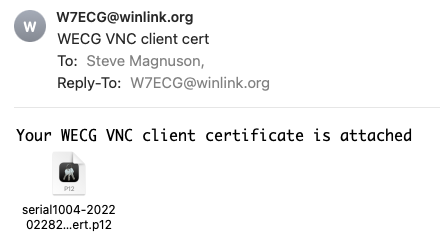
-
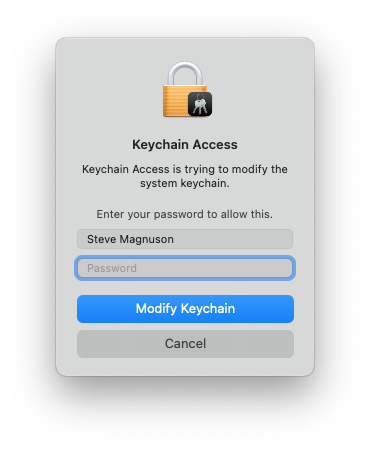
Enter your keychain password when prompted:
-
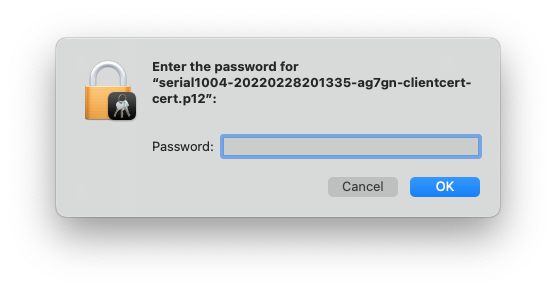
Enter the certificate bundle password, which will be in the email message from the WECG administrator:
-
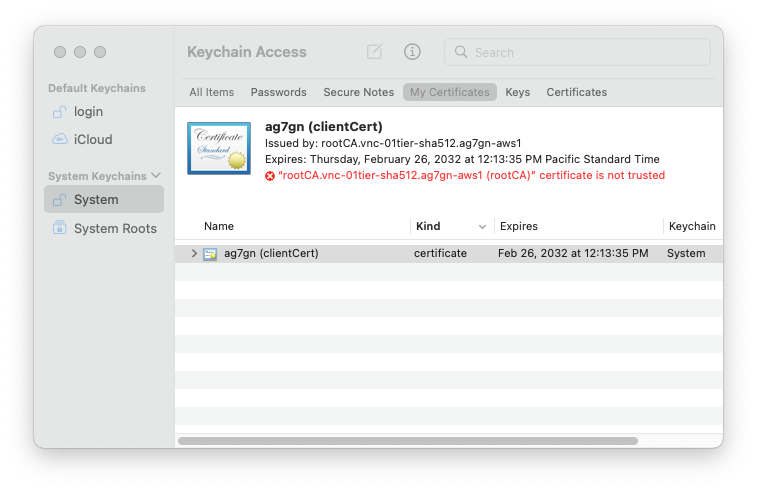
The cert will appear like this in the Keychain app:
-
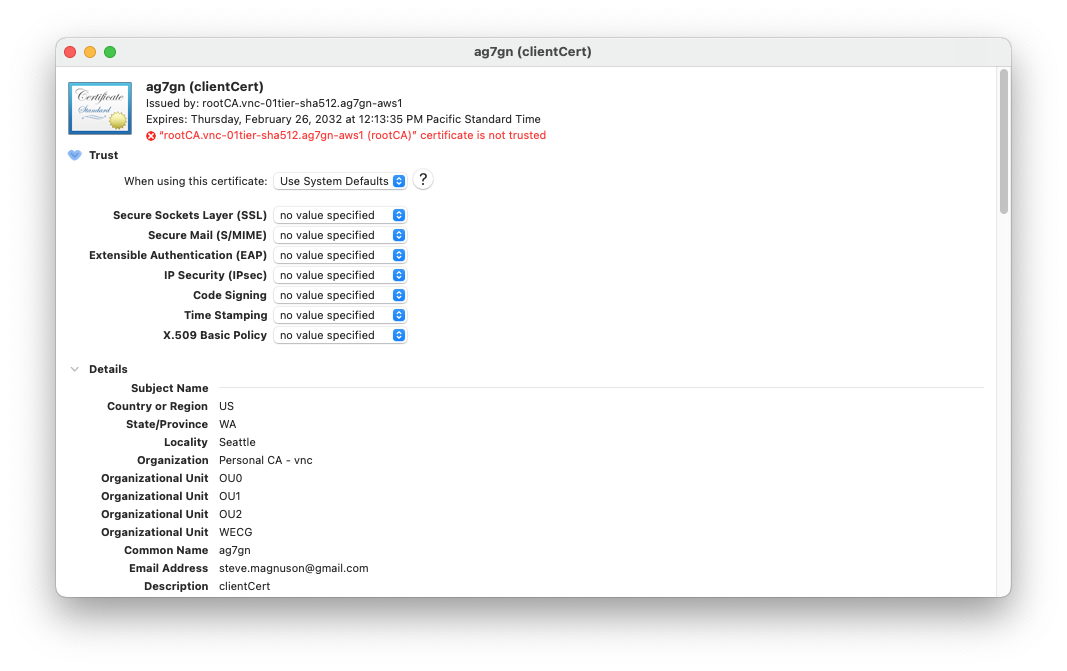
Double-click the certificate to show the certificate details:
-
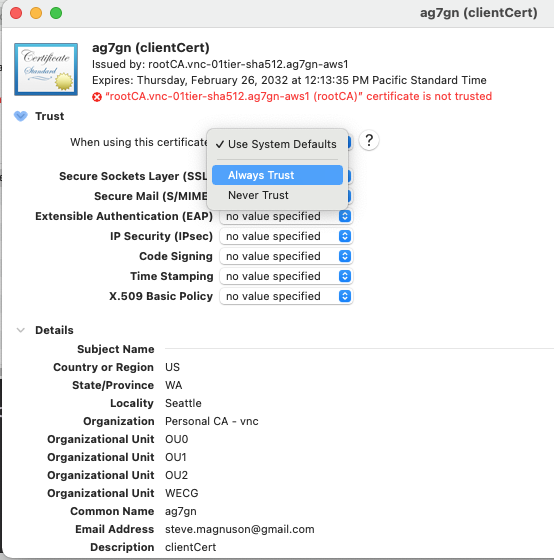
Select the > symbol to expand the Trust section, then click the When using this certificate dropdown box and select Always Trust from the list.
-
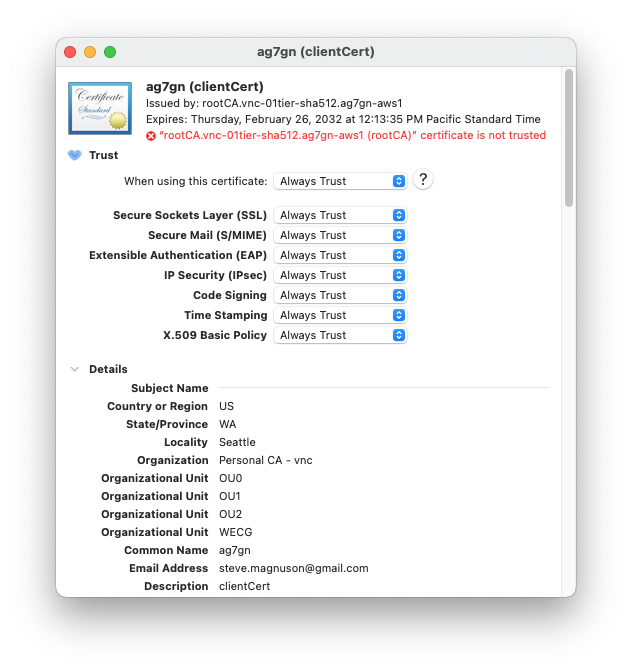
The Trust section should now look like this:
-
Enter your Keychain password when prompted:
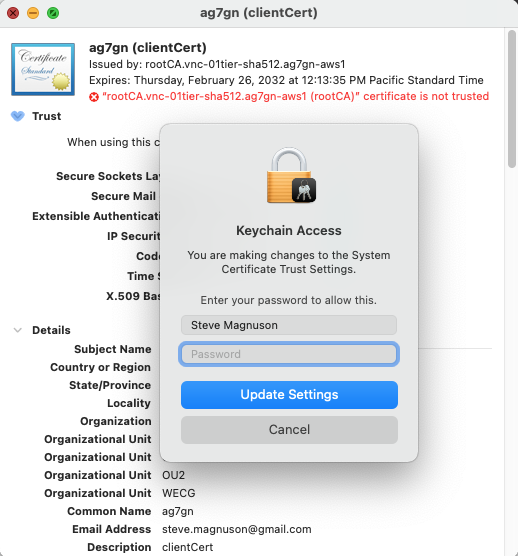
Click Update Settings.
-
The certificate properties should now look like this:

-
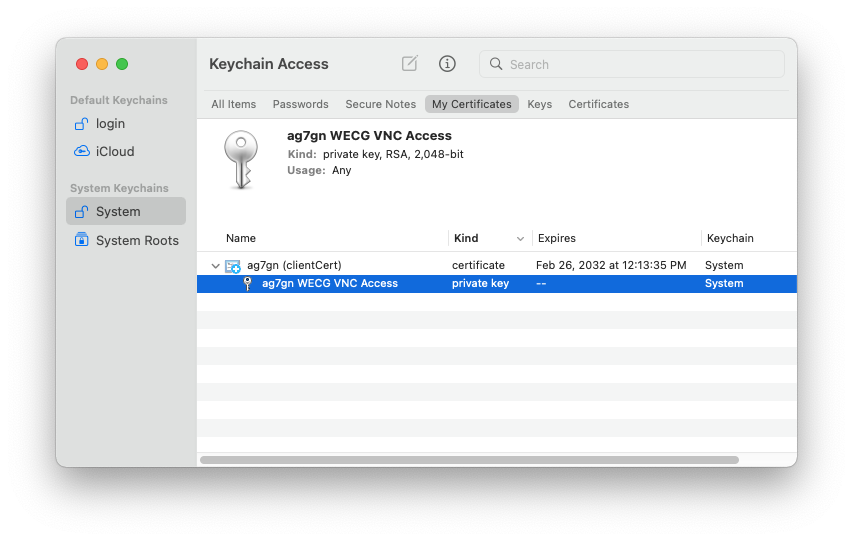
Click on the > to the left of the cert to reveal the private key line:
-
Double-click the private key line. This will display a window with 2 tabs. Select the Access Control tab:
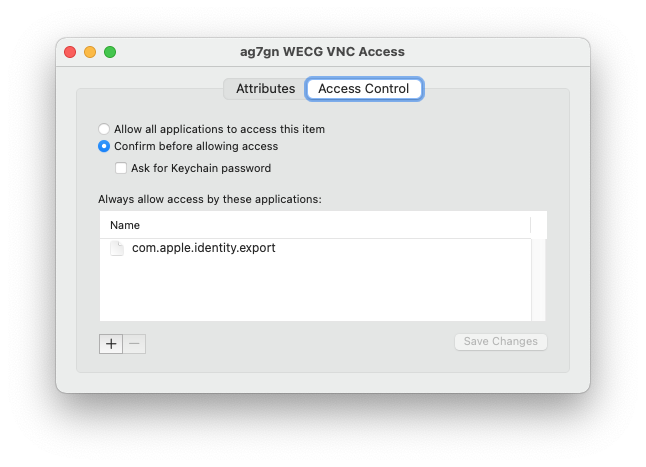
-
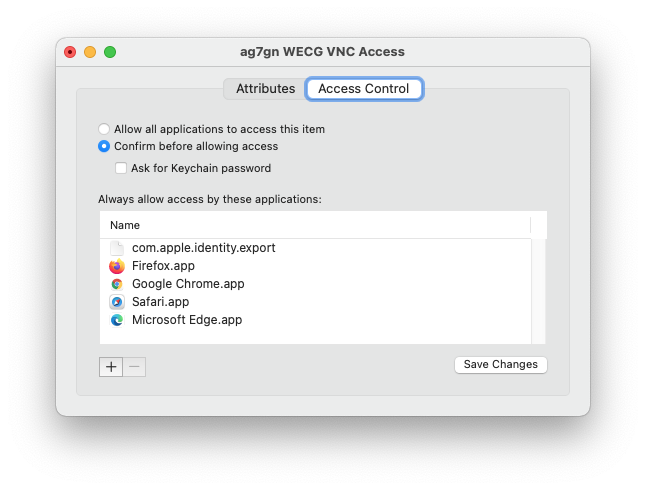
Click + and select the Safari application from the Applications folder. Repeat for any other browsers you have installed on your Mac. When finished, it should look something like this depending on which browsers you've added:
-
Click Save Changes and enter your Mac password if prompted. Close the Keychain application.
Testing the Certificate on a Mac
-
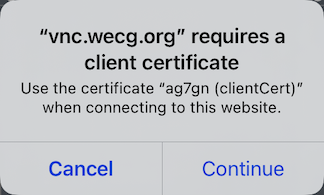
Open a Safari, Edge, Firefox or Chrome browser (whatever you enabled in the previous step) and enter http://vnc.wecg.org in the URL field. Press ENTER. You'll be prompted to select a certificate:
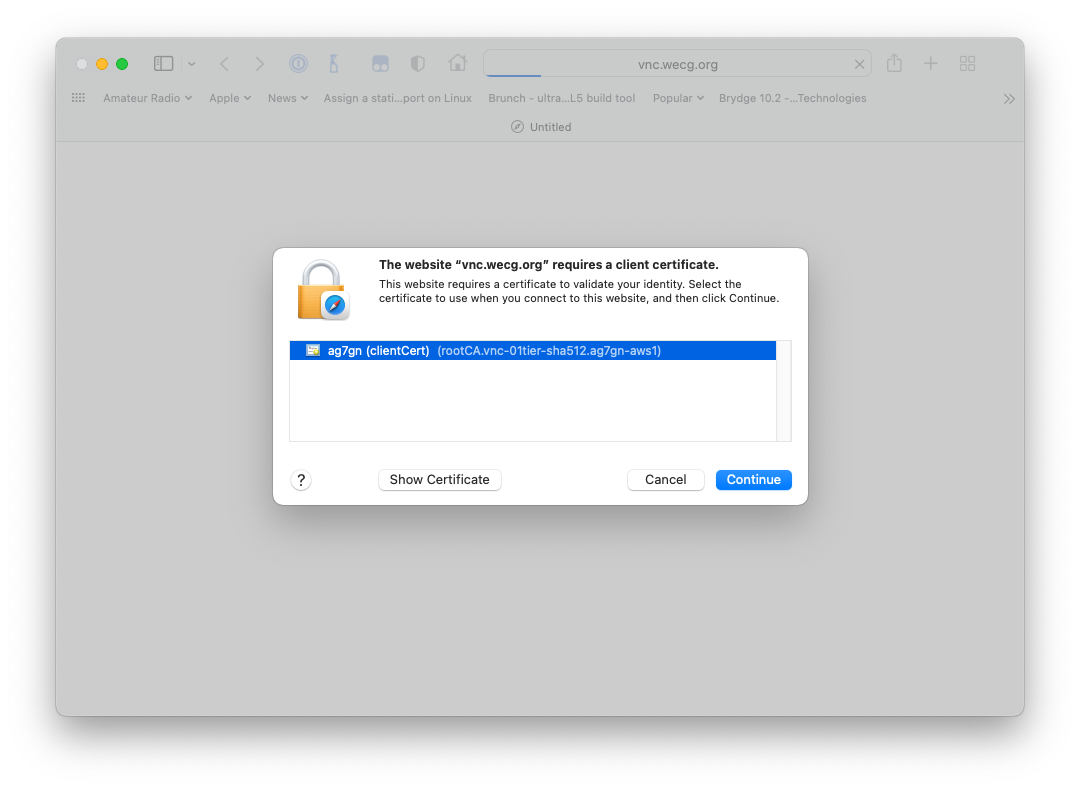
Select the certificate and click Continue.
-
You should see the remote node menu in your browser:
Click on the desired Remote Node.
-
If you're running Safari, you may be prompted again to select the certificate. Select it and click Continue. Other browsers don't prompt at this point in the process.

-
You'll be prompted for the VNC password, which will be in the email message from the WECG administrator:
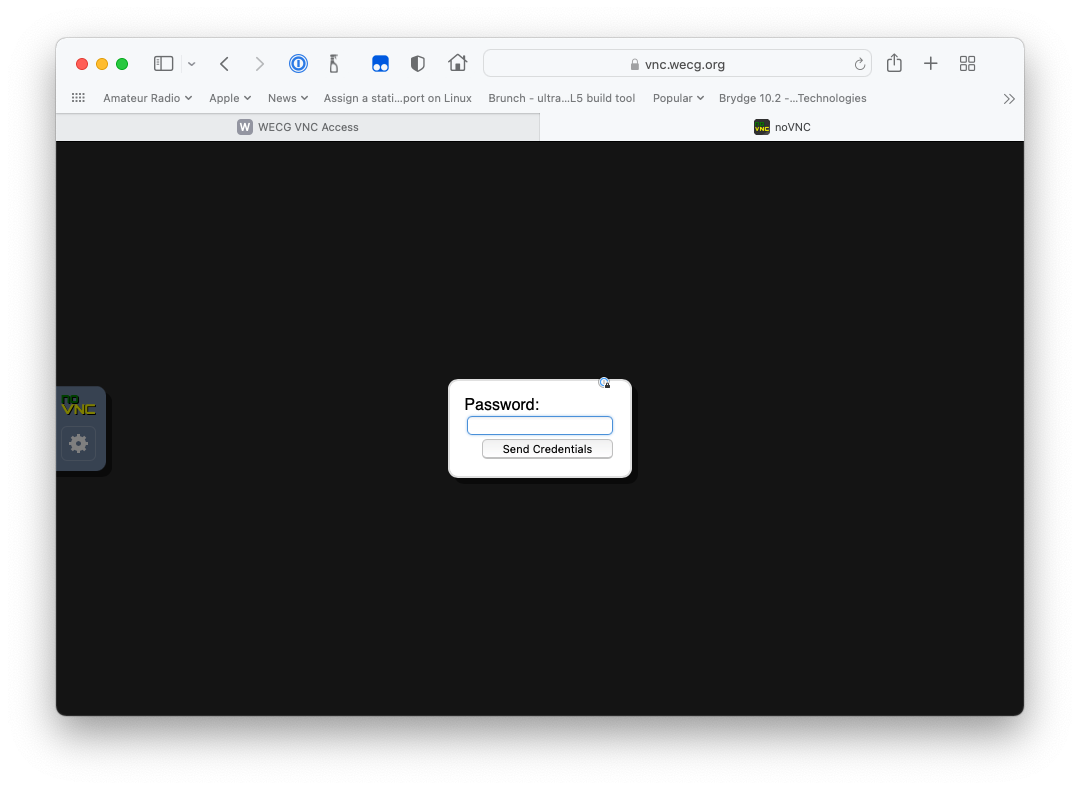
Enter the password and click Send Credentials.
You should now see the remote desktop. Go to the Operation section for next steps.
Installing the Certificate on a Linux PC
-
Open an email client and save the
p12file from the email message, or use another method to get thep12file onto your Linux PC. -
Open your Firefox browser. Firefox instructions are provided here, but the process for the Chrome browser is nearly identical.
-
Import the Certificate:
- Open Firefox Settings > Privacy & Security
- Scroll down to Certificates and click View Certificates
- Select the Your Certificates tab
- Click Import...
- Locate and select the certificate you saved, click OK
- Enter the certificate bundle password, which will be in the email message from the WECG administrator, then click OK
-
Close the Firefox Settings tab
Testing the Certificate on a Linux PC
-
Open a new tab and enter http://vnc.wecg.org in the URL field. Press ENTER.
-
You'll be prompted to use the certificate. Select it and click OK.
-
You should see the remote node menu.
Click on the desired Remote Node.
-
You'll be prompted for the VNC password, which will be provided to you via email or text message:
Enter the password and click Send Credentials.
You should now see the remote desktop. Move on to the Operations section for next steps.
Installing the Certificate on an iPad
-
Open the email message containing the certificate in your iPad's Mail app and tap on the attached
p12file: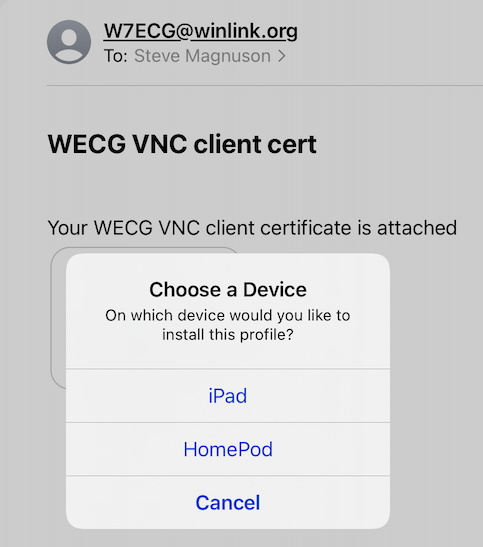
If more than one device is listed, select iPad. This will download the certificate:
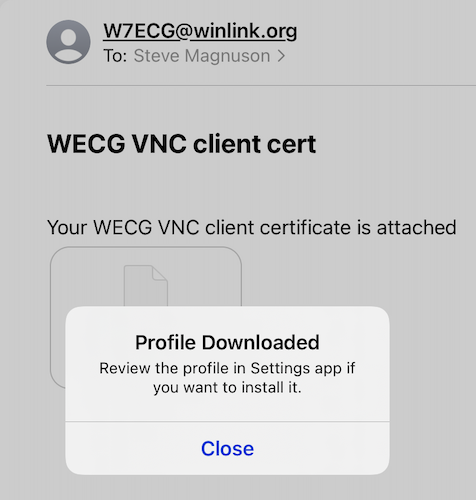
Tap Close.
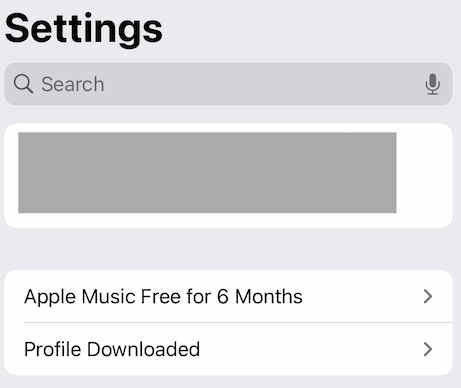
-
Open Settings and tap Profile Downloaded:
-
This will open the Install Profile window:
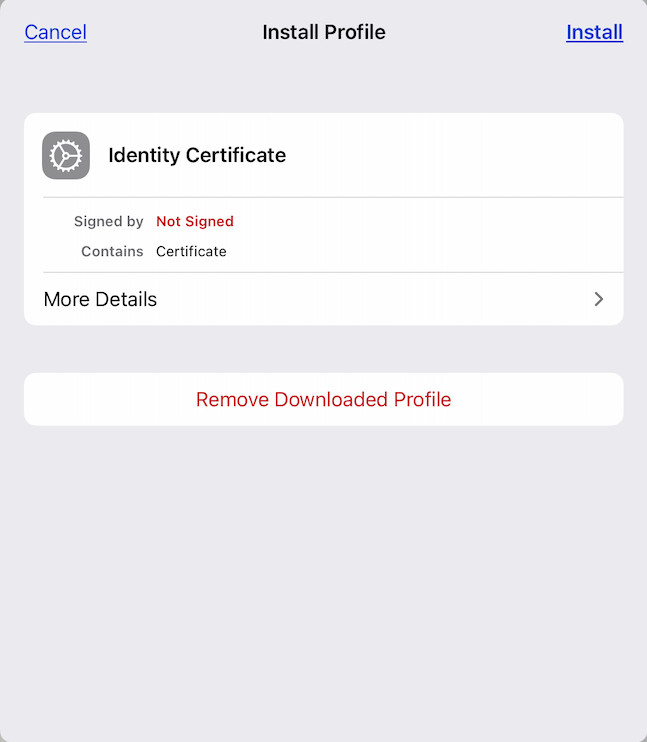
Tap Install.
-
Enter your iPad's passcode when prompted:
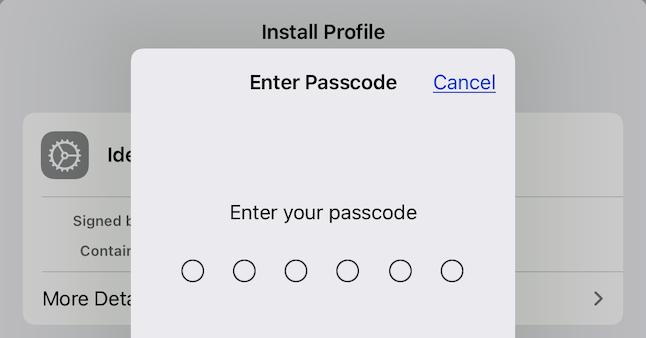
-
You'll see a warning message about the profile not being signed. This is expected.

Tap Install.
-
Enter the certificate bundle password, which will be in the email message from the WECG administrator:
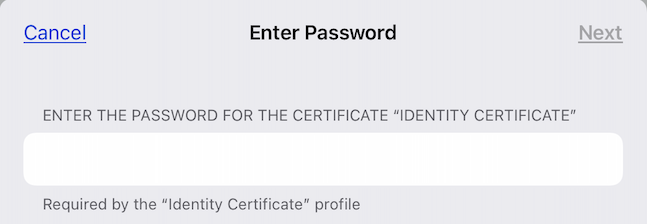
Tap Next.
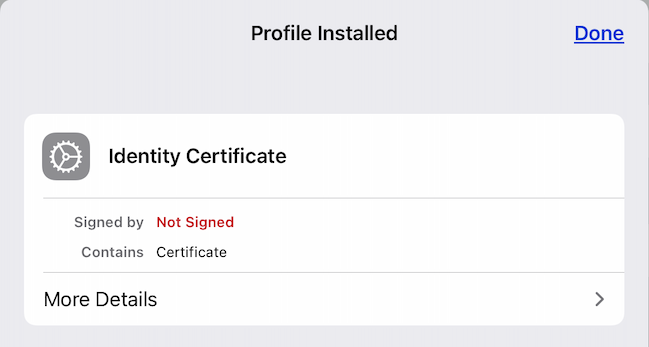
You should see this Profile Installed window:
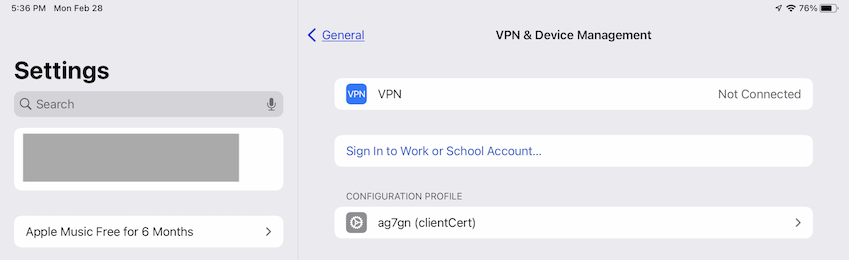
-
Back in Settings, you should see your certificate under General > VPN & Device Management:
Testing the Certificate on an iPad
-
Open the Safari app and go to http://vnc.wecg.org. you;ll be prompted:
Tap Continue and you should see the WECG Remote Nodes menu. Note that if you have more than one certificate installed on your iPad, you'll have to select the certificate from a list.
Operation
The NoVNC Interface
-
Open a browser and and enter http://vnc.wecg.org in the URL field. Press ENTER. You'll be prompted to select a certificate (at least on the first attempt to connect to this web page). Select it and click OK or Continue or whatever your browser prompts you to do.
-
You'll be prompted for the VNC password, which will be in the email message from the WECG administrator:
Enter the password and click Send Credentials.
You may also be prompted to log into Windows. Use the VNC password.
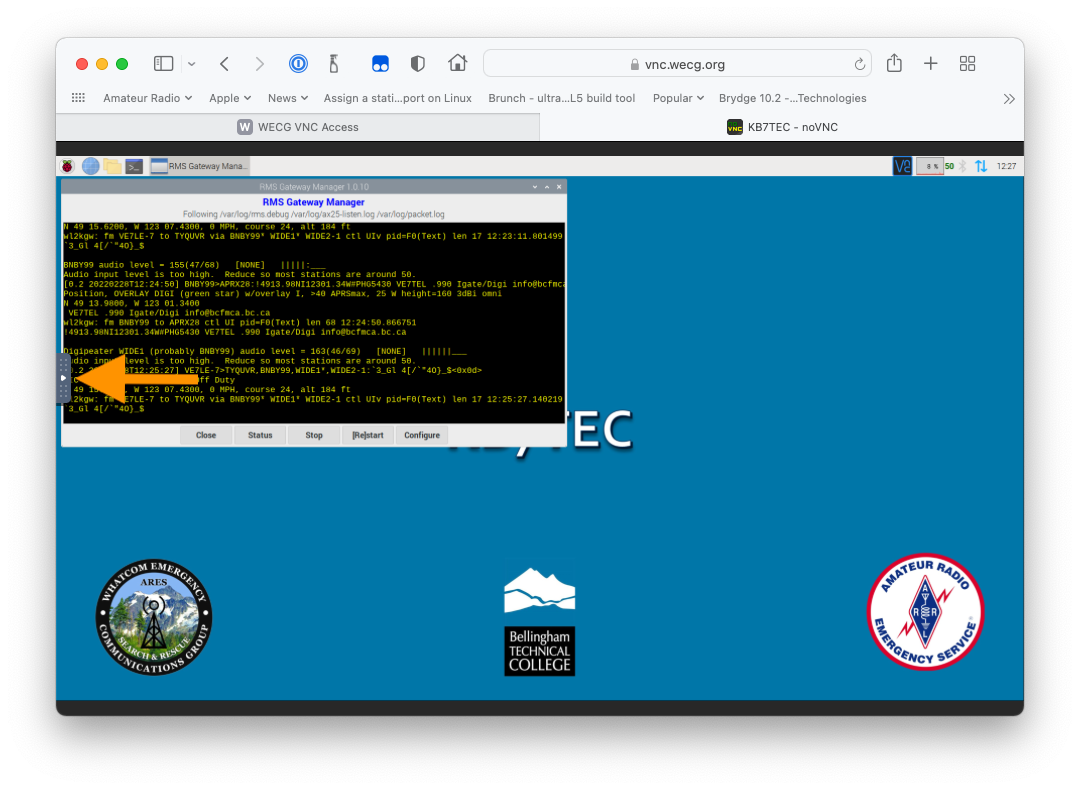
-
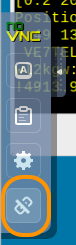
You should now see the remote desktop. Resize your browser or make it full screen as desired. Note the tab on the left side of the browser. This tab allows you to control your VNC session.
-
Click the tab on the left side of the browser:

-
The top item provides a way to send certain keystrokes to the remote computer. You should not need to use this with WECG remote nodes. Hover your mouse over each item to see what it does.
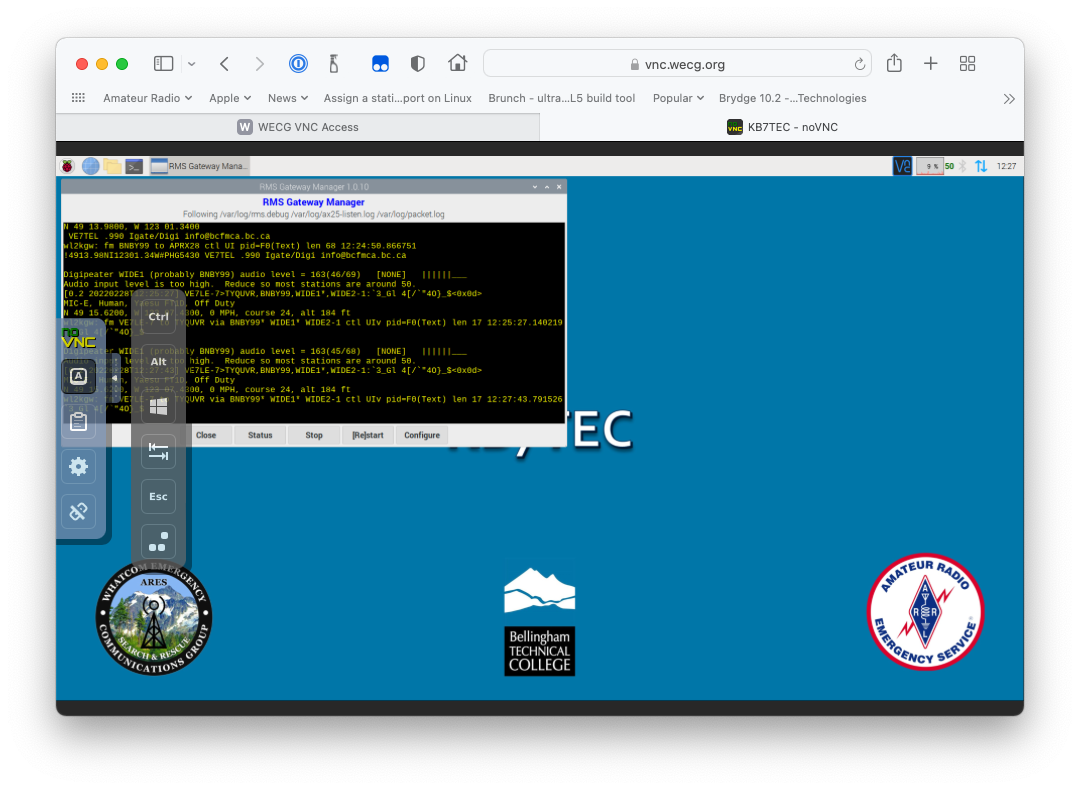
-
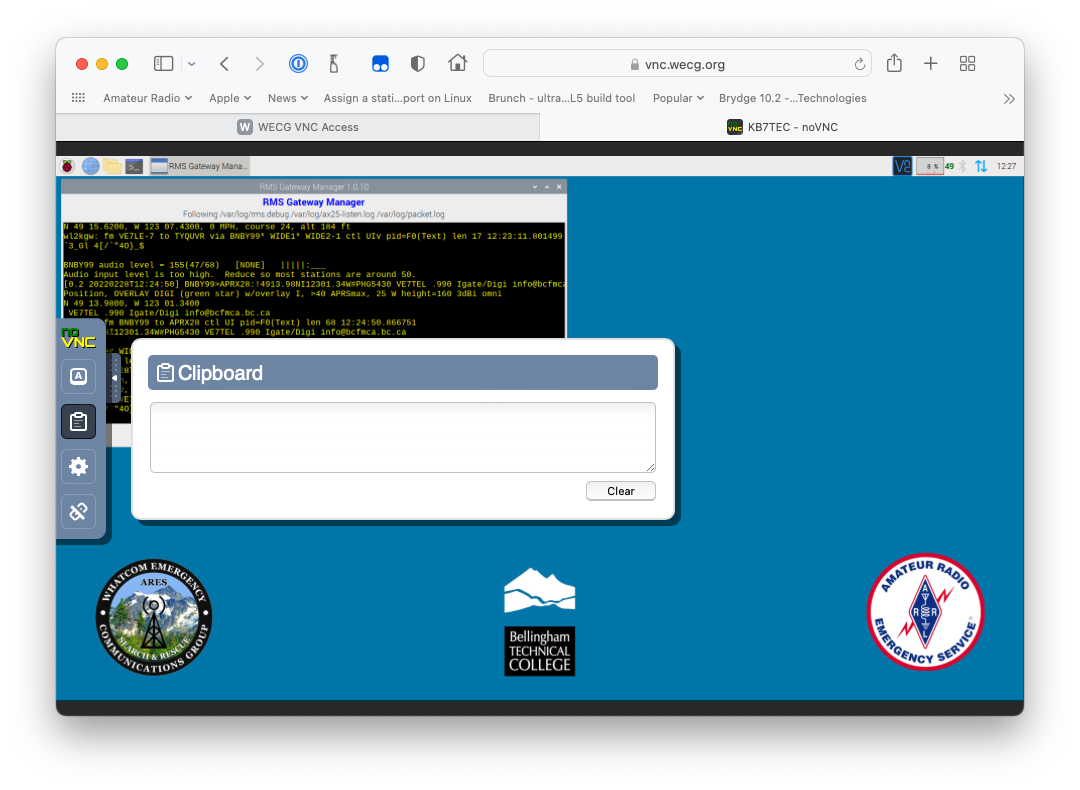
The next item down is the clipboard. If you need to copy/paste something from your PC/Mac/Linux PC to the remote node, paste it in this window. It will then be available in the clipboard of the remote node. Likewise, if you select some text in the remote node and copy it (Ctrl-C), it will appear in the VNC clipboard, where you can select/copy it and paste it into your PC/Mac/Linux host.
-
The third item (the gear icon) is for advanced settings and you shouldn't need to change anything there.
-
The bottom item terminates your VNC session.
Fldigi, Flrig, Flmsg on sarwin1
One of the NoVNC hosts is sarwin1. This host is a Windows PC connected to an Icom IC-706MKIIG radio. This equipment is located in the SAR building. This host is typically used by the digital NCS for the WECG Sunday digital nets.
Starting Fldigi, Flrig, Flmsg on sarwin1
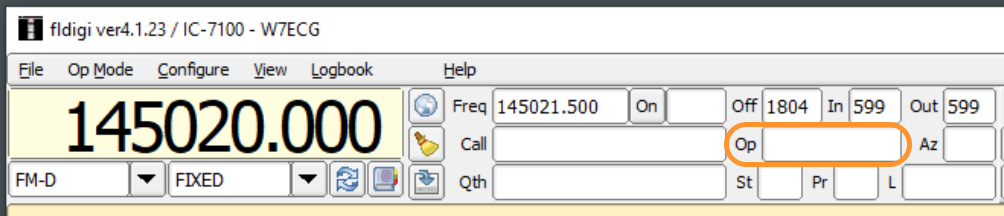
NOTE: You may find that the previous user left these applications running.
There is a shortcut on the desktop called Fldigi + Flrig + Flmsg. Double-clicking it starts all 3 applications. Flrig controls the Icom IC-706MKIIG radio connected to this remote Windows PC. It allows you to change frequency and a very small number of other parameters on this radio.
Stopping Fldigi, Flrig, Flmsg
While the shortcut above starts all 3 applications, there's no shortcut to stop all 3 applications. When you've finished, close the apps as follows (the order does not matter).
- Close Flmsg by clicking File > Exit or clicking the X in the upper right corner of the application.
- Close Fldigi by clicking File > Exit or clicking the X in the upper right corner of the application. This will also close Flrig.
Changing frequency
🛑 IMPORTANT! Although the IC-706MKIIG supports HF, there is NO HF antenna connected to it! NEVER set a frequency outside the VHF band on this radio either directly or via Flrig or Fldigi. If you transmit outside the VHF band, it could damage the radio.
There's usually no reason to change frequency from WECG's designated digital frequency of 145.020 MHz. However, you can change frequency in either Fldigi or Flrig. Changing it in either location will update the other application as well as change the radio.
The important thing to remember is that the frequency is displayed in KHz, not MHz! So 145.020 MHz is displayed as 145020.000.
The most straightforward way to change the frequency (in either Fldigi or Flrig) is to click on the most significant digit in the currently displayed frequency (the 1 in 145020.000 for example), then type the frequency in KHz (so you'd type 1 4 5 0 2 0), then press Enter. There are other frequency changing techniques as well. See the Flrig documentation for more information.
This radio has 2 VFOs, VFO A and VFO B. By default, VFO A is active. To toggle between A and B, you can use the VfoA or VfoB or A/B buttons in Flrig You'll notice that the frequency listed in VFO B is not VHF (it's probably 51850.000 KHz), so you'll have to change it to a VHF frequency and change the modulation. To do this:
- Click VfoB
- Type the desired frequency in KHz (for example, 147560) and press return
- You'll notice the dropdown fields under the meter are now FIXED and USB. In the dropdown that shows USB, select FM. The other dropdown should now show NORMAL.
- You are now ready to use VFO B.
Unless you are familiar with the IC-706MKIIG and Flrig, I recommend leaving the other Flrig settings as-is.
Fldigi Operation
There are several macros just above the waterfall in Fldigi. These are set up to make operating the weekly nets easier for the the digital NCS and are also useful during drills and events.
The group of macros in green are specific to FSQ.
FSQ Macros
The FSQ documenation has instructions on how FSQ works and what various parts of the Fldigi FSQ screen are for.
IMPORTANT: In FSQ, when you type a message in the blue pane or use a macro button to print text in the blue pane, that your cursor be located at the end of the text before your press Enter to transmit the message. FSQ will only transmit up to the cursor location.
- FSQ
This macro puts FLDigi in FSQ mode. Once in FSQ mode, make sure that the FSQ-ON and ACTIVE buttons below the white pane are lit. click the MON button to open the FSQ Monitor window. The monitor window allows you to see all received traffic as well as any "noise". This is handy for seeing traffic from weak stations that might not appear in the yellow pane. See the FSQ documenation for more information.
- Pre-Net
Prints the following text in the blue pane:
allcall wecg net will start @ 1800. check in via winlink to [email protected] before 1800. stand by, i'll call for fsq check-ins shortly.
Use this macro 5 to 10 minutes before the start of the net. Note that you have to press Enter after clicking the Pre-Net macro button in order to transmit this message.
- Net Start 1
Press this macro button at the start of the FSQ net.
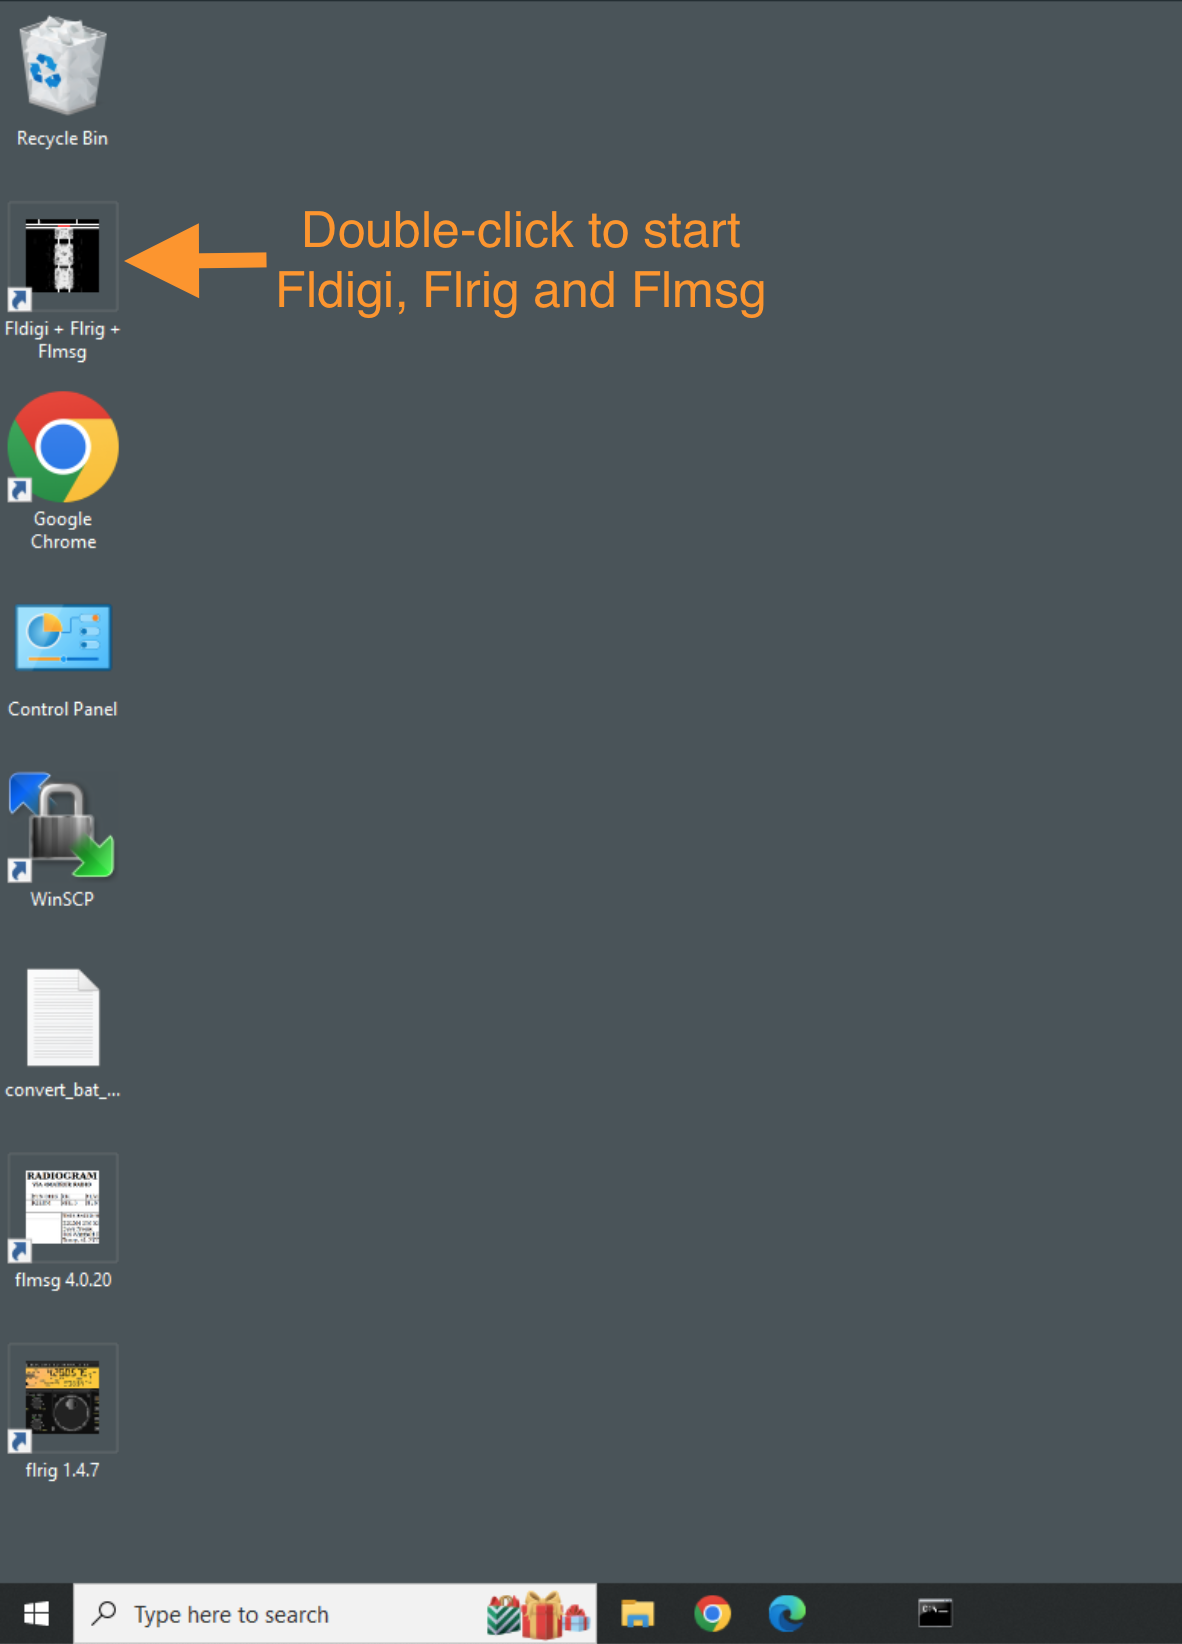
This macro uses text from the Op field in Fldigi:
If I type steve, ag7gn in the Op field, then press the Net Start 1 macro button, this text appears in the blue pane:
allcall welcome to the wecg fsq net. this is steve, ag7gn. i'll call for announcements around 1815. break
The macro pulls the steve, ag7gn text from the Op field and inserts it into the macro text after ... this is. If you leave the Op field blank, it'll print:
allcall welcome to the wecg fsq net. this is . i'll call for announcements around 1815. break
After pressing this macro button, make sure your cursor is located at the end of the message then press Enter to transmit the message.
- Net Start 2
Press this macro button just after sending the text from the Net Start 1 macro. This macro will print:
allcall now accepting wecg check-ins until 1820. send: w7ecg#your-first-name, your-location.
After pressing this macro button, make sure your cursor is located at the end of the message then press Enter to transmit the message.
During quiet periods in the FSQ net, use this macro to remind operators that the net is open and accepting check-ins.
- Anncmnts
Press this macro button about half way through the net to ask for announcements from other operators. This macro will print:
allcall stations with announcements for wecg net please come now.
After pressing this macro button, make sure your cursor is located at the end of the message then press Enter to transmit the message.
- Ack Rcpt
This macro is rarely used during the weekly needs, but might more commonly be used during events or drills. You can use it to explicitly acknowledge a particular station. To use this macro, type the call sign of the intended recipient at the beginning of the line in the blue area, then click the Ack Rcpt macro. You'll see something like this (where the call sign you entered at the beginning of the line is ag7gn, for example):
ag7gn wecg acknowledges receipt of your message at 18:06
The macro will automatically insert the current time. After pressing this macro button, make sure your cursor is located at the end of the message then press Enter to transmit the message.
- Net End
Use this macro to close the FSQ net. Like the Net Start 1 macrio, this macro will use the value you entered in the Op field to close the net. So, if you entered steve, ag7gn in the Op field, this macro will print:
allcall wecg fsq net now closed at 18:19. thanks for checking in. stay tuned for wecg flmsg net on this frequency. steve, ag7gn clear.
This macro will automatically insert the current time. After pressing this macro button, make sure your cursor is located at the end of the message then press Enter to transmit the message.
- Clear Freq
This macro alerts other hams that this frequency is in use. Running this macro will send:
allcall please keep this frequency clear for wecg net.
After pressing this macro button, make sure your cursor is located at the end of the message then press Enter to transmit the message.
Flmsg Operation
When both applications are running, Flmsg communicates with Fldigi to coordinate the mode and Fldigi will pass the decoded traffic to Flmsg for display. For convenience, open the Received Messages window so you can see a list of the forms that Fldigi has successfully decoded and presented to Flmsg. To open this window, in Flmsg click Utilities > Received Msgs.
WECG has standardized on using the MFSK128 mode to pass Flmsg forms.
FLmsg/MFSK128 Macros
The macros in red are for handling MFSK128 traffic and are used during the Flmsg net.
- MFSK128
This macro puts FLDigi in MFSK128 mode. Note that like FSQ, you can type messages in the blue pane, but unlike FSQ, simply hitting Enter will not transmit the message. That is what the remaining macro buttons are for.
- Ack Rcpt ▶|
This macro will retrieve the value in the Call field in Fldigi and insert it into the text. You would use this upon successfully receiving an Flmsg form (success means the received form appears in the Flmsg Received Messages window). So say that I as digital NCS successfully receive an Flmsg form from AG7GN. I would enter AG7GN in the Call field, then press the Ack Rcpt ▶| macro. Pressing the macro will immediately transmit the following text:
AG7GN de W7ECG: WECG acknowledges receipt of your flmsg traffic at 12:50.

W7ECG monitoring
The macro automatically inserts the current time. Unlike FSQ, you do not press Enter after pressing this macro button. The text is transmitted as soon as you press the macro button.
- FAILED1 ▶|
If an Flmsg form was sent but Fldigi could not decode it (and so it was not received in the Flmsg Received Messages window), enter the sender's call sign in the Fldigi Call field, then click this macro. For example, if I enter AG7GN in the Call field and press the macro button, this message will be transmitted (macro automatically inserts the time):
AG7GN de W7ECG

!!!!!!!! MESSAGE NOT RECEIVED at 18:32
!!!!!!!! Please Resend

W7ECG monitoring
This should prompt the sender to try again.
- FAILED2 ▶|
If the sender attempts a second time to send an Flmsg form but again Fldigi could not decode it (and so it was not received in the Flmsg Received Messages window), enter the sender's call sign in the Fldigi Call field, then click this macro. For example, if I enter AG7GN in the Call field and press the macro button, this message will be transmitted (macro automatically inserts the time):
AG7GN de W7ECG

!!!!!!!! 2nd TRY - MESSAGE NOT RECEIVED at 18:34

PLEASE CONTACT NCS VIA VOICE FOR INSTRUCTIONS

W7ECG monitoring
This should prompt the sender contact the voice NCS for instructions.
- Standby ▶|
Use this macro to make the intended recipient aware that you (as NCS) are about send them Flmsg traffic. As with the other red macros, enter the intended recipient's call sign in the Call field before you run this macro.
Example:
AG7GN de W7ECG: Stand by for flmsg traffic.
- TX de me ▶|
This macro will simply transmit whatever you have typed into the blue pane. Enter your text in the blue pane. It is usually not used during the weekly net. The first line should be intended recipient's call:. Add some empty lines (press Enter) before and after your text so the recipient has an easier time picking your message out from any noise in the their receive (yellow) pane.
Example:
AG7GN:

Hello from Steve
This is what will be transmitted:
AG7GN:

Hello from Steve

de W7ECG k
- Clear Freq ▶|
This macro alerts other hams that this frequency is in use. Running this macro will send:
ALLCALL de W7ECG: Please keep this frequency clear for net traffic.
Net Operation
As network control operator, you have wide latitude with regards to how you run the WECG digital nets. The overview described here is one way to do it that leverages the Fldigi macros described earlier.
FSQ Net
-
Connect to the
sarwin1computer as described above and startFldigi + Flrig + Flmsg. This will open Flmsg, but Flmsg isn't used for the FSQ net. Ignore the Flmsg window for now - don't close it. -
Make sure the frequency is set to 145020.000 KHz. Remember to always enter the frequency in KHz in either Fldigi or Flrig.
-
Click the FSQ macro button.
-
Click the MON button under the FSQ Heard List (Fldigi white pane). This will open the FSQ Monitor window.
Also make sure that:
- The FSQ-ON and ACTIVE buttons are On (have yellow "lights").
- The waterfall is centered on 1500 Hz.
-
Open the
notepadapp (enternotepadin the Windows search field to locate it) and position thenotepadwindow as desired. Innotepad, add 2 lines like this:allcall welcome allcall welcome -
Enter your
name, callsignin the Op field at the top of Fldigi so that the FSQ macros can use it. Enter in lower case (the convention for FSQ) like this:steve, ag7gn -
~17:50-17:55 Announce the Net
Click the Pre-Net macro button, make sure your cursor is at the end of the text in the blue pane, then press Enter.
-
18:00 Start the Net
Click the Net Start1 macro button. Note that your
name, callsignhas been inserted into the macro text in the blue pane. Make sure your cursor is at the end of the text in the blue pane, then press Enter. -
18:00+ Start the Net
Immediately after the Net Start1 macro text is transmitted, click the Net Start2 macro button. Make sure your cursor is at the end of the text in the blue pane, then press Enter.
-
Monitor received traffic as participants check in.
-
As they check in, add their names or call signs at the end of the first
allcall welcomeline. Once you have 3 or 4 check-ins, the line will look something like this:allcall welcome ag7gn,ae7uq,kf7volor
allcall welcome steve,jim,andy -
Wait for a lull in the traffic, then copy that line from
notepadand paste it into Fldigi's blue pane, make sure your cursor is at the end of the text in the blue pane, then press Enter. -
Repeat this process on the second
allcall welcomeline as more check-ins arrive. Add additionalallcall welcomelines as needed.
-
-
18:05+ Reminder to check in
During a lull in the traffic, click the Net Start2 macro button, make sure your cursor is at the end of the text in the blue pane, then press Enter.
-
~18:15 Ask for announcements
Click the Anncmnts macro button, make sure your cursor is at the end of the text in the blue pane, then press Enter. If there isn't much traffic, you may choose to ask for announcements sooner rather than later.
-
~18:19 End the Net
Click the Net End macro button, make sure your cursor is at the end of the text in the blue pane, then press Enter. If it's a slow night, you may choose to close the net before 18:20.
-
Update the check-in spreadsheet
-
Close
notepad
Flmsg Net
Coordinate with the voice net control operator before the net starts (via repeater, phone call, email, etc) as to how you both know when a digital message has been acknowledged. See the FAQ below for more information about this.
-
Click the MFSK128 macro button.
-
In Flmsg, update the Date and Time in the ICS213 W7ECG-ClosingComments.213 form that is automatically loaded when Flmsg starts.
- Do this by clicking the ... buttons near those fields. Also change the App'd field to your name and callsign.
- Save the modified form in Flmsg: File > Save
-
In Flmsg, open the Received Msgs window.
- Click Utilities > Received Msgs.
- Position the window as desired. A list of the messages that Fldigi successfully decoded and passed to Flmsg will appear in this window.
-
Wait for the voice network control operator to start the net and ask for digital traffic.
-
Monitor and acknowledge received traffic
-
Monitor the yellow pane in Fldigi for incoming traffic.
-
Once the message has been received, the name of the file containing the sender's message will appear in the Flmsg Received Msgs window. When it appears in the window, enter the sender's callsign in ALL CAPS the Call field in Fldigi, then click the Ack Rcpt ▶| macro button. The acknowledgment is transmitted immediately. No need to hit Enter.
-
If the message appears to complete in the Fldigi yellow pane but did not appear in the Flmsg Received Msgs window, enter the sender's callsign in ALL CAPS the Call field in Fldigi, then click the FAILED1 ▶| macro button. A message requesting the sender to try again is transmitted immediately. No need to hit Enter.
-
If the second attempt succeeds, click the Ack Rcpt ▶| macro button.
-
If the second attempt fails, click the FAILED2 ▶| macro button, notify the voice NCO if necessary (on the repeater) and then await instructions from the voice NCO.
-
-
If you want to send a custom message, simply type your message in Fldigi's blue pane, then click the TX de me ▶| macro button. In the text of your message, be sure to address your message to a particular call sign or ALLCALL if it's intended for everyone.
-
Wait for the voice NCO to close the Net
-
Update the check-in spreadsheet
-
Close Flmsg, and Fldigi (closing Fldigi will automatically close Flrig).
Troubleshooting
400 Bad Request No required SSL certificate was sent
In the WECG VNC web page, after you've clicked the link to go to your desired destination, your browser might return a 400 Bad Request No required SSL certificate was sent error message. This means that your browser can't find the certificate you installed in the Installing the Certificate... steps above. This might happen after an OS or browser software update (although it is rare). The fix is to simply reinstall your client certificate using the steps described above.
Mouse pointer is invisible or just a 'dot'
The mouse pointer in sarwin1 might be a 'dot' that's hard to see when you first log in. This is a quirk of the NoVNC software in Windows. Move your mouse down until the dot is over the Windows task bar. The pointer should return to normal and work normally after that.
Flrig produces "Transceiver not opening" error
You might see this error upon launching the Fldigi+Flrig+Flmsg desktop shortcut. This error sometimes happens after a Windows OS update. To fix:
- Click OK to close the error window, but leave Flrig and the other FL apps open.
- Open the Windows Device Manager (type Device Manager in the search field in Windows task bar).
- Locate Ports (COM & LPT) in the list and click it. You should see at least 3 COM ports as shown in this example:
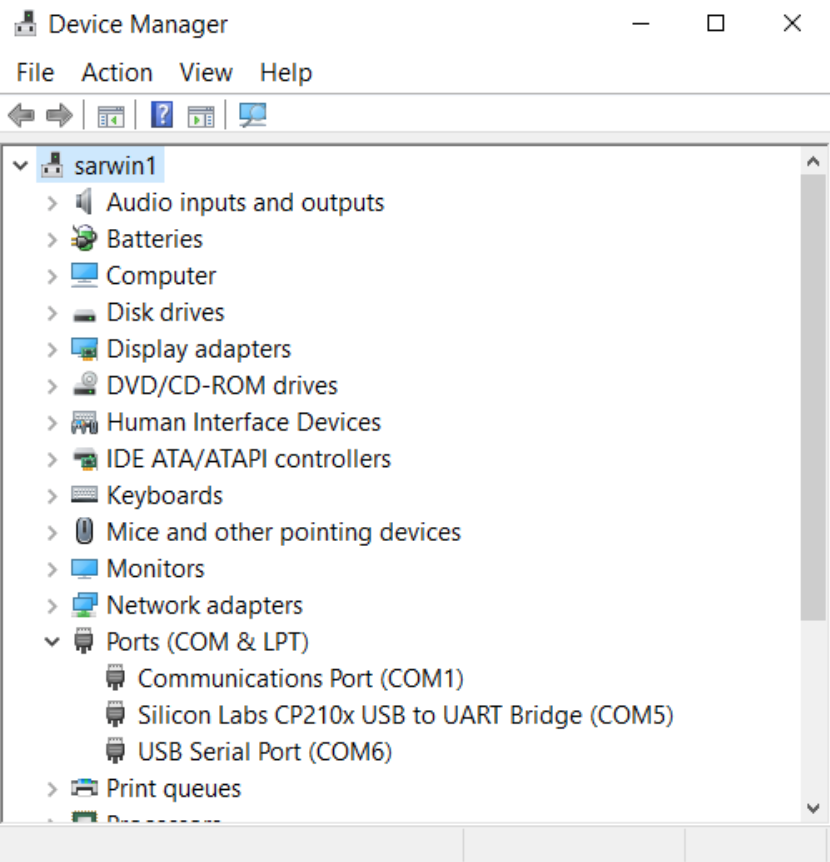
- If you do not see the USB Serial Port... COM port, then the power has been shut off to the IC-706MKIIG or the CI-V USB cable has been unplugged and someone will have to go on site and fix.
- If you do see the USB Serial Port... device, note/write down its COM port (usually COM6).
- You should also see a serial port called Silicon Labs CP210x... (usually on COM5). That port is used for PTT on the IC-706MKIIG. Don't get these ports mixed up! The Silicon Labs CP210x... port can only be used for PTT and the USB Serial Port... port can only be used for rig control.
- Close the Windows Device Manager.
- In Flrig, click Config > Setup > Transceiver.
- Click the Update button.
- Select COM6 (or whatever port you noted from the earlier step for the USB Serial Port... device) from the list.
- Click the Init button in Flrig. The Configuration > Xcvr window should look like this:

- Close the Flrig Configuration window (click X in upper right), then click File > Exit in Flrig, and close Fldigi and Flmsg.
- Double-click the Fldigi + Flrig + Flmsg desktop shortcut and verify all works as expected.
FAQ
Q: If I'm voice NCS for the Sunday Flmsg net, how do I know if the digital NCS has received the Flmsg form a participant?
A: There are multiple ways to do this.
-
If you have reasonable reception at home and can simultaneously monitor ChurchU and 145.020 and can see the MFSK128 ACKs from W7ECG on your home digital setup, you'll know that the digital NCS has acknowledged the traffic.
-
You can connect to sarwin1 as described above and monitor the activity of the digital NCS. More than one user can connect to a remote host at one time. Just be careful not to try to control the remote host while the digital NCS is operating.
-
You arrange with the digital NCS ahead of time for the digital NCS to announce on ChurchU that the ICS213 has been received.
In any case, you should coordinate with the digital NCS prior to the net so you're both on the same page as far as acknowledging digital traffic.
Q: I connected to sarwin1 and Fldigi, Flrig and Flmsg were already running. Do I have to close them and start again?
A: Occasionally the previous user will forget to close the apps. If these apps are running when you connect and all appears to be working, there's no need to close and re-open the apps.