Zelda 2 Randomizer Mapper - AFontaine79/Z2R_Mapper_Docs GitHub Wiki
Zelda 2 Randomizer Mapper
This document is updated for Z2R Mapper version 1.1.
Overview
Z2R Mapper is a tool to make it quick and easy to analyze and review ROMs generated by the Zelda 2 Randomizer. This document assumes you already have familiarity with Zelda 2 and the Randomizer.
Get the Randomizer here.Join the Z2R Discord server here.
Download
Download Z2R Mapper from the releases page.
Opening a ROM File
There are three ways to open a ROM file.
- Drag the file onto the program’s shortcut.
- Drag the file onto the application window.
- Use the File menu.
If another file was already opened, its information will be replaced by the new file. Note that the file does not remain opened by Z2R Mapper. It is only opened briefly to read out the contents.
Starting Stats Page
This page displays the following stats. Starting lives, gems, and heart containers. Starting inventories for items and spells. Starting techs (i.e. upstab and downstab).
If you want to evaluate a new seed quickly for its starting stats without revealing any other information, switch to this tab before opening the ROM file. It is not necessary to reset the checkboxes on this page first. Z2R Mapper resets all checkboxes to their default state when a new ROM is opened.
Show Max Heart Containers
Checking this option will additionally show the maximum number of heart containers. Unchecked by default.
Show Spell Combined With Fire
Checking this option will show what spell Fire is combined with. If Fire is not in the starting inventory, this option does nothing. Unchecked by default.
Overworld Map Pages
Z2R Mapper provides a graphical map of all four overworld areas.
- Item caves and item tiles have their item picture overlaid on that tile.
- Passthrough caves have an identifying letter overlaid on the cave entrance.
- Forced encounters are overlaid with a red box. Forced encounters on lava will use light blue.
- Palaces are overlaid with the palace name: P1 through P6 or GP.
- Towns have the town name appearing beneath them. So does North Palace.
Here is a sample screenshot:
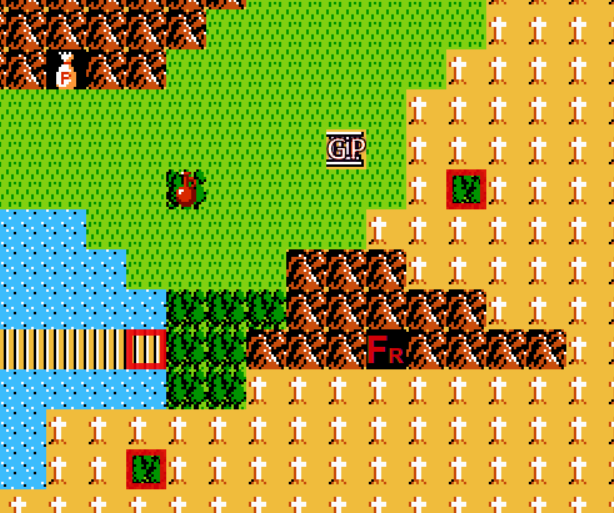
This screenshot shows one item cave containing a pbag, one forest tile containing a red jar, three forced encounter tiles, the right-hand entrance to Fairy cave, and Great Palace.
Map Borders
Out of bounds (OoB) areas are not shown on the maps. Normally, when playing the game, OoB areas will appear as mountain or water. You cannot walk on OoB water, even with the boots. The reason for not showing OoB areas is that sometimes the Randomizer will have a one tile wide path of walkable water along the edge of the map, right next to OoB water. Adding extra terrain tiles around the edge to include OoB space would make the maps look more complete, but may make it harder to assess what areas are accessible.
Panning and Zoom Level
Map images can be panned by using the arrow keys, grabbing and dragging with the mouse, or by using the scroll bars.
Map images can be zoomed by using the Zoom In and Zoom Out buttons in the menu bar, by using the + and - keys of the keyboard, or by holding the Ctrl key and using the mouse wheel.
Each map is zoomed independently. The zoom factor for the selected map is shown in the title bar. When a text page is selected, the zoom factor is not shown and the Zoom In and Zoom Out buttons are disabled.
Western Hyrule Map Page
The Western Hyrule map will start out centered on North Palace. There are three passthrough caves in Western Hyrule. The cave entrances will be labeled with the subscripts L and R to denote entrance on the left-hand and right-hand side of the cave.
- P is for Parapa Cave.
- J is for Jump Cave.
- F is for Fairy Cave. The left-hand entrance will appear on top of a grave tile.
There are two entrances to Death Mountain, denoted with the letter D and a subscript 1 or 2.
- D1 connects to W1 on the Death Mountain map.
- D2 connects to W2 on the Death Mountain map.
Similar to the passthrough caves, Saria town is also denoted using L and R for left and right. The town names appear as Saria(L) and Saria(R).
Two additional special tiles are identified with a letter.
- Bagu’s House will be labeled with a B.
- King’s Tomb will be labeled with a K.
Death Mountain Map Page
Note: The Death Mountain map is cropped to the number of rows and columns generated by the Randomizer. Additional area is cut off.
There are 16 passthrough caves in Death Mountain, labeled A through P. Cave lettering assignments match this this guide at videogamemaps.net.
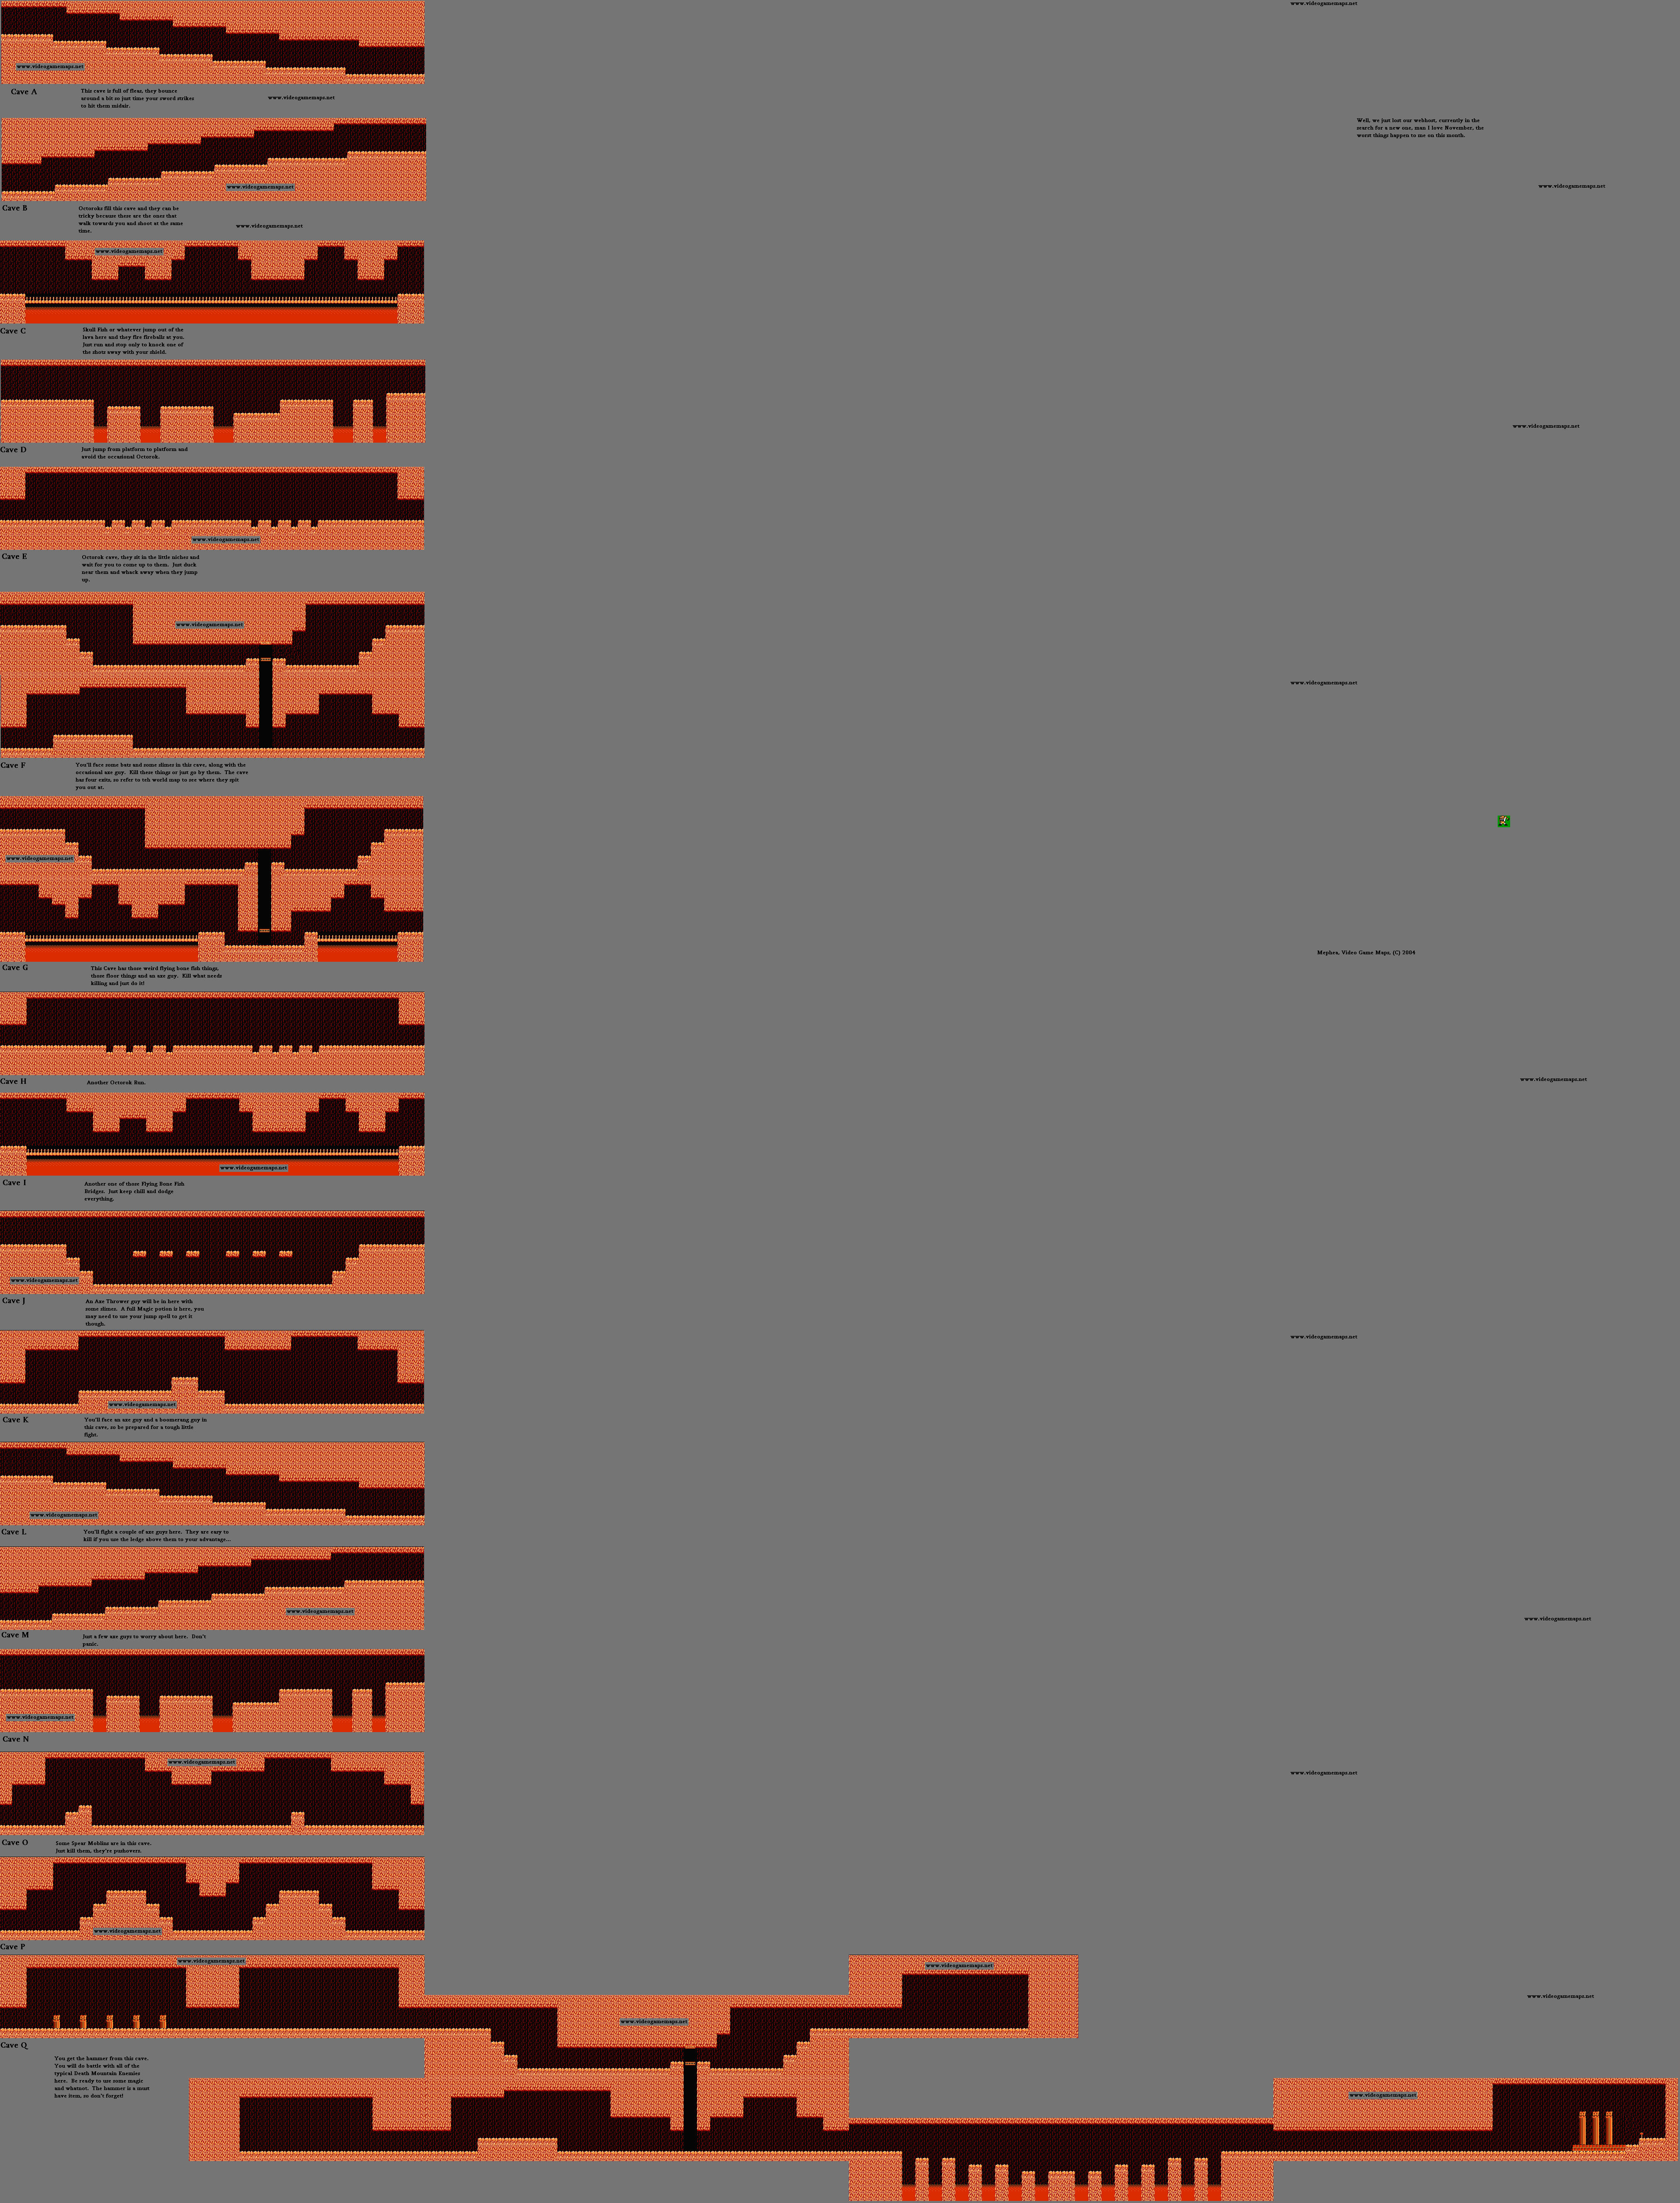
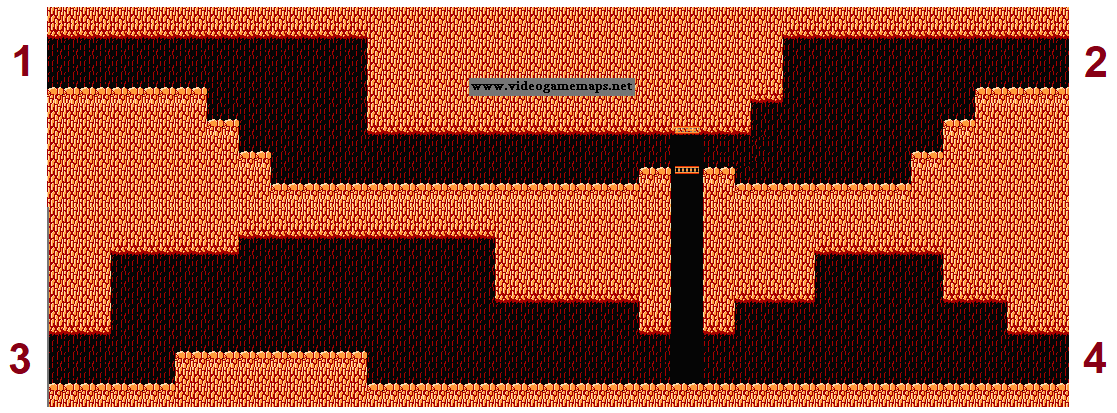
Directionality is not shown, except for 4-way caves. In this case, the subscripts 1 through 4 identify the entrances as follows:
Hammer cave is identifiable because it will show the item on top of the cave entrance instead of a letter.
There are two exits back to Western Hyrule.
- W1 connects to D1 on the Western Hyrule map.
- W2 connects to D2 on the Western Hyrule map.
Eastern Hyrule Map Page
The Eastern Hyrule map will start out centered on the raft arrival location.
Eastern Hyrule has four passthrough caves. These are labeled A through D in the order they are encountered in the vanilla game. The letter assignment maps to the caves as follows:
- A – Cave north of Nabooru
- B – Tektite Cave (cave that connects to New Kasuto)
- C – First VoD cave
- D – Second VoD cave just before GP
New Kasuto may be hidden. If it is, a forest tile will be shown instead of a town tile, but it will still be labeled with the name “New Kasuto”.

One of the palaces may be hidden. If it is, then three-eye rock will appear somewhere on the map. The palace tile location will appear as normal terrain, but will still have the palace name overlaid on top of it.

Maze Island Map Page
Note: The Maze Island map is cropped to the number of rows and columns generated by the Randomizer. Additional area is cut off.
Item Summary Page
The Item Summary is organized by location and only shows locations that may contain major items. These are heart containers, magic containers, inventory items, and spell quest items. The Randomizer may place small items, such as pbags and red jars, at major item locations, but it will never place a major item at a small item location. The exception is when “Include Pbag Caves in Item Shuffle” option is checked. Z2R Mapper considers pbag caves as major item locations and includes them in the item summary.
There are six major item locations in Western Hyrule.
- Grass Tile (normally the Heart Container south of P1)
- Magic Cave
- Trophy Cave
- Medicine Cave
- Pbag Cave
- Heart Container Cave
There are two major item locations in Death Mountain.
- Hammer Cave
- Specatacle Rock
There are four major item locations in Eastern Hyrule.
- Water Tile (normally the Heart Container north of P5)
- Desert Tile (normally the Heart Container east of P6)
- Pbag Cave #1
- Pbag Cave #2
There are two major item locations in Maze Island.
- Magic Container Cave
- Child Cave
Additionally, New Kasuto has two major item locations. These items are not shown on the Eastern Hyrule map. The number of magic containers required by Magic Container Lady will also be shown as "x jars required". In the Z2 Randomizer, this is referred to as "New Kasuto jar requirement" and is usually randomized.
- Magic Container Lady
- Magic Key Basement
And finally, there are the palace item rooms. These items are also not shown on the overworld maps.
For Eastern and Western Hyrule and for palaces, the item summary will indicate the approximate overworld location (e.g. lower left, upper middle, etc.).
Spell Summary Page
Indicates which spells are assigned to which towns. Also indicates the approximate overworld locations of the towns. If Fire is combined with another spell, that will be shown here as well.
The Life spell indicates how many life bars it refills.
Show Magic Costs
Checking this option will show the full table of spell costs. Unchecked by default.
Palace Routing Page
Shows directions and requirements for all palaces. For convenience, this screen also shows the items contained within the palaces. For the overworld location of palaces, check the item summary screen.
Each palace (except Great Palace) has three route types:
- Entrance to Item (always visible)
- Item to Boss (off by default)
- Entrance to Boss (always visible)
Each route contains the following:
- Directions (off by default)
- Requirements (on by default)
If a palace route (e.g. P5 Entrance to Item) has more than solution, then each solution will be displayed on a separate line with the prefixes "Route 1", "Route 2", etc. Each solution has its own set of directions and requirements.
Requirements can be either “No requirements”, or any combination of the following:
- N locked doors – If you don’t have the Magic Key, you will need this many small keys and/or Fairy casts.
- Glove required
- Jump or Fairy required – Either spell will work to get through.
- Glove or Fairy required – Either the glove or Fairy spell will work to get through. Only occurs in Great Palace.
- Fairy required – There is a room that requires the Fairy spell to pass through. Jump will not work.
- Upstab required – Will occur with Glove Required.
- Downstab required – Will occur with Glove Required.
- Rebonack required – Rebonack mini-boss encounter on this route. Palace 6 only.
- Thunderbird required – Thunderbird encounter on this route. Great Palace only.
These checks are directional. For example, there is a room in P2 that requires Jump or Fairy when going from right to left, but has no requirements when going left to right.
Show Directions
Toggle on/off display of directions for each route (e.g. “left, down, left, drop, right, right”). Unchecked by default.
Show Requirements
Toggle on/off display of requirements. Checked by default.
Show Item to Boss Routing
Toggle on/off display of routes going from the item room to the boss. Unchecked by default.
Show Palace Locations
Toggle on/off display of palace overworld locations. Unchecked by default.
Locked Door Count for Entrance to Item Routing
The locked door count for Entrance to Item always includes the locked door in front of the item. Routes going from Item to Boss do not include this door.
Special Routing Considerations for Palace 6
Glove Blocked Drop Room
P6 has a drop to room that is essentially glove-blocked. You may only exit left and you need glove to do so.

However, it is possible that the drop from the room above is aligned such that you will land on the ceiling, which means you can exit left without the glove. In this case this room will not trigger the glove requirement.
Infinite Loop Pits
P6 has a room that is both drop from and drop to and has left and right exits. This room may trigger extra routing solutions. If a route passes straight through this room left-to-right or right-to-left and this room is part of a circular pit, it will trigger the extra route. The extra route will pass through all the drops once and then continue on in the intended direction.
Example of extra routes:
Route 1: down, right, right, right, right, right, up, right, drop, drop, drop, right, drop, right
Route 2: down, right, right, right, right, right, up, right, right, drop, right
Route 3: down, right, right, right, right, right, right, right, drop, drop, drop, right, drop, right
Route 4: down, right, right, right, right, right, right, right, right, drop, right
Rebonack Guarding Item
Entrance to Item routes for palace 6 will always be flagged as Rebonack required. If the passthrough Rebonack also appears on the way to the item room, the requirement will read as “Rebonack required x 2”.
Note: Even though Rebonack drops a key, both the locked door and the Rebonack are included in the requirements list.

For Item room to Boss routing, neither the Rebonack nor the locked door are counted.
Passthrough Rebonack
The passthrough Rebonack drops a key but has no locked door. This means you get an extra key. This may or may not help you with locked doors. It depends on whether or not he is placed after the last locked door.

Special Routing Considerations for Great Palace
Some rooms in Great Palace require special consideration.
The L7 Room

The mapper considers this room impassible between the upper left and lower right. Randomizer racing rules allow damage boost to illegally take the right exit from the top, then reentering the room to get to the bottom. This is considered a minor glitch. The mapper will not show these routes.
Block Column Rooms

These rooms are Glove Required, Downstab Required when going from left to right, and Glove Required, Upstab Required when going from right to left. There is no Jump or Fairy spell requirement for these rooms. It is possible to get from right to left without Jump or Fairy.
Glove or Fairy Room

This room requires the glove or Fairy spell to get from the left entrance to the pit. It does not require upstab. If this room appears in a route and there are no other glove requirements, then the routing requirements will read “glove or fairy required”. If this room appears in a route along with other glove-required rooms, then the routing requirements will read “glove required” and will not mention fairy spell.
Update: Jump can also be used to get through this room. Z2R Mapper does not recognized this and will only flag it as Glove or Fairy required.
Overworld images rendered by Z2R Mapper.
Death Mountain 4-way cave image from videogamemaps.net.
Palace room images for P6 and GP rendered by Z2Edit.