mlcc - 9dian/Index GitHub Wiki
sudo apt-get install python3-dev python3-pip
sudo apt install python3-virtualenv
mkdir mlcc-exercises
cd mlcc-exercises
virtualenv --no-site-package jupyter-env -p /usr/bin/python3
#  python3 -m virtualenv --no-site-package jupyter-env -p /usr/bin/python3
进入虚拟环境:
source jupyter-env/bin/activate
安装库:
pip install -i https://pypi.tuna.tsinghua.edu.cn/simple --ignore-installed --upgrade \
  tensorflow "matplotlib<3" pandas sklearn scipy seaborn ipython==5.7 notebook
jupyter notebook
ubuntu@dev01:/sandbox/mlcc-exercises_zh-CN$ jupyter notebook --ip=ipaddress --notebook-dir=../mlcc-exercises_zh-CN
# jupyter notebook --ip=${ip} --notebook-dir=../mlcc_cn
从https://www.anaconda.com/download 安装 Python 3.6 版本的 Anaconda。这些练习不适用于 Python 2.7 版本。
安装后,从“开始”菜单打开 Anaconda Prompt,然后输入以下命令:
conda create -n mlcc pip python=3.6
conda activate mlcc
pip install -i https://pypi.tuna.tsinghua.edu.cn/simple --ignore-installed --upgrade \
  tensorflow matplotlib pandas sklearn scipy s
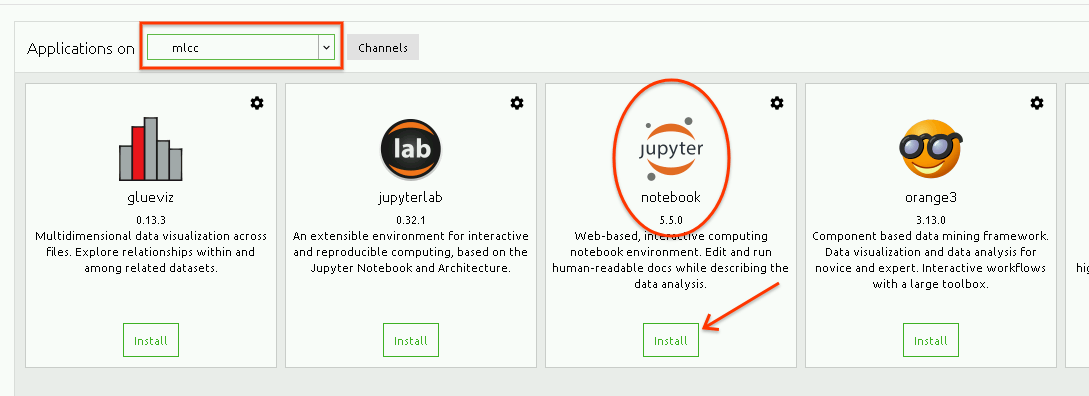
完成所有软件包的安装后,从“开始”菜单中打开 Anaconda Navigator。在 Navigator 中:
- 切换到 mlcc 环境,如以下屏幕截图所示。每次打开 Jupyter 时,都必须选择 mlcc 环境。

-
在 mlcc 环境中安装 notebook,如下所示:
-
安装 notebook 后,点击 Launch。这将打开一个网络浏览器。
- 如果您尚未安装 XCode,请通过运行以下命令安装它(这需要一段时间):
xcode-select --install
- 安装 pip 和 virtualenv:
sudo easy_install pip virtualenv
- 在新目录中设置虚拟环境(这里我们称之为“mlcc-exercises”):
mkdir mlcc-exercises cd mlcc-exercises virtualenv --no-site-package jupyter-env
- 设置并运行 Jupyter。
- 进入虚拟环境:
source jupyter-env/bin/activate
- 安装库:
pip install -i https://pypi.tuna.tsinghua.edu.cn/simple --ignore-installed --upgrade
tensorflow "matplotlib<3" pandas sklearn scipy seaborn ipython==5.7 notebook
- 启动 Jupyter:
jupyter notebook