How to edit vanilla Car Generators in ymaps & replace them with your own vehicles - 5mods/tutorials GitHub Wiki
In this tutorial, I'll use the example of replacing the yellow lifeguard SUVs ('lguard') at Vespucci Beach. With the info given, it should be pretty easy for you to adapt the process to suit your needs:thumbsup:
Tip: If you don't like the idea of editing game files directly, extract (drag & drop) the ymap you intend to edit to somewhere on your computer. Edit it to your liking with something like Notepad++ & then use the add-on 'custom_maps' dlc that is packaged in Map Editor & Menyoo to YMap Converter to load your map for the game. It's a simple process of editing your ymap & then placing it in the 'custom_maps.rpf ' here:
...\mods\update\x64\dlcpacks\custom_maps\dlc.rpf\x64\levels\gta5_citye\maps\custom_maps.rpf
Note: Remember to add:
<Item>dlcpacks:\custom_maps\</Item>to your 'dlclist.xml' if you do it this way 👍
With that out of the way, let us begin.

The basic process goes like this:
- Open Codewalker > hit the left pointing arrow at the top right > 'Selection' Tab > tick 'Mouse select (right-click)' box > change 'Mode' drop-down to 'Car Generator'
- Move to the location of the car generator spawn you want to edit (WSAD to move (Shift = Faster) & mouse click & drag to look).
- Right-click the blue car generator box (it should turn green) & info about it should be displayed in the text box at the right-hand side of the screen (drag the side of it left so you can see all the lines of text etc)
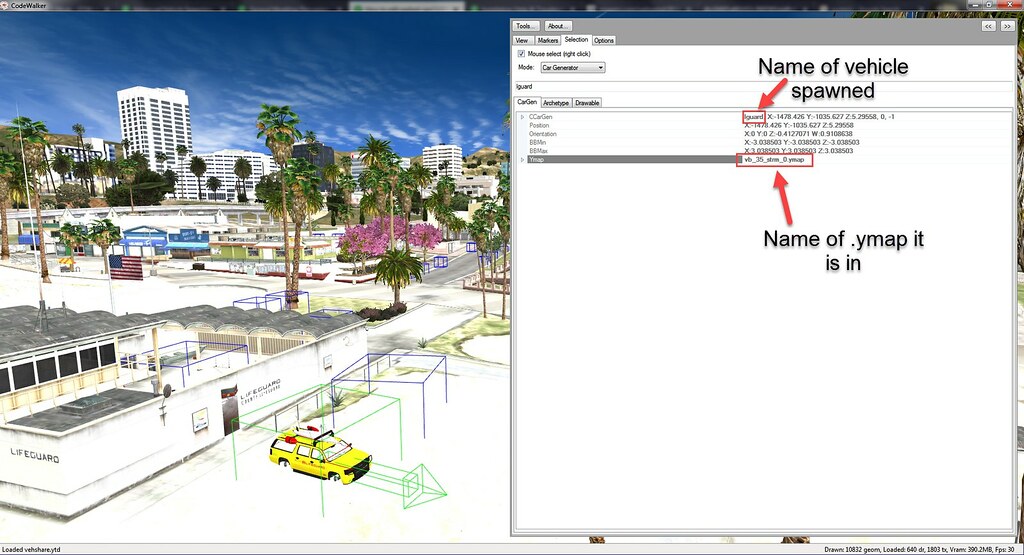
- Start OpenIV & hit Ctrl+F3 to open the search box & search for the name of the '.ymap' you found in Codewalker (in this case 'vb_35_strm_0.ymap'). Note: You can highlight the ymap name using your mouse (click & drag over the name) in Codewalker & copy & then paste it into OpenIV (to avoid typos etc)

- There will most likely be more than one '.ymap' of the same name. Use the same logic you use when replacing a vanilla vehicle to select the '.ymap' the game uses (patchdays beat x64a>w.rpf, update.rpf beats patchdays, etc).
- At this point, it's a good idea to track up through the folder hierarchy in OpenIV & make a backup of the '.rpf' that contains the '.ymap' you intend to edit.
- After creating a backup, go to the '.ymap' location in OpenIV & right-click it & select 'Edit' (Ctrl+Enter)
- Once the file opens use search (Ctrl+F) to search for & then replace the name of the vanilla vehicle with the spawn name of the new vehicle you want to replace it with.

Note: If you want to replace ALL (3 in this case) of the stationary cargen locations for that vanilla vehicle ('lguard' in this case) then feel free to replace all the references to 'lguard' etc you find in the file. If you want to be more selective use the position coordinates given 4 lines above the '' line to identify its location with Codewalker or a Trainer & only replace the exact ones you want.
- Save the '.ymap' (bottom right) & that's it 👍. Load up the game & test out your new vehicle/s spawn.

If this doesn't work for some reason, it is most likely that you have edited the wrong '.ymap'. One that the game is not loading. Go back through the process & make sure you have selected the correct '.ymap' & haven't made any silly mistakes (typos etc).
Randomising Car Generator Spawns:
This part will allow you to spawn multiple different random vehicles (one at a time) in the same Car Generator spot
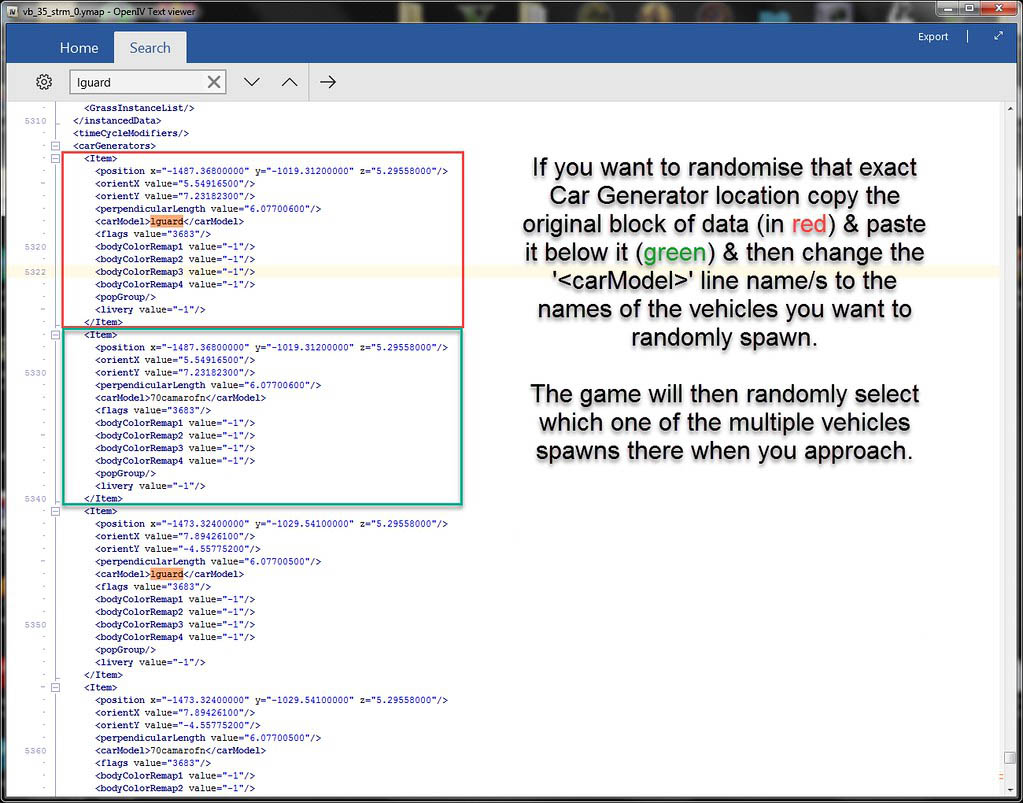
In theory (Note: NOT tested or confirmed but confident it will work 👍) it should also be possible to follow the process in the pic above & then edit the '<position' line coordinates & the '<orientX/Y' lines to create a completely new Car Generator location. No more Codewalker knowledge brick wall of silence as far as Car Generators are concerned 👍
If you come to a fork in the road & don't know which way to go. Make your path. 🙂 👍
Any questions or problems about any of this & I'll help you out 👍