Windows Admin Center - 5huckle/OFFICIALTECHJOURNAL GitHub Wiki
Intro
This lab is focused on Windows Admin Center. We will be setting it up and using it to manage systems.
Domain User: jibreel.diaz
Pre Reqs
- AD01
- Make sure system is on your LAN Network
- Before configuring Networking, use sconfig to turn updates to Manual* * Set Timezone to be EST
- Set the Hostname to be AD01
- IP is 10.0.5.5/24
- Note: For this lab in particular, we experienced widespread issues trying to configure the network using sconfig. The solution to this is to use the gui to manually set the IP address instead of doing it from the command line
- Install AD/DS, providing a domain of yourname.local
- Use Server Manager
- DHCP is a good idea (On your LAN only), you can either integrate that within AD or on one of your linux lan systems
- Create a named Domain Admin and a named Domain User
- FS01
- Make sure system is on your LAN Network
- Before configuring Networking, use sconfig to turn updates to Manual
- Set Timezone to be EST
- Set the Hostname to be FS01
- IP Address is 10.0.5.7
- Joined to yourname.local
- WKS1
- Make sure system is on your LAN Network
- Joined to your domain
- DHCP is a nice touch but not required
- Turn on network discovery
- Control Panel > Network and Internet > Network and Sharing Center > Advanced Sharing Settings

Windows Admin Center
On FS01, open Server Manager. This time, do not close the pop up that appears and instead read it, it should be telling you about Windows Admin Center. The pop up should contain a link that takes you to 'aka.ms/WindowsAdminCenter'. Follow the pages and links to find the download for Windows Admin Center, then download it. Once it is downloaded, run the program and run through the setup wizard selecting all the defaults. When it is done, it will give you a link to your new Admin Center page.
You will be prompted to log in. You can use any credentials that you can use to log in to FS01. Then, just let the page sit for a minute or two while it installs updates, it will then tell you it has to restart.

Now we can start using Windows Admin Center!
Adding Functionality
Go to Settings > Extensions and look up Active Directory and DNS (separately)

After these are done installing, go back to the home screen by clicking on Windows Admin center in the top right corner. Click on AD01, it will bring up a screen called 'Tools' that has a bunch of management control tools on the left hand sidebar. The top one should be Active Directory, it may take a minute to register. Click on Active Directory > Browse > Computers and you will find this


Deliverables
Deliverable 1:
Computers and Servers in Windows Admin Center

Deliverable 2:
Installing DNS and AD DS on FS01 Windows Admin Center
Deliverable 3:
For deliverable 3, I needed to change the logon user from [email protected] to JIBREEL\jibreel-adm. I made the mistake of using / instead of \ which really delayed me in finding the solution. You change your logon user by selecting the check box next to the server you want to change the logon name of, then hit 'Manage As', then type in JIBREEL\jibreel-adm.

Deliverable 4:
FIX THIS ERROR:

This happens if you have a basic installation of Windows Admin Center and you try to connect to a Windows PC. The service “Windows Remote Management (WS-Management)” is not started by default on any Windows PC and traffic is not allowed through the Windows Defender Firewall because the predefined rule ‘Windows Remote Management (HTTP-In)’ is not enabled. We could enable the service and the predefined rule manually but that is not a good idea. Instead we use a Group Policy for this on our Domain Controller.
Solution:
On AD01
Tools > Group Policy Management > expand tree and right click on domain > Create a GPO and link it

Add Domain Admins, Domain Users, and Domain Computers to the security filtering, then remove Authenticated Users

Next we have to create a WMI filter to use.
Right click WMI Filters > New
Give the filter an appropriate name and a small description

Use this new filter back in the Group Policy you just created under the WMI Filter section.
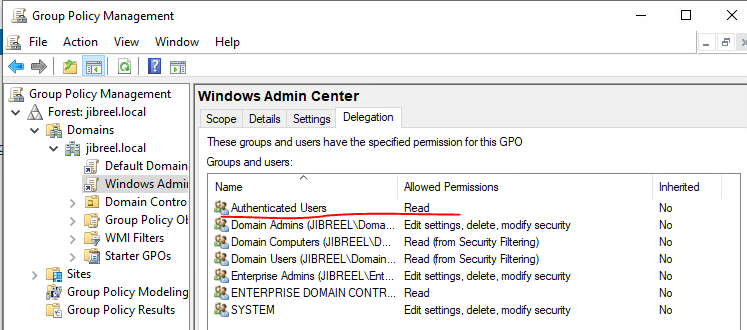
Now select the Delegation tab and add Authenticated Users with Read Only permissions
Now right click the policy you just created and select edit

Navigate to this option and click it. Then Right click it and hit New > Service
Startup: Automatic Service name: WinRM Service action: Start Service
The rest is default

Now, without closing the current window, navigate to Computer Configuration > Policies > Windows Settings > Security Settings > Windows Defender Firewall with Advanced Security > > Inbound Rules. Right click Inbound Rules and add a new one.
Change the rule type to Predefined, click next, unselect the top box in the next screen, leave the rest as default.
Now we go to WKS01 and open Powershell as an administrator
Run the following commands
gpupdate
Get-Service WinRM
Get-NetFirewallRule -DisplayGroup 'Windows Remote Management' -PolicyStore ActiveStore -PolicyStoreSourceType GroupPolicy | Select DisplayName, Enabled