10 Jekyll components - 18F/federalist-jekyll-netlify-cms-guides GitHub Wiki
YAML
In your day-to-day work with Jekyll, it’s likely that you’ll come into contact with YAML (rhymes with “camel”) since Jekyll and any plugins you may want to use are configured using YAML configuration files. YAML is easy to read and understand because of its minimal syntax and it allows comments within the files.
One of the most important things to know about YAML syntax is that whitespace is significant. Jekyll also supports loading data from YAML flat files (as well as other formats such as JSON, CSV, and TSV), more detail below. Since whitespace is used to indicate nesting, most developers use an online linting tool or one built into their code editor so whitespace issues are easy to catch.
During local development, if you change a YAML file, you have to build and run the application again.
Jekyll configuration
The YAML configuration file for Jekyll can be found at _config.yml in the root of the code repository. This file currently contains a mix of Jekyll configuration options as well as some custom key-value pairs introduced by 18F to support the Digital Analytics Platform , Touchpoints , and the internationalization functionality which is covered in the Multi-language setup section.
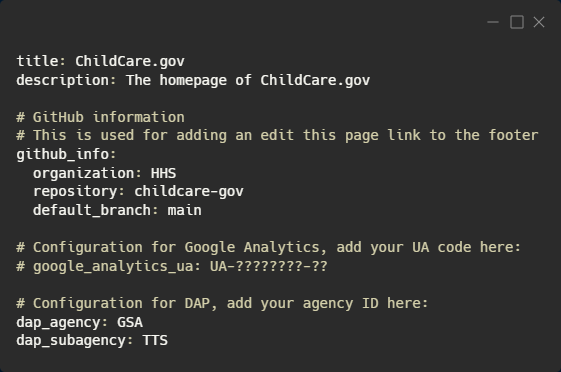
_The beginning of config.yml for ChildCare.gov
Here’s a list of all the Jekyll supported configuration values.
Markdown/kramdown
By default, page content in Jekyll is written using Markdown, which is a plain text formatting syntax that leaves documents readable without code or tags cluttering up the file while still allowing you to quickly and easily express how you would like the content to appear. Markdown is easy to learn, fast to use, and you might already be familiar with it since it has been popular for many years and found in places like Facebook chat, Reddit, and Skype.
Markdown documents are converted into HTML through a parser; the default Markdown parser in Jekyll is called kramdown. Kramdown’s syntax has been enhanced by implementing support for some features that were found useful in other Markdown parsers but in terms of everyday use, your standard Markdown syntax works perfectly fine and you won’t have to learn obscure rules for accomplishing the basic formatting tasks.
One feature that kramdown does support that’s used heavily on the ChildCare.gov site is Inline Attribute Lists (IALs). An IAL is a block element used to attach HTML properties to another block level element such as a paragraph or a link.
Here’s an example of Markdown syntax and a kramdown IAL being used to add the HTML class usa-link--external to the two link elements in the unordered list at the bottom of the snippet below.

A snippet of Markdown from the COVID-19 page on ChildCare.gov.
Front matter
Front matter is an important concept in Jekyll and any file that contains a YAML front matter block will be processed as a special file by Jekyll. By default, the way to denote a front matter block is to fence one or more key-value pairs in a set of triple dashes.
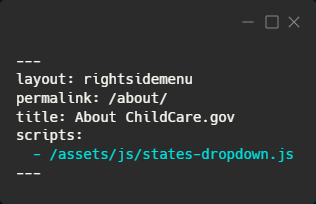
Three dashes delimiting the front matter block of en/about.md
From top to bottom in the screenshot above, these are giving Jekyll the answers to the questions:
- What layout should be used to render the content inside of this Markdown document once kramdown has parsed and converted it?
- At what permalink/URL should this document be accessible?
- What is the title of this page?
- What scripts should be included in this document, if any?
You only need to provide the keys you care to configure in the front matter and if you don’t have any keys to define, that’s fine too. The set of three dashes with no variables in between will still get Jekyll to process your file.
If you find yourself continually specifying the same variable in all of your documents or all of the documents within a collection, setting those variables as front matter defaults within the Jekyll configuration file.
Liquid templates
Jekyll uses Liquid for its templating engine. It’s straightforward and similar to most templating engines, allowing you to build templates and create reusable components for your site.
Liquid has two main kinds of Markup that you’ll encounter:
- Output Markup is surrounded by two curly braces on either side of the Markup being rendered.
- Tag Markup is surrounded by a single curly brace and a percent sign on either side of the Liquid tag being used.

_A snippet from the state resource page layout: layouts/state-page.html
Let’s unpack the screenshot above.
- The layout opens with three dashes which delimits its front matter variables. Layouts within Jekyll can include other layouts and that’s how this layout starts, by specifying that it’s using the default layout (found at
_layouts/default.html). - The filename of the layout specifies what you call the layout when you use it. Since this file is named
state-page.html, you would specifylayout: state-pageto use it elsewhere. - The layout specifies one JavaScript file to be included. These are added to the end of the body so that they’re non-blocking to the render loop of the web browser.
- After the front matter there’s a chunk of HTML with some Liquid syntax mixed into it.
- There are several classes being applied to the different elements — these are part of the United States Web Design System (USDS), which is covered in the USWDS section.
- The first Liquid tag being used is
[assign](https://shopify.github.io/liquid/tags/variable/#assign)which is a variable tag in Liquid used to assign a named variable to a value. Here we’re assigning sidenav to hold information from a file located at_data/navigation/state-pages/en.yml - The second Liquid tag is a control flow tag,
[if](https://shopify.github.io/liquid/tags/control-flow/#if), that allows you to do boolean logic. Liquid supports all the normal control flow statements likeif/else/else ifas well case. - The last Liquid tag is
[include](https://shopify.github.io/liquid/tags/template/#include)which tells Liquid we want to include the contents of another layout file within the current one.
All of these instructions in the layout tell Jekyll exactly what content we want, where to put it, and how to style it.
It’s important to know that all of these Liquid tags are parsed during the build process in order to output the final styled markup page. You aren’t introducing any performance bottlenecks that would affect ChildCare.gov users by using some complex or lengthy set of instructions to Liquid. The build time may increase slightly over time, which affects the developer experience, but the website users are spared from any of that.
Jekyll variables in Liquid templates
Jekyll exposes several variables within Liquid to help you display the dynamic (parsed/rendered at build time) content you want to display. Here’s a list of them.
The two most important and commonly used are site and page. With the site variable, you can access any information from _config.yml as well as access any data loaded from YAML files placed in the _data folder.
Accessing data files
Any JSON, YAML, CSV, or TSV file placed into the _data folder will be loaded automatically by Jekyll. The data contained in these files will then be available in your templates via the site.data property and then the name of the file. For example: If I have _data/translations.yml then I would access any data within that file in my template with {{ site.data.translations.myKeyName }}. See Jekyll docs on data files.
Accessing config variables
If you have a key in _config.yml named phone_number then you would access that in your template by using {% site.phone_number %}. If you wanted to have a list of phone numbers, you could create a YAML file, name it phone_numbers.yml, and drop it in the _data folder and access the array of phone numbers in my template with {% assign phone_numbers = site.data.phone_numbers %}. Jekyll provides several extra metadata variables about the site that are useful. Check them out here.
Accessing page variables
With the page variable, you can access any of the front matter variables for the page in question. If your page has a front matter variable called title, you can render that in a template with {{ page.title }}. Jekyll also gives you some metadata about the pages, check those out here.
United States Web Design System (USWDS)
USWDS is a toolkit of principles, guidance, and code that makes it easier to build accessible, mobile-friendly government websites. It’s built with the 21st century integrated digital experience act (IDEA) in mind. We’ve applied many USWDS styles on ChildCare.gov.
USWDS uses Sass instead of standard CSS. Sass offers many quality of life improvements for developers writing styles like nesting and modules to help make managing large stylesheets easier.
Important note: The current version of USWDS being used on ChildCare.gov is still using an old implementation of the Sass processing pipeline (rubysass) and therefore the actual stylesheet files are SCSS. As of April 2022, USWDS is preparing to release version 3 of USWDS, which will address those issues. Some work on the asset pipeline may be required at that time. The same asset pipeline work may also occur on the upstream 18F USWDS Jekyll Template from which the Jekyll version of ChildCare.gov very closely mimics.
Although USWDS uses Sass/SCSS, much of the daily interaction with it for developers/designers is via all of the HTML classes that they expose style rules through. They provide classes for working with nearly every aspect of CSS properties such as margin and padding, a grid layout, flexbox, paragraph styles, and many more. An example of using these HTML classes to achieve a styling is by applying padding-y-2 and text-center to apply two units of vertical padding and align some text in the center of its element. Check out all of the USWDS utilities.
Style overrides file
When adding custom style directives, it should be placed in the custom styles file that is loaded last, located at: _sass/_uswds-theme-custom-styles.scss
This file is primarily for CSS specificity overrides. It should be a last resort.
Preferably, use the USWDS utility classes within HTML templates where possible. Also use design tokens in the _uswds-theme-settings.scss file.