04 Intro to Netlify CMS for developers - 18F/federalist-jekyll-netlify-cms-guides GitHub Wiki
Included with the Jekyll version of ChildCare.gov is the Netlify Content Management System (CMS). Netlify CMS lets content folks create and manage content tailored to ChildCare.gov. Netlify CMS is a React application that lives inside the admin directory. Netlify CMS works by reading and committing files to GitHub from the configured repository and branch. There is beta support for working with local files.
Content editing workflow
When content editors make changes to content and save it, a branch will be created on the configured GitHub code repository and a pull request will be created. A Federalist build/deploy will generate a preview URL for content editors. Content editors can manage the entire publishing workflow within Netlify CMS, and although they need write access to GitHub, they don’t need to use GitHub as part of their workflow.
Once the content changes are ready and the content editor moves the status from Draft to Ready to Publish, the pull request will automatically be merged into the branch configured in the config file (usually main) and the pull request will be closed. This will also automatically trigger a Federalist build/deploy — the content changes will then be available on the live production website.
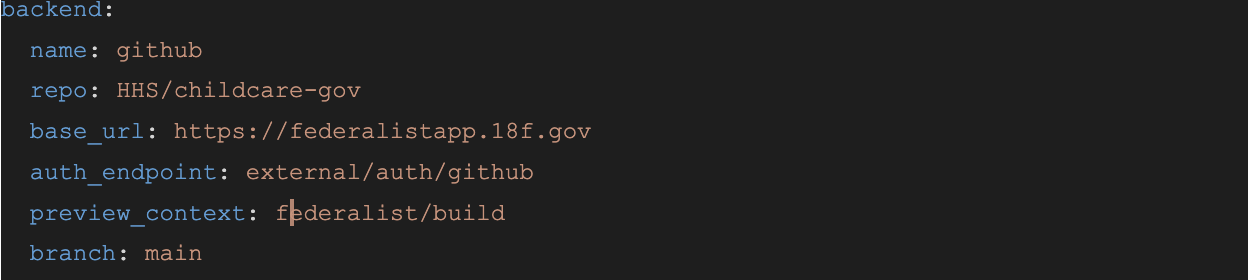
Configuration
You’ll find the Netlify CMS configuration file at admin/config.yml. The configuration controls all aspects of the CMS. The most important keys in the configuration file are: backend and collections. The backend key is how you tell Netlify CMS which repository and branch it should be using to read and write file changes.
Collections
The collections key is how you add or remove folders or individual files to the Netlify CMS UI so that content editors can change this content. Generally for each collection, you’ll give it a name, tell Netlify CMS where the folder or individual file lives in the filesystem, and which fields within the Markdown file(s) should be shown in the UI as editable and which widgets should be shown for those fields (string fields, number fields, boolean field, etc). The widgets you assign to each field also controls the data type that will be written back to the Markdown document.
Take a look at the full documentation for collections.
Uploaded files
When content editors upload files through Netlify CMS, the files are immediately added to the code repository, into the directory defined in the media_folder configuration key, and pushed into the branch defined in the backend configuration key. If your media_folder is set to assets/img then all uploaded files will go to this directory.
In order to link to a file such as a PDF, you can approach it two ways.
- You can add a new front matter property to your Markdown document and then add that property as a field within the collection with the widget type of file.
- Or you can just edit the document using Markdown mode and use a combination of Markdown syntax and Liquid to make a link to the file, like so:
[This text renders as the link]({{site.baseurl}}/assets/pdf/ChildCare_govFull-checklist-EN-Final.pdf) - The
{{site.baseurl}}Liquid tag is important here otherwise the file may not be found when the user clicks it.
Using a proxy server
If you’re working on the Netlify CMS UI, you might want to build locally and skip the GitHub approval process. Netlify provides a proxy server for this purpose.
Here’s how you can enable this feature in your admin/config.yml:
- At the beginning of the file, add a
local_backendsetting and set it totrue - Set the backend
namesetting togit-gateway - Comment out the rest of the
backendsettings

In a new terminal window, run npx netlify-cms-proxy-server from the root directory. In another terminal window, run the application (npm run start).
Now you can open http://localhost:4000/admin to verify that you can administer your content locally without authentication.
Note: This feature is for local development only. The editorial_workflow is not supported in this environment.
Don’t forget to put back the original backend settings when you’re done!
Check out Working with a Local Git Repository for more details.