GSoC 2016 Application Aman Deep: Implementing a Formula input widget for Sympy in Jupyter Ipython Notebook - sympy/sympy GitHub Wiki
Implementing a Formula input widget for Sympy in Jupyter/Ipython Notebook
Personal Details
Name: Aman Deep
College: National Institute of Technology, Durgapur
Email : [email protected]
Github username: hiamandeep
Blog: www.techinfected.net
My Google Groups Idea Discussion Thread: https://groups.google.com/forum/#!topic/sympy/28cWReuChdI
##Short Biography
I am from India, Currently in Second year BTech, studying Information Technology at National Institute of Technology, Durgapur. I have done 5 tasks in Google Code-In 2011. I love working on Ideas. I also write blog on Linux/FOSS (www.techinfected.net).
##Platform & Editor Experience
I use Ubuntu 15.10 as my primary operating system, I also use windows.
I use SublimeText 3 for large projects and vim for small programs.
I have intermediate expertise in vim.
##Programming Experience
I know C and Python Programming Language.
In web,
I know Javascript, JQuery, Html, Css, Bootstrap, Django, Mysql.
I have built a website for my club using Django and Bootstrap along with a senior. Live at www.onlinetreasurehunt.herokuapp.com hosted on heroku.
Github repo: https://github.com/hiamandeep/online_treasure_hunt_sammita
I have also customized my blog’s template to a great extent.
I have been using Git and Github for some time. I am acquainted with them.
##My Experience with Python
I liked the python language ever since I first used it. I love it for the readability that it provides. I like how the code is written in less number of lines.
My Projects in Python
- A Basic Gui Calculator in Python Using Tkinter. Github link
I have also written a blog post describing, usage and how I wrote the code Link
-
A Basic Music Player written in Python Using Gstreamer. Github Repo
-
A keylogger for linux written in Python using pyxhook module. Github Repo
I have also written an article on my blog showing usage and explaining code Link
##The Project
SymPy currently lacks a Gui interface with which users can input expressions interactively (WYSIWYG).
As per the discussion in in my idea thread, the best Gui would be the Jupyter notebook with SymPy.
If a Formula input widget is created for Jupyter then It will be very easy for a user to enter a math formula and also be able to edit it, then do any symbolic computation using SymPy. This will make SymPy easier to use, as part of the wider scientific Python ecosystem.
**I have developed a working prototype for this project idea, I have detailed it rigorously in the sections below. It’s also been discussed a lot in my idea thread. **
I have used MathQuill for entering the Mathematical expression and then converting MathQuill expression into an equivalent Sympy expression.
Aim: To create a formula editing widget in Jupyter/Ipython Notebook.
The Project can be divided into 2 major parts:
Part 1: Implementing a MathQuill widget in Jupyter Notebook.
Part 2: Conversion of MathQuill expression to equivalent Sympy expression.
After achieving the two parts, if I get some time, I have also planned to implement,
what Francesco Bonazzi Suggested :
Convert a SymPy expression to a MathQuill widget.
This will allow users to edit complex sympy expressions easily with MathQuill’s WYSIWYG interface.
I have described this idea in later part
##About the Prototype As I mentioned earlier, I have already made a working prototype which shows the MathQuill input box in Jupyter and takes Latex of the user entered Mathematical expression and converts it into equivalent Sympy expression.
Here is the link to the prototype code: http://nbviewer.jupyter.org/gist/hiamandeep/9edc1f889336b4b1b979
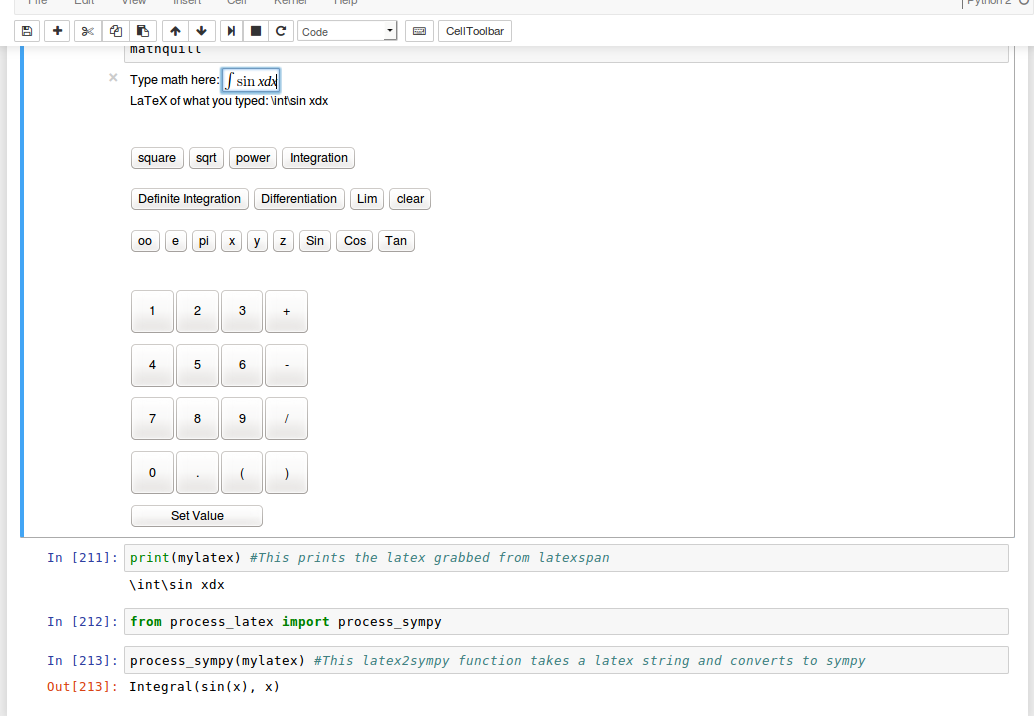
And here is a screenshot after running the prototype:
How to Run the Prototype:
- Download my prototype code from the above link.
- install Jupyter locally, Install latex2sympy package using Antlr4.
- Run Jupyter Notebook from the directory where latex2sympy is installed.
- Open my downloaded Notebook code under File --> open in Jupyter.
- Run all the cells till the html and javascript string cell.
Usage:
After entering the math expression in the input box click on set value button to get latex in mylatex variable and then execute the python command cells.
(here is a the code link for only Html/Javascript. So that you can run it simply in any internet browser, [Link] but it is only for the interface part, not the sympy conversion as that requires python code)
I have explained the Prototype in Part 1 and also in later section in great detail
###Part 1:
I have used MathQuill for entering and editing the formula, which will then be converted into equivalent Sympy Expression.
MathQuill is a WYSIWYG Latex Math Editor. It uses Mozilla Public License.
The arrow keys or mouse are used to move the cursor in the input box.
For entering Math Symbols, MathQuill takes input in latex. For example: to enter an integration sign in mathquill, the we need to type ‘\int’
As you can see in the screenshot above, I have added buttons to the widget for symbols so that the user doesn’t have to know the latex commands.
When the user clicks on the button, the sign is inserted into the current cursor position and user can move around the area to fill values in different cells, for example: upper & lower limits in definite integral.
###Part 2:
Conversion from MathQuill to Sympy expression
Different Approaches:
####Approach 1:
Get Sympy expression using the latex generated by MathQuill latex method and convert it using the latex2sympy package.
Note: I have followed this approach in my prototype.
latex2sympy is a software package which accepts a latex input and produces its equivalent sympy expression.
So, I get latex expression from MathQuill and after entering that expression I get sympy expression.
Sympy2latex works well to a good extent. Though, there are some issues that needs to be fixed.
In fact, I submitted an issue regarding the formatting of exponent and integration and they were fixed, PR #6 and PR #8. I also fixed one minor issue PR #9 (Merged)
Another Issue that I fixed myself was that, MathQuill produces \left and \right , if there is brackets in equation, they are actually latex commands to make sure that the brackets are of the same height of the expression in html rendered form.
But this is unnecessary and only creates problem in conversion, so I edited the mathquill.js file and removed the ‘\left’ and ‘\right’ from the return statement in latex method. So, the problem is solved.
Here is the modified mathquill.js: Link
Here is an example to show, what I mean.
For an expression: 1/(a+b)
MathQuill’s latex: \frac{1}{\left(a+b\right)}
Modified MathQuill’s latex: \frac{1}{a+b}
Some examples showing conversions from mathquill latex to sympy.
>>> from process_latex import process_sympy
>>>
>>> process_sympy(r"\frac{d}{dx}x^4")
Derivative(x**4, x)
>>>
>>> process_sympy(r"\int x^2dx")
Integral(x**2, x)
>>>
>>> process_sympy(r"\int2^{(x+3)}dx")
Integral(2**(x + 3), x)
>>>
>>> process_sympy(r"\int_0^{\infty}\sin xdx")
Integral(sin(x), (x, 0, oo))
>>>
>>> process_sympy(r" \lim_{x\to4}\frac{2-\sqrt{x}}{4-x}")
Limit((-sqrt(x) + 2)/(-x + 4), x, 4)
Problems & my solutions with this approach:
The author of this package has not updated his status on whether he would like to move it into sympy PR #1 I have asked the author about any updates on this.
But of course the package can be used without merging it into sympy. So, I will have to learn very well, how the latex2sympy source code is written.
There is no documentation about the source code available as of now.
Since This package depends on Antlr4, I will have to learn that.
Advantage with this approach:
I have tried this parser with many different expressions and it works well. Though, I also found some issues.
I won’t have to start from scratch.
####Approach 2:
To find out the data structure that MathQuill uses to store the javascript expression tree and then traversing the expression tree in python with some traversal algorithm should convert the expression into a python expression.
Advantage of this approach:
This approach is much more desirable, since we won’t have to depend on any other software package (like latex2sympy) and also any parser (like antlr4) is not required here.
Disadvantage of following this approach:
I haven’t gone through this approach. I have focused on the Approach 1. And I have only basic knowledge about expression trees.
##How I Implemented the Prototype Widget and my Plans to improve it:
I have divided the explanation of working of my Prototype implementation into two parts:
- MathQuill Widget user interface
- Conversion of the latex of the Input expression to equivalent Sympy Expression.
###1. MathQuill Widget UI
First, I assigned the Html and the Javascript part of the MathQuill Api code as python string in the Jupyter Notebook Cell. After running that cell using Ipython’s HTML function. I was able to produce MathQuill MathField box along with buttons inside the Notebook.
Here is the initial code: http://nbviewer.jupyter.org/gist/hiamandeep/cedbdd62bc03b5f89c7c
But, this was just a page being rendered in Jupyter, I had to make a widget out of it.
So, I went through Ipython’s Documentation and some online resources and to see how an Ipython widget is made.
An Ipython Widget consists of a Back-end Widget and a Front-end Widget.
The Back-end part is written in python and the front-end in Javascript using Backbone.js, It is an MVC (Model view controller) framework written in Javascript.
Simply passing the string containing the Html & javascript from backend to frontend where it is rendered using JQuery’s html function.
This is the back-end widget code where (input_form+javascript) is passed
class MyWidget(widgets.DOMWidget):
    _view_name = Unicode('MyView').tag (sync=True)
    value = Unicode(input_form+javascript).tag (sync=True)
And this is the front-end widget code where the html/js code is rendered.
    %%javascript
require(["widgets/js/widget", "widgets/js/manager"], function(widget, manager){

    var MyView = widget.DOMWidgetView.extend({

        render: function(){
            this.$el.html(this.model.get('value'));
        },
    });

    manager.WidgetManager.register_widget_view('MyView', MyView);
});
Finally, calling the widget shows the MathQuill Input area inside the Jupyter Notebook.
mathquill = (MyWidget())
mathquill
Further improvement Plans in the UI:
Every possible Symbol button will be added. The buttons will be categorised in sections. For example: Numbers, Basic Math, Trigonometry, Calculus and so on. There will be a dropdown menu for accessing the category, hence making it uncluttered. And, the commonly used buttons will also be placed outside the categories, for easy access.
And of course, the user experience will be improved by designing the interface well.
So, after I design the complete interface, It will be just a matter of replacing my existing html & javascript code with the new improved code.
###2. Conversion to Sympy using latex2sympy.
This part is about the conversion of the latex that we got from MathQuill input box, into Sympy expression using the latex2sympy package.
The set_value function is responsible for grabbing the latex expression from the input box and passing it to Jupyter Kernel for conversion using process_sympy, which is a latex2sympy function that carries out the conversion.
This function gets called when the set value button is pressed.
So, every time we enter an expression into the input box, we need to press set value button.
function set_value(){
        var var_name = 'mylatex'
        var var_value = latexSpan.innerHTML;
        newv = var_value.replace(/\\/g, "\\\\"); //replace single backslash with double backslash
        var command = var_name + " = '" + newv + "'";
        var kernel = IPython.notebook.kernel;
        kernel.execute(command);
    }
The basic idea for the conversion is the need to pass latex expression from the javascript to python kernal, So that we get a variable (‘mylatex’) containing the latex as a string, which will then be converted to sympy using a latex2sympy function.
Now lets see what each statements in the function does.
Latex expression generated by MathQuill is grabbed from latexSpan in the html
var var_value = latexSpan.innerHTML;
Here we are replacing \ with \ so that special characters in latex are not interpreted by python.
newv = var_value.replace(/\\/g, "\\\\");
Python statement assigning newv to the variable given by var_name (which I have set to ‘mylatex’)
var command = var_name + " = '" + newv + "'";
And Finally the Python statement is executed from javascript by creating a kernal object.
var kernel = IPython.notebook.kernel;
kernel.execute(command);
Now, let’s look at the python code. The comments are enough to understand this.
print(mylatex) #this prints the latex expression of mathquill input

from process_latex import process_sympy

process_sympy(mylatex) #This function finally carries out the conversion to a Sympy expression.
Further Plans:
Represent Sympy expression in the MathQuill Input box.
The user will enter a sympy expression and that expression will be shown in WYSIWYG form in the Mathquill input box.
The user will be able to edit the expression in the input box, interactively.
Approach:
Convert the user entered sympy expression into latex using the sympy’s latex() function
Example:
>>> print(latex(Integral(sqrt(1/x), x)))
\int \sqrt{\frac{1}{x}}\, dx
Study MathQuill api’s to represent the latex in MathQuill input area.
##How Do I fit in
Working on Gui for sympy was my idea and with the help of my mentors, I was shown where and exactly what I should be working on, and I really liked it (go through my Idea thread on Google Groups). Since, I have already made a Working prototype. I know exactly what to do. I have gained decent knowledge of the softwares required for this project: Jupyter Notebook, Ipython widgets . I am very much comfortable with Html, Javascript, JQuery and Python which will be extensively used in this project.
##What excites me
I love working on user interfaces. It really excites me that lots of people will be using what I with the help of the opensource community will create. By implementing the widget, I will be making things lot simpler for many people.
Work that I have done so far
-
Made an Interactive Plot in Jupyter Notebook. (Not much related to current idea)
-
Made A basic Prototype MathQuill Widget in Jupyter Notebook.
In the Process I learnt some basics of Backbone.js (an MVC in Javascript) which is used to make widgets in Jupyter/Ipython Notebook. And also some Parsing basics with Antlr4.
##Patches Submitted in Sympy
- (Open) PR #10869 Added an example of an interactive plot using matplotlib in Jupyter Notebook.
- (Merged) PR #10871 Made code simpler and fixed compatibility issue with python3
- (Merged) PR #10872 Fixed python2 Compatibility
- (Merged) PR #10797 Placed import statement at top to maintain consistency and readability.
- (Merged) PR #10838 Fixed two typos in enumerative.py
- (Open) PR #10819 Fixed missing codes readme.rst
- (Open) PR #10765 Updated readme.rst
##Patches Submitted in latex2sympy:
(Merged) PR #9 corrected the latex expressions for exponents
##Bugs/Issues raised
- (Closed) PR #6 Exponent Problem.
- (Open) PR #7 Fix undefined symbols problems.
- (Closed) PR #8 Improve Integration
##Commitment
I will be giving 50 hours or more, a week for my GSoC project.
I won’t be taking vacations. I will devote all my time to the project.
Even after the Summer of code ends, I will still work on my project. Since it will be just the beginning of the new semester so there won’t be much to study.
Schedule
Community Bonding Period (22nd April to 22nd May ):
My exams ends on 6th May. So, I can start working from 7th May.
Week 1,2
- Read SymPy Documentation and make myself familiar with all libraries and modules.
- Go through Sympy Github Repo and make myself familiar with its code base.
- Interact with Jupyter/Ipython community and get information about implementation of my prototype widget.
1st half of the coding period ( 23rd May - 28th June ) :
Week 3:
First of all, I will be working on the conversion of Mathquill expression to sympy, Since It is the most important and challenging part of the project.
I will have to decide which approach to take for conversion of Mathquill to sympy form. Since Approach 2 is much desired, I will do extensive study of the MathQuill.js to see if I can get some tree expression. And based on the progress, I will finally decide whether I should go with Approach 1 or Approach 2.
Since I haven’t gone through approach 2. So I will assume that I will go with Approach 1 in the further schedule.
Week 4
If I go with Approach 1:
-
In the latex2sympy package, I will study the grammar file PS.g4 (Written in Antlr4) and understand how the lexing is done i.e. how the expression is broken down into sub-expression and matched with the lexer rules and when the lexing is complete how the parsing is done.
-
Study the process_latex.py file, which tells antlr to lex the latex expression, parse it and walk it and attach listener to it. (the listener listens for a parser rule which gets triggered).
Week 5, 6
- Start working on the issues with latex2symy.
- Try all kinds of complex math expressions to see if it works with all.
( 28th June to 16 August ):
Week 7,8
- Work on the User Interface and functionality of the Widget.
Week 9, 10
- Work on Sympy expression to MathQuill form conversion.
Week 11, 12
- Finish all pending tasks
- Cleaning up code and refactoring and fix bugs.
##References