How To Write Extensions And Themes
This document outlines how to write your own extensions and themes for Phoenix Code.
Click on one of the below links and follow the instructions there to start:
This is an evolving document, please refer the below links for extension API docs and how tos.
- Phoenix APIs - https://github.com/phcode-dev/phoenix/wiki#phoenix-api-docs
- This is a work in progress. As we improve our documentation for phcode.dev, please check out the Brackets API docs too.
- Brackets APIs are also supported- https://brackets.io/docs/current/
- Common How-Tos: https://github.com/brackets-cont/brackets/wiki/How-to-Write-Extensions#common-how-tos
- Take a look at our default extensions for code reference: https://github.com/phcode-dev/phoenix/tree/main/src/extensions/default
Follow the below step to run and debug your Extension/Theme:
- Clone your extension Repository into a folder. See this link to lean how to clone a repository from GitHub.
- Go to https://create.phcode.dev .This is a special development centric website of phcode.dev which shows non minified js/css files in the browser developer tools.
- Open the cloned folder and select
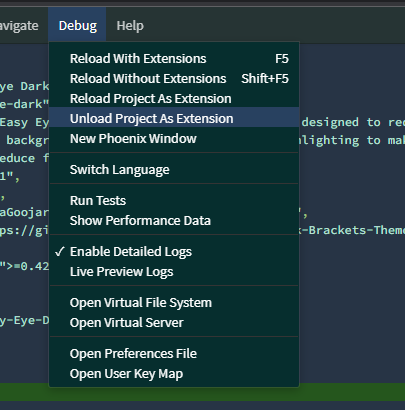
Debug > Load Project As Extension

- The Theme/Extension will be loaded in Phoenix Editor now.
- You can now make code changes to your theme and live preview theme changes as you edit your theme css.

- You can also select
Debug> Reload With Extensionsto test the new code changes. - When you are done developing the extension/theme, select
Debug> Unload Project As Extensionto unload the extension.
- You can use the browser developer tools to debug the extension/theme.
Extensions created from the above GitHub template can be easily published from your GitHub repo to the store.
Just creating a release in GitHub with an attached extensions.zip file. Follow the below steps:
- Increment the
versionfield inpackage.jsonfile before publishing. - Compress the extension folder into a zip file with name
extension.zip. NB: It is important to name the file as exactlyextension.zip
- Create a new release in GitHub and attach the above
extension.zipfile in the release.- On GitHub.com, navigate to the main page of the repository.
- To the right of the list of files, click
Releases.
- Click on
Draft New Release
- Select
choose a tagand type in your new extension version andCreate new tag.
- Fill out the remaining fields.
- Drag and drop the
extension.zipfile to the release.
- Click on
Publish releasebutton.
See Release Example: https://github.com/phcode-dev/extension-template/releases/tag/0.0.1
- You will get an issue in your issue tab regarding the publishing status of the extension/theme.
See Example: https://github.com/phcode-dev/extension-template/issues/2
- If there are any errors in publishing, please visit the link in the issue to
see the errors. Fix and
retrypublishing the release.
- Once the extension is published, you should be able to see it in the extension store in https://phcode.dev

Follow this section only for old brackets extensions.
To publish Extensions/themes that are not created from the above theme and extension template or old Brackets extensions, please follow the below steps:
- Create a GitHub repo for your extension if it is not present.
- Create a file
.github/workflows/publishToPhcode.ymlin your repo with the following contents: https://github.com/phcode-dev/theme-template/blob/main/.github/workflows/publishToPhcode.yml
That's all, you can now follow the above Publishing to the extension/theme store section.
Your repository must be public to be able to be published to the Phoenix Extension store. See this link on understanding how to change repo visibility to public in GitHub.
The verified extension badge(tick mark) will be automatically granted to verified GitHub Organizations.
Please raise an issue here: https://github.com/phcode-dev/phoenix/issues/new/choose , mention your extension repository.