Charmhigh modifications for OpenPnP
This Wiki page is outdated. Some conversion steps are no longer strictly needed (you can keep the original cameras), others have changed. This Wiki page should be updated by someone who owns such a machine and is on top of things.
HELP WANTED!
See also: CharmHigh CHMT36VA
_Mark (2021-12-04)
Working on it Sam (2022-01-07)
This page gives instructions on how to upgrade your Charmhigh CHMT48VB or CHMT36VA machine to work with OpenPnP. For Full instructions on how to Setup and Calibrate your machine with OpenPnP see CharmHigh CHMT36VA
Upgrading the PnP machine will require the following:
You will need to reflash the pick-and-place's control board firmware with Smoothieware, which is a popular CNC controller.
Upgrading the camera's to HD USB with better resolution (Upgrading the camera's takes the most effort in upgrading the hardware). You can decide to keep the existing camera's, but this is not recommended, because OpenPnP does use computer vision that needs the best image quality possible.
There are also some recommendations made so that you can get the most out of your machine when using OpenPnP.
This process will surely void your warranty. You might break your machine.
This is not yet an easy and quick 5 minute conversion. OpenPnP is designed to be used with custom DIY build machines. It requires extensive configuration to get up and running. However, pre-configured configuration files are available for both 48VB and 36VA machines and help to start. Nevertheless, do plan for your machine to be down for a while (most people need 1 week or more).
This process is known to work for the 48VB and 36VA model with some small differences here and there. I do not know for certain if other machines use the exact same control board or if the process will work for other Charmhigh models.
Some of the steps that follow might not be in the best order or might lack detail. Feel free to update this page if you go through the process and can make it easier for those that follow you.
The parts below are known to work for the conversion. It might be possible to substitute these parts with others.
Parts needed for both CHMT36VA and CHMT48VB
-
STLINK-V3SET
You need a ST device programmer to reflash the firmware on the Charmhigh's main control board. There are many options available for this so feel free to use another programmer if you have one. -
Downward looking USB camera
The cameras built in to the Charmhigh have analog output and are hardwired in to the machine's electronics. The easiest route is to replace the machine's cameras with USB cameras that can be directly read from the computer running OpenPnP. Get the 12mm version of the camera at the link above. The Charmhigh's original down-looking camrea has an 8mm lens on it, but the 12mm will give you more of a zoom in case you want to see 0402 parts better. If you don't like the 12mm lens you can take the 8mm lens off of the Charmhigh's original analog camera and put it on the USB camera. -
USB extension cables
The USB cable on the downward looking camera is not long enough. You will also need two USB cables to go inside the machine. It's recommended that you get 3 extension cables. These extension cables easily fit through the existing opening at the back-left of the machine so your modification will look as professional as possible. Since these cables come in packs of two you'll have to get two packs so you have three of them for the modification. -
Semi-closed drag chain
Since you are replacing the downward looking camera you are going to have to get in to the drag chain. However, the drag chain that comes with the Charmhigh isn't made to be modified. Consider just cutting the cables out of the existing drag chain and replacing it with drag chain that lets you open and close it if you ever have to run more wires through it. If you do this replacement you'll need to order two sets of this drag chain: one for your x-axis and another for your y-axis. You need the 15mm x 20mm version. -
Upward looking USB camera
The camera inside the Charmhigh is not a USB camera. It's easiest to replace it with a camera like this. This camera features a global shutter, which means it reads all of its 1 million pixels at the same time, which eliminates motion blur. It also operates at 60fps, which gives amazing performance. This camera is black-and-white only, no color, but you shouldn't need color. It's recommended that you get it with the 2.8-12mm lens, or you can buy the lens separately with the next link. -
Variable lens for upward camera
This variable lens will let you set the field-of-view for your upward looking camera. Adjust it so that you can see your largest part in the camera when your largest part is rotated by 15 degrees (which is OpenPnP's default value for worst expected rotation error). You can optionally get this lens packaged with your camera when you order it. -
Black pick nozzles
Nozzle tips are usually green so that the tip can act as a green-screen. The recommended upward looking camera is grayscale only, so it might be better to use black nozzles that won't show up in the camera's background.
Extra parts needed only for CHMT48VB
-
RS-422 adapter
The updated firmware will communicate over RS-422 and RS-232. You'll need a USB to RS-422 adapter for the communication. This one features isolation that should protect your setup in case there is a problem. -
Right-angle USB connector
A right-angle connector will make it easy to fit the RS-422 adapter inside your machine.
- Install OpenPnP
- Replace your machine.xml file
Download the machine.xml file from the link. Use it to replace the default machine.xml that comes with OpenPnP. - Connect your RS-422 adapter
Plug your adapter in to your computer. Don't worry about connecting it to your machine just yet. We just want it to enumerate for the computer so we can set the configuration in OpenPnP. - Remove your downward looking camera
If you bought the replacement drag chain you can just cut your cables out of the chain. Remember you're supposed to cut the drag chain, not your cables. You can leave the camera wired in through the machine for now. We just need it out of the drag chain. - Mount your new downward camera
Place your new downward camera in the mount on the head. Run its USB cable through the x-axis drag chain. Connect the camera's USB connector to a USB extension cable between the x-axis drag chain and the y-axis drag chain. Run the USB extension cable through the y-axis drag chain and connect it to your computer. - Configure OpenPnP
Open OpenPnP and set the COM port for your RS-422 adapter under the settings for the GCode driver. Configure the settings for the downward looking camera so you can see the video feed in OpenPnP. - Adjust your downward camera
Adjust how deep the lens is screwed in to your downward camera and where the camera is positioned vertically so the video feed is in focus and has the zoom you want.
This is a one-way process. You can not undo this operation. If this process fails you will have to buy a replacement control board from Charmhigh. You will not be able to get the original Charmhigh firmware back on your control board.
-
Take off the machine's base.
Make sure your machine is powered off. The metal top of the pick-and-place is a tooling plate probably made of MIC-6 aluminum. There are multiple socket head screws around the perimeter of the plate that hold it to the base. Remove all of these socket head screws to gain access to the inside of the machine. -
Find the programming pins
The main control board is at the center of the machine in the front. It has four pins that are for reprogramming it. You'll need to make a connection between these pins and your programmer. It's recommended that you leave a cable connected to these pins and run it out through the opening at the back-left of your machine in case you need to reflash your machine again in the future.
The picture below shows what to look for. On the left the RS-422 adapter is circled in yellow. The blue shows the main board's 4-pin header used to program the ST microcontroller. The detailed view shows the individual pins designations. The purple rounded rectangle on the right side shows the RS-422 communication connection. The orange rectangle at the bottom shows where the RS-422 cable from the main control board connects to the touchscreen.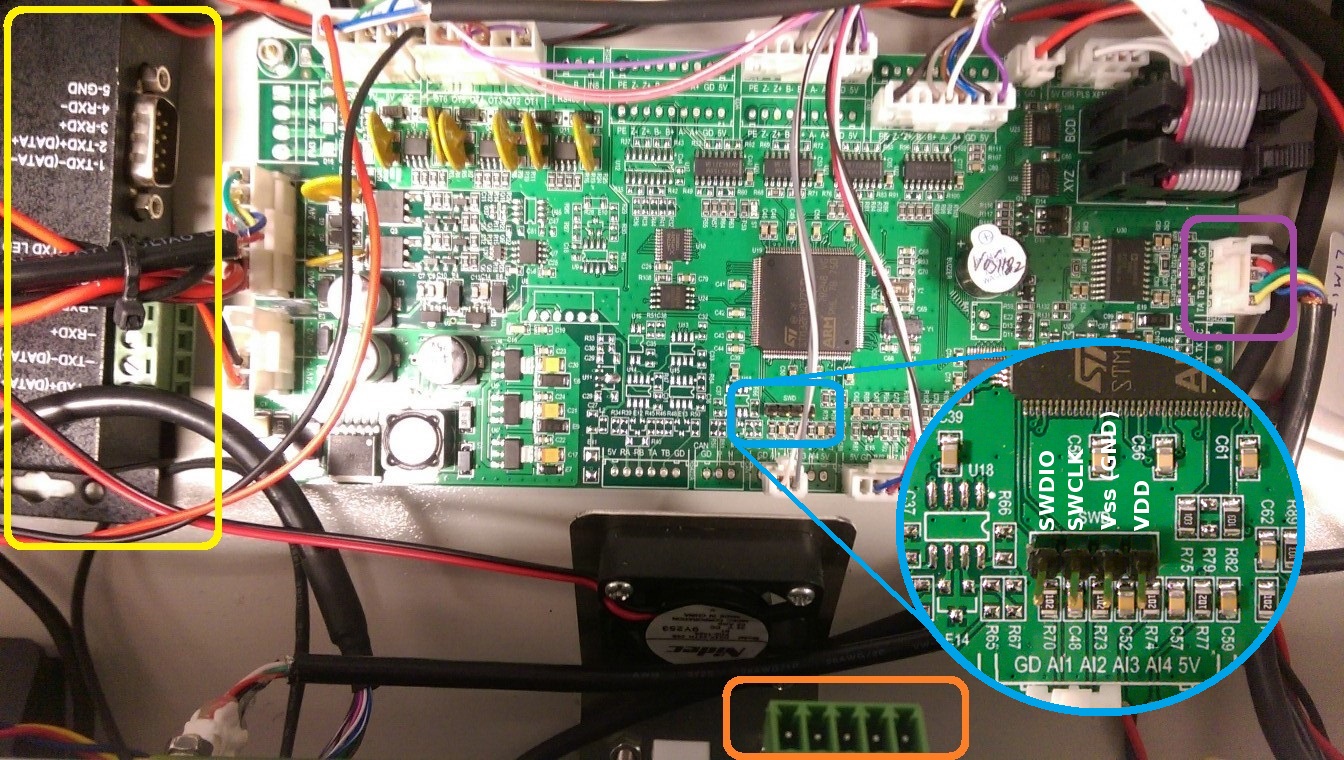
Cut off the end of the cable on the touchscreen side and expose the bare wires on the cable still plugged in to the main control board so you can connect the wires to the screw terminals of your RS-422 adapter.
-
Download the new firmware (main.hex) from Jan's GitHub repo, see also the CharmHigh CHMT36VA page for details about this version.
-
Flash the new firmware.
Use a tool like STSW-LINK004 to first update the firmware of your device programmer (if you are using the recommended STLINK-V3SET). With your connection and machine securely positioned, turn on your machine, then wipe the memory on the Charmhigh control board, then write the main.hex file to the control board. Your machine will make some scary sounds while this process is occurring. -
Turn off your machine
- Install USB extension cables
There is a slot at the back-left of the machine that has wires going in through it. Push the female end of two USB extension cables in through that slot. - Install the RS-422 adapter
Connect the RS-422 adapter to the right-angle USB cable and then to the other USB extension cable you wired in through the machine's slot. Use the screw terminals on the RS-422 adapter to connect a cable to the machine's main control board. Consider using Velcro to mount the RS-422 adapter to the machine's base. - Replace the upward looking camera
Remove the stock upward looking camera from the mount and replace it with your new camera. You'll have to take the 4 socket head screws from the right light off to remove the camera mount. Screw the variable lens in to the camera and run it all the way down the threads. Run the camera's USB cable as far as you can towards the slot at the back-left of the machine and connect it to one of the extension cables. Connect the cable to the computer and get the video feed in OpenPnP. Use the video feed to make sure the camera is oriented in the camera mount in the correct orientation: so the the left side of the video is on the left side and the right side of the video is to the right of the machine. Unscrew the lens from the camera so that you can access the adjustment screws on the side of the camera mount. Make sure you can move the adjustment screws through their full movement while in the camera mount. Tighten down the lock screw to hold the lens to the camera. - Consider using electrical tape to protect the exposed electronics on the bottom of the ring light.
- Adjust the upward camera
Mount two screws to hold the camera holder to the machine's base plate. Put the right light over the camera. Turn on the right light in OpenPnP by activating UPLED. Move the head over the camera. Turn on the vacuum and manually attach your biggest part to the nozzle on the head. Use this to adjust the zoom and focus on the upward camera's lens. Fasten down all of the screws when you have everything in place. - Cut the cable to the old downward looking cable and remove it.
- Reconnect the machine's base
Tighten the socket head screws to the machine's base completing the modifications. - Celebrate
 Search the Wiki