3D BLTouch
The BL/3D/CRTouch is an electronic probe that allows to correct the surface imperfections of the bed, that does not prevent you from doing the bed tramming, but can help to do it very simple.
Place the BL/3D/CRTouch following this guide:
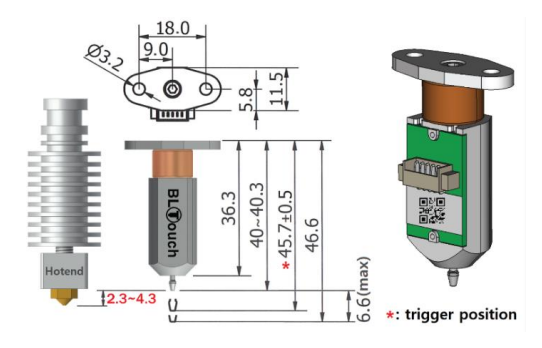
Image from: https://www.antclabs.com/bltouch-v3
The retracted push-pin of the probe must be higher than the tip of the nozzle, and when the probe is deployed, the push-pin must be lower.
Connect 3DTouch/BLTouch to the 5pin Probe port on the Ender 3v2 board as indicated on the image, It is not necessary to disconnect the z-endstop.
Image from https://marlin.crc.id.au
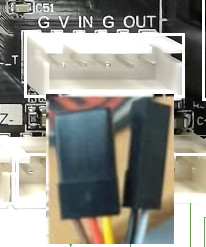
If you can't home Z (see the video below) re-check the wires connections of the probe, specially the white wire.
BLTouch_bad_connection.mp4
The NOZZLE_TO_PROBE_OFFSET X and Y values are defined for the support: https://www.thingiverse.com/thing:4605354 use M851 or the Probe Offset menu on Advanced Settings to change according to your support, do not forget to save with M500. For the indicated support the z-offset is about of -1.7 mm for the stock glass bed and about of -3.5 for flex thin bed, but you need to adjust it according to your setup.
The latest version of this firmware implements the Z Probe Wizard
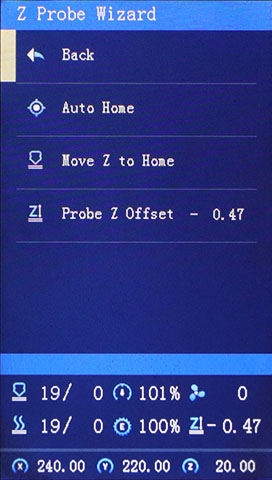
You can easily adjust the Z offset following these steps:
- If you didn't do it before, level the bed with the leveling knobs, you can use the menu Prepare/Bed tramming
- Go to menu Prepare /
Z Probe Wizard - Choose
Move Z to Home, the printer will do an auto home and move the nozzle to the center of the bed, then the nozzle will go down to the current 0 position. - Choose
Probe Z Offsetand set the correct value as usual (paper method)
Other methods to set the Z Offset can be found in these videos:
- https://www.youtube.com/watch?v=y_1Kg45APko
- https://www.webcarpenter.com/blog/162-3D-Print---How-to-calibrate-Z-offset-with-a-BLTouch-bed-leveling-probe-sensor
Put in the start Gcode script of the slicer (Cura, Simplify, Prusaslicer, Superslicer, etc.) after the G28 the commands:
G28 ; Home all axes
M420 S1 Z2 ; Use mesh level upto 2 mm
Z2 is for set fade height to 2, so leveling correction is active only the first 2mm. S1 enables the leveling system (only if a valid mesh exists in RAM), S0 disables the leveling system, more info in Marlin Docs.
Note: if you have your printer connected to Octoprint, and you try to print a g-code with the
M420without a valid mesh you can get anM112error. Please follow this guide to change the error handing in Octoprint.
For UBL you can alternatively use these start G-codes after the G28:
G28 ; Home all axes
G29 L0 ; load a valid mesh from slot 0
G29 A  ; active the UBL system
Verify that you don't have a M501 in your start G-code script, that G-code will clear the UBL mesh data, so if you use M420 S1 to enable leveling you will have a mesh with all points in 0.
If the mesh level compensation is enabled while printing you can see the color change (from white to blue or red depending on your current icon set)
in the z-offset icon, in the most recent versions the icon background also blinks:
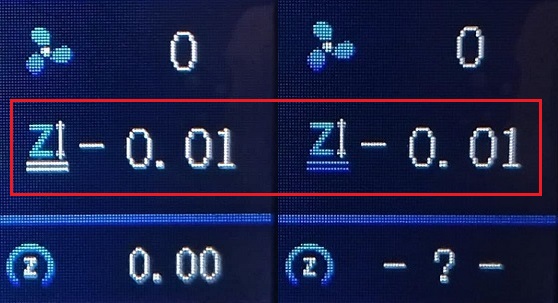
Blink-Leveling-Active.mp4
Some S1 users have accuracy problems with the CRTouch, 3DJurney has an excellent guide for get a perfect first layer.
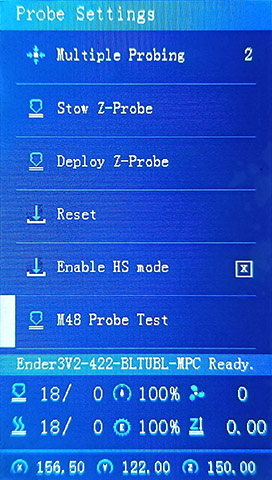
After checking it seems that the CR-Touch is not totally compatible with the HS mode, feed rate and the timings that this firmware (and most Marlin forks) uses for large mesh. If you have problems increase the value of the Z feed rate to 960 mm/min and/or disable the HS mode in the menu Advanced Settings/Probe Settings.