Import from Image
This tutorial discusses two Python scripts that can be used to automatically generate Tiled maps from bitmaps. This is in particularly useful when you are remaking an old, tile-based game. In many cases, devoted fans of such games have meticulously stitched together screenshots to create bitmaps of the maps of such games. Together with some extra parameters, these bitmaps form the input of the scripts. The output is a tile set and a map based on this tile set, together recreating the map of the original game.
The scripts are written in Python, which means that you will need to have Python installed to use them. You can download Python from Python Programming Language -- Official Website. Additionally you will need to download the Python package NetworkX, which can be downloaded from the same website. If you use Debian or a Debian based distribution (for example Ubuntu), then these can be installed by typing in a terminal
sudo apt-get install python python-networkxfollowed by your root password. Additionally, you should download the scripts
Image2Map.py and MapWriter.py at https://gist.github.com/bjorn/5498157.
Alternatively, a Node.js version can be found at https://gist.github.com/phyreman/5857384.
 Without further ado, let's try to apply the scripts to obtain a tile map from the picture shown on the right, which has the file name JansHouse.png. Closely examining the picture in an image editor will reveal that the tiles in this map are 8 by 8 pixels.
The first step is to create a tile set from this image, by running the command
python Image2Map.py 8 8 JansHouse.png
align=right from the directory where you have both the map bitmap JansHouse.png and the script Image2Map.py. The parameters 8 8 correspond to the size of the tiles in the bitmap. Because the original file name was JansHouse.png, this script will create a tile set image with the name JansHouse-Tileset.png, which is shown here on the right.
After this, a tile map can be created by typing
python MapWriter.py 8 8 JansHouse.png JansHouse-Tileset.png
again from the directory where you have both scripts and both bitmaps. This command will then create a tile map JansHouse.tmx.
Notice that before one generates the tile map, it is possible to manually adjust the arrangement of the tile set. As a matter of fact, this is the only reason why there are two separate scripts. The algorithm will never give a 100% satisfactory result (and sometimes quite a bad result), but will at least do the bulk of the work. Especially when you want to replace the tiles later with a better graphic, it is very convenient to have an intuitive arrangement of the tiles in the tile set.
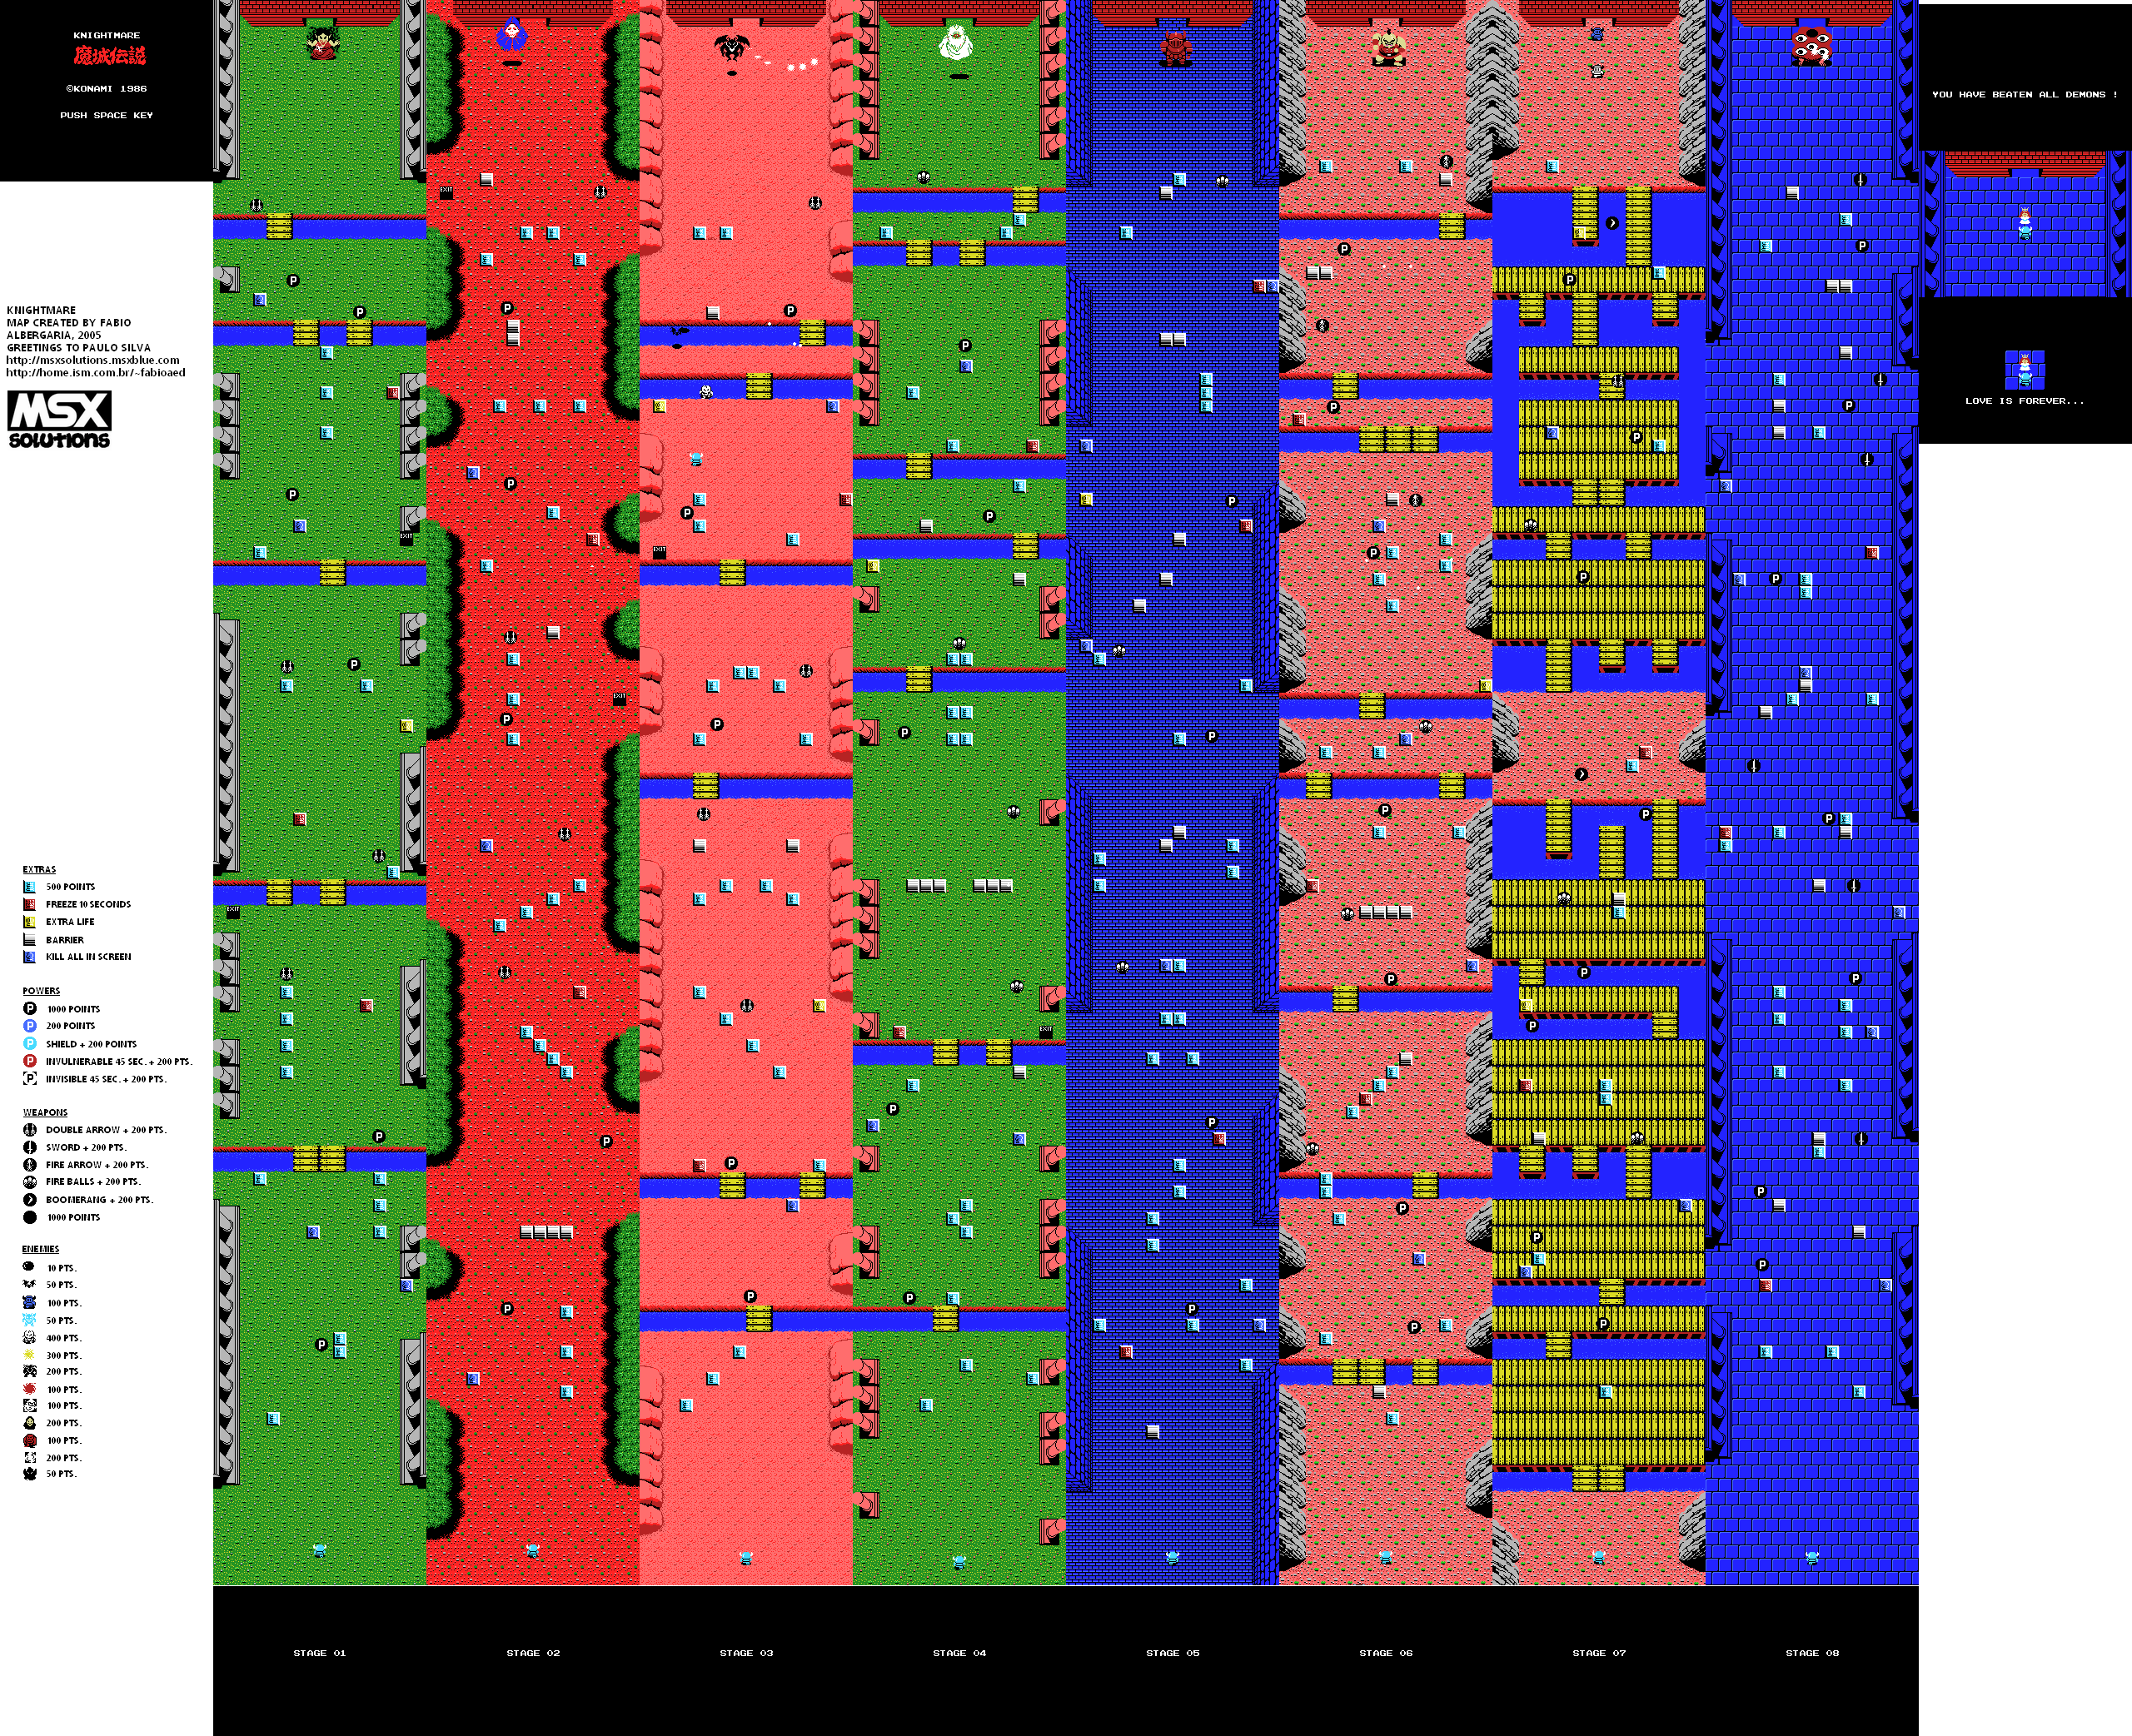
 In this example we will remake the maps from the MSX game "Knightmare". On the way I will point at some of the pitfalls one can encounter, and how to deal with them.
 First of all we need to find a bitmap of the world map. Googling around yields several such images, but we need one that has some nice properties:
- The map bitmap should be losslessly compressed. This is an absolute necessity, because the scripts need to identify equal tiles occurring at different places. Lossy compression will generally cause many such tiles to differ slightly, rendering the scripts useless. Note that lossless compression rules out formats like JPEG and JPEG 2000, but Lossless JPEG, PNG, TIFF and BMP are good to use. GIF is good enough if your original maps don't contain more than 256 different colours combined.
- The map bitmap should not contain too many objects that should be placed on top of the map, instead of being part of the map. As you don't want such objects to be part of the map you will need to take them away and restore what's behind them, which means more work. Sometimes such objects are located on top of tiles that do not occur anywhere else in the map, in which case it won't be possible to reconstruct the tiles beneath. Because of this, it is worth your time to look for a map that is as clean as possible.
Now we have found a reasonably good map bitmap, we need to change it into something that can be used as the input for our scripts. As it is now, there are several things that need to be taken care of.
Part of the image isn't part of the map at all, like the title screen, the credits, the legend, the stage screens on the bottom and the white space on the right. This will need to be cut off.
Sometimes map bitmaps will not completely correspond to the original maps. Stitching all those screen shots together can lead to little mistakes invisible to the naked eye. Lines on the border can disappear, for instance, leaving the border tiles to be one pixel smaller. As always, any mistake corrected in the beginning will save you a lot of work in the end.
For detecting these flaws, the grid is your friend. Use the grid to figure out how the map is arranged. Can we subdivide this map into blocks of 8 by 8 pixels, or are bigger blocks more natural? Does it make sense for the grid to start on this pixel, or do we need significantly fewer different tiles when we start one pixel to the right? Are the dimensions of the map a multiple of the tile size, or do we end up one pixel short (in which case part of the map is missing)? Move the grid around and try to match the pattern. Generally there is really only one logical way to subdivide the bitmap into tiles. If you don't align the map image properly along a grid, there is no use applying the scripts afterwards.
In our case, we have been lucky. Superposing a 16 by 16 grid on top of the image, starting with zero offset, seems to fit perfectly. The yellow bridges fit in precisely with the grid, and so do the "special square stones" and the pillars. It is clear that changing the offset of the grid will completely mess up this structure, so this must have been the original grid. (Only the last screen, where our hero meets the princess, seems to have a wrong vertical offset.)
All the maps are in one file, while it is often more convenient to have a separate file for each map. That's why it is a good idea to split the map bitmap into several bitmaps, each corresponding to a stage in the game. Here it is convenient to use a "Snap to Grid"-function (like one for instance has in The Gimp), to avoid clicking one pixel to the left or right.
For our map bitmap we end up with 8 + 1 maps. The first eight maps are all of size 256 by 1904, and the last of size 256 by 176. Note that in both cases these numbers are a multiple of 16, fitting with a tile size of 16 by 16.
There are objects in the map bitmap that shouldn't be part of the map, like the P's, monsters, end bosses etc. We need to find out which tiles are behind them and copy those from somewhere else. While doing this it is important to place these tiles exactly on the right place, which means with pixel accuracy. Slightly misplaced tiles will show up in your tile set as new tiles, and this should be avoided since they are just shifted copies of other tiles.
By now we have created a bitmap of the map which is more or less the way we want it to look like in the game. Now it is time to create a tile set for each map. Let's start with the bitmap of the third stage, and suppose we named it Stage3.png. Running the script Image2Map.py will walk through our map bitmap, detect the unique tiles, and connect them according to how they are arranged in the map bitmap. Here we execute the script by typing
python Image2Map.py 16 16 Stage3.png
from the directory where we have both the script Image2Map.py and the map bitmap Stage3.png. The parameter 16 16 corresponds to the tile size. After the script is completed, we find the file Stage3-Tileset.png in our directory, which is a bitmap of a tile set corresponding to the map bitmap Stage3.png.
 But as you can see in the figure on the left, something has gone awry. There are way too many sand tiles, and they all look alike! The explanation for this is that the map was not as flawless as it seemed to be. The person that created this map probably moved sand tiles around to place them on top of objects that were in the screen shots but not part of the map, like monsters for example. While doing this he didn't place the tiles on the grid, causing the script to think that all those wrongly aligned sand tiles are in fact new tiles.
 A way to deal with this is to find out which tiles are wrongly aligned copies of other tiles and delete these from the tile set. We can do this by deleting all sand tiles, and copying sand tiles from the map bitmap into the tile set. When we later generate the map it will contain some holes, which we can then easily fill in with the map editor. If we have bad luck, however, we will have copied bad sand tiles into the tile set, and there will almost not be any sand tiles at all in the map. In this case we just need to copy different sand tiles into the tile set and try again. If everything goes well, you will end up with a tile set like the one shown to the right (after rearranging the tiles, of course).
Once we have a tile set that we think is correct, we can use the script MapWriter.py to create a map in the Tiled Map XML file format. This is done by running the command
python MapWriter.py 16 16 Stage3.png Stage3-Tileset.png
from the directory where you have the script MapWriter.py, the map bitmap Stage3.png and the tile set Stage3-Tileset.png. This script will then create a file Stage3.tmx, walk through the map bitmap and insert a tile for each 16 by 16 block that matches one of the tiles in the tile set.
You can edit this map in Tiled. If you deleted some bad tiles from the tile set in the previous step, this map will contain some holes that need to be filled in. If you deleted some good tiles from the tile set, however, large pieces of map might be missing. In this case you will need to add the right tiles to the tile set and try again.
Given a map bitmap, it is a lot of work to extract the unique tiles, and very easy to forget one. Typically a computer is much faster than a human at walking through a tile set and adding new tiles on the way, and much better at checking if such tiles don't happen to be the same as some tile already present in the tile set. This is the first thing the script Image2Map.py does for us.
It is much harder, on the other hand, to arrange the tiles in a way that pleases the eye and coincides with how they are supposed to connect. Humans have the ability to judge whether or not it makes sense visually to place two tiles next to each other. As this is virtually impossible for computers, they need to make do with information about how the tiles appear in a map bitmap. As a consequence it is next to impossible to create an algorithm that is 100% satisfactory in every case.
The script Image2Map.py should therefore be seen as a tool that gives you a head start into arranging the tile set, usually leaving quite some work to the user. The sole reason for splitting off the functionality for creating a tile map into a separate script MapWriter.py is to give the user the opportunity to improve the tile set.
Create a double array MList. Walk tilewise through the map image. At each step we extract a tile bitmap. Such an image can be converted to a string, which will be useful for comparing them. So for each tile we encounter, check if its string is already in the dictionary TDict. If not, add the string with value the tile number to the dictionary TDict, and the bitmap of the tile to the list TList. Place in both cases its dictionary value (the tile number) at the corresponding place in MList.
The idea is that creating an abstract structure representing tile adjacency will make it easier to use this information in an algorithm. We create a weighted directed graph. Its vertices are the unique tiles, and it has arcs between tiles that are adjacent in the map bitmap. More precisely, we walk through the list of adjacent tiles (which means either vertically or horizontally adjacent) and add weighted arcs according to the following scheme:
- Left A, Right B: Add an arc A -> B of weight 1.
- Left B, Right A: Add an arc B -> A of weight 1.
- Up A, Down B: Add an arc A -> B of weight -1.
- Up B, Down A: Add an arc B -> A of weight -1.
To embed the tiles in a tile set, we create a dictionary FullTileMap whose keys will be coordinates in the tile set, and whose values will be the tile numbers. By using a dictionary for this, we keep the freedom to grow our tile set in whatever direction we please. One by one, we then move tiles from the graph to this dictionary, according to the recipe we'll describe below.
If there are no tiles left that are adjacent to the border tiles of the tile set, we cannot grow the tile set any further. In this case we start a new component and repeat until we run out of tiles. Each new component can be added to the previous component, preferrably at minimal distance from the center of the previous component (the mean of the coordinates of its tiles).
We add tiles to the tile set according to the following recipe.
- First select a random tile from our graph and embed it in the tile set.
- For this node, for each of the directions, make a possible edge-list to choose from, and combine them into one list Edges such that Edges[i] stands for the edges with direction code i, where 0 = up, 1 = right, 2 = down and 3 = left.
- For the tile that we just embedded, we want to visit the directions with the smallest amount of possible tiles first. The reason for this is that this location will probably be the hardest to fill after it becomes surrounded by more tiles. Therefore we sort Edges by the number of tiles within each entry (while remembering which entry corresponds to which direction).
- Now that we sorted Edges by the previous criterion, we create a list E of the edges in the most urgent direction. Order E with respect to the values of its edges. This will make it possible to start with the pair that appears most often in the graph, which we assume to be a measure for how much two tiles "belong together".
- According to this ordering, add the first edge that fits to the tile set and delete it from the graph.
- Jump to step 2 and repeat with this new node.
MapWriter.py simply takes a tile size, a map bitmap and a tile set, and creates a TMX-file of the map.
- Remaking Old Games The original blog post announcing the scripts, explaining their motivation and showing an example.