Contributing Code with VSCode - magma/magma GitHub Wiki
This page walks a new developer through the process of setting up VSCode. The primary focus of this guide is for AGW development.
There are two types of workspaces supported by the Magma team
- Remote SSH workspace with Magma VM: A workspace for working with files in the Magma VM from your local machine. Jump to Setup Remote SSH workspace with Magma VM
- Devcontainer workspace: A Docker based development flow that is best suited for changes that only require unit testing. It is natively supported with GitHub Codespaces. However, it is currently only supported for AGW C/C++ code. Setup Devcontainer workspace with GitHub Codespaces
Visual Studio Code is available for downloads at their official website.
- Heavy CPU load of process
rg: - The DevContainer image is not the one, you expect it to be:
The steps below need to only be done once. After your workspace is setup once, it is easily accessible via File->Open Recent.
Open VSCode and use Command+Shift+P to open the editor preferences and select Preferences: Open Settings (JSON). This will open the user settings file for VSCode. Insert the following into the file. This configuration will take effect the next time VSCode connects to a remote host.
    "remote.SSH.defaultExtensions": [
        "llvm-vs-code-extensions.vscode-clangd",
        "stackbuild.bazel-stack-vscode",
        "coolchyni.beyond-debug",
        "stackbuild.bazel-stack-vscode-cc",
        "augustocdias.tasks-shell-input",
        "ryuta46.multi-command",
        "ms-python.python",
        "njpwerner.autodocstring",
        "ms-python.vscode-pylance",
    ],
Unlike with Devcontainer settings, there is no way to configure default extensions ouside of user settings. It may be good to periodically check this section for any updated extensions that should be installed.
Prerequisite: Have the Magma VM running.
Go to $MAGMA_ROOT/lte/gateway and run vagrant ssh-config. Copy the output into ~/.ssh/config.
You SSH config should now look like this:
...

Host magma
  HostName 127.0.0.1
  User vagrant
  Port 2222
  UserKnownHostsFile /dev/null
  StrictHostKeyChecking no
  PasswordAuthentication no
  IdentityFile /Users/<user_name>/.vagrant.d/insecure_private_key
  IdentitiesOnly yes
  LogLevel FATAL
  ForwardAgent yes
A more detailed documentation is available on the official VSCode doc on remote SSH.
Use Command+Shift+X to open the extensions tab and install the Remote SSH extension. Once installed, open the command palette with Command+Shift+P and select Remote-SSH: Connect to Host. Select magma to start a remote SSH workspace.
Inside the newly created VSCode window, go to File → Open Workspace and select /home/vagrant/magma/vscode-workspaces/workspace.magma-vm-workspace.code-workspace.
Prerequisites:
- Membership of Magma organization in order to use GitHub Codespaces
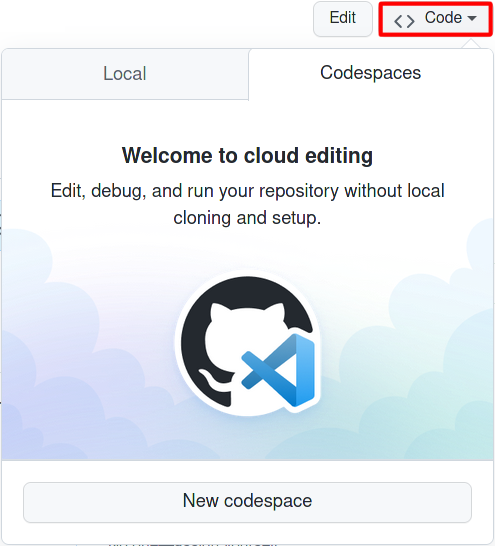
To open a GitHub codespace from any branch or pull request, you can use the <Code>-button usually situated somewhere on the top right of the page (depending on the view). The currently selected git reference will automatically be opened in the configured DevContainer.
If you intend to make changes and submit a pull request, always select your fork of Magma.
Any changes made inside the DevContainer will be wiped when it is upgraded. This should not happen often and you will always be given a prompt before the DevContainer upgrades. To have persisting personal configs, refer to the GitHub's documentation on Personalizing Codespaces for your account.
Prerequisites:
- Docker installed
- VS code installed
- VS Code Remote - Containers extension installed
- VS Code Docker extension installed
Using the DevContainer with VS Code, you have two options:
- Checkout the repository inside the running container.
- Mounting a local copy of the repository inside the running container.
With option 1 the state of your work would always be deleted when you terminate the DevContainer. In addition, it will increase the resource requirements for your running container. While such an ephemeral setup can be desirable at times, it is safer to use option 2. With option 2 you use a previously cloned version of the repository already cloned on your hard-drive. This copy will than be reopened (i.e. mounted) to your running DevContainer. Changes to the code made outside the DevContainer will also be available inside, and vice versa. Be aware that the IDE might need some time or refresh to become aware of changes. With option 2 it is in principle possible to use other IDEs to code (e.g. IntelliJ), while still using DevContainer to build and test changes.
To start a remote container in VS Code, press F1 and search for Remote - Containers. An overview of options will be presented.

To follow the above-mentioned option 1, choose Clone {Repository|Github Pull Request} in Container Volume....
To follow the above-mentioned option 2 (recommended), choose Rebuild and Reopen in Container.
Your VS Code title bar should than include [Dev Container] and the terminal (Menu Terminal - New Terminal) prompt similar to
vscode ➜ /workspaces/magma (your/branch ✗) $
also shows that you are inside the container.
You can than proceed with your build of the component as usual.
In some operating systems (e.g. MAC) docker runs in a VM and you must allocate system resources (e.g. memory, CPU). Detailed explanation on how to change the system resources can be found in the Getting Started guide. Different build targets in Magma require different resources, e.g.
- 7 GB RAM are required for
make test_oaiandmake build_oaiwithinlte/gateway/, while - 12 GB RAM are required from
make test_session_managerwithinlte/gateway/.
- Running out of disk space
Docker uses a lot of disc space. You can prune unused images with
docker image prune. Use the--alloption, if you want to get rid of everything. -
apt-getoraptfailure seemingly without reason This can also happen, when you run out of disk space. Check the point above.
Documentation on how to develop the DevContainer itself, including local build option, can be found within the respective ReadMe.
We've enabled several extensions and custom configurations to improve developer experience, refer to the sections below for language and tool specific commands and features.
Supported in both Remote SSH + Magma VM and Devcontainer
We utilize clangd to enable smart code insights. Clangd looks at $MAGMA_ROOT/compile_commands.json to figure out file dependencies for code navigation. Most often, clangd will need to be restarted when the compile_commands.json is modified.
The compilation database can be generated with both CMake and Bazel. The Bazel method will be described more in detail below. With CMake, it is not possible to generate a single compilation database for all C/C++ targets, so you will have generate one at a time and restart clangd.
To generate the compilation database with CMake, run make build_oai or the equivalent command for another target. This will generate a compile_commands.json file which contains compilation commands for every file in the target. Due to a quirk in our CMake configurations, you may need to run the build command twice to get a compile_commands.json file that contains all instructions.
We can then symlink $MAGMA_ROOT/compile_commands.json to the generated file with the following steps
- Open the command palette (Command+Shift+P)
- Select Tasks: Run Task and choose Set compile_commands.json for IntelliSense
- Select a
compile_commands.json - After the task completes, restart clangd by running opening the command palette again and running clangd: Restart language server (If you see errors relating to clangd at this point, refer to Dealing with clangd extension errors)
Once clangd is retarted, you should see some note about indexing in the bottom of your editor. Code completion and navigation should work after the indexing completes.
If you see errors about clangd, try the following:
- For errors about
clangdnot being found, try running clangd: Download language server from the command palette. Reload the window after clangd is installed. - For errors about the extension commands not being found, try running clangd: Manually activate extension to start the extension
First SSH into your VM and run rm -rf ~/python_ide_env && cd $MAGMA_ROOT && bazel run //dev_tools:python_env ~/python_ide_env. This will setup a virtual Python environment we will need.
Follow the following steps to enable code completion and navigation
- Open the command palette (Command+Shift+P)
- Select Python: Select interpreter and choose
magmaand the default Python interpreter (~/python_ide_env/bin/python) - Run Python: Build Workplace Symbols via the command palette
Additional features such as formatting on save is enabled for the Python source files.
Python code navigation, code completion, formatting on save and other supporting features are available in the DevContainer by default. VS Code might prompt you to reload the window to activate the Pylance extension. This is necessary to enable code navigation and the like.
Be aware that by default the selected Python Interpreter is the one from a virtual Python environment. Also, by default, every Terminal window that is opened while this interpreter is selected, will source the virtual environment. Of course you can deactivate the environment by running deactivate. Conversely, if you open a Terminal window while the virtual env interpreter is not selected, the environment won't be sourced automatically. You can activate it with the command source ~/python_ide_env/bin/activate.
Supported in both Remote SSH + Magma VM and Devcontainer
The bazel-stack-vscode extension adds codelens directly into BUILD.bazel files. Utilizing this makes building and testing as easy as clicking a button.
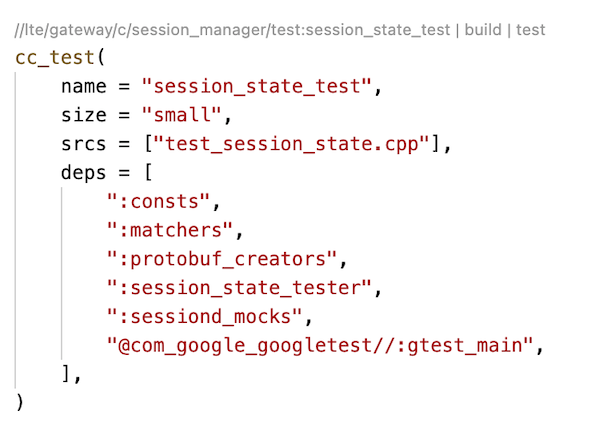
For example, to run a single unit test for SessionD, open lte/gateway/c/session_manager/test/BUILD.bazel and click the test codelens. Similarly, click the build codelens to build only. If the codelens does not show up, try opening up a different BUILD.bazel file, or reloading the file (Command+Shift+P then File: Revert File).
At the top of each BUILD.bazel file, there is a codelens to build and test all targets in the file.
To generate the compilation database with Bazel, run Command+Shift+P to open the command palette and select Multi command: Execute multi command. Select the command generateCcWithBazelAndRestartClangderror. This is a wrapper command that runs two extension commands: bsv.cc.compdb.generate (Bzl: Bazel/C++: Generate Compilation Database) and then clangd.restart (clangd: Restart language server).
This compilation database will contain necessary information for all C / C++ targets available to be built with Bazel.
Refer to Dealing with clangd extension errors for debugging extension issues.
First, build the test target that you wish to test. You can do this in the terminal by running Bazel directly, or through the codelens UI in the corresponding BUILD.bazel file.
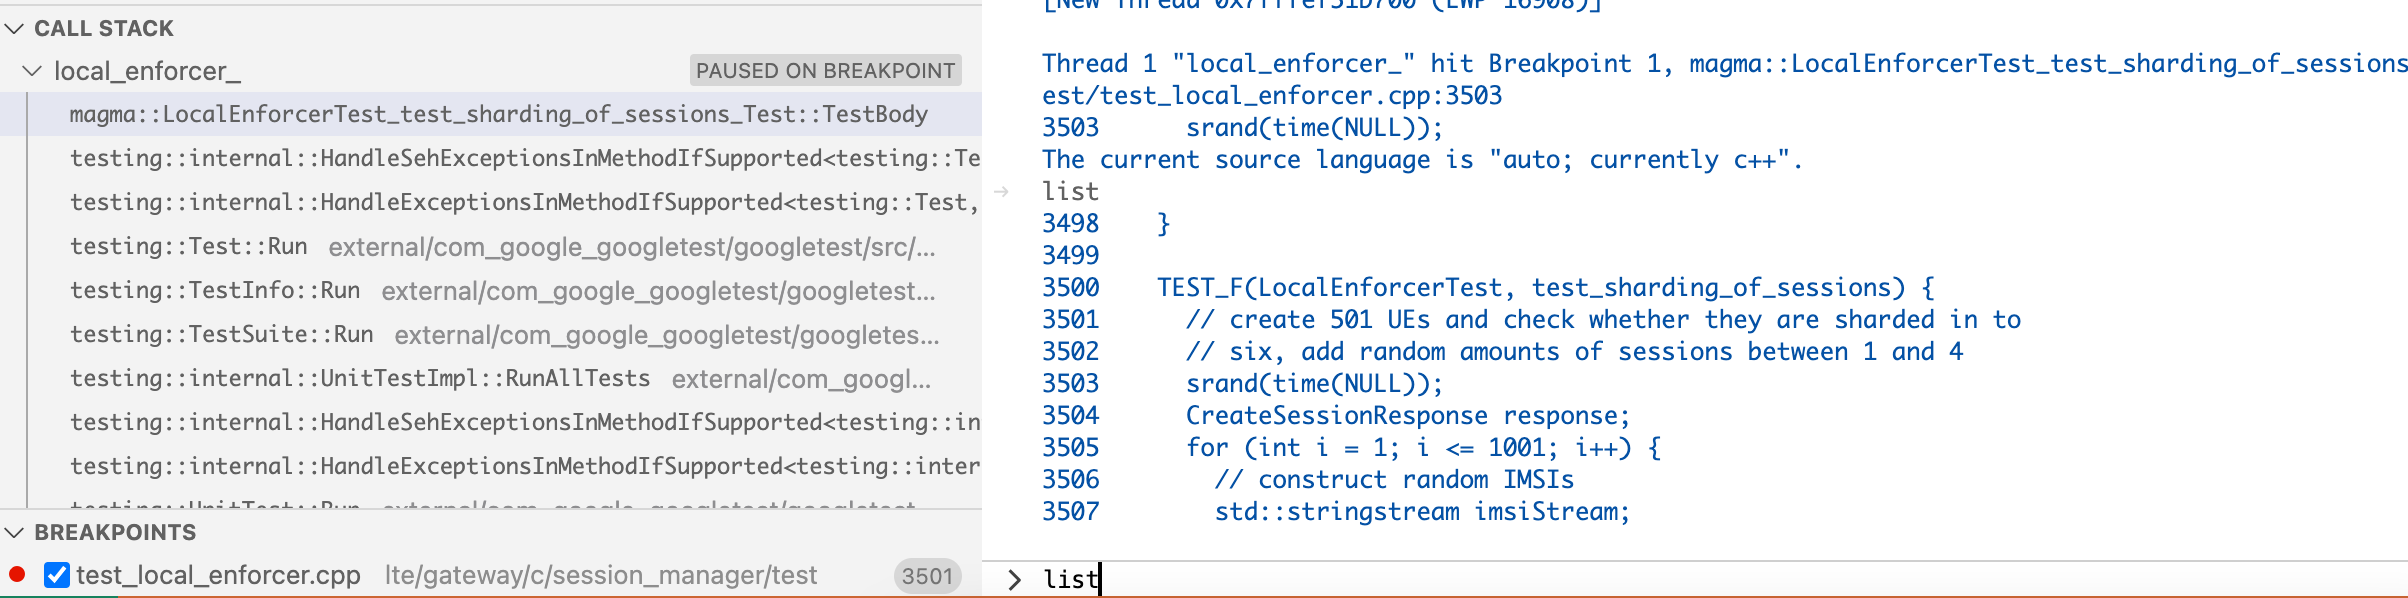
Run Command+Shift+D to open the debug tab. In the drop down menu at the top of the tab, select (Remote SSH) Run C/C++ test with GDB and press the gree arrow. This will open up a new drop down menu with all cc_test targets. Once a test is selected, VSCode will launch the test with GDB.
The test output will be printed out in the terminal tab, and the debug console tab will contain a GDB interface.

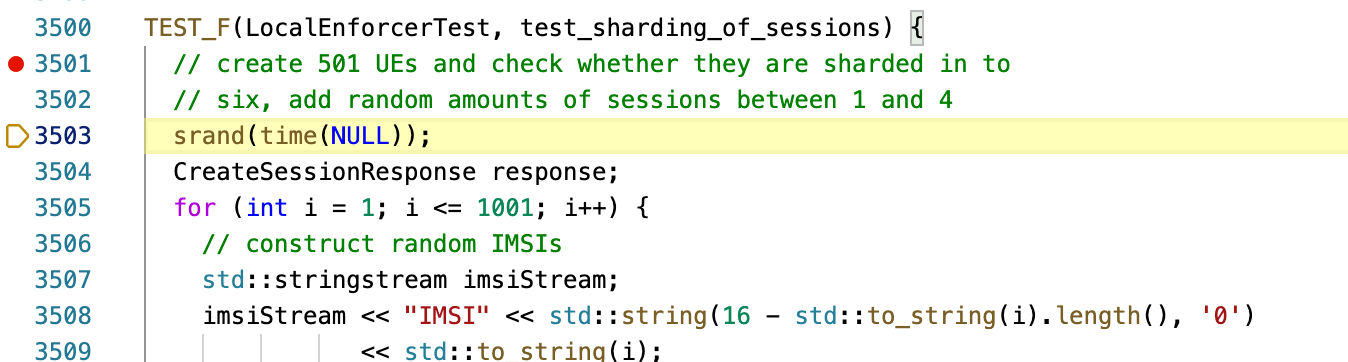
Once the task is launched, the test will start execution immeditately. It is recommended to add a breakpoint before triggering the debugger to halt the execution.
To add a breakpoint, simply click on the left most edge of the code to add a red circle.
With a breakpoint added, the debug console will show when the breakpoint is hit. Finally, use the debug console like a normal GDB console to aid your testing!