LNbits Documentation
Before you install LNbits make sure to have read and understood the following general guides about what LNbits is and which possibilities it unleashes for you.
- LND Guide | Installing LND
- LND Config Example | LND Settings
- CLN Guide | Installing CLN
- LUDs | LNURL Spec
- NIPs | Nostr Spec
- ToDos for your safety with LNbits | Youtube Video
- Generate your first wallet on LNbits | Substack
- Private Banks on LN | Substack
- Run custodian wallets for your friends & family | Substack
- Run a watchtower | Very important!
LNbits works based on the LNURL protocol which means that requests are valid in two forms: either as https:// clearnet link (no self-signed certificates allowed) or as http:// v2/v3 onion link. To offer LNbits services like LNURLp/w QR codes or NFC Cards, that can be used in the wild, you will need to open LNbits up to clearnet (https).
You can choose between the most common package managers like poetry and nix.
By default, LNbits will use SQLite as its database. You can also use PostgreSQL which is recommended for applications with a high load.
Basic installation guide.
For everyone new to this, you will find more detailed step-by-step guides for getting your LNbits into Clearnet here from Axel or in the one from Hannes specifically about setting up LNbits on a VPS or this one from Leo if you want to use cloudflare.
You can also find a video on the dockerised Setup on a VPS with PostgreSQ, LightningTipBot as a funding source using nginx.
When you´re not into the technical stuff and neither want to host your funding source nor your lnbits yourself there is a LNbits SaaS version (Software-as-a-service) you can use. It is basically like LNbits in a cloud but you can define the funding source (e.g. your Node, a LNbits wallet, the LNtipbot, fakewallet etc) and environmnent variables yourself - which mostly is not the case on other cloud-solutions.
If you need ports or look for folders mentioned here that you cannot find please visit the dedicated channel of your implementation
- Citadel: https://runcitadel.space
- Umbrel: https://umbrel.com
- BitcoinCore: https://bitcoincore.org
- MyNode: https://mynodebtc.com
- RoninDojo: https://ronindojo.io
- RaspiBlitz: https://shop.fulmo.org/raspiblitz
- RaspiBolt: https://raspibolt.org
LNbits is not a node management software but a LN focused accounting system on top of a LND or CLN funding source.
After the first installation you can visit your LNbits at http://localhost:5000/. To modify the funding source go to your super-user-URL and select a funding source within "Manage Server" or edit the .env file by modifying LNBITS_BACKEND_WALLET_CLASS to your needed source if you set adminUI=TRUE in the .env. You will find the .env file within your lnbits/ or lnbits/apps/data folder by extending the command to list files in your directory by ls -a
You might also need to install additional packages or perform additional setup steps, selecting the desired funding source. After a restart your new setup will be active.
Which funding sources can I use for LNbits?
LNbits can run on top of many lightning-network funding sources. Currently there is support for CoreLightning, LND, LNbits, LNPay, OpenNode, with more being added regularly. It is important to choose a source that has a good liquidity and good peers connected. If you use LNbits for public services your users payments can only then flow happily in both directions.A backend wallet (funding source) can be configured using the following LNbits environment variables in the .env file or within your superuser account under Manage-Server section.
If you would like to use the .env version you can find the parameters here
-
LNBITS_BACKEND_WALLET_CLASS: CoreLightningWallet -
CORELIGHTNING_RPC: /file/path/lightning-rpc -
LNBITS_BACKEND_WALLET_CLASS: SparkWallet -
SPARK_URL: http://10.147.17.230:9737/rpc -
SPARK_TOKEN: secret_access_key -
LNBITS_BACKEND_WALLET_CLASS: LndRestWallet -
LND_REST_ENDPOINT: http://10.147.17.230:8080/ -
LND_REST_CERT: /file/path/tls.cert -
LND_REST_MACAROON: /file/path/admin.macaroon or Bech64/Hex -
LND_REST_MACAROON_ENCRYPTED: eNcRyPtEdMaCaRoOn -
LNBITS_BACKEND_WALLET_CLASS: LndWallet -
LND_GRPC_ENDPOINT: ip_address -
LND_GRPC_PORT: port -
LND_GRPC_CERT: /file/path/tls.cert -
LND_GRPC_MACAROON: /file/path/admin.macaroon or Bech64/Hex -
LND_GRPC_MACAROON_ENCRYPTED: eNcRyPtEdMaCaRoOn -
LNBITS_BACKEND_WALLET_CLASS: LNbitsWallet -
LNBITS_ENDPOINT: https://lnbits.mydomain.com -
LNBITS_KEY: my-lnbits-AdminKey -
LNBITS_BACKEND_WALLET_CLASS: LNbitsWallet -
LNBITS_ENDPOINT: https://legend.lnbits.com -
LNBITS_KEY: legend-lnbits-AdminKey -
LNBITS_BACKEND_WALLET_CLASS: LnTipsWallet -
LNBITS_ENDPOINT: https://ln.tips -
LNBITS_KEY: To get the Key you will need to run /api in a private chat with the LightningTipbot on Telegram once. -
LNBITS_BACKEND_WALLET_CLASS: LNPayWallet -
LNPAY_API_ENDPOINT: https://api.lnpay.co/v1/ -
LNPAY_API_KEY: sak_apiKey -
LNPAY_WALLET_KEY: waka_apiKey -
LNBITS_BACKEND_WALLET_CLASS: OpenNodeWallet -
OPENNODE_API_ENDPOINT: https://api.opennode.com/ -
OPENNODE_KEY: opennodeAdminApiKey -
CLICHE_ENDPOINT: ws://127.0.0.1:12000
CoreLightning
CLNSpark (c-lightning)
Lightning Network Daemon
LND (REST)
or
LND (gRPC)
You can also use an AES-encrypted macaroon (more info) instead by using
To encrypt your macaroon, run ./venv/bin/python lnbits/wallets/macaroon/macaroon.py.
LNbits (another LNbits instance)
LNbits instance hosted on a cloud server or your own home server
LNbits Legend Demo Server (!! Do NOT use this one for production / commercial purposes, only for testing !!)
Lightning TipBot
To connect your Lightning Tipbot you will need to set the following parameter
Also see this tutorial how to install LNbits with LightningTipBot via vps
IBEX HUB
Register here then get your keys/tokens from there, endpoint is https://ibexpay-api.ibexmercado.com. More info see IBEX API-Documentation.
LNPay
For the invoice listener to work you have a publicly accessible URL in your LNbits and have to set up a LNPay webhook pointing to <your LNbits host>/wallet/webhook with the "Wallet Receive" event and no secret given. The setting https://mylnbits/wallet/webhook will be the endpoint url that gets notified about any payment.
OpenNode
For the invoice to work, you need to have a publicly accessible URL in your LNbits. The webhook setting is optional.
Cliche Wallet
Client for Lightning-compatible Lite Channels aka "Hosted". More details here
Funding source is in a cloud (e.g. Voltage)
This means that you might not have access to some files which would allow certain administrative functions. E.g. on Voltage config-files like lnd.conf or the .env cannot be edited.
Payments from your node to LNbits wallets can therefore not be configured in this case atm so you will need to take an extra wallet to send from funding source->wallet x->LNbits wallet (only) for the initial funding of the wallet.
We do also run a SaaS LNbits cloud solution, see Installation ☝️
HOW TO topup an existing LNbits account
If you want to add funds to an existing empty LNbits account or just want to refill it with funds from the same LN node linked to your Lnbits, now there's an option in the adminUI ("manage server") section.
If you already activated the adminUI extension with the Super User URI (see the previous section Additional guides or this guide from Calle, you can login using the super user URI account (not the regular user account URI).
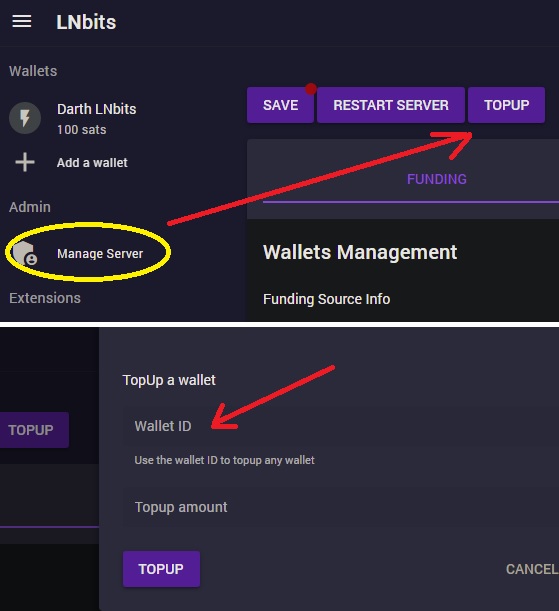
Go to All Extensions and enable the "userManager" extension. Look for the walletID you want to refill and copy it. Go to "Manage server" - click on "topup" button, paste the walletID into the window and define the amount you want to top the wallet up with - save by pressing "Topup". Enjoy!
The Killswitch 🚨
There have been so many dangerous bugs lately not only in the whole space but also in LNbits that we decided to do something about it. You can now opt-in for warnings and/or to take direct action, when a vulnerability or a bug that could lead to the loss of funds occurs again.

If switched to void-wallet all usertypes on the instance will see a yellow banner where you would normally find the "LNbits is in Beta" notice next to the theme/language area up to the right - and is the most obvious hint, that something happend. Have a look at your new server-tab highlighted in green in the left part of the window.
How does it work ? When the killswitch is enabled, a secret github repository only available to the LNbits core team will be checked at an interval of X minutes (which can be specified). If a vulnerable bug is published in this repository, it serves as a signal that triggers the killswitch on all installations that subscribed and transitions your lnbits instance to use the void wallet. If the clouds have cleared and you have installed the security update you can set your funding source to your node, wallet or whatever you are using again also via the Manage Server section. This wiki has a section about switching funding sources if you do not know what to configure.
Difference between admin and superuser
The LNbits Admin UI lets you change LNbits settings via the LNbits frontend. It is disabled by default and the first time you set the enviroment variable LNBITS_ADMIN_UI=true in the .env, the settings are initialized and will be used. From there on the according settings from the database instead those of the .env file are used.
Super User
With the Admin UI we introduced the super user which has access to the server so can change settings that may crash the server or make it unresponsive via frontend and api, like e.g changing the funding source. The super user is only stored inside the settings table of the database. After the settings are "reset to defaults" and restarted a new super user is created. We also added a decorator for the API routes to check for the existance of a super user. Its ID is never sent over the api and the frontend and only receives a bool (yes/no) if you are super user or not.
Only the super user is allowed to brrrr satoshis to different wallets via the "Top Up" section.
You can as well post the super user via webhook to another service when it is created.
More info here https://github.com/lnbits/lnbits/blob/main/lnbits/settings.py class SaaSSettings
In the frontend you will also find the possibility to change the shop-image that is shown on the "create wallet" page by opening the Manage Server section and choosing Theme -> Custom Logo.
Admin Users
Enviroment variable: LNBITS_ADMIN_USERS, comma-seperated list of user IDs. Admin Users can change settings in the admin ui - with the exception of funding source settings, because this would require a server restart and could potentially make the server inaccessable. Also they have access to all the extensions dedicaated to them in LNBITS_ADMIN_EXTENSIONS.
Allowed Users
Enviroment variable: LNBITS_ALLOWED_USERS, comma-seperated list of user IDs. By defining these users LNbits will no longer be useable by the public. Only defined users and admins can then access the LNbits frontend.
Update LNbits
cd lnbits
## Stop LNbits with `ctrl + x`
git pull
## Keep your poetry install up to date, this can be done with
poetry self update
poetry install --only main
## or
git checkout main && git pull && poetry install
## Start LNbits with
poetry run lnbits
If you run Raspiblitz or MyNode you might additionally need a
sudo systemctl restart lnbits
at the end, because it runs LNbits as a service.
On Umbrel/Citadel the commands would be
cd ~/apps/lnbits
git pull upstream main
sudo ~/scripts/app start lnbits
SQLite to PostgreSQL migration
If you already have LNbits installed and running on an SQLite database we highly recommend to migrate to postgres if you are planning to run LNbits on scale.
There's a script included that can do the migration easyly. You need to have Postgres already installed and there should be a password for the user (see Postgres install guide above). Additionally, your LNbits instance needs to run once on postgres to implement the database schema before the migration can work:
# STOP LNbits

# add the database connection string to .env 'nano .env' LNBITS_DATABASE_URL=
# postgres://<user>:<password>@<host>/<database> - alter line bellow with your user, password and db name
LNBITS_DATABASE_URL="postgres://postgres:postgres@localhost/lnbits"
# save and exit

# START LNbits
# STOP LNbits
poetry run python tools/conv.py
# or
make migration
Hopefully now everything works and gets migrated... Launch LNbits again and check if everything is working properly.
Defining a route with path parameters
old:
python
# with <>
@offlineshop_ext.route("/lnurl/<item_id>", methods=["GET"])
new:
python
# with curly braces: {}
@offlineshop_ext.get("/lnurl/{item_id}")
Check if a user exists and access user object old:
python
# decorators
@check_user_exists()
async def do_routing_stuff():
    pass
new:
If user doesn't exist, Depends(check_user_exists) will raise an exception.
If user exists, user will be the user object.
python
# depends calls
@core_html_routes.get("/my_route")
async def extensions(user: User = Depends(check_user_exists)):
    pass
Returning data from API calls old:
python
return (
    {
        "id": wallet.wallet.id,
        "name": wallet.wallet.name,
        "balance": wallet.wallet.balance_msat
    },
    HTTPStatus.OK,
)
FastAPI returns HTTPStatus.OK by default id no Exception is raised
new:
python
return {
    "id": wallet.wallet.id,
    "name": wallet.wallet.name,
    "balance": wallet.wallet.balance_msat
}
To change the default HTTPStatus, add it to the path decorator
python
@core_app.post("/api/v1/payments", status_code=HTTPStatus.CREATED)
async def payments():
    pass
Raise exceptions
old:
python
return (
    {"message": f"Failed to connect to {domain}."},
    HTTPStatus.BAD_REQUEST,
)
# or the Quart way via abort function
abort(HTTPStatus.INTERNAL_SERVER_ERROR, "Could not process withdraw LNURL.")
new: Raise an exception to return a status code other than the default status code.
python
raise HTTPException(
    status_code=HTTPStatus.BAD_REQUEST,
    detail=f"Failed to connect to {domain}."
)
Extensions old:
python
from quart import Blueprint

amilk_ext: Blueprint = Blueprint(
    "amilk", __name__, static_folder="static", template_folder="templates"
)
new:
python
from fastapi import APIRouter
from lnbits.jinja2_templating import Jinja2Templates
from lnbits.helpers import template_renderer
from fastapi.staticfiles import StaticFiles

offlineshop_ext: APIRouter = APIRouter(
    prefix="/Extension",
    tags=["Offlineshop"]
)

offlineshop_ext.mount(
    "lnbits/offlineshop/static",
    StaticFiles("lnbits/offlineshop/static")
)

offlineshop_rndr = template_renderer([
    "lnbits/offlineshop/templates",
])
Possible caching optimizations with Redis Instead of hitting the database over and over again, we can store a short living object in Redis for an arbitrary key. Example:
- Get transactions for a wallet ID
- User data for a user id
- Wallet data for a Admin / Invoice key
Backup and restore of the database
Please refer to this very detailed guide about the backup & restore process
Backup and restore of blockchain data
Sometimes you just want to start over from scratch. To not need a full blockchain scan again, you can save the blockchain, chainstats and index folders to another hard drive, format your ssd, set up the new install, restore from your 24 words or generate a new seed. First lets copy your folders to your local downloads folder.
scp -r <username>@<raspberry_pi_ip>:/path/to/bitcoin/blocks /path/to/local/Downloads
scp -r <username>@<raspberry_pi_ip>:/path/to/bitcoin/chainstate /path/to/local/Downloads
scp -r <username>@<raspberry_pi_ip>:/path/to/bitcoin/indexes /path/to/local/Downloads
or if you have putty installed
pscp -r <username>@<raspberry_pi_ip>:/path/to/bitcoin/blocks C:\Users\<YourUsername>\Downloads
pscp -r <username>@<raspberry_pi_ip>:/path/to/bitcoin/chainstate C:\Users\<YourUsername>\Downloads
pscp -r <username>@<raspberry_pi_ip>:/path/to/bitcoin/indexes C:\Users\<YourUsername>\Downloads
so e.g. to copy the blockchain from a citadel node to this folder would translate to
scp -r citadel@citadel:~/citadel/bitcoin/indexes /Users/yourusername/Downloads
Please note that formatting a drive on which your operating system is running will result in the loss of all data. Make sure you've backed up your important data before proceeding. This could also mean a backup of your LNbits database which you can do from the Manage-Server section with the "Backup Database" Button on the top. Copy this also to your local folder before you proceed formatting it within the new install process.
After you have done this let your new node sync a little bit. Then stop it and delete these 3 folders
- bitcoin/blocks
- bitcoin/chainstate
- bitcoin/indexes
You would then want to copy the 100% synced blockchain folders over to this place in the opposite direction as before.
scp -r /path/to/local/Downloads/blocks <username>@<raspberry_pi_ip>:/path/to/bitcoin/
scp -r /path/to/local/Downloads/chainstate <username>@<raspberry_pi_ip>:/path/to/bitcoin/
scp -r /path/to/local/Downloads/indexes <username>@<raspberry_pi_ip>:/path/to/bitcoin/
and accordingly for putty. Wait for this copy to finish and only then reboot your node. After a short indexing period you should see it downloading just the missing blocks from the moment you saved it before on your old installation.
The advanced mode would be to sync the blockchain to another ssd all the time automatically. For tor nodes this has the potential to make things way faster if your node has local access to this peer. To automaticall sync you will need a tool like rsync
sudo apt-get install rsync
#!/bin/bash
rsync -av --delete /path/to/source/bitcoin/blocks /path/to/destination/bitcoin/
rsync -av --delete /path/to/source/bitcoin/chainstate /path/to/destination/bitcoin/
rsync -av --delete /path/to/source/bitcoin/indexes /path/to/destination/bitcoin/
Replace /path/to/source with the path where your blockchain folders are located (e.g., /home/username) and /path/to/destination with the path of the destination directory where you want to sync the blockchain folders. Then make the script executable
chmod +x sync_bitcoin.sh
To automate and set the frequency you now want to open the crontab, where recurring jobs are stored
crontab -e
Add a line to schedule the script. For example, to run the script every day at midnight
0 0 * * * /path/to/sync_bitcoin.sh
This small script will sync the blocks, chainstate, and indexes folders from the source directory to your destination directory, automatically keeping them in sync.
Connect LNbits via GnuCash to LN-FinTS
This tutorial explains how to configure and connect GnuCash (Version: 3.8 or Version 4.8) to the LN-FinTS Server of your Bitcoin Lightning node. It assumes that you already have successfully installed LN-FinTS to your Bitcoin Lightning node and that LNbits is used.
Especially, this open source accounting software supports to import financial transactions and account balances via the German FinTS/HBCI protocol — FinTS stands for Financial Transaction Services, HBCI stands for Homebanking Computer Interface. The FinTS in version 3.0 protocols is used since many years by individuals and small businesses to connect accounting software to authorized German bank accounts in order to import account balances and account transactions.
Funding my LNbits wallet from my node doesn't work
If you want to send sats from the same node that is the funding source of your LNbits, you will need to edit the lnd.conf file. The parameters to be included are:
allow-circular-route=1
Please do so in the section Application options of your lnd.conf. On some bundle node the start of LND could fail otherwise.
NOTE: It is recommended to instead use the new adminUI extension with the "TopUp" option to add funds to a LNbits account. This ☝️ is only an option to check for, if something does not work as expected. More info on this in the extensions section.
I got the error: "lnurl needs to be delivered over publically accessible https domain or tor. 426 upgrade required"
This error usually is because your LNbits behind a ngnix tunnel is not forwarding the LNURL address correct. Stop your LNbits and edit the .env file adding this line:FORWARDED_ALLOW_IPS=*
Also if you use a ngnix setup, be sure you have these headers in the ngnix config:
RequestHeader set "X-Forwarded-Proto" expr=%{REQUEST_SCHEME}
RequestHeader set "X-Forwarded-SSL" expr=%{HTTPS}
"https error", network error" or others when scanning a QR
Bad news, this is a routing error that might have quite a lot of reasons. First check the QR´s LNURL with the Lightning Decoder if you can find something weird in there.
Let´s try a few of the most possible problems and their solutions. First choose your setup:
LNbits is running via Tor only, you can't open it on a public domain like lnbits.yourdomain.com
- Given that you want your setup to stay like this open your LNbits wallet using the .onion URI and create it again. In this way the QR is generated to be accessible via this .onion URI so via tor only. Do not generate that QR from a .local URI, because it will not be reachable via internet - only from within your home-LAN.
- Open your LN wallet app that you used to scan that QR and this time by using tor (see wallet app settings). If the app doesn't offer tor, you can use Orbot (Android) instead. See installation section for detailed instructions on how to open your LNbits for clearnet/https.
Prevent others from generating wallets on my lnbits
When you run your LNbits in clearnet basically everyone can generate a wallet on it. Since the funds of your node are bound to these wallets you might want to prevent that. There are two ways to do so:
>Configure allowed users and extensions in the .env file. This only works if you use the setting adminUI=FALSE in the .env, otherwise you need to do that in the Manage Server section -> Users -> Allowed Users. Everyone else will not be allowed afterwards.Customize the invoice expiry timeframe
- Now you can generate invoices with a custom expiry. Compatible with backends: LndRestWallet, LndWallet, CoreLightningWallet, EclairWallet, LnbitsWallet, SparkWallet so far!
You can set LIGHTNING_INVOICE_EXPIRY in your .env file or use the AdminUI to change the default value for all invoices. There is also a new field in the /api/v1/payments endpoint where you can set expiry in the JSON data.
Wallet-URL deleted
-
Wallet on demo server legend.lnbits
Always save a copy of your wallet-URL, Export2phone-QR or LNDhub for your own wallets in a safe place. LNbits CANNOT help you to recover them when lost.
-
Wallet on your own funding source/node
Always save a copy of your wallet-URL, Export2phone-QR or LNDhub for your own wallets in a safe place. You can find all LNbits users and wallet-IDs in your LNbits user manager extension or in your sqlite database. To edit or read the LNbits database, go to the LNbits /data folder and look for the file called sqlite.db. You can open and edit it with excel or with a dedicated SQL-Editor like SQLite browser.
Also you can dump the wallets via cli and view every wallet within your database.
cd ~/app-data/lnbits/data
sqlite3 database.sqlite3
.dump wallets
The output will look smth like this
INSERT INTO wallets VALUES('f8a43fc363ea428db5c53b3559935f1f','NAME OF WALLET','1280ff5910a9c485a782a2376f338b6c','33b95b099ce848e3b484124373f681e5','2cca208ae6d94d438227b9487ff216f9');and you want to put these values into a url like this
https://your.lnbits.com/wallet?usr=1280ff5910a9c485a782a2376f338b6c&wal=f8a43fc363ea428db5c53b3559935f1fWhereby you replace f8a43fc363ea428db5c53b3559935f1f with the value that comes before the name (in our example f8a43fc363ea428db5c53b3559935f1f) and 1280ff5910a9c485a782a2376f338b6c is your user and should become the value shown after the name. To quit sqlite3 put in
.quit
LNURL for a lightning-address vice versa
Try this encoder from fiatjaf or this one. For to pay or check an LNURLp you can as well use LNurlpay. It should state HTTPS NOT HTTP.
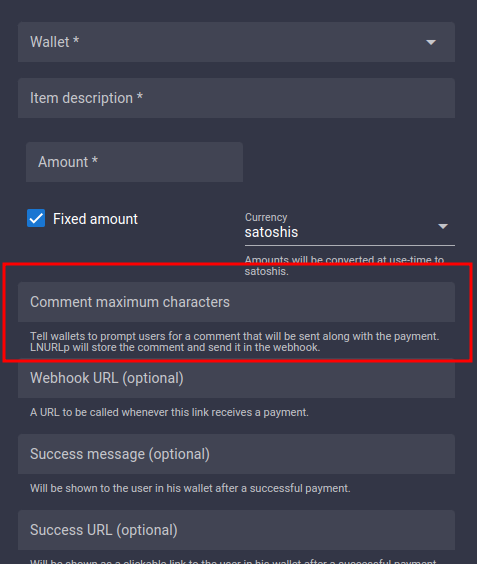
Configure a comment that people see when paying to my LNURLp QR
When you create a LNURL-p, by default the comment box is not filled. That means comments are not allowed to be attached to payments.
In order to allow comments, add the characters lenght of the box, from 1 to 250. Once you put a number there, the comment box will be displayed in the payment process. You can also edit a LNURL-p already created and add that number.
Deposit onchain BTC to LNbits
There are multiple ways to exchange sats from onchain btc to LN btc (resp. to LNbits).
A - Via an external swap service
Other users that dont have access to your LNb its can use a swap service like Boltz, FixedFloat, DiamondHands or ZigZag. This is useful if you provide only LNURL/LN invoices from your LNbits instance, but a payer only has onchain sats so they will have to swap those sats first on their side.
The procedure is simple: user sends onchain btc to the swap service and provides the LNURL / LN invoice from LNbits as destination of the swap.
B - Using the Onchain and Boltz LNbits extension
Keep in mind that this is a separate wallet, not the LN btc one that is represented by LNbits as "your wallet" upon your LN funding source. This onchain wallet can be used also to swap LN btc to (e.g. your hardwarewallet) by using the LNbits Boltz or Deezy extension. If you run a webshop that is linked to your LNbits for LN payments, it is very handy to regularily drain all the sats from LN into onchain. This leads to more space in your LN channels to be able to receive new fresh sats.
Procedure for those without a bitcoin hardware wallet:*
- Use Electrum or Sparrow wallet to create a new onchain wallet and save the backup seed in a safe place.
- Go to wallet information and copy the xpub.
- Go to LNbits - Onchain extension and create a new watch-only wallet with that xpub.
- Go to LNbits - Tipjar extension and create a new Tipjar. Select also the onchain option besides the LN wallet.
- Optional - Go to LNbits - SatsPay extension and create a new charge for onchain btc. You can choose between onchain and LN or both. It will then create an invoice that can be shared.
- Optional - If you use your LNbits linked to a Wordpress + Woocommerce page, once you create/link a watch-only wallet to your LN btc shop wallet, the customer will have both options to pay on the same screen.
Payment details
When you receive a payment in LNbits, the transaction log will display only a resumed type of the transaction.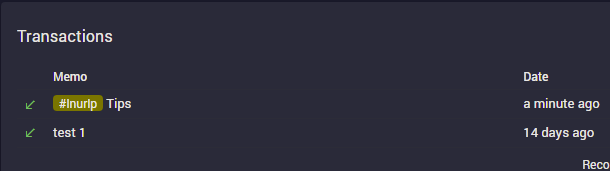
In your transaction overview you will find a little green arrow for received and a red arrow for the funds that are sent.
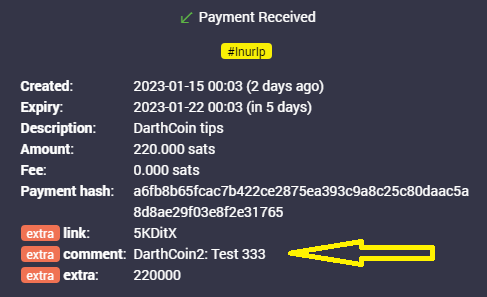
If you click on those arrows, a details popup shows attached messages as well as the sender´s name if given.
Configure a name to appear within payments
In LNbits this is currently not possible to do - but to receive. This is only possible if the sender's LN wallet supports LUD-18 (nameDesc) like e.g. Open Bitcion Wallet - OBW or Blixt node does.
You will then see an alias/pseudonym in the details section of your LNbits transactions (click the arrows). Note that you can give any name there and it might not be related to the real sender´s name if your receive such.
Import your LNbits wallet in an app
Open your LNbits with the account / wallet you want to use, go to "manage extensions" and activate the LNDHUB extension. Open the LNDHUB extension, choose the wallet you want to use and scan either the "admin" or "invoice only" QR, depending on the security level you want for that wallet.
You can use Zeus or Bluewallet as wallet apps for a lndhub account whereby BW supports more than one such wallet.
When doing this we recommend to as well set the LN network URI to the one of your own node. If your LNbits instance is Tor only, you also have to use theose apps with Tor activated. Also in this case you need to open the LNbits page through your Tor .onion address.
Error "unsupported hash type" when using a ypub in On-chain extension
If your LNbits instance is using python 3.10 it could be affected by this issue. Edit the openssl.cnf like described in the stackoverflow answer and restart your LNbits.
LNbits is beta, for responsible disclosure of any concerns please contact lnbits@pm.me