Rendering - jmc2obj/j-mc-2-obj GitHub Wiki
How do I make a render?
Good question! While JMC isn't a rendering software, it'd be nice to at least offer a starting point for those that would like to use this to get their world models for rendering! Here are some quick steps for a couple of different popular 3D Rendering software. More guides will be added here for different methods as well, as add-ons come and go over time, so it's useful to know how to do some of this without relying on them! For the time being though, we'll go over the easiest methods.
Blender Quick Guide
First, you'll need to actually download and install Blender: https://www.blender.org/download/ (Currently, 3.0 has been released and is what I'm using for this guide!)
Next, you'll want to get the MCPrep add-on: https://theduckcow.com/dev/blender/mcprep-download/ They have a few tutorials for using MCPrep, but I'll include a small bit of info here.
    MCPrep is an add-on that takes almost all of the initial work setup legwork, and does it for us in just a few clicks!
    Huge, HUGE thanks to Patrick and Moo-Ack! Productions for creating this. It's honestly one of the best Minecraft-Blender add-ons I've ever seen!
Then you'll actually want to export your world. Check the Getting started guide for all the info on doing so!
Now we'll get into how to get this all set up and rendered quickly with Blender!
- Open Blender, press "A" to select all of the default start objects, and press "Delete" on your keyboard to delete them.
- In the top-left, go to "Edit" > "Preferences..."
- We need to add the MCPrep add-on to Blender, so click "Add-ons" on the left pane.
- Click "Install..." on the top right, and navigate to where you downloaded MCPrep.
- Select the .zip file, and click "Install Add-on".
- Make sure the check next to it is checked to enable it.
Autodesk Maya Quick Guide
First and foremost make sure you have your Maya project set up, this can be done with "File" > "Set Project", this is important so that Maya will know exactly where to grab the files from.
Once everything is set up export your world. Check the Getting started guide
- Take the "tex" folder and put it inside your project folder with the rest of the folders.
- Take the OBJ and MTL files generated by JMC and drop them into the "Asset" folder.
- Inside Maya go to "File" > "Import" and make sure you are inside the Asset folder, that can be quickly done by clicking on the left-hand side Asset folder, make sure you set Maya to look for the OBJ file type and import the OBJ file exported by JMC
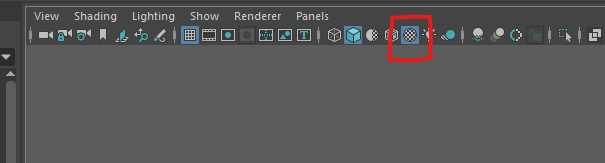
- After a small while Maya should import the map. Enable textures by pressing this button in your viewport.
- Final step is to remove mipmaps, go into your JMC Folder "JMC\conf\contrib", open Maya_readme.txt and follow the guide there.
You are done!
For more advanced rendering you will need to convert the basic materials into the materials from the render engine of choice.
Troubleshooting
- If you are missing the OBJ import option then go to "Windows" > "Settings/preferences" > "Plug-in Manager" and search OBJ, a option called OBJExporter should appear and click "Loaded" and "Auto load".
- Alternatively you can skip the project set up and just import the file, if you are missing textures go to "Windows" > "General Editors" > "File path editor", select everything, press "Repath" on the bottom left, select two checkboxes and set the search path to where ever JMC exported the tex folder. This method also works but is not optimum.
Guide written for Maya 2023
Cinema 4D Quick Guide
Please follow the Getting started guide
The setup
- Put the exported Tex, Obj and MTL into one folder.
- Start a new c4d scene.
- You need to save a clean C4D file in the same place the obj and Tex folders are, this is very important... Your textures won't work otherwise.
- Import the OBJ file with the Blender preset for best compatibility.
- Disable texture filtering by selecting all textures and setting the sampling to "None"
You are ready to render! Guide written for Cinema 4D 2023