Configuration of Artifactory and Repository Indexing - jhermann/artifactory-debian GitHub Wiki
See the ReadMe for a concise and straightforward description, this page goes into much more detail.
To create your Debian repositories in Artifactory, start by adding a Repository Layout named
debian-default with this Artifact Path Pattern:
[orgPath]/[module]/[baseRev]/[module]-[baseRev](-[patchLevel<[.~0-9a-zA-Z]+>])(_[archTag<\w+>]).[ext]
Set the Folder/File Integration Revision RegExp fields to .*.
Then create a new Artifactory repository named debian-local using the new layout.
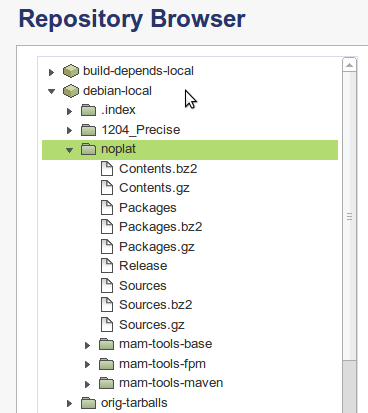
Note that within that Artifactory repository, you can have several Debian repositories in form of subfolders.
Packages in those Debian repositories go into pkgname/pkgversion subfolders
(cf. [orgPath]/[module]/[baseRev] in the layout's path pattern).
In the Artifactory web interface, the final result will look like this…
For the Debian repositories to work together with apt-get, some index data needs
to be generated; this is what the script deb-index.sh does. The script and a
configuration example can be found in the
indexing directory.
The following diagram shows a typical setup and how the components interact.
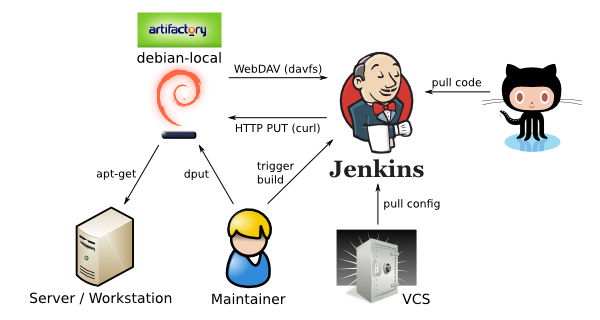
You can use any host that has access to your Artifactory server for indexing, and
run the index task via either a crontab entry, or as a job on a continuous integration server.
The index host needs some software and configuration added,
for that simply call the script with the setup argument like this:
sudo ./deb-index.sh setup "http://repo.example.com/artifactory/"This installs the necessary tool packages, and adds a DAVFS mount to /etc/fstab and credentials to
/etc/davfs2/secrets. Your configured editor is called automatically to allow you
to fill in the Artifactory credentials for read-only access.
Next, describe your repositories in the apt-ftparchive.conf and repo-«reponame».conf configuration files;
see the provided examples and man apt-ftparchive for details.
These are always expected in the current directory, and temporary files are written
to subdirectories (work and tmp).
After finishing your configuration, you can create the Debian index files and upload them to Artifactory, by calling
./deb-index.sh refresh "http://repo.example.com/artifactory/"in any normal user account (e.g. that of your continuous integration server, see the next section for a practical Jenkins example).
Instead of passing the Artifactory URL on the comamnd line, you can set the ARTIFACTORY_URL environment variable.
Note that you also need to provide the Artifactory deployment credentials (of the form user:pwd) for
your new repository in either the ARTIFACTORY_CREDENTIALS environment variable, or the file ~/.artifactory.credentials.
This account needs upload permissions to debian-local.
Using a Jenkins job is a nice environment for running your indexing task. You can commit your repository configuration as described in the previous section to your local VCS, let the Jenkins job check that out, and then run a Shell Build Step like follows:
export ARTIFACTORY_URL="http://repo.example.com/artifactory/"

test -d artifactory-debian \
    && ( cd artifactory-debian && git pull ) \
    || git clone "https://github.com/jhermann/artifactory-debian.git"

artifactory-debian/indexing/deb-index.sh refresh
The upload credentials are preferably injected into the job's environment using the EnvInject plugin,
so that they never appear in any console logs or other reports.
For that, add the ARTIFACTORY_CREDENTIALS environment variable
to the Inject passwords to the build as environment variables setting of Build Environment.
Jenkins also allows you to trigger the index generation via a simple curl call or similar, using the Jenkins REST API.