Admin User Management - girleffect/ge-web GitHub Wiki
Google Auth is used to enable users of the Wagtail admin to login with their Google email accounts. Documentation for the setup required for Google Auth is included here as well.
Having multiple sites in the same Wagtail instance means we only have one admin portal where all of the content is managed. However there are times where we would like to restrict content access to only the people working on that content.
For that purpose we have added the ability to whitelist email addresses in the Site Settings. Logged in users will only be able to view the content for a site if the email address they used to log in is on the whitelist for that site*.
To facilitate this, an Administrator needs to create user groups for each site and set the permissions and accessible pages for that group. After those groups are set up, whenever a new user logs in with a whitelisted Google email address they will automatically be added to the [site name] Editor group for that site and will only have access to the content for that site.
*Note: users with the Editor or Administrator role will always be able to see content for all sites, even if they are not in the site whitelist. Any users that were added with either of these roles before the Site Editor groups were added will still have access to all content. These roles will need to be removed from them to restrict their access.
The automatic group assignment described above requires specific groups to be created on the application. The name of the group is of utmost importance. These groups must be named after the Wagtail site that they will provide access to, using the format "[site name] Editors" eg Springster English Editors, Yegna Editors
- In the Wagtail admin go to Settings > Groups > Add a group
- Name the group using the format "[site name] Editors"
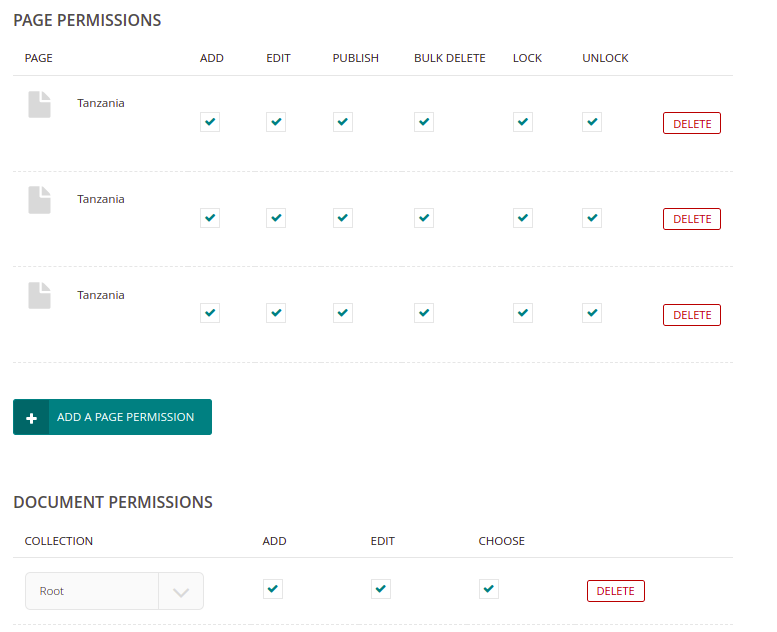
- Check the permissions as per the screenshots below.
- In the "Page Permissions" section ensure that you add all Root Pages relevant for the site you wish to grant access to.
- If the documents, images and media are separated into collections by site then ensure you choose the correct collection for each
- Submit the page by clicking "Add Group" at the bottom


Only users added to a site whitelist will be granted access to that site when logging in via Google. New users will automatically be added to the [site name] Editors group for the site they have access to.
- In the Wagtail admin go to Settings > Site Settings
- use the dropdown on the top right to select the site to grant access to
- Scroll to the bottom of that page and add the new users Google Email address to "Allowed Emails"
- If your Google Client is still in Testing mode then ensure you add the new email address to the list of Test users in the GCP portal (see point 5 and 6 in Google Auth setup)
- The user should now navigate to the site admin and try to log in with their Google Email account. Successful login will create their account and permissions can be further tweaked from there.
When a user logs in for the first time they will only have access to the content for the site they logged in on. To extent their access they must be granted more permissions.
- In the Wagtail admin go to Settings > Users
- Find the user you need to change and click "Edit" below their name (this button is only visible when hovering over the user in the list)
- Click on the "Roles" tab
- Click the checkbox for the permissions you want to grant them
- Editor: grants access to add, edit and delete content across all sites
- Moderator: grants access to moderate pages across the site (Note this is not comment moderation)
- Administrator: grants access to absolutely everything (including the Django admin)
- Click "Save"

Google allows users to login to a multitude of different services using their Google email account for verification. Support for Google Auth has been added to the Wagtail Admin login page. In order to implement Google Auth on an application a client must be created on Google Cloud Platform where the details for the authentication service can be provided. The instructions assume your Wagtail site is already up and running in Divio.
- Setup a Google Auth client
- Find the Client ID and Client Secret on the page for the Client in the Google Cloud interface
- In Divio, add the Client ID and the Client Secret to the environment variables for your environment as
SOCIAL_AUTH_GOOGLE_OAUTH2_KEYandSOCIAL_AUTH_GOOGLE_OAUTH2_SECRETrespectively - Deploy the environment to ensure the new variables are present
- Go back to the Google Cloud interface and load the OAuth consent screen page
- Check the published status
- If the app is in Testing consider publishing it instead. Otherwise, every time you want to add a new user to a site you will need to add their email address to the list of Test Users lower on that page.
- Click on "Credentials" and open the page for the Client you created earlier
- Scroll down to "Authorized redirect URIs"
- Add a URI for every domain you want users to be able to login from. This should in the format "https://[domain]/complete/google-oauth2/"